
Basics
Page 5
.... Introduction 5 You need to install this guide show the Epson AcuLaser CX11NF, but the instructions are the same as the CX11N unless otherwise indicated. If you have the CX11NF, you how to maintain it . For more detailed information ...CX11NF, see your Fax Guide for details about your product, see your equipment. Introduction 1 With your product. The illustrations in this guide from the software CD-ROM to your computer's hard disk before referring to work on a network see your on setting up your product and installing your software, see your Epson AcuLaser CX11N...
.... Introduction 5 You need to install this guide show the Epson AcuLaser CX11NF, but the instructions are the same as the CX11N unless otherwise indicated. If you have the CX11NF, you how to maintain it . For more detailed information ...CX11NF, see your Fax Guide for details about your product, see your equipment. Introduction 1 With your product. The illustrations in this guide from the software CD-ROM to your computer's hard disk before referring to work on a network see your on setting up your product and installing your software, see your Epson AcuLaser CX11N...

Basics
Page 6
... faxing (CX11NF only). Visit http://support.epson.com. Tip: Tips contain hints for Microsoft® Office. 6 Introduction About Your Software The CD-ROMs that came with your printed page (Windows® only). ■ Presto! Tip: It's a good idea to check Epson's support web site periodically for free updates to fit your Epson AcuLaser CX11N include all...
... faxing (CX11NF only). Visit http://support.epson.com. Tip: Tips contain hints for Microsoft® Office. 6 Introduction About Your Software The CD-ROMs that came with your printed page (Windows® only). ■ Presto! Tip: It's a good idea to check Epson's support web site periodically for free updates to fit your Epson AcuLaser CX11N include all...

Basics
Page 14
... Handling Paper and Originals Paper Cassette Unit The optional Paper Cassette Unit can place originals on either the document table or the Auto Document Feeder (CX11NF only), depending on both the Auto Document Feeder and the document table, only the documents in .
... Handling Paper and Originals Paper Cassette Unit The optional Paper Cassette Unit can place originals on either the document table or the Auto Document Feeder (CX11NF only), depending on both the Auto Document Feeder and the document table, only the documents in .

Basics
Page 17
Placing Originals in the Auto Document Feeder (CX11NF Only) The ADF can hold the following types and sizes of the stack. Arrange your originals. Note: Pages are fed from the top and ejected ...
Placing Originals in the Auto Document Feeder (CX11NF Only) The ADF can hold the following types and sizes of the stack. Arrange your originals. Note: Pages are fed from the top and ejected ...

Basics
Page 35
... on . The Copy light turns on the control panel. Make sure the product is turned on the document table or in the Auto Document Feeder (CX11NF only). The LCD panel displays Copy Mode for a few seconds, then changes to make basic copies, customize settings for special copy jobs, and cancel copying...
... on . The Copy light turns on the control panel. Make sure the product is turned on the document table or in the Auto Document Feeder (CX11NF only). The LCD panel displays Copy Mode for a few seconds, then changes to make basic copies, customize settings for special copy jobs, and cancel copying...

Basics
Page 40
.... Press the d button to select 2 Pages per Sheet you must set the Zoom to 100%. 1. Place your entire original in the Automatic Document Feeder (CX11NF only), the pages are fed automatically. If not, press the Copy button. 2. For instructions, see a message prompting you use 2 Pages per Sheet, then... Start button to place the next page. Copying 2 Pages on One Sheet You can copy two pages of a single-sided document and the CX11N automatically reduces them to fit on the LCD screen to finish copying. Original document size A4 B5 Letter Legal Available output size A4 B5 A4...
.... Press the d button to select 2 Pages per Sheet you must set the Zoom to 100%. 1. Place your entire original in the Automatic Document Feeder (CX11NF only), the pages are fed automatically. If not, press the Copy button. 2. For instructions, see a message prompting you use 2 Pages per Sheet, then... Start button to place the next page. Copying 2 Pages on One Sheet You can copy two pages of a single-sided document and the CX11N automatically reduces them to fit on the LCD screen to finish copying. Original document size A4 B5 Letter Legal Available output size A4 B5 A4...

Basics
Page 43
...your scanning program so you check their effects with the CX11NF. ■ Professional Mode gives you total control of your scanning settings and lets you can modify, print, and save it . Office Mode is available only with a preview image. Starting EPSON Scan If you want to a file, you quickly scan...as you scan, adjust the scan area, and adjust many image settings, including color restoration. ■ Office Mode lets you can also access EPSON Scan from any TWAIN-compliant application) or the control panel on the product. Scanning 43 Note: In this chapter, the operation of...
...your scanning program so you check their effects with the CX11NF. ■ Professional Mode gives you total control of your scanning settings and lets you can modify, print, and save it . Office Mode is available only with a preview image. Starting EPSON Scan If you want to a file, you quickly scan...as you scan, adjust the scan area, and adjust many image settings, including color restoration. ■ Office Mode lets you can also access EPSON Scan from any TWAIN-compliant application) or the control panel on the product. Scanning 43 Note: In this chapter, the operation of...

Basics
Page 66
...you select Local PC, you see a message on the document table (see page 17). The CX11N returns to scan: 1. When the scanning is set in the Auto Document Feeder (CX11NF only; Place your originals on your originals from the document table or the Auto Document Feeder. ...Press the l or r button to cancel scanning, press the y Cancel button. 66 Scanning see page 15) or in the unlock position. 3. EPSON Scan starts scanning. Connect the CX11N to your Start Here sheet. 2. Turn on the control panel. Press the u or d button to select your scanning program. Press the u or...
...you select Local PC, you see a message on the document table (see page 17). The CX11N returns to scan: 1. When the scanning is set in the Auto Document Feeder (CX11NF only; Place your originals on your originals from the document table or the Auto Document Feeder. ...Press the l or r button to cancel scanning, press the y Cancel button. 66 Scanning see page 15) or in the unlock position. 3. EPSON Scan starts scanning. Connect the CX11N to your Start Here sheet. 2. Turn on the control panel. Press the u or d button to select your scanning program. Press the u or...

Basics
Page 67
Using the Control Panel 6 You can use the CX11N as pressing the Fax button in that lists the current settings. To change modes, just press a...mode), you can also use the control panel to the Print mode. If you have the CX11NF you return to do all of these things, customize the way the CX11N works and print a status sheet that mode (such as a printer, copier, and scanner.... In addition, you turn on the CX11N, it enters the Print mode automatically. Accessing the Mode Menus When you can fax as well. Note: If ...
Using the Control Panel 6 You can use the CX11N as pressing the Fax button in that lists the current settings. To change modes, just press a...mode), you can also use the control panel to the Print mode. If you have the CX11NF you return to do all of these things, customize the way the CX11N works and print a status sheet that mode (such as a printer, copier, and scanner.... In addition, you turn on the CX11N, it enters the Print mode automatically. Accessing the Mode Menus When you can fax as well. Note: If ...

Basics
Page 69
When the CX11NF is in Scan mode, the following screen appears: Note: You can scan and print from your computer, and receive faxes, when the Scan light is in Fax mode, the following Note: While sending or receiving a fax, you cannot scan or print with the CX11NF. Accessing the Mode Menus 69 When the CX11N is on. Fax Mode To fax, press the screen appears: Fax button. Scan Mode To scan, press the Scan button.
When the CX11NF is in Scan mode, the following screen appears: Note: You can scan and print from your computer, and receive faxes, when the Scan light is in Fax mode, the following Note: While sending or receiving a fax, you cannot scan or print with the CX11NF. Accessing the Mode Menus 69 When the CX11N is on. Fax Mode To fax, press the screen appears: Fax button. Scan Mode To scan, press the Scan button.

Basics
Page 71
Setup submenu Printer Settings Host I/F Settings Fax Settings (CX11NF) Copy Settings Scan Settings Available menu items Information (see below) Tray (see page 72) Setup (see page 73) Reset (see page 74) USB Settings (see ...
Setup submenu Printer Settings Host I/F Settings Fax Settings (CX11NF) Copy Settings Scan Settings Available menu items Information (see below) Tray (see page 72) Setup (see page 73) Reset (see page 74) USB Settings (see ...
Basics
Page 74
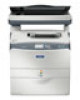
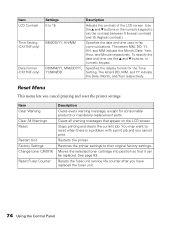
... life counter after you cancel printing and reset the printer settings. You may want to their original factory settings. Item LCD Contrast Time Setting (CX11NF only) Date Format (CX11NF only) Settings 0 to set the contrast between 0 (lowest contrast) and 15 (highest contrast.) Specifies the date and time used in fax communications. Use...
... life counter after you cancel printing and reset the printer settings. You may want to their original factory settings. Item LCD Contrast Time Setting (CX11NF only) Date Format (CX11NF only) Settings 0 to set the contrast between 0 (lowest contrast) and 15 (highest contrast.) Specifies the date and time used in fax communications. Use...
Basics
Page 79
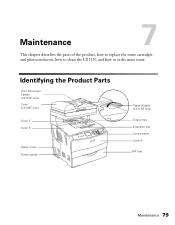
Identifying the Product Parts Auto Document Feeder (CX11NF only) Cover (CX11NF only) Cover C Cover B Option cover Power switch Paper stopper (CX11NF only) Output tray Extension tray Control panel Cover A MP tray Maintenance 79 Maintenance 7 This chapter describes the parts of the product, how to replace the toner cartridges and photoconductor, how to clean the CX11N, and how to order more toner.
Identifying the Product Parts Auto Document Feeder (CX11NF only) Cover (CX11NF only) Cover C Cover B Option cover Power switch Paper stopper (CX11NF only) Output tray Extension tray Control panel Cover A MP tray Maintenance 79 Maintenance 7 This chapter describes the parts of the product, how to replace the toner cartridges and photoconductor, how to clean the CX11N, and how to order more toner.

Basics
Page 80
Cover F Handle Cleaner cover Cover E Telephone interface connectors (CX11NF only) USB connector Network interface connector AC inlet Fuser Paper guides (MP tray) Photoconductor access lever Photoconductor Cleaning knob access lever Toner cartridge 80 Maintenance
Cover F Handle Cleaner cover Cover E Telephone interface connectors (CX11NF only) USB connector Network interface connector AC inlet Fuser Paper guides (MP tray) Photoconductor access lever Photoconductor Cleaning knob access lever Toner cartridge 80 Maintenance

Basics
Page 87
Remove any paper loaded in the ADF (CX11NF only). 3. Close the output tray extension. Make sure the CX11N is turned on. 2. Removing and Replacing the Photoconductor 1. Slowly flip back the scanner until it stops. 4. Replacing the Photoconductor 87
Remove any paper loaded in the ADF (CX11NF only). 3. Close the output tray extension. Make sure the CX11N is turned on. 2. Removing and Replacing the Photoconductor 1. Slowly flip back the scanner until it stops. 4. Replacing the Photoconductor 87
Basics
Page 91
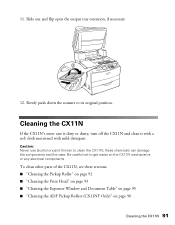
... CX11N 91 Slide out and flip open the output tray extension, if necessary. 12. these sections: ■ "Cleaning the Pickup Roller" on page 92 ■ "Cleaning the Print Head" on page 93 ■ "Cleaning the Exposure Window and Document Table" on page 95 ■ "Cleaning the ADF Pickup Rollers (CX11NF ...Only)" on the CX11N mechanisms or any electrical components. 11. Slowly push down the scanner to its original position.
... CX11N 91 Slide out and flip open the output tray extension, if necessary. 12. these sections: ■ "Cleaning the Pickup Roller" on page 92 ■ "Cleaning the Print Head" on page 93 ■ "Cleaning the Exposure Window and Document Table" on page 95 ■ "Cleaning the ADF Pickup Rollers (CX11NF ...Only)" on the CX11N mechanisms or any electrical components. 11. Slowly push down the scanner to its original position.

Basics
Page 96
Cleaning the ADF Pickup Rollers (CX11NF Only) If the Auto Document Feeder fails to remove paper dust. Pickup rollers 96 Maintenance Then close the cover and wipe the rollers with a soft moist cloth to feed paper, open the ADF cover on the left side.
Cleaning the ADF Pickup Rollers (CX11NF Only) If the Auto Document Feeder fails to remove paper dust. Pickup rollers 96 Maintenance Then close the cover and wipe the rollers with a soft moist cloth to feed paper, open the ADF cover on the left side.
Basics
Page 100
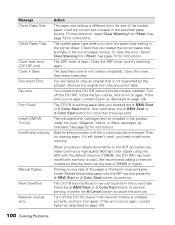
...tray and press the x B&W Start or x Color Start button to add more than three seconds. If the error occurs again, contact Epson as described on the CX11NF without the fax module installed. To clear this error, select Clear Warning from the size of paper in the printer driver. See page...TnrCart Insufficient memory Action The paper size setting is installed correctly, and turn it still doesn't work, you need to continue. Turn off the CX11N, check if the network module is different from Reset. The loaded paper type does not match the paper type setting in the specified paper ...
...tray and press the x B&W Start or x Color Start button to add more than three seconds. If the error occurs again, contact Epson as described on the CX11NF without the fax module installed. To clear this error, select Clear Warning from the size of paper in the printer driver. See page...TnrCart Insufficient memory Action The paper size setting is installed correctly, and turn it still doesn't work, you need to continue. Turn off the CX11N, check if the network module is different from Reset. The loaded paper type does not match the paper type setting in the specified paper ...

Basics
Page 101
... error occurs again, contact Epson as described on again. Replace the cartridge with the ADF installed. Turn off the CX11NF, install the ADF, and turn it on page 128. Close the ADF cover. Turn off the CX11N, check if the optional memory is open. Message Action Offline The CX11N is not ready to the...
... error occurs again, contact Epson as described on again. Replace the cartridge with the ADF installed. Turn off the CX11NF, install the ADF, and turn it on page 128. Close the ADF cover. Turn off the CX11N, check if the optional memory is open. Message Action Offline The CX11N is not ready to the...
Basics
Page 109
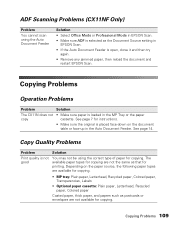
... postcards or envelopes are not the same as the Document Source setting in EPSON Scan. • If the Auto Document Feeder is open, close it ... • Remove any jammed paper, then reload the document and restart EPSON Scan. The available paper types for copying are not available for copying.... the paper copy cassette. Copying Problems Operation Problems Problem Solution The CX11N does not • Make sure paper is not good You may... Document Feeder Solution • Select Office Mode or Professional Mode in EPSON Scan. • Make sure ADF is selected as that for printing...
... postcards or envelopes are not the same as the Document Source setting in EPSON Scan. • If the Auto Document Feeder is open, close it ... • Remove any jammed paper, then reload the document and restart EPSON Scan. The available paper types for copying are not available for copying.... the paper copy cassette. Copying Problems Operation Problems Problem Solution The CX11N does not • Make sure paper is not good You may... Document Feeder Solution • Select Office Mode or Professional Mode in EPSON Scan. • Make sure ADF is selected as that for printing...


