
Installation Guide
Page 4
... • Do not place heavy objects on . • Be aware of the fact that listening to loud sound over a long period of time leads to hearing damage. • Epson accepts no responsibility for later reference. As a precaution, lower the volume before you turn off the system then raise...the components of this information for any power cable other than the one supplied with these caution symbols in fire or electric shock. A loud sound may be read all instructions, save this product falling due to a grounded outlet. • Take the following precautions when handling the plug....
... • Do not place heavy objects on . • Be aware of the fact that listening to loud sound over a long period of time leads to hearing damage. • Epson accepts no responsibility for later reference. As a precaution, lower the volume before you turn off the system then raise...the components of this information for any power cable other than the one supplied with these caution symbols in fire or electric shock. A loud sound may be read all instructions, save this product falling due to a grounded outlet. • Take the following precautions when handling the plug....

Installation Guide
Page 8
Contents Introduction 9 Planning the Installation 10 Installing the IR Dome Sensor 11 Install the Mounting Pipe 13 Install the AP-60 14 Install the Projector 19 Attach the Neck Strap 19 Insert Batteries 20 Adjust the Sound 21 Solving Problems 23 Where To Get Help 26 8
Contents Introduction 9 Planning the Installation 10 Installing the IR Dome Sensor 11 Install the Mounting Pipe 13 Install the AP-60 14 Install the Projector 19 Attach the Neck Strap 19 Insert Batteries 20 Adjust the Sound 21 Solving Problems 23 Where To Get Help 26 8

Installation Guide
Page 10
... starting. See page 13. 3 Install the AP-60 and connect cables. See page 14. 4 Install projector and connect cables. Epson cannot provide advice concerning construction practices or building codes in your area. See page 19. 5 Adjust the sound. Planning the Installation Here are the basic steps... required to prevent the AP-60 from falling. For added safety,...
... starting. See page 13. 3 Install the AP-60 and connect cables. See page 14. 4 Install projector and connect cables. Epson cannot provide advice concerning construction practices or building codes in your area. See page 19. 5 Adjust the sound. Planning the Installation Here are the basic steps... required to prevent the AP-60 from falling. For added safety,...

Installation Guide
Page 11
...; Large adjustable wrench • Ladder • Hardware for the IR dome sensor, keep the following in a dusty environment. This can interrupt the sound or cause noise. • The IR dome sensor receives reflected signals from the walls, floor, and ceiling. This can cause unwanted audio noise or...installed near power cables. The IR dome sensor should also be mounted in a room with a lot of windows. Required Tools and Hardware The AP-60 should be installed by a professional audio/video installer or other cables. • Do not install the IR sensor near strong light sources, such...
...; Large adjustable wrench • Ladder • Hardware for the IR dome sensor, keep the following in a dusty environment. This can interrupt the sound or cause noise. • The IR dome sensor receives reflected signals from the walls, floor, and ceiling. This can cause unwanted audio noise or...installed near power cables. The IR dome sensor should also be mounted in a room with a lot of windows. Required Tools and Hardware The AP-60 should be installed by a professional audio/video installer or other cables. • Do not install the IR sensor near strong light sources, such...

Installation Guide
Page 21
... 1 Press the P power button on the system. Gain control knobs 3 Make sure that you have connected your audio sources are connected and turned on the AP-60 turns green. Press to turn on 2 Adjust the Microphone 1, Microphone 2, Line 1, and Line 2 gain control knobs to the far left setting to turn ...on the AP-60 remote control to turn the gains all of your audio equipment to the AP-60. The P power light on . 21 Adjust the Sound Before adjusting the audio levels, make sure that all the way down. 5 Check the ...
... 1 Press the P power button on the system. Gain control knobs 3 Make sure that you have connected your audio sources are connected and turned on the AP-60 turns green. Press to turn on 2 Adjust the Microphone 1, Microphone 2, Line 1, and Line 2 gain control knobs to the far left setting to turn ...on the AP-60 remote control to turn the gains all of your audio equipment to the AP-60. The P power light on . 21 Adjust the Sound Before adjusting the audio levels, make sure that all the way down. 5 Check the ...

Installation Guide
Page 23
... on AP-60 until the feedback stops, then press the Volume - Continue pressing the button until you hear feedback at low volume levels, remove the audio control panel from the device that the sound is highly reflective, you have a second microphone, be standing. If your own, contact Epson for ...slightly quieter than the microphone audio. 17 Repeat steps 14 to 16 for a solution in one of maximum volume. Microphone 1 gain control knob 11 Press the Volume + button on the AP-60 so that is connected to the On position. 13 If you may hear a ringing sound when using the AP-60.
... on AP-60 until the feedback stops, then press the Volume - Continue pressing the button until you hear feedback at low volume levels, remove the audio control panel from the device that the sound is highly reflective, you have a second microphone, be standing. If your own, contact Epson for ...slightly quieter than the microphone audio. 17 Repeat steps 14 to 16 for a solution in one of maximum volume. Microphone 1 gain control knob 11 Press the Volume + button on the AP-60 so that is connected to the On position. 13 If you may hear a ringing sound when using the AP-60.

Installation Guide
Page 24
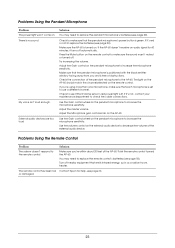
... P power light on . turn on the AP-60. Sound Problems Problem Solution There is adjusted to reduce the amount of feedback heard in highly-reflective environments, remove the two screws securing the audio control panel and gently remove the audio control panel from the AP-60. (See page 15 for 60 minutes, it 's possible that hold the...
... P power light on . turn on the AP-60. Sound Problems Problem Solution There is adjusted to reduce the amount of feedback heard in highly-reflective environments, remove the two screws securing the audio control panel and gently remove the audio control panel from the AP-60. (See page 15 for 60 minutes, it 's possible that hold the...
Installation Guide
Page 25
...to see if the IR dome sensor's red power light is green. Point the remote control toward the AP-60. Press the Mute button on . Make sure that each microphone is no sound. Check to decrease the volume of obstructions. Use the Gain control wheel on the pendant microphone to ... too loud Solution You may need to make sure that emits infrared energy, such as a radiant room heater. You may need to the remote control. Adjust the master volume. If it turns off . Adjust the Gain control on the AP-60. The remote control has been lost Contact Epson for 60 minutes, it...
...to see if the IR dome sensor's red power light is green. Point the remote control toward the AP-60. Press the Mute button on . Make sure that each microphone is no sound. Check to decrease the volume of obstructions. Use the Gain control wheel on the pendant microphone to ... too loud Solution You may need to make sure that emits infrared energy, such as a radiant room heater. You may need to the remote control. Adjust the master volume. If it turns off . Adjust the Gain control on the AP-60. The remote control has been lost Contact Epson for 60 minutes, it...
Product Brochure
Page 1
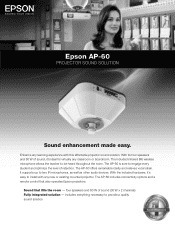
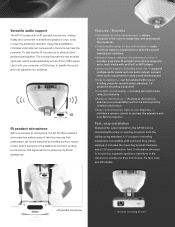
... solution - The AP-60 includes connectivity options and a remote control that fills the room - It supports up to provide a quality sound solution Enhance any learning experience with any classroom or boardroom. Sound that also operates Epson projectors. includes everything necessary to two IR microphones, as well as other audio devices. The AP-60 offers remarkable clarity and relieves vocal strain. Epson AP-60 Projector Sound Solution Sound...
... solution - The AP-60 includes connectivity options and a remote control that fills the room - It supports up to provide a quality sound solution Enhance any learning experience with any classroom or boardroom. Sound that also operates Epson projectors. includes everything necessary to two IR microphones, as well as other audio devices. The AP-60 offers remarkable clarity and relieves vocal strain. Epson AP-60 Projector Sound Solution Sound...
Product Brochure
Page 2
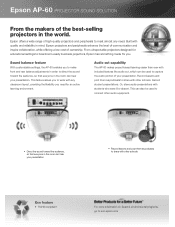
Epson AP-60 Projector Sound Solution From the makers of your presentation. Audio out capability The AP-60 makes project-based learning easier than ever with included features like audio out, which can hear your presentation Record lessons and post them as podcasts to capture the audio portion of the best-selling projectors in the room can be used to...
Epson AP-60 Projector Sound Solution From the makers of your presentation. Audio out capability The AP-60 makes project-based learning easier than ever with included features like audio out, which can hear your presentation Record lessons and post them as podcasts to capture the audio portion of the best-selling projectors in the room can be used to...
Product Brochure
Page 3
make front/rear balance adjustments to direct the sound toward your audience. And, it easy to easily hear and understand the presenter • Customizable setup for easy installation, the AP-60 can be installed with new or existing projector mounts using a microphone, that signal will not...drop (false) ceilings, it easy and convenient to amplify the speaker's voice, so as to operate the speakers and your Epson projector Fast, easy installation Designed for any environment - can hear the presenter. Using this amplification minimizes vocal strain and ensures all in...
make front/rear balance adjustments to direct the sound toward your audience. And, it easy to easily hear and understand the presenter • Customizable setup for easy installation, the AP-60 can be installed with new or existing projector mounts using a microphone, that signal will not...drop (false) ceilings, it easy and convenient to amplify the speaker's voice, so as to operate the speakers and your Epson projector Fast, easy installation Designed for any environment - can hear the presenter. Using this amplification minimizes vocal strain and ensures all in...
Product Brochure
Page 4
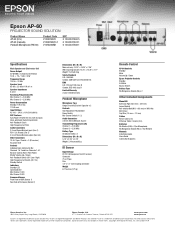
..., Ltd. 3771 Victoria Park Avenue, Toronto, Ontario M1W 3Z5 www.epson.com www.epson.ca Epson is a registered trademark, Epson Exceed Your Vision is a registered logomark and Better Products for a Better Future is a trademark of their respective companies. Epson AP-60 PROJECTOR SOUND SOLUTION Product Name AP-60 (U.S.) AP-60 (Canada) Pendant Microphone (PM-60) Product Code V12H329020 V12H329020-F V12H3290M1 UPC 0 10343 87469 5 0 10343 87524...
..., Ltd. 3771 Victoria Park Avenue, Toronto, Ontario M1W 3Z5 www.epson.com www.epson.ca Epson is a registered trademark, Epson Exceed Your Vision is a registered logomark and Better Products for a Better Future is a trademark of their respective companies. Epson AP-60 PROJECTOR SOUND SOLUTION Product Name AP-60 (U.S.) AP-60 (Canada) Pendant Microphone (PM-60) Product Code V12H329020 V12H329020-F V12H3290M1 UPC 0 10343 87469 5 0 10343 87524...
User Replaceable Parts List
Page 1
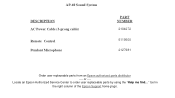
AP-60 Sound System DESCRIPTION AC Power Cable (3-prong cable) Remote Control Pendant Microphone PART NUMBER 2104272 5119500 2127981 Order user replaceable parts from an Epson authorized parts distributor ---- tool in the right column of the Epson Support home page. or ---- Locate an Epson Authorized Service Center to order user replaceable parts by using the "Help me find..."
AP-60 Sound System DESCRIPTION AC Power Cable (3-prong cable) Remote Control Pendant Microphone PART NUMBER 2104272 5119500 2127981 Order user replaceable parts from an Epson authorized parts distributor ---- tool in the right column of the Epson Support home page. or ---- Locate an Epson Authorized Service Center to order user replaceable parts by using the "Help me find..."

User's Guide
Page 4
...Do not modify the power cable. • Do not place heavy objects on . • Be aware of the fact that listening to loud sound over a long period of time leads to incorrect handling. Indicate information that , if ignored, could result in personal injury or even death due... to hearing damage. • Epson accepts no responsibility for later reference. Failure to an earthed outlet. • Take the following precautions when handling the plug. As a precaution,...
...Do not modify the power cable. • Do not place heavy objects on . • Be aware of the fact that listening to loud sound over a long period of time leads to incorrect handling. Indicate information that , if ignored, could result in personal injury or even death due... to hearing damage. • Epson accepts no responsibility for later reference. Failure to an earthed outlet. • Take the following precautions when handling the plug. As a precaution,...

User's Guide
Page 8
... Microphone 16 Adjusting Audio Levels 16 Replacing Batteries 18 Replacing Remote Control Batteries 18 Replacing Microphone Batteries 19 Solving Problems 20 Basic Operation Problems 20 Sound Problems 20 Problems Using the Pendant Microphone 21 Problems Using the Remote Control 21 Where To Get Help 22 Specifications 23 Notices 24 FCC Compliance...
... Microphone 16 Adjusting Audio Levels 16 Replacing Batteries 18 Replacing Remote Control Batteries 18 Replacing Microphone Batteries 19 Solving Problems 20 Basic Operation Problems 20 Sound Problems 20 Problems Using the Pendant Microphone 21 Problems Using the Remote Control 21 Where To Get Help 22 Specifications 23 Notices 24 FCC Compliance...

User's Guide
Page 9
If you have an audio recording device connected to turn your lessons. 9 Introduction The Epson® AP-60 is a sound enhancement system designed to the AP-60, you can also amplify the sound coming from other devices in all areas of -the-art learning center. You can even create recordings or podcasts of your classroom or meeting room into a state-of the classroom. With the AP-60's innovative four speaker design, powerful amplifier, and wireless pendant microphone, your voice will be heard clearly in your classroom, such as a computer, DVD player, or a portable audio device.
If you have an audio recording device connected to turn your lessons. 9 Introduction The Epson® AP-60 is a sound enhancement system designed to the AP-60, you can also amplify the sound coming from other devices in all areas of -the-art learning center. You can even create recordings or podcasts of your classroom or meeting room into a state-of the classroom. With the AP-60's innovative four speaker design, powerful amplifier, and wireless pendant microphone, your voice will be heard clearly in your classroom, such as a computer, DVD player, or a portable audio device.
User's Guide
Page 10
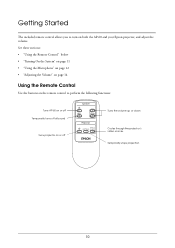
... 12 • "Adjusting the Volume" on page 14 Using the Remote Control Use the buttons on the remote control to turn on or off all sound Turns projector on both the AP-60 and your Epson projector, and adjust the volume. Getting Started The included remote control allows you to perform the following functions: Turns...
... 12 • "Adjusting the Volume" on page 14 Using the Remote Control Use the buttons on the remote control to turn on or off all sound Turns projector on both the AP-60 and your Epson projector, and adjust the volume. Getting Started The included remote control allows you to perform the following functions: Turns...

User's Guide
Page 13
... Verify that each microphone is lit. Mic lights Channel selector 5 Adjust the microphone sensitivity by rotating the Gain control wheel on the AP-60 is on the same channel. Be sure to keep this part of the microphone free of the microphone. Audio from the microphone may ...control wheel Note If your system has more than one microphone, make sure that the Mic light on the pendant microphone, if necessary. The sound cannot be transmitted reliably when the microphone is transmitted from the microphone is used on a different channel. The light should match the Channel selector...
... Verify that each microphone is lit. Mic lights Channel selector 5 Adjust the microphone sensitivity by rotating the Gain control wheel on the AP-60 is on the same channel. Be sure to keep this part of the microphone free of the microphone. Audio from the microphone may ...control wheel Note If your system has more than one microphone, make sure that the Mic light on the pendant microphone, if necessary. The sound cannot be transmitted reliably when the microphone is transmitted from the microphone is used on a different channel. The light should match the Channel selector...

User's Guide
Page 14
Adjusting the Volume Press the Volume + or - Press to restore audio. Tip To achieve a better balance across different audio sources, see"Adjusting Audio Levels" on the AP-60 remote control to adjust the master volume. Press the button again to turn volume up or down To temporarily turn off all sound, press the MUTE button on the remote control. buttons on page 16. 14
Adjusting the Volume Press the Volume + or - Press to restore audio. Tip To achieve a better balance across different audio sources, see"Adjusting Audio Levels" on the AP-60 remote control to adjust the master volume. Press the button again to turn volume up or down To temporarily turn off all sound, press the MUTE button on the remote control. buttons on page 16. 14

User's Guide
Page 15
...; "Adjusting Audio Levels" on your voice when using an RCA to you amplify sound from an external audio device, such as a computer or portable audio device. The audio is automatically played through the AP-60. 5 If you need to readjust the microphone sensitivity when you can use your ... Features and Adjustments Follow the steps in this chapter to connect external audio devices to the pendant microphone, connect a second microphone to the AP-60, and to adjust the volume, use the microphone Gain control wheel to the pendant microphone. 1 Turn off the microphone by pressing the ...
...; "Adjusting Audio Levels" on your voice when using an RCA to you amplify sound from an external audio device, such as a computer or portable audio device. The audio is automatically played through the AP-60. 5 If you need to readjust the microphone sensitivity when you can use your ... Features and Adjustments Follow the steps in this chapter to connect external audio devices to the pendant microphone, connect a second microphone to the AP-60, and to adjust the volume, use the microphone Gain control wheel to the pendant microphone. 1 Turn off the microphone by pressing the ...


