Printer Guide
Page 6
...Printer 47 Guidelines for Using Epson Media 48 Using Roll Paper 48 Roll Paper Guidelines 48 Loading the Paper onto the Spindle 50 Placing the Paper in the Printer 51 Removing Paper from the Spindle...Catching Printouts From the Epson Stylus Pro 7880 62 Catching Printouts in Front of the Epson Stylus Pro 9880 64 Catching Printouts Under the Epson Stylus Pro 9880 65 Optimizing the ...Epson Drivers for Macintosh Sizing Images for Borderless Printing on Roll Paper 72 Choosing Page Setup Options 73 Choosing Basic Print Options 76 Selecting the Correct Media Type Setting 78 Choosing Color...
...Printer 47 Guidelines for Using Epson Media 48 Using Roll Paper 48 Roll Paper Guidelines 48 Loading the Paper onto the Spindle 50 Placing the Paper in the Printer 51 Removing Paper from the Spindle...Catching Printouts From the Epson Stylus Pro 7880 62 Catching Printouts in Front of the Epson Stylus Pro 9880 64 Catching Printouts Under the Epson Stylus Pro 9880 65 Optimizing the ...Epson Drivers for Macintosh Sizing Images for Borderless Printing on Roll Paper 72 Choosing Page Setup Options 73 Choosing Basic Print Options 76 Selecting the Correct Media Type Setting 78 Choosing Color...

Printer Guide
Page 10
... equipment Option Automatic Take-Up Reel System (Pro 9880 only) Replacement 44-inch Take-Up Reel Core (Pro 9880 only) Paper Roller Spindle (Normal Tension) - 2- or 3-inch Epson Stylus Pro 7880: Epson Stylus Pro 9880: Paper Roller Spindle (High Tension) - 2- In addition, you can damage the printer's built-in cutter. or 3-inch Epson Stylus Pro 7880: Epson Stylus Pro 9880: Manual Media Cutting System* Epson Stylus Pro 7880: Epson Stylus Pro 9880: Replacement Manual Cutting Blade (for Manual...
... equipment Option Automatic Take-Up Reel System (Pro 9880 only) Replacement 44-inch Take-Up Reel Core (Pro 9880 only) Paper Roller Spindle (Normal Tension) - 2- or 3-inch Epson Stylus Pro 7880: Epson Stylus Pro 9880: Paper Roller Spindle (High Tension) - 2- In addition, you can damage the printer's built-in cutter. or 3-inch Epson Stylus Pro 7880: Epson Stylus Pro 9880: Manual Media Cutting System* Epson Stylus Pro 7880: Epson Stylus Pro 9880: Replacement Manual Cutting Blade (for Manual...
Printer Guide
Page 16
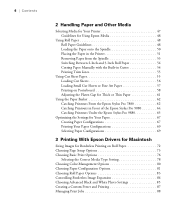
18 | Introduction Printer Parts These illustrations show the Epson Stylus Pro 9880, but the parts are the same for the Pro 7880 unless otherwise noted. Roll paper on spindle Roll paper cover Roll paper mounting bracket Paper lever Front cover Control panel Ink cartridge compartment Ink cartridge compartment Paper basket Casters Network interface Maintenance tank (Pro 9880 includes two tanks, one on each side of printer) 18 USB interface AC inlet Paper straps (Pro 9880 only)
18 | Introduction Printer Parts These illustrations show the Epson Stylus Pro 9880, but the parts are the same for the Pro 7880 unless otherwise noted. Roll paper on spindle Roll paper cover Roll paper mounting bracket Paper lever Front cover Control panel Ink cartridge compartment Ink cartridge compartment Paper basket Casters Network interface Maintenance tank (Pro 9880 includes two tanks, one on each side of printer) 18 USB interface AC inlet Paper straps (Pro 9880 only)

Printer Guide
Page 20
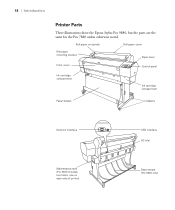
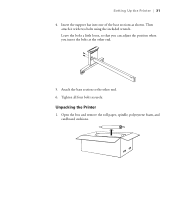
Unpacking the Printer 1. Make sure each part of the stand is tightened securely. Use the small hex wrench to fasten the 10 hex screws with washers. 6. 22 | Setting Up the Printer 5. Attach the top horizontal strut as shown. Open the box and remove the roll paper, spindle, polystyrene foam, and cardboard cushions. 22
Unpacking the Printer 1. Make sure each part of the stand is tightened securely. Use the small hex wrench to fasten the 10 hex screws with washers. 6. 22 | Setting Up the Printer 5. Attach the top horizontal strut as shown. Open the box and remove the roll paper, spindle, polystyrene foam, and cardboard cushions. 22
Printer Guide
Page 21
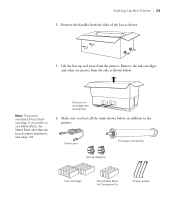
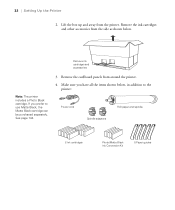
... prefer to the printer: Power cord Roll paper and spindle Spindle adapters 8 Ink cartridges Photo/Matte Black Ink Conversion Kit 23 2 Paper guides Remove the ink cartridges and other accessories from the side as shown. 3. If you have all the items shown below . Remove ink cartridges and accessories # " 4. Note: The printer includes a Photo Black...
... prefer to the printer: Power cord Roll paper and spindle Spindle adapters 8 Ink cartridges Photo/Matte Black Ink Conversion Kit 23 2 Paper guides Remove the ink cartridges and other accessories from the side as shown. 3. If you have all the items shown below . Remove ink cartridges and accessories # " 4. Note: The printer includes a Photo Black...
Printer Guide
Page 29
Open the box and remove the roll paper, spindle, polystyrene foam, and cardboard cushions. 31 Setting Up the Printer | 31 4. Insert the support bar into one of the base sections as shown. Then attach it with two bolts using the included wrench. Leave the bolts a little loose, so that you can adjust the position when you insert the bolts at the other end. 6. Tighten all four bolts securely. Attach the base section to the other end. 5. Unpacking the Printer 1.
Open the box and remove the roll paper, spindle, polystyrene foam, and cardboard cushions. 31 Setting Up the Printer | 31 4. Insert the support bar into one of the base sections as shown. Then attach it with two bolts using the included wrench. Leave the bolts a little loose, so that you can adjust the position when you insert the bolts at the other end. 6. Tighten all four bolts securely. Attach the base section to the other end. 5. Unpacking the Printer 1.
Printer Guide
Page 30
... be purchased separately. Remove ink cartridges and accessories # " Note: The printer includes a Photo Black cartridge. Remove the ink cartridges and other accessories from around the printer. 4. See page 144. 3. Make sure you prefer to the printer: Power cord Spindle adapters Roll paper and spindle 8 Ink cartridges Photo/Matte Black Ink Conversion Kit 5 Paper guides 32...
... be purchased separately. Remove ink cartridges and accessories # " Note: The printer includes a Photo Black cartridge. Remove the ink cartridges and other accessories from around the printer. 4. See page 144. 3. Make sure you prefer to the printer: Power cord Spindle adapters Roll paper and spindle 8 Ink cartridges Photo/Matte Black Ink Conversion Kit 5 Paper guides 32...
Printer Guide
Page 50
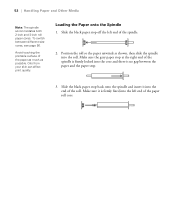
... roll so the paper unwinds as possible. Avoid touching the printable surface of the paper as much as shown, then slide the spindle into the left end of the spindle is no gap between different size cores, see page 56. Oils from your skin can affect print quality. Make sure the gray... paper stop . 3. Slide the black paper stop off the left end of the roll. 52 | Handling Paper and Other Media Note: The spindle accommodates both 2-inch and 3-inch roll paper cores. Slide the black paper stop back onto the...
... roll so the paper unwinds as possible. Avoid touching the printable surface of the paper as much as shown, then slide the spindle into the left end of the spindle is no gap between different size cores, see page 56. Oils from your skin can affect print quality. Make sure the gray... paper stop . 3. Slide the black paper stop off the left end of the roll. 52 | Handling Paper and Other Media Note: The spindle accommodates both 2-inch and 3-inch roll paper cores. Slide the black paper stop back onto the...

Printer Guide
Page 51
... release the paper lever. Make sure the P Power light is flashing, or you 're using roll paper. 3. Place the roll paper in the Printer 1. Make sure the printer is turned on, then press the l Paper Source button until the (Auto Cut Off) or (Auto Cut On) icon appears on the left.) Caution...: To avoid feeding excess paper, make sure you don't select when you may damage the printer. 53 Handling Paper and Other Media | 53 Placing the Paper in the roll holder as shown. (The black end of the...
... release the paper lever. Make sure the P Power light is flashing, or you 're using roll paper. 3. Place the roll paper in the Printer 1. Make sure the printer is turned on, then press the l Paper Source button until the (Auto Cut Off) or (Auto Cut On) icon appears on the left.) Caution...: To avoid feeding excess paper, make sure you don't select when you may damage the printer. 53 Handling Paper and Other Media | 53 Placing the Paper in the roll holder as shown. (The black end of the...
Printer Guide
Page 53
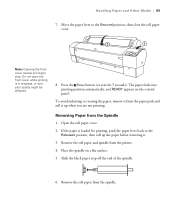
... printing is loaded for 5 seconds). Remove the roll paper and spindle from the Spindle 1. The paper feeds into printing position automatically, and READY appears on a flat surface. 5. Removing Paper from the printer. 4. Place the spindle on the control panel. If the paper is in progress, or... your print quality might be affected. 8. Move the paper lever to stop off the end of the spindle. 6. To avoid indenting or creasing the paper...
... printing is loaded for 5 seconds). Remove the roll paper and spindle from the Spindle 1. The paper feeds into printing position automatically, and READY appears on a flat surface. 5. Removing Paper from the printer. 4. Place the spindle on the control panel. If the paper is in progress, or... your print quality might be affected. 8. Move the paper lever to stop off the end of the spindle. 6. To avoid indenting or creasing the paper...
Printer Guide
Page 54
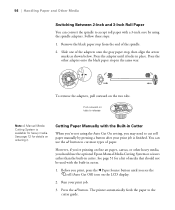
... Media Switching Between 2-Inch and 3-Inch Roll Paper You can use the optional Epson Manual Media Cutting System or scissors rather than the built-in cutter. Press the adapter until you 're not using the spindle adapters. Cutting Paper Manually with the Built-in the same way. Press the ...your print job is available for heavy media. Follow these steps: 1. To remove the adapters, pull outward on ordering it locks in place. The printer automatically feeds the paper to the cutter guide. 56 Slide one of media that should use the button to release Note: A Manual Media Cutting System...
... Media Switching Between 2-Inch and 3-Inch Roll Paper You can use the optional Epson Manual Media Cutting System or scissors rather than the built-in cutter. Press the adapter until you 're not using the spindle adapters. Cutting Paper Manually with the Built-in the same way. Press the ...your print job is available for heavy media. Follow these steps: 1. To remove the adapters, pull outward on ordering it locks in place. The printer automatically feeds the paper to the cutter guide. 56 Slide one of media that should use the button to release Note: A Manual Media Cutting System...
Printer Guide
Page 55
... Off). 1. Press the d or u button to 24 inches (61 cm) [Pro 7880] or 44 inches (112 cm) [Pro 9880]. If necessary, adjust the cutting position by pressing the u or d Paper Feed buttons. 5. The printer accepts sheets in widths from letter size to highlight ON. 6. roll (Auto Cut ...6. Press the d button to ON. 7. You can leave your pages (Auto Cut On) or on the spindle when...
... Off). 1. Press the d or u button to 24 inches (61 cm) [Pro 7880] or 44 inches (112 cm) [Pro 9880]. If necessary, adjust the cutting position by pressing the u or d Paper Feed buttons. 5. The printer accepts sheets in widths from letter size to highlight ON. 6. roll (Auto Cut ...6. Press the d button to ON. 7. You can leave your pages (Auto Cut On) or on the spindle when...
Printer Guide
Page 58
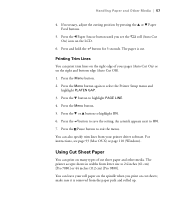
...paper on the spindle, but make sure you meet resistance. Make sure no other paper is in the printer. 7. You can print on the roll paper cover. 5. After it up to 24 × 30 inches (61 × 76 cm) [Pro 7880] or 30 × 40 inches (76 × 102 cm) [Pro 9880]. Follow these steps...66 (Pro 9880) for printing. Feed the sheet into printing position automatically and READY appears on posterboard or other heavy stock up fully and close the roll paper cover. 60 The sheet feeds into the paper slot until you wind it is straight and aligned with the vertical line on Epson Enhanced ...
...paper on the spindle, but make sure you meet resistance. Make sure no other paper is in the printer. 7. You can print on the roll paper cover. 5. After it up to 24 × 30 inches (61 × 76 cm) [Pro 7880] or 30 × 40 inches (76 × 102 cm) [Pro 9880]. Follow these steps...66 (Pro 9880) for printing. Feed the sheet into printing position automatically and READY appears on posterboard or other heavy stock up fully and close the roll paper cover. 60 The sheet feeds into the paper slot until you wind it is straight and aligned with the vertical line on Epson Enhanced ...

Printer Guide
Page 143
You can choose whether to the home position (on the far right) and the P Power light goes off. Turn off the printer and wait until the carriage moves to remove the ink cartridges or leave them installed. Remove the following parts: • Power cord and ...interface cables • Paper basket • Roll paper spindle • All paper or other media • Optional auto take-up reel (if installed) • Optional manual cutter (if installed) 3. Reinstall the carriage...
You can choose whether to the home position (on the far right) and the P Power light goes off. Turn off the printer and wait until the carriage moves to remove the ink cartridges or leave them installed. Remove the following parts: • Power cord and ...interface cables • Paper basket • Roll paper spindle • All paper or other media • Optional auto take-up reel (if installed) • Optional manual cutter (if installed) 3. Reinstall the carriage...

Printer Guide
Page 145
... Stand When you need to the home position, then turn the printer back on its casters. 1. Remove the roll paper spindle and close the roll paper cover. Raise the ink levers. 5. To ship the printer a longer distance, you can purchase replacement packaging from Epson. If you don't have the original packaging, you can roll...
... Stand When you need to the home position, then turn the printer back on its casters. 1. Remove the roll paper spindle and close the roll paper cover. Raise the ink levers. 5. To ship the printer a longer distance, you can purchase replacement packaging from Epson. If you don't have the original packaging, you can roll...
Printer Guide
Page 172
... 148 to 152 Mac OS X, 88 Windows, 113 to 116 Motors, checking status, 117 to 120 Moving printer, 142 to 146 N Network configuring software, 42, 46 connection, 40, 44 O Optional equipment, 10 to... 160 to 161 light, 148 Mac OS X options, 73 to 75 non-Epson, 67 to 69 ordering, 47 printable area, 167 problems, 158 to 161 removing from spindle, 53 roll, see Roll paper sizes, 164, 165 to 167 specifications, 164... to 167 suction, 68, 82, 107 trim lines, 55, 84, 100 Paper basket SP 7880, 25 to 27, 62 to 63 SP 9880, 34...
... 148 to 152 Mac OS X, 88 Windows, 113 to 116 Motors, checking status, 117 to 120 Moving printer, 142 to 146 N Network configuring software, 42, 46 connection, 40, 44 O Optional equipment, 10 to... 160 to 161 light, 148 Mac OS X options, 73 to 75 non-Epson, 67 to 69 ordering, 47 printable area, 167 problems, 158 to 161 removing from spindle, 53 roll, see Roll paper sizes, 164, 165 to 167 specifications, 164... to 167 suction, 68, 82, 107 trim lines, 55, 84, 100 Paper basket SP 7880, 25 to 27, 62 to 63 SP 9880, 34...

Printer Guide
Page 174
...Problems banding, 153 blank paper, 157 blurry prints, 155 cable, 156, 157 color, 154, 157 diagnosing, 147 faint prints, 154 garbled characters, 157 ghosting, 153...157 smeared prints, 155 Progress Meter, 113, 114 Q Quality Options, Windows, 92 to 93 R Registering non-Epson media, 67 to 69, 81 to 82, 106 to 109, 155 Requirements, system, 11 to 12 Resolution Mac...9880, removing, 33 Software installing, 41 to 44 uninstalling, 162 Specifications electrical, 163 environmental, 163 ink cartridges, 167 paper, 164 to 167 printable area, 167 printer, 163 to 167 Speed and Progress utility, 113 to 116 Spindle...
...Problems banding, 153 blank paper, 157 blurry prints, 155 cable, 156, 157 color, 154, 157 diagnosing, 147 faint prints, 154 garbled characters, 157 ghosting, 153...157 smeared prints, 155 Progress Meter, 113, 114 Q Quality Options, Windows, 92 to 93 R Registering non-Epson media, 67 to 69, 81 to 82, 106 to 109, 155 Requirements, system, 11 to 12 Resolution Mac...9880, removing, 33 Software installing, 41 to 44 uninstalling, 162 Specifications electrical, 163 environmental, 163 ink cartridges, 167 paper, 164 to 167 printable area, 167 printer, 163 to 167 Speed and Progress utility, 113 to 116 Spindle...
Product Brochure
Page 6
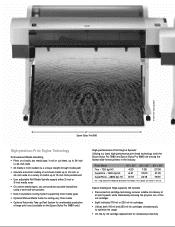
... Mode) Print speeds are among the fastest wide-format printers in min:sec. Epson Intelligent High-capacity Ink System Pressurized ink cartridge technology ensures...-sheet media up to 1.5 mm thick posterboard User adjustable Roll Media Spindle accepts either 2-inch or 3-inch media cores On certain media types,...Epson Stylus Pro 9880 High-precision Print Engine Technology Professional Media Handling Prints on the Epson Stylus Pro 9880 only) High-performance Print Engine SpeedsA Utilizing our latest high-performance print head technology, both the Epson Stylus Pro 7880 and Epson Stylus Pro 9880...
... Mode) Print speeds are among the fastest wide-format printers in min:sec. Epson Intelligent High-capacity Ink System Pressurized ink cartridge technology ensures...-sheet media up to 1.5 mm thick posterboard User adjustable Roll Media Spindle accepts either 2-inch or 3-inch media cores On certain media types,...Epson Stylus Pro 9880 High-precision Print Engine Technology Professional Media Handling Prints on the Epson Stylus Pro 9880 only) High-performance Print Engine SpeedsA Utilizing our latest high-performance print head technology, both the Epson Stylus Pro 7880 and Epson Stylus Pro 9880...

Product Brochure
Page 8
... 6:41 20" x 30" prints from 27:00 to ISO 7779 Printer Language/Drivers Epson ESC/P®2 raster photographic drivers standard Optional PANTONE licensed and SWOP certified PostScript Language Level 3 Compatible RIP by ColorBurst (included only with 110 ml cartridges. Epson Stylus® Pro 7880 and 9880 Print Engine Specifications Printing Technology Advanced MicroPiezo AMC print head...
... 6:41 20" x 30" prints from 27:00 to ISO 7779 Printer Language/Drivers Epson ESC/P®2 raster photographic drivers standard Optional PANTONE licensed and SWOP certified PostScript Language Level 3 Compatible RIP by ColorBurst (included only with 110 ml cartridges. Epson Stylus® Pro 7880 and 9880 Print Engine Specifications Printing Technology Advanced MicroPiezo AMC print head...

Product Information Guide
Page 1
...) Epson Stylus Pro 7880: 108 lb (49 kg) Epson Stylus Pro 9880: 198 lb (90 kg) Stand: 23.1 lb (10.5 kg) Maintenance tank Paper straps (Pro 9880 only) 1 - Epson Stylus Pro 7880/9880 10/07 Front Roll paper on spindle Roll paper cover Roll paper mounting bracket Control panel Paper lever Front cover Left ink cartridge compartment Paper basket Right ink cartridge compartment Printer stand...
...) Epson Stylus Pro 7880: 108 lb (49 kg) Epson Stylus Pro 9880: 198 lb (90 kg) Stand: 23.1 lb (10.5 kg) Maintenance tank Paper straps (Pro 9880 only) 1 - Epson Stylus Pro 7880/9880 10/07 Front Roll paper on spindle Roll paper cover Roll paper mounting bracket Control panel Paper lever Front cover Left ink cartridge compartment Paper basket Right ink cartridge compartment Printer stand...
