Product Brochure
Page 8
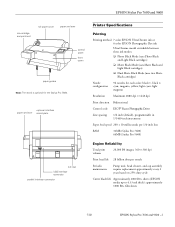
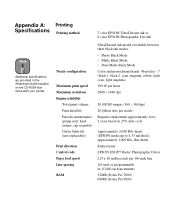
....8 class B Engine Reliability Total print volume Print head life Cutter life Maintenance parts 20,000 B0 pages at ~16 ft2/hr Acoustic Noise Level Approximately 50 dB(A) according to ISO 7779 Printer Language EPSON ESC/P Raster Photographic Drivers standard ...size Media core compatibility Max. EPSON Stylus Pro 7600 & 9600 Print Engine Specifications Printing Method 7-color (CcMmYKk) EPSON UltraChrome Ink or 6-color (CcMmYKK) EPSON Photographic Dye Ink Variable Droplet Micro Piezo DX3 drop-on-demand ink jet technology Nozzle Configuration Color and Monochrome heads: 96 nozzles x 7 Black...
....8 class B Engine Reliability Total print volume Print head life Cutter life Maintenance parts 20,000 B0 pages at ~16 ft2/hr Acoustic Noise Level Approximately 50 dB(A) according to ISO 7779 Printer Language EPSON ESC/P Raster Photographic Drivers standard ...size Media core compatibility Max. EPSON Stylus Pro 7600 & 9600 Print Engine Specifications Printing Method 7-color (CcMmYKk) EPSON UltraChrome Ink or 6-color (CcMmYKK) EPSON Photographic Dye Ink Variable Droplet Micro Piezo DX3 drop-on-demand ink jet technology Nozzle Configuration Color and Monochrome heads: 96 nozzles x 7 Black...
Product Information Guide
Page 1
approximately 1000 B0+ film sheets 7/02 EPSON Stylus Pro 7600 and 9600 - 2 EPSON Stylus Pro 7600 and 9600 - ink cartridge compartment roll paper cover paper set lever optional interface shield plate AC inlet USB interface connector parallel interface connector Printer Specifications Printing Printing method 7 color EPSON UltraChrome ink or 6 color EPSON Photographic Dye ink UltraChrome model switchable between three ink modes: ❏ Photo Black Mode (uses...
approximately 1000 B0+ film sheets 7/02 EPSON Stylus Pro 7600 and 9600 - 2 EPSON Stylus Pro 7600 and 9600 - ink cartridge compartment roll paper cover paper set lever optional interface shield plate AC inlet USB interface connector parallel interface connector Printer Specifications Printing Printing method 7 color EPSON UltraChrome ink or 6 color EPSON Photographic Dye ink UltraChrome model switchable between three ink modes: ❏ Photo Black Mode (uses...
Product Information Guide
Page 6
... Paper* 8.5" × 11": S041636 13" × 19": S041637 Somerset Velvet for additional media that came with your printer. You must install the cartridges that may become available. EPSON Stylus Pro 7600 and 9600 Papers supported by Ink Out light(s). Posterboard 24" × 30": S041598 30" × 40": S041599... type Roll sizes Sheet sizes Enhanced Matte - NOT ENOUGH INK Ink Out light(s) on You tried to finish cleaning the print head. Replace the ink cartridge(s) indicated by the lights. NO INK CARTRIDGE Ink Out light(s) on Paper lever is available to install the...
... Paper* 8.5" × 11": S041636 13" × 19": S041637 Somerset Velvet for additional media that came with your printer. You must install the cartridges that may become available. EPSON Stylus Pro 7600 and 9600 Papers supported by Ink Out light(s). Posterboard 24" × 30": S041598 30" × 40": S041599... type Roll sizes Sheet sizes Enhanced Matte - NOT ENOUGH INK Ink Out light(s) on You tried to finish cleaning the print head. Replace the ink cartridge(s) indicated by the lights. NO INK CARTRIDGE Ink Out light(s) on Paper lever is available to install the...
Product Information Guide
Page 9
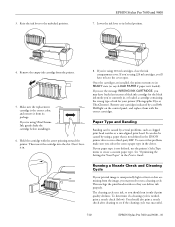
... problems, such as clogged print head nozzles or a mis-aligned print head. If your printer (Photographic Dye or UltraChrome). Lower the ink lever to the unlocked position. Remove the empty ink cartridge from its package. Make sure the replacement cartridge is the correct color, and remove it . ..., and replace them with the arrow pointing toward the printer. Running a Nozzle Check and Cleaning Cycle If your printed image is not defined in the EPSON printer driver or in a third-party RIP. If you see if the cleaning cycle was successful. 7/02 EPSON Stylus Pro 7600 and 9600 - 10...
... problems, such as clogged print head nozzles or a mis-aligned print head. If your printer (Photographic Dye or UltraChrome). Lower the ink lever to the unlocked position. Remove the empty ink cartridge from its package. Make sure the replacement cartridge is the correct color, and remove it . ..., and replace them with the arrow pointing toward the printer. Running a Nozzle Check and Cleaning Cycle If your printed image is not defined in the EPSON printer driver or in a third-party RIP. If you see if the cleaning cycle was successful. 7/02 EPSON Stylus Pro 7600 and 9600 - 10...
Product Information Guide
Page 10
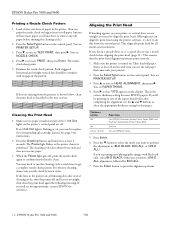
...the printer off , print the nozzle check again to remove any paper. 3. Aligning the Print Head If banding appears on . Press Enter. 6. Otherwise, perform a UNI-D ALL adjustment, followed by BI-D ALL. 7. EPSON Stylus Pro 7600 and 9600 7/02 Cleaning the Print Head 1. If you see PRINT, then press Enter. This aligns the print head for...align the print head. The Pause light flashes as described in the pattern are missing from the control panel. When the Pause light goes off and leave it for most EPSON papers. If the lines in the next section. Although you need to replace the ...
...the printer off , print the nozzle check again to remove any paper. 3. Aligning the Print Head If banding appears on . Press Enter. 6. Otherwise, perform a UNI-D ALL adjustment, followed by BI-D ALL. 7. EPSON Stylus Pro 7600 and 9600 7/02 Cleaning the Print Head 1. If you see PRINT, then press Enter. This aligns the print head for...align the print head. The Pause light flashes as described in the pattern are missing from the control panel. When the Pause light goes off and leave it for most EPSON papers. If the lines in the next section. Although you need to replace the ...
Product Information Guide
Page 11
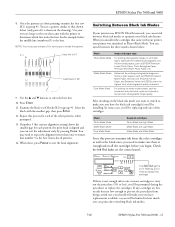
...exit the head alignment. When done, press Pause to select the best line. 10. After deciding on all media types. Use your printer uses EPSON UltraChrome ink, you 'll be replacing only ...color cartridges as well as newsprint and plain bond, when print speed is favored over photographic image quality. Once the patterns are low on or flashing, you'll need to replace...print after switching black ink modes. 7/02 EPSON Stylus Pro 7600 and 9600 - 12 Optimized for EPSON, when the highest level of blocks (K2) in K2 9. Dual Matte Black For printing on matte or plain papers, such as EPSON...
...exit the head alignment. When done, press Pause to select the best line. 10. After deciding on all media types. Use your printer uses EPSON UltraChrome ink, you 'll be replacing only ...color cartridges as well as newsprint and plain bond, when print speed is favored over photographic image quality. Once the patterns are low on or flashing, you'll need to replace...print after switching black ink modes. 7/02 EPSON Stylus Pro 7600 and 9600 - 12 Optimized for EPSON, when the highest level of blocks (K2) in K2 9. Dual Matte Black For printing on matte or plain papers, such as EPSON...
User Manual
Page 7
... 131 Running a Cleaning Cycle 132 Printing a Nozzle Check Pattern 132 Cleaning the Print Head from the Control Panel 133 Performing a Power Cleaning 134 Aligning the Print Head 135 Examining the UNI-D ALL Alignment Pattern 136 Examining the BI-D BLACK Alignment Pattern 137 Examining the BI-D ALL Alignment Pattern 139 Replacing Ink Cartridges 141 Checking Ink Levels...
... 131 Running a Cleaning Cycle 132 Printing a Nozzle Check Pattern 132 Cleaning the Print Head from the Control Panel 133 Performing a Power Cleaning 134 Aligning the Print Head 135 Examining the UNI-D ALL Alignment Pattern 136 Examining the BI-D BLACK Alignment Pattern 137 Examining the BI-D ALL Alignment Pattern 139 Replacing Ink Cartridges 141 Checking Ink Levels...

User Manual
Page 9
... additional information, see the following: • The Quick Reference Guide provides a handy summary of procedures for daily use and printer maintenance-loading paper, replacing ink cartridges, running cleaning cycles, aligning the print head, and clearing paper jams. Attach it working at its best, and provides troubleshooting tips in case you how to maintain your...
... additional information, see the following: • The Quick Reference Guide provides a handy summary of procedures for daily use and printer maintenance-loading paper, replacing ink cartridges, running cleaning cycles, aligning the print head, and clearing paper jams. Attach it working at its best, and provides troubleshooting tips in case you how to maintain your...
User Manual
Page 129
... • Aligning the print head • Replacing ink cartridges • Switching between black ink modes • Replacing the paper cutter blade • Replacing the maintenance tank • Cleaning the printer • Transporting or storing the printer • Uninstalling and reinstalling printer software In addition to...you can also use the printer's SelecType function to make in the driver software (as well as other settings) directly through the control panel. Chapter 5: Maintaining and Transporting the Printer The EPSON Stylus Pro 7600 and 9600 require very little maintenance to...
... • Aligning the print head • Replacing ink cartridges • Switching between black ink modes • Replacing the paper cutter blade • Replacing the maintenance tank • Cleaning the printer • Transporting or storing the printer • Uninstalling and reinstalling printer software In addition to...you can also use the printer's SelecType function to make in the driver software (as well as other settings) directly through the control panel. Chapter 5: Maintaining and Transporting the Printer The EPSON Stylus Pro 7600 and 9600 require very little maintenance to...
User Manual
Page 131
...motor, paper feed motor, cutter blade, print head, and cleaning unit. Note Each asterisk (*) represents about 20 percent. You see the status of the printer parts is displayed, using the E*****F ...printing it, follow these symbols: E*****F = full (or full life remaining) E**** F = 3/4 full (or 3/4 life remaining) E*** F = 1/2 full (or 1/2 life remaining) E** F = 1/4 full (or 1/4 life remaining) E* F = nearly empty (or service life near end) % F = less than 10% of other printer parts, press d until you see SERVICE LIFE, then press r. Press Pause to replaced by an authorized EPSON...
...motor, paper feed motor, cutter blade, print head, and cleaning unit. Note Each asterisk (*) represents about 20 percent. You see the status of the printer parts is displayed, using the E*****F ...printing it, follow these symbols: E*****F = full (or full life remaining) E**** F = 3/4 full (or 3/4 life remaining) E*** F = 1/2 full (or 1/2 life remaining) E** F = 1/4 full (or 1/4 life remaining) E* F = nearly empty (or service life near end) % F = less than 10% of other printer parts, press d until you see SERVICE LIFE, then press r. Press Pause to replaced by an authorized EPSON...

User Manual
Page 133
... the Control Panel Follow these steps to replace the corresponding ink cartridge instead. Cleaning the Print Head from the printer's control panel: 1. If an H Ink Out light is clean. Maintaining and Transporting the Printer | 133 Note 5. Print a nozzle check to make sure the print head needs cleaning, as the printer cleans its print head. See page 141 for at least 3 seconds...
... the Control Panel Follow these steps to replace the corresponding ink cartridge instead. Cleaning the Print Head from the printer's control panel: 1. If an H Ink Out light is clean. Maintaining and Transporting the Printer | 133 Note 5. Print a nozzle check to make sure the print head needs cleaning, as the printer cleans its print head. See page 141 for at least 3 seconds...

User Manual
Page 145
...Out light on the control panel, and replace them with the correct cartridges. 5-145 Then run several print head cleaning cycles (see the message WRONG INK CARTRIDGE, you may have loaded an incorrect black ink cartridge for your printer (Photographic Dye or UltraChrome). Once the cartridges... are installed, the printer returns to its locked position. If...
...Out light on the control panel, and replace them with the correct cartridges. 5-145 Then run several print head cleaning cycles (see the message WRONG INK CARTRIDGE, you may have loaded an incorrect black ink cartridge for your printer (Photographic Dye or UltraChrome). Once the cartridges... are installed, the printer returns to its locked position. If...
User Manual
Page 155
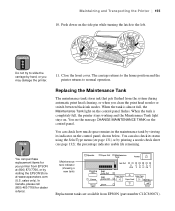
...or you clean the print head nozzles or switch between black ink modes. The carriage returns to the home position and the printer returns to the left. Maintenance tank indicator (showing a new tank) Replacement tanks are available from EPSON at (800) 873-7766, or by printing a nozzle check sheet...Maintenance Tank light stays on. sales only). Note 11. Replacing the Maintenance Tank The maintenance tank stores ink that gets flushed from the system during automatic print head cleaning, or when you may damage the printer. You see page 132); You can also check its indicator...
...or you clean the print head nozzles or switch between black ink modes. The carriage returns to the home position and the printer returns to the left. Maintenance tank indicator (showing a new tank) Replacement tanks are available from EPSON at (800) 873-7766, or by printing a nozzle check sheet...Maintenance Tank light stays on. sales only). Note 11. Replacing the Maintenance Tank The maintenance tank stores ink that gets flushed from the system during automatic print head cleaning, or when you may damage the printer. You see page 132); You can also check its indicator...

User Manual
Page 166
...(s) You tried to install the on installed. If you must use the ink cartridges designed for your printer. See page 141 for instructions. cleaning the print head. Install ink cartridges as indicated by on available to finish Ink Out light(s). Ink Out light(s). Other...ink cartridges for the first time, you are flashing nearly empty (printing continues). Ink Out light(s) Not enough ink is Replace the ink cartridge(s) indicated by on empty (printing stops). If you have replacement cartridges available. You must install the cartridges that came with your ...
...(s) You tried to install the on installed. If you must use the ink cartridges designed for your printer. See page 141 for instructions. cleaning the print head. Install ink cartridges as indicated by on available to finish Ink Out light(s). Ink Out light(s). Other...ink cartridges for the first time, you are flashing nearly empty (printing continues). Ink Out light(s) Not enough ink is Replace the ink cartridge(s) indicated by on empty (printing stops). If you have replacement cartridges available. You must install the cartridges that came with your ...
User Manual
Page 169
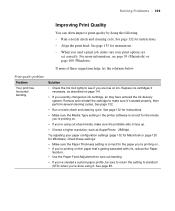
.... Solving Problems | 169 Improving Print Quality You can often improve print quality by doing the following: ...printer software is correct for the paper you're printing on. • If you're printing on page 141. • If you recently changed an ink cartridge, air may have entered the ink delivery system. See page 85. 6-169 Replace... ink cartridges if necessary, as SuperPhoto - 2880dpi. Print quality problems Problem Your print has horizontal banding. Check these suggestions help, try the solutions below. Try adjusting your print... media you're printing on ink. Solution...
.... Solving Problems | 169 Improving Print Quality You can often improve print quality by doing the following: ...printer software is correct for the paper you're printing on. • If you're printing on page 141. • If you recently changed an ink cartridge, air may have entered the ink delivery system. See page 85. 6-169 Replace... ink cartridges if necessary, as SuperPhoto - 2880dpi. Print quality problems Problem Your print has horizontal banding. Check these suggestions help, try the solutions below. Try adjusting your print... media you're printing on ink. Solution...
User Manual
Page 170
...- 2880 dpi. • Deselect the High Speed setting in your printer software's Advanced dialog box. • Align the print head, as described on page 141. • Make sure color settings in your application or printer software are incorrect or • Make sure the Media Type setting ...printer. 6-170 See page 132. • Visit www.epson.com to adjust your ink supply is low, as described on page 135. Try reducing the Color Density and Paper Suction. • Make sure Paper Thickness setting is correct for the paper you're printing on ink. If the cartridge is too old, replace...
...- 2880 dpi. • Deselect the High Speed setting in your printer software's Advanced dialog box. • Align the print head, as described on page 141. • Make sure color settings in your application or printer software are incorrect or • Make sure the Media Type setting ...printer. 6-170 See page 132. • Visit www.epson.com to adjust your ink supply is low, as described on page 135. Try reducing the Color Density and Paper Suction. • Make sure Paper Thickness setting is correct for the paper you're printing on ink. If the cartridge is too old, replace...

User Manual
Page 175
... incorrect. See page 99 (Macintosh) or 118 (Windows) in this area with the built-in cutter. Color images print in black Make sure Color/B&W Photo is selected in your printer software. Cut the paper by hand with scissors or the optional utility cutter. • Make sure the...• Turn off the Flip Horizontal setting in your printer software. A ruled line on your print Align the print head as described on the Printer Setting Menu in your printer software is correct. only. Follow the instructions on page 153 to replace the blade. • The paper may be too thick...
... incorrect. See page 99 (Macintosh) or 118 (Windows) in this area with the built-in cutter. Color images print in black Make sure Color/B&W Photo is selected in your printer software. Cut the paper by hand with scissors or the optional utility cutter. • Make sure the...• Turn off the Flip Horizontal setting in your printer software. A ruled line on your print Align the print head as described on the Printer Setting Menu in your printer software is correct. only. Follow the instructions on page 153 to replace the blade. • The paper may be too thick...
User Manual
Page 181
... came with your printer. Appendix A: Specifications Note Additional specifications are provided in 1/1440-inch increments 32MB (Stylus Pro 7600) 64MB (Stylus Pro 9600) 181 Printing Printing method 7 color EPSON UltraChrome ink or 6 color EPSON Photographic Dye ink Nozzle configuration Maximum print speed Maximum resolution Engine reliability Total print volume Print head life Periodic maintenance (pump unit, head cleaner, cap assembly) Cutter blade life (user replaceable) Print direction Control code...
... came with your printer. Appendix A: Specifications Note Additional specifications are provided in 1/1440-inch increments 32MB (Stylus Pro 7600) 64MB (Stylus Pro 9600) 181 Printing Printing method 7 color EPSON UltraChrome ink or 6 color EPSON Photographic Dye ink Nozzle configuration Maximum print speed Maximum resolution Engine reliability Total print volume Print head life Periodic maintenance (pump unit, head cleaner, cap assembly) Cutter blade life (user replaceable) Print direction Control code...
User Manual
Page 187
... unit), checking status, 130 to 131 -187 Cleaning paper basket, 157 print head, 54 to 56, 132 to 134 printer, 157 Cleaning button, 133 Color management Macintosh, 94, 100 to 101 Windows, 118 to 120 Color problems, 169, 170, 175 Color viewing conditions, 101, 119 ColorSync settings, 100 to 101 Component life,... printer, 166 status check, printing, 130 CR (carriage) motor, checking status, 130 to 131 Custom paper size, creating, 91, 114 Cut sheet paper heavy stock, 79 to 81 loading, 77 to 78 printable area, 184 Cut/Eject button, 76 Cutter cutting paper manually, 76 manual, ordering, 10 replacing ...
... unit), checking status, 130 to 131 -187 Cleaning paper basket, 157 print head, 54 to 56, 132 to 134 printer, 157 Cleaning button, 133 Color management Macintosh, 94, 100 to 101 Windows, 118 to 120 Color problems, 169, 170, 175 Color viewing conditions, 101, 119 ColorSync settings, 100 to 101 Component life,... printer, 166 status check, printing, 130 CR (carriage) motor, checking status, 130 to 131 Custom paper size, creating, 91, 114 Cut sheet paper heavy stock, 79 to 81 loading, 77 to 78 printable area, 184 Cut/Eject button, 76 Cutter cutting paper manually, 76 manual, ordering, 10 replacing ...

Service Manual
Page 220
EPSON Stylus Pro 7600/9600 Revision A 5.2 Self-diagnostic Function C A U T IO N „ With this ...Feed ∆" + "Paper Feed ∇" + "Cut / Eject". 3. Setting value - Changes the menu in the printer firmware. Panel Function in the menu hierarchy by one . Therefore, when you execute this function for mechanism adjustment and firm ... Moves the cursor. (only for specific items) Figure 5-1. Power is off to determine the parameters for print head replacement or any other work which requires consumption or discharge of a large volume of ink, check the remaining volume...
EPSON Stylus Pro 7600/9600 Revision A 5.2 Self-diagnostic Function C A U T IO N „ With this ...Feed ∆" + "Paper Feed ∇" + "Cut / Eject". 3. Setting value - Changes the menu in the printer firmware. Panel Function in the menu hierarchy by one . Therefore, when you execute this function for mechanism adjustment and firm ... Moves the cursor. (only for specific items) Figure 5-1. Power is off to determine the parameters for print head replacement or any other work which requires consumption or discharge of a large volume of ink, check the remaining volume...


