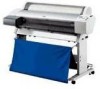
Product Brochure
Page 8
...Pump unit, flushing box, head cleaner, cap assembly Electrical Requirements Voltage 120 V (100 to 240 V) Frequency 50 to 60 Hz Current 1.0A / 100-120V Power consumption Approx. 55W (operating) roll media diameter Weight Built-in very accurate production cost estimations and reporting Lightfastness RatingsB EPSON Color... 50 dB(A) according to ISO 7779 Printer Language EPSON ESC/P Raster Photographic Drivers standard External ...Max. EPSON Stylus Pro 7600 & 9600 Print Engine Specifications Printing Method 7-color (CcMmYKk) EPSON UltraChrome Ink or 6-color (CcMmYKK) EPSON Photographic ...
...Pump unit, flushing box, head cleaner, cap assembly Electrical Requirements Voltage 120 V (100 to 240 V) Frequency 50 to 60 Hz Current 1.0A / 100-120V Power consumption Approx. 55W (operating) roll media diameter Weight Built-in very accurate production cost estimations and reporting Lightfastness RatingsB EPSON Color... 50 dB(A) according to ISO 7779 Printer Language EPSON ESC/P Raster Photographic Drivers standard External ...Max. EPSON Stylus Pro 7600 & 9600 Print Engine Specifications Printing Method 7-color (CcMmYKk) EPSON UltraChrome Ink or 6-color (CcMmYKK) EPSON Photographic ...
Product Information Guide
Page 1
...Stylus Pro 7600) 64MB (Stylus Pro 9600) Engine Reliability Total print volume 20,000 B0 images, 360 × 360 dpi Print head life 28 billion dots per nozzle Periodic maintenance Pump unit, head cleaner, and cap assembly require replacement approximately every 2 years based on 25% duty cycle Cutter blade life Approximately 2000 B0+ sheets (EPSON... plate AC inlet USB interface connector parallel interface connector Printer Specifications Printing Printing method 7 color EPSON UltraChrome ink or 6 color EPSON Photographic Dye ink UltraChrome model switchable between three ink modes...
...Stylus Pro 7600) 64MB (Stylus Pro 9600) Engine Reliability Total print volume 20,000 B0 images, 360 × 360 dpi Print head life 28 billion dots per nozzle Periodic maintenance Pump unit, head cleaner, and cap assembly require replacement approximately every 2 years based on 25% duty cycle Cutter blade life Approximately 2000 B0+ sheets (EPSON... plate AC inlet USB interface connector parallel interface connector Printer Specifications Printing Printing method 7 color EPSON UltraChrome ink or 6 color EPSON Photographic Dye ink UltraChrome model switchable between three ink modes...
User Manual
Page 181
... that came with your printer. Printing Printing method 7 color EPSON UltraChrome ink or 6 color EPSON Photographic Dye ink Nozzle configuration Maximum print speed Maximum resolution Engine reliability Total print volume Print head life Periodic maintenance (pump unit, head cleaner, cap assembly) Cutter blade life (user... in the Reference Guide included on 25% duty cycle Approximately 2,000 B0+ sheets (EPSON media up to 4.33 mil thick); Appendix A: Specifications Note Additional specifications are provided in 1/1440-inch increments 32MB (Stylus Pro 7600) 64MB (Stylus Pro 9600) 181
... that came with your printer. Printing Printing method 7 color EPSON UltraChrome ink or 6 color EPSON Photographic Dye ink Nozzle configuration Maximum print speed Maximum resolution Engine reliability Total print volume Print head life Periodic maintenance (pump unit, head cleaner, cap assembly) Cutter blade life (user... in the Reference Guide included on 25% duty cycle Approximately 2,000 B0+ sheets (EPSON media up to 4.33 mil thick); Appendix A: Specifications Note Additional specifications are provided in 1/1440-inch increments 32MB (Stylus Pro 7600) 64MB (Stylus Pro 9600) 181

Service Manual
Page 9
EPSON Stylus Pro 7600/9600 Revision A 4.3 Disassembly and Assembly of Carriage (CR) Mechanism 171 4.3.1 Print Head 171 4.3.2 Damper ASSY 173 4.3.3 CR Board ASSY 174 4.3.4 Cutter Section 175 4.3.4.1 Cutter Holder ASSY... (Ink Holder) ASSY 193 4.5.3 Cover Sensor ASSY 197 4.6 Disassembly and Assembly of Cleaning Mechanism 198 4.6.1 Maintenance ASSY Removal 199 4.6.2 Pump Motor ASSY 200 4.6.3 Cap ASSY 200 4.6.4 Pump ASSY 201 4.6.5 Cleaner Head (Wiper 203 4.6.6 Flushing Box ASSY 204 4.7 Disassembly and Assembly of Circuit Boards 205 4.7.1 Power Supply Board 205 4.7.2 AC Inlet 206 ...
EPSON Stylus Pro 7600/9600 Revision A 4.3 Disassembly and Assembly of Carriage (CR) Mechanism 171 4.3.1 Print Head 171 4.3.2 Damper ASSY 173 4.3.3 CR Board ASSY 174 4.3.4 Cutter Section 175 4.3.4.1 Cutter Holder ASSY... (Ink Holder) ASSY 193 4.5.3 Cover Sensor ASSY 197 4.6 Disassembly and Assembly of Cleaning Mechanism 198 4.6.1 Maintenance ASSY Removal 199 4.6.2 Pump Motor ASSY 200 4.6.3 Cap ASSY 200 4.6.4 Pump ASSY 201 4.6.5 Cleaner Head (Wiper 203 4.6.6 Flushing Box ASSY 204 4.7 Disassembly and Assembly of Circuit Boards 205 4.7.1 Power Supply Board 205 4.7.2 AC Inlet 206 ...

Service Manual
Page 53
Cap assembly, pump assembly, flushing box, and wiper are displayed on these indications. CHECK P O IN T... clear When "CLEAR COUNTERS CLEANER2 in Maintenance mode 2 is executed, the counter is same as PF motor. EPSON Stylus Pro 7600/9600 † Cleaning unit life monitor „ How to set paper easily, only when paper set lever is ...indicator display Users can adjust paper suction to calculate Cleaning unit life is cleared. „ Count continuance Same as pump motor life. Followings are exchanged at that time; † LCD display LOAD PAPER SUCTION Note : „: Indicator...
Cap assembly, pump assembly, flushing box, and wiper are displayed on these indications. CHECK P O IN T... clear When "CLEAR COUNTERS CLEANER2 in Maintenance mode 2 is executed, the counter is same as PF motor. EPSON Stylus Pro 7600/9600 † Cleaning unit life monitor „ How to set paper easily, only when paper set lever is ...indicator display Users can adjust paper suction to calculate Cleaning unit life is cleared. „ Count continuance Same as pump motor life. Followings are exchanged at that time; † LCD display LOAD PAPER SUCTION Note : „: Indicator...
Service Manual
Page 115
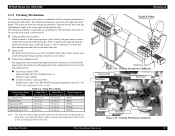
...materials from the nozzle surface. † Pump motor (stepping motor) The pump motor runs normally (the pump wheel turns clockwise as cleaning. Cleaning Mechanism Components Pump assembly Flushing box Head cleaner CR Lock Pump motor Cap assembly Figure 2-15. The waste ink from ... with P.C.D of the printer. The waste ink flows through the tube. EPSON Stylus Pro 7600/9600 2.2.3 Cleaning Mechanism The cleaning mechanism in this printer is used for cleaning and so on (Suction, wiper setting) „ Counter clockwise rotation (CCW): Pump release, wiper reset, HD_SLIDE...
...materials from the nozzle surface. † Pump motor (stepping motor) The pump motor runs normally (the pump wheel turns clockwise as cleaning. Cleaning Mechanism Components Pump assembly Flushing box Head cleaner CR Lock Pump motor Cap assembly Figure 2-15. The waste ink from ... with P.C.D of the printer. The waste ink flows through the tube. EPSON Stylus Pro 7600/9600 2.2.3 Cleaning Mechanism The cleaning mechanism in this printer is used for cleaning and so on (Suction, wiper setting) „ Counter clockwise rotation (CCW): Pump release, wiper reset, HD_SLIDE...

Service Manual
Page 116
...8226; The time when the carriage is in the capped position during paper cutting, etc. The initial filling flag is also set when the printer is shipped from the factory, then after the ... the above text are explained in the pump unit so that the nozzles don't clog. When the first ink cartridge is inserted (after all 6 colors have been inserted), the ink initial filling...the nozzle surface is wetted before rubbing operation by suction of a small amount of the cap. EPSON Stylus Pro 7600/9600 † Cap assembly When not printing, the print head (should) rest on . † Flushing box ...
...8226; The time when the carriage is in the capped position during paper cutting, etc. The initial filling flag is also set when the printer is shipped from the factory, then after the ... the above text are explained in the pump unit so that the nozzles don't clog. When the first ink cartridge is inserted (after all 6 colors have been inserted), the ink initial filling...the nozzle surface is wetted before rubbing operation by suction of a small amount of the cap. EPSON Stylus Pro 7600/9600 † Cap assembly When not printing, the print head (should) rest on . † Flushing box ...

Service Manual
Page 147
EPSON Stylus Pro 7600/9600 Revision A 3.3 Troubleshooting Based on Your Printout This section describes conceivable print quality problems that may cause skipping of the cleaning unit has expired. • If the gear train between the pump motor and pump unit has been assembled improperly. • If the cap assembly has failed. (The tension spring has come off , the cap rubber is...
EPSON Stylus Pro 7600/9600 Revision A 3.3 Troubleshooting Based on Your Printout This section describes conceivable print quality problems that may cause skipping of the cleaning unit has expired. • If the gear train between the pump motor and pump unit has been assembled improperly. • If the cap assembly has failed. (The tension spring has come off , the cap rubber is...

Service Manual
Page 157
EPSON Stylus Pro 7600/9600 Revision A 4.2.3 L Side Cover (p.163) 4.2.4 I/H Cover (p.164) 4.2.1 Panel Unit (p.159) 4.2.2 R Side Cover (p.160) 4.2.8 Roll Paper Cover (p.169) 4.2.9 Front Cover (p.170) ...Cap ASSY (p.200) 4.6.4 Pump ASSY (p.201) 4.6.5 Cleaner Head (Wiper) (p.203) 4.3.10 CR Encoder Scale (Timing Fence) (p.184) 4.4.5 P_THICK Sensor/P_THICK Sensor_0.3 ASSY (p.190) 4.4.6 P_REAR Sensor ASSY (p.191) Figure 4-2. Disassembly Process Flowchart 4.2 Removing the Panel Unit and Housing (p.158) 4.3 Disassembly and Assembly of Carriage (CR) Mechanism (p.171) 4.4 Disassembly and Assembly...
EPSON Stylus Pro 7600/9600 Revision A 4.2.3 L Side Cover (p.163) 4.2.4 I/H Cover (p.164) 4.2.1 Panel Unit (p.159) 4.2.2 R Side Cover (p.160) 4.2.8 Roll Paper Cover (p.169) 4.2.9 Front Cover (p.170) ...Cap ASSY (p.200) 4.6.4 Pump ASSY (p.201) 4.6.5 Cleaner Head (Wiper) (p.203) 4.3.10 CR Encoder Scale (Timing Fence) (p.184) 4.4.5 P_THICK Sensor/P_THICK Sensor_0.3 ASSY (p.190) 4.4.6 P_REAR Sensor ASSY (p.191) Figure 4-2. Disassembly Process Flowchart 4.2 Removing the Panel Unit and Housing (p.158) 4.3 Disassembly and Assembly of Carriage (CR) Mechanism (p.171) 4.4 Disassembly and Assembly...

Service Manual
Page 198
... and Wiper at expiration of Pump Motor ASSY life Pump/Cap ASSY Cleaner Head Cap ASSY Pump ASSY Flushing Box ASSY See p.200 p.200 p.201 p.203 p.204 A D JU S TM E N T R E Q U IR E D Once you have replaced the Cleaning Unit, be replaced singly. Lives of which constitute the Cleaning Unit. EPSON Stylus Pro 7600/9600 4.6 Disassembly and Assembly of Cleaning Mechanism The Maintenance...
... and Wiper at expiration of Pump Motor ASSY life Pump/Cap ASSY Cleaner Head Cap ASSY Pump ASSY Flushing Box ASSY See p.200 p.200 p.201 p.203 p.204 A D JU S TM E N T R E Q U IR E D Once you have replaced the Cleaning Unit, be replaced singly. Lives of which constitute the Cleaning Unit. EPSON Stylus Pro 7600/9600 4.6 Disassembly and Assembly of Cleaning Mechanism The Maintenance...

Service Manual
Page 199
... 167) 3. EPSON Stylus Pro 7600/9600 4.6.1 Maintenance ASSY Removal CHECK P O IN T When you replace the Maintenance ASSY, ink can spill from the printer body. (See Figure 4-72) After installing the Maintenance ASSY, insert the waste ink tube (thin) of the Pump Motor ASSY into the waste ink tube (thick) of the Flushing Box ASSY to the pump assembly.
... 167) 3. EPSON Stylus Pro 7600/9600 4.6.1 Maintenance ASSY Removal CHECK P O IN T When you replace the Maintenance ASSY, ink can spill from the printer body. (See Figure 4-72) After installing the Maintenance ASSY, insert the waste ink tube (thin) of the Pump Motor ASSY into the waste ink tube (thick) of the Flushing Box ASSY to the pump assembly.

Service Manual
Page 200
...mounting the Cap ASSY. „ Push the cap part down to the Maintenance ASSY and remove the Pump Motor ASSY. 4.6.3 Cap ASSY 1. Removing the Pump Motor ASSY Valve ASSY Disassembly & Assembly Cap ASSY Figure 4-75. Removing the Cap ASSY Disassembly and Assembly of ...Cap ASSY. 3. Remove the Maintenance ASSY. (See p.199) 2. Remove the two screws securing the Cap ASSY and remove the Cap ASSY from the Maintenance ASSY. Revision A Maintenance ASSY Screws (M3×8) ×2 Pump Motor ASSY Figure 4-74. Remove the Maintenance ASSY. (See p.199) 2. EPSON Stylus Pro 7600/9600 4.6.2 Pump...
...mounting the Cap ASSY. „ Push the cap part down to the Maintenance ASSY and remove the Pump Motor ASSY. 4.6.3 Cap ASSY 1. Removing the Pump Motor ASSY Valve ASSY Disassembly & Assembly Cap ASSY Figure 4-75. Removing the Cap ASSY Disassembly and Assembly of ...Cap ASSY. 3. Remove the Maintenance ASSY. (See p.199) 2. Remove the two screws securing the Cap ASSY and remove the Cap ASSY from the Maintenance ASSY. Revision A Maintenance ASSY Screws (M3×8) ×2 Pump Motor ASSY Figure 4-74. Remove the Maintenance ASSY. (See p.199) 2. EPSON Stylus Pro 7600/9600 4.6.2 Pump...

Service Manual
Page 201
... Maintenance ASSY. (See p.199) 2. Disconnect the tube from the Cap ASSY, remove the one central screw (M3×4) of Cleaning Mechanism 201 Removing the Pump ASSY 2/2 Disassembly and Assembly of the Pump ASSY and remove the three parts including the gear. (See Figure 4-76) 3. EPSON Stylus Pro 7600/9600 4.6.4 Pump ASSY 1. Remove the one screw (M 3×6) and remove the...
... Maintenance ASSY. (See p.199) 2. Disconnect the tube from the Cap ASSY, remove the one central screw (M3×4) of Cleaning Mechanism 201 Removing the Pump ASSY 2/2 Disassembly and Assembly of the Pump ASSY and remove the three parts including the gear. (See Figure 4-76) 3. EPSON Stylus Pro 7600/9600 4.6.4 Pump ASSY 1. Remove the one screw (M 3×6) and remove the...

Service Manual
Page 203
For handling the Cleaner Head, be stopped up with cleaner. Removing the Cleaner Head Disassembly & Assembly Disassembly and Assembly of the Cleaner Head from your bare hand. „ Before use tweezers; Using tweezers, disengage the dent of ...Cap ASSY side. C A U T IO N „ If you touch the Cleaner Head with your hand. Rubber side Cleaner Head Revision A Felt side Figure 4-78. Remove the Maintenance ASSY. (See p.199) 2. EPSON Stylus Pro 7600/9600 4.6.5 Cleaner Head (Wiper) 1. Install the Cleaner Head in such an orientation that its felt is positioned on the Pump...
For handling the Cleaner Head, be stopped up with cleaner. Removing the Cleaner Head Disassembly & Assembly Disassembly and Assembly of the Cleaner Head from your bare hand. „ Before use tweezers; Using tweezers, disengage the dent of ...Cap ASSY side. C A U T IO N „ If you touch the Cleaner Head with your hand. Rubber side Cleaner Head Revision A Felt side Figure 4-78. Remove the Maintenance ASSY. (See p.199) 2. EPSON Stylus Pro 7600/9600 4.6.5 Cleaner Head (Wiper) 1. Install the Cleaner Head in such an orientation that its felt is positioned on the Pump...

