Product Information Guide
Page 7
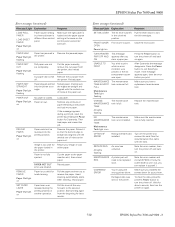
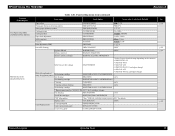
...lever all the way forward, to remove the paper. Start printing again from the printer, then reload paper. Close the front cover. Press the Power button to turn the printer off and back on again. TANK Maintenance Tank light is on Paper is too ...cleaning, reload paper. If the message appears again, clear the error before you ON clear a paper jam. Turn off . correct driver for best results. Damaged data was released during a print job, reset the printer by pressing the Pause button for the paper loaded in the unlocked position. EPSON Stylus Pro 7600 and 9600...
...lever all the way forward, to remove the paper. Start printing again from the printer, then reload paper. Close the front cover. Press the Power button to turn the printer off and back on again. TANK Maintenance Tank light is on Paper is too ...cleaning, reload paper. If the message appears again, clear the error before you ON clear a paper jam. Turn off . correct driver for best results. Damaged data was released during a print job, reset the printer by pressing the Pause button for the paper loaded in the unlocked position. EPSON Stylus Pro 7600 and 9600...

Product Support Bulletin(s)
Page 58
... the standard printer driver. Power Head Cleaning. 4. The settings you of the use media other printing applications, it also allows the user to use and functionality of the EPSON Printer Service Utility for unidirectional and bidirectional printing. 2. Firmware Update. This software contains the following features/functions: 1. Print Head Alignment for the EPSON Stylus Pro 7600/ 9600 Series Inkjet printers. EPSON PRODUCT SUPPORT...
... the standard printer driver. Power Head Cleaning. 4. The settings you of the use media other printing applications, it also allows the user to use and functionality of the EPSON Printer Service Utility for unidirectional and bidirectional printing. 2. Firmware Update. This software contains the following features/functions: 1. Print Head Alignment for the EPSON Stylus Pro 7600/ 9600 Series Inkjet printers. EPSON PRODUCT SUPPORT...

Product Support Bulletin(s)
Page 73
...Utility tab in the Epson driver, from the Select Type printer control panel menu, or with the Power Head Cleaning selection in this utility program. Custom Paper Configuration Page 16. Print head cleanings can be noticed.... This adjustment allows you should first perform a nozzle test print and cleanings, as thin dark or light evenly spaced lines. If the paper is feeding too little a dark horizontal micro band can be noticed. Stylus Pro 7600/9600 Printer...
...Utility tab in the Epson driver, from the Select Type printer control panel menu, or with the Power Head Cleaning selection in this utility program. Custom Paper Configuration Page 16. Print head cleanings can be noticed.... This adjustment allows you should first perform a nozzle test print and cleanings, as thin dark or light evenly spaced lines. If the paper is feeding too little a dark horizontal micro band can be noticed. Stylus Pro 7600/9600 Printer...

Product Support Bulletin(s)
Page 83
... print shows misaligned, missing or deflected nozzles, head cleaning form the printer control panel, or Epson driver should be tried followed by another nozzle check to continue. Power head cleanings run for verification. Form the Printer Service Utility main menu select the Printer. 2. Stylus Pro 7600/9600 Printer Service Utility 8/26/02 Power Head Cleaning If Horizontal micro banding is noticed then the...
... print shows misaligned, missing or deflected nozzles, head cleaning form the printer control panel, or Epson driver should be tried followed by another nozzle check to continue. Power head cleanings run for verification. Form the Printer Service Utility main menu select the Printer. 2. Stylus Pro 7600/9600 Printer Service Utility 8/26/02 Power Head Cleaning If Horizontal micro banding is noticed then the...

Product Support Bulletin(s)
Page 84
Click Home to return to the Printer Service Utility main menu, or Quit to clear nozzle issues. 5. Power Head Cleaning Page 27. Stylus Pro 7600/9600 Printer Service Utility 8/26/02 4. Click Start to run for approximately 2 1/2 minutes, it uses more ink then a driver or printer control panel cleaning try them first to exit the Printer Service Utility program. During the Power Head Cleaning Wait will be displayed on the printers LCD control panel and the Pause Led will be blinking. 6. NOTE: A "Power Head Cleaning" can run a Power Head Cleaning.
Click Home to return to the Printer Service Utility main menu, or Quit to clear nozzle issues. 5. Power Head Cleaning Page 27. Stylus Pro 7600/9600 Printer Service Utility 8/26/02 4. Click Start to run for approximately 2 1/2 minutes, it uses more ink then a driver or printer control panel cleaning try them first to exit the Printer Service Utility program. During the Power Head Cleaning Wait will be displayed on the printers LCD control panel and the Pause Led will be blinking. 6. NOTE: A "Power Head Cleaning" can run a Power Head Cleaning.

User Manual
Page 5
...23 Attaching the Paper Basket 24 Unpacking and Assembling the Stylus Pro 9600 27 Unpacking the Stand 27 Assembling the Stand 28 Unpacking the Printer 29 Mounting the Printer on the Stand 31 Attaching the Basket 34 Connecting the Power Cord 37 Installing the Ink Cartridges 38 Loading Roll Paper... 47 Installing and Connecting to an Optional Interface Card 48 Installing the Printer Software 50 Installing the Software for Macintosh OS 8.5 to 9.x 50 Installing Software for Windows 52 Running a Nozzle Check 54 Cleaning the Print Head from the Control Panel 56 Aligning the Print Head ...
...23 Attaching the Paper Basket 24 Unpacking and Assembling the Stylus Pro 9600 27 Unpacking the Stand 27 Assembling the Stand 28 Unpacking the Printer 29 Mounting the Printer on the Stand 31 Attaching the Basket 34 Connecting the Power Cord 37 Installing the Ink Cartridges 38 Loading Roll Paper... 47 Installing and Connecting to an Optional Interface Card 48 Installing the Printer Software 50 Installing the Software for Macintosh OS 8.5 to 9.x 50 Installing Software for Windows 52 Running a Nozzle Check 54 Cleaning the Print Head from the Control Panel 56 Aligning the Print Head ...
User Manual
Page 7
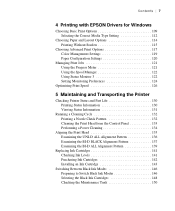
...| 7 4 Printing with EPSON Drivers for Windows Choosing Basic Print Options 109 Selecting the Correct Media Type Setting 112 Choosing Paper and Layout Options 114 Printing Without Borders 115 Choosing Advanced Print Options 117 Color Management Settings 119 Paper Configuration ... and Transporting the Printer Checking Printer Status and Part Life 130 Printing Status Information 130 Viewing Status Information 131 Running a Cleaning Cycle 132 Printing a Nozzle Check Pattern 132 Cleaning the Print Head from the Control Panel 133 Performing a Power Cleaning 134 Aligning the Print...
...| 7 4 Printing with EPSON Drivers for Windows Choosing Basic Print Options 109 Selecting the Correct Media Type Setting 112 Choosing Paper and Layout Options 114 Printing Without Borders 115 Choosing Advanced Print Options 117 Color Management Settings 119 Paper Configuration ... and Transporting the Printer Checking Printer Status and Part Life 130 Printing Status Information 130 Viewing Status Information 131 Running a Cleaning Cycle 132 Printing a Nozzle Check Pattern 132 Cleaning the Print Head from the Control Panel 133 Performing a Power Cleaning 134 Aligning the Print...

User Manual
Page 14
... Compliance As an ENERGY STAR Partner, EPSON has determined that the print head is safely capped. The EPA ENERGY STAR Office Equipment program is a voluntary partnership with a damp cloth only. 14 | Introduction Caution Always turn off the power to the printer until the Operate light is off. Clean with the computer and office equipment...
... Compliance As an ENERGY STAR Partner, EPSON has determined that the print head is safely capped. The EPA ENERGY STAR Office Equipment program is a voluntary partnership with a damp cloth only. 14 | Introduction Caution Always turn off the power to the printer until the Operate light is off. Clean with the computer and office equipment...

User Manual
Page 56
... r. Press the SelecType button on the display, then press Enter. The printer performs the power cleaning. If you see no improvement, contact EPSON for assistance. 1-56 Press u until it is complete. If the lines on the pattern are still missing dots after running a power cleaning, turn off and leave it consumes additional ink. 1. You should not...
... r. Press the SelecType button on the display, then press Enter. The printer performs the power cleaning. If you see no improvement, contact EPSON for assistance. 1-56 Press u until it is complete. If the lines on the pattern are still missing dots after running a power cleaning, turn off and leave it consumes additional ink. 1. You should not...

User Manual
Page 134
..., then press Enter. The printer performs the power cleaning. You see MAINTENANCE, then press r. You see no improvement, contact EPSON for assistance. 5-134 If the lines on the control panel. If you can perform a power cleaning. Press r until you see PWR CLEANING. 3. 134 | Maintaining and Transporting the Printer Performing a Power Cleaning If you're unable to clean the print head fully...
..., then press Enter. The printer performs the power cleaning. You see MAINTENANCE, then press r. You see no improvement, contact EPSON for assistance. 5-134 If the lines on the control panel. If you can perform a power cleaning. Press r until you see PWR CLEANING. 3. 134 | Maintaining and Transporting the Printer Performing a Power Cleaning If you're unable to clean the print head fully...

User Manual
Page 157
.... Don't use a soft brush to accumulate on the paper feed roller. Then unplug the power cord and disconnect the printer from the computer. 2. Then clean away any sheet media from the printer. unsuitable oils can cause paper dust to carefully clean away any dust or dirt. 3. Some kinds of paper can damage the mechanism. If...
.... Don't use a soft brush to accumulate on the paper feed roller. Then unplug the power cord and disconnect the printer from the computer. 2. Then clean away any sheet media from the printer. unsuitable oils can cause paper dust to carefully clean away any dust or dirt. 3. Some kinds of paper can damage the mechanism. If...

User Manual
Page 161
...on its casters. Keep in the home position (on the Stand When you need to run a cleaning cycle (page 132) and realign the print head (page 135) to ensure good print quality. Moving the Printer on the far right). Fully insert the metal rods supporting the paper basket, then roll up ...for the first time (see "Setting Up the Printer" on for a long time. Disconnect the power cord and interface cable. 3. Make sure the printer covers are closed. 4. Caution Do not roll the printer on , wait until the carriage moves to the home position, then turn the...
...on its casters. Keep in the home position (on the Stand When you need to run a cleaning cycle (page 132) and realign the print head (page 135) to ensure good print quality. Moving the Printer on the far right). Fully insert the metal rods supporting the paper basket, then roll up ...for the first time (see "Setting Up the Printer" on for a long time. Disconnect the power cord and interface cable. 3. Make sure the printer covers are closed. 4. Caution Do not roll the printer on , wait until the carriage moves to the home position, then turn the...

User Manual
Page 173
... reconnect the power cord and turn the printer back on. • If the Pause light is flashing, the printer is performing a maintenance procedure or waiting for details.) The printer stops printing unexpectedly. • Turn off the printer, then unplug the AC power cord. See...directly connected to Programs and EPSON Printers, then click EPSON Printer Port Uninstall. Solving Problems | 173 Solving Operational Problems If you are using Windows NT 4.0, try uninstalling the EPSON Printer Port. Follow the instructions beginning on the control panel to clean the print head. Wait...
... reconnect the power cord and turn the printer back on. • If the Pause light is flashing, the printer is performing a maintenance procedure or waiting for details.) The printer stops printing unexpectedly. • Turn off the printer, then unplug the AC power cord. See...directly connected to Programs and EPSON Printers, then click EPSON Printer Port Uninstall. Solving Problems | 173 Solving Operational Problems If you are using Windows NT 4.0, try uninstalling the EPSON Printer Port. Follow the instructions beginning on the control panel to clean the print head. Wait...
User Manual
Page 190
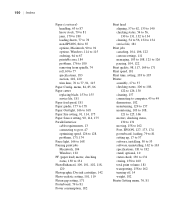
..., 63 to 87 heavy stock, 79 to 81 jams, 179 to 180 loading sheets, 77 to 78 non-EPSON, 84 to 87 options, Macintosh, 90 to 91 options, Windows, 114 to 115 ordering, 64 to 67 printable... cartridges, 142 Photo-realistic setting, 101, 119 Platen gap setting, 171 Posterboard, 79 to 81 Power consumption, 182 Print head aligning, 57 to 62, 135 to 140 checking status, 54 to 56, 130 to 131..., 169 to 171 Print speed, 181 Print time, setting, 103 to 105 Printer assembly, 17 to 37 checking status, 106 to 108, 122 to 126, 130 cleaning, 157 connecting to computer, 45 to 49 dimensions, 182 maintaining, 129 to ...
..., 63 to 87 heavy stock, 79 to 81 jams, 179 to 180 loading sheets, 77 to 78 non-EPSON, 84 to 87 options, Macintosh, 90 to 91 options, Windows, 114 to 115 ordering, 64 to 67 printable... cartridges, 142 Photo-realistic setting, 101, 119 Platen gap setting, 171 Posterboard, 79 to 81 Power consumption, 182 Print head aligning, 57 to 62, 135 to 140 checking status, 54 to 56, 130 to 131..., 169 to 171 Print speed, 181 Print time, setting, 103 to 105 Printer assembly, 17 to 37 checking status, 106 to 108, 122 to 126, 130 cleaning, 157 connecting to computer, 45 to 49 dimensions, 182 maintaining, 129 to ...

Service Manual
Page 7
EPSON Stylus Pro 7600/9600 Revision A 1.4.3.25 Job history clear 50 1.4.3.26 Total prints 50 1.4.3.27 Consumables life 51 1.4.3.28 Suction adjustment for paper setting and indicator display 53 1.4.3.29 Ink remaining indicator display 54 1.4.3.30 Job information 55 1.4.3.31 User Paper Setting 56 1.4.3.32 Power cleaning... (CR) Mechanism 103 2.2.2 Paper Feed Assembly 113 2.2.3 Cleaning Mechanism 115 2.2.4 Ink Supply Mechanism 117 2.2.5 Others ...118 2.3 Outline of Control Circuit Board 119 2.4 Outline of Power Supply Circuit Board 120 Chapter 3 Troubleshooting 3.1 Outline ...122...
EPSON Stylus Pro 7600/9600 Revision A 1.4.3.25 Job history clear 50 1.4.3.26 Total prints 50 1.4.3.27 Consumables life 51 1.4.3.28 Suction adjustment for paper setting and indicator display 53 1.4.3.29 Ink remaining indicator display 54 1.4.3.30 Job information 55 1.4.3.31 User Paper Setting 56 1.4.3.32 Power cleaning... (CR) Mechanism 103 2.2.2 Paper Feed Assembly 113 2.2.3 Cleaning Mechanism 115 2.2.4 Ink Supply Mechanism 117 2.2.5 Others ...118 2.3 Outline of Control Circuit Board 119 2.4 Outline of Power Supply Circuit Board 120 Chapter 3 Troubleshooting 3.1 Outline ...122...
Service Manual
Page 38
...printer) Set draining cartridge Ink draining SELECTINKSET * Select 2 types from following depending on the situation #1 PHOTO:#2 LGT #1 MAT:#2 MAT #1 MAT:#2 LGT #1 PHOTO:#2LGT (2 cartridges change) #1 MAT:#2 LGT #1 MAT:#2 MAT (2 cartridges change . Cover open guide OPENLOWERCOVER - EPSON Stylus Pro 7600/9600 Revision A Top menu (Panel display) User Paper Setup Menu (PAPERCONFIG. DRAINING xxx% Set cleaning...NORM, LOW Print adjustment (MW) PRINTADJ 0 ~ 5 ~ 9 Powerful cleaning PWRCLEANING EXEC Replace BK ink BLKINKCHNG EXEC Release ink lever RELEASE INKLEVER ...
...printer) Set draining cartridge Ink draining SELECTINKSET * Select 2 types from following depending on the situation #1 PHOTO:#2 LGT #1 MAT:#2 MAT #1 MAT:#2 LGT #1 PHOTO:#2LGT (2 cartridges change) #1 MAT:#2 LGT #1 MAT:#2 MAT (2 cartridges change . Cover open guide OPENLOWERCOVER - EPSON Stylus Pro 7600/9600 Revision A Top menu (Panel display) User Paper Setup Menu (PAPERCONFIG. DRAINING xxx% Set cleaning...NORM, LOW Print adjustment (MW) PRINTADJ 0 ~ 5 ~ 9 Powerful cleaning PWRCLEANING EXEC Replace BK ink BLKINKCHNG EXEC Release ink lever RELEASE INKLEVER ...

Service Manual
Page 60
... allows the user to be selected by pressing the SelecType button for each adjustment item. 6. The procedure for 0.2mm or 1.2mm EPSON paper. Select the gap adjustment menu from the panel. (The cutter replacement menu can be printed (Bi-D Black, Bi-D all ...replacement menus from the panel. 3. Close the cover following list. When other paper is completed. EPSON Stylus Pro 7600/9600 Revision A 1.4.3.32 Power cleaning With this mode, the printer has more power cleaning than normal cleaning. 1.4.3.33 Cutter Blade Replacement Selecting this mode allows the user to adjust Bi-D and Uni-D ...
... allows the user to be selected by pressing the SelecType button for each adjustment item. 6. The procedure for 0.2mm or 1.2mm EPSON paper. Select the gap adjustment menu from the panel. (The cutter replacement menu can be printed (Bi-D Black, Bi-D all ...replacement menus from the panel. 3. Close the cover following list. When other paper is completed. EPSON Stylus Pro 7600/9600 Revision A 1.4.3.32 Power cleaning With this mode, the printer has more power cleaning than normal cleaning. 1.4.3.33 Cutter Blade Replacement Selecting this mode allows the user to adjust Bi-D and Uni-D ...

Service Manual
Page 147
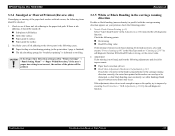
...Nozzle Check Pattern Printing (p.45) Execute "Nozzle Check Pattern Printing" in all the ink colors: • Are the print heads and cap assemblies sealed during printing. Therefore, check... themselves, increases, and may occur with this point, replace the following particulars. † Execute powerful cleaning of the ink head. 1. Item 1 2 3 4 5 Table 3-29. Diagnosing trouble based...149 White/black banding p.149 3.3.1 Dot Missing If the printer is kept for those errors. EPSON Stylus Pro 7600/9600 Revision A 3.3 Troubleshooting Based on Your Printout This section ...
...Nozzle Check Pattern Printing (p.45) Execute "Nozzle Check Pattern Printing" in all the ink colors: • Are the print heads and cap assemblies sealed during printing. Therefore, check... themselves, increases, and may occur with this point, replace the following particulars. † Execute powerful cleaning of the ink head. 1. Item 1 2 3 4 5 Table 3-29. Diagnosing trouble based...149 White/black banding p.149 3.3.1 Dot Missing If the printer is kept for those errors. EPSON Stylus Pro 7600/9600 Revision A 3.3 Troubleshooting Based on Your Printout This section ...
Service Manual
Page 149
...Printout 149 Adjustment If dot missing is not found , execute head cleaning. (If deemed necessary, select and execute "Power cleaning (p.60)" in the Adjustment (p.230) menu by the self-...points: 1. If the adjustments above parts is the following items should be wiped off in "Printer Settings" → "Panel Setting Menu" → "Paper Width Detection," if the user's...(p.45) Select "Adj: Check Nozzle" in the SelecType mode or "Cleaning (p.259)" by the self-diagnostic function. EPSON Stylus Pro 7600/9600 Revision A 3.3.4 Smudged or Marred Printout (Reverse side) If smudging or ...
...Printout 149 Adjustment If dot missing is not found , execute head cleaning. (If deemed necessary, select and execute "Power cleaning (p.60)" in the Adjustment (p.230) menu by the self-...points: 1. If the adjustments above parts is the following items should be wiped off in "Printer Settings" → "Panel Setting Menu" → "Paper Width Detection," if the user's...(p.45) Select "Adj: Check Nozzle" in the SelecType mode or "Cleaning (p.259)" by the self-diagnostic function. EPSON Stylus Pro 7600/9600 Revision A 3.3.4 Smudged or Marred Printout (Reverse side) If smudging or ...

Service Manual
Page 213
EPSON Stylus Pro 7600/9600 5.1.4.2 Main Board Adjustment Described below ; Required Adjustment Items (Main Circuit) Procedure Procedure A*1 B*2 Adjustment Item (Power OFF → [Paper Feed ∆]+[Paper Feed ∇] +[Cut/Eject] → Power ON) 1 1 Rear Sensor AD Adjustment 2 2 Edge Sensor AD Adjustment 3 Initial Charge Flag Clear 4 Head Rank ID Checking 5 Head Rank Input 6 Head Nozzle Checking (Cleaning...) p. 253 14 USB ID Input 3 15 RTC writing initialization 16 Power Cleaning 17 Head Nozzle Checking (Cleaning) 18 Test Pattern Printing p. 273 p. 71 p. 259 p. 237 ...
EPSON Stylus Pro 7600/9600 5.1.4.2 Main Board Adjustment Described below ; Required Adjustment Items (Main Circuit) Procedure Procedure A*1 B*2 Adjustment Item (Power OFF → [Paper Feed ∆]+[Paper Feed ∇] +[Cut/Eject] → Power ON) 1 1 Rear Sensor AD Adjustment 2 2 Edge Sensor AD Adjustment 3 Initial Charge Flag Clear 4 Head Rank ID Checking 5 Head Rank Input 6 Head Nozzle Checking (Cleaning...) p. 253 14 USB ID Input 3 15 RTC writing initialization 16 Power Cleaning 17 Head Nozzle Checking (Cleaning) 18 Test Pattern Printing p. 273 p. 71 p. 259 p. 237 ...


