Reference Guide
Page 333
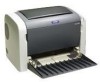
The photoconductor counter is turned off, and then 9 hold down these buttons until the Ready (green) and Error (red) lights turn on. For EPL-6200, make sure that the printer is cleared. 9 9 To reset the photoconductor counter using the printer driver, see "Resetting the photoconductor counter" on page 81 (Windows) or "Resetting the photoconductor counter" on page 297 (Macintosh). 9 9 9 9 9 9 9 9 9 Replacing Consumable Products 333 Continue holding down the N Start/Stop and the @ Information buttons on the control panel simultaneously while turning on the printer.
The photoconductor counter is turned off, and then 9 hold down these buttons until the Ready (green) and Error (red) lights turn on. For EPL-6200, make sure that the printer is cleared. 9 9 To reset the photoconductor counter using the printer driver, see "Resetting the photoconductor counter" on page 81 (Windows) or "Resetting the photoconductor counter" on page 297 (Macintosh). 9 9 9 9 9 9 9 9 9 Replacing Consumable Products 333 Continue holding down the N Start/Stop and the @ Information buttons on the control panel simultaneously while turning on the printer.

Reference Guide
Page 364
...order they are presented until your printer status, as described below. Ready and Error Lights (EPL-6200L only) The Ready (green) and Error (red) lights on , off or flashing, indicates your problem is solved. The status of the lights, on the top of the printer may be the first indication ...of error has occurred and offers you have, then try the recommended solutions in the EPSON...
...order they are presented until your printer status, as described below. Ready and Error Lights (EPL-6200L only) The Ready (green) and Error (red) lights on , off or flashing, indicates your problem is solved. The status of the lights, on the top of the printer may be the first indication ...of error has occurred and offers you have, then try the recommended solutions in the EPSON...

Reference Guide
Page 384
If the Error light (red) continues flashing after removing all jammed paper, open and close the printer's front cover again to remove because only a small portion of the paper is visible, remove the sheet as follows: Note: The illustrations used in this procedure show the EPL-6200. 11 11 ... visible, see "Paper jam - Carefully remove the paper from the page that jammed. Close the printer's front cover. Reinstall the developer cartridge. 6. 4. output cover 11 If the jammed paper inside the printer is difficult to clear the error. 11 11 11 Paper jam - output cover" on page 384...
If the Error light (red) continues flashing after removing all jammed paper, open and close the printer's front cover again to remove because only a small portion of the paper is visible, remove the sheet as follows: Note: The illustrations used in this procedure show the EPL-6200. 11 11 ... visible, see "Paper jam - Carefully remove the paper from the page that jammed. Close the printer's front cover. Reinstall the developer cartridge. 6. 4. output cover 11 If the jammed paper inside the printer is difficult to clear the error. 11 11 11 Paper jam - output cover" on page 384...
