Operation Guide - EMP Monitor v4.30
Page 3
...a Windows Vista environment 8 Before starting operations 8 Using EMP Monitor Registering and deleting projectors for monitoring 10 Starting EMP Monitor 10 Registering projectors using automatic search (Searching for and registering projectors that are located in the same segment 11 Procedures for automatic search 11 Procedures for... view icons 23 Selecting display items 25 Sorting lists 26 Searching for desired icons (Projector list 26 Monitoring using the system tray 26 Displaying projectors with problem or warning statuses in a list 27 Checking properties in detail 28 Displaying...
...a Windows Vista environment 8 Before starting operations 8 Using EMP Monitor Registering and deleting projectors for monitoring 10 Starting EMP Monitor 10 Registering projectors using automatic search (Searching for and registering projectors that are located in the same segment 11 Procedures for automatic search 11 Procedures for... view icons 23 Selecting display items 25 Sorting lists 26 Searching for desired icons (Projector list 26 Monitoring using the system tray 26 Displaying projectors with problem or warning statuses in a list 27 Checking properties in detail 28 Displaying...
Operation Guide - EMP Monitor v4.30
Page 10
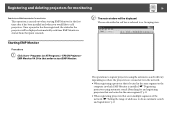
...do an automatic search and registration" p.13 Registering and deleting projectors for monitoring 10 Registering and deleting projectors for monitoring This operation is carried out when starting EMP Monitor for the projector will be displayed. Once a projector has been registered, the status for the first time after... time EMP Monitor is started from that point onwards. Starting EMP Monitor Procedure A Click Start - Programs (or All Programs) - EPSON Projector EMP Monitor V4.30 in red box is referred to as the computer in multiple segments of addresses to in the network. •...
...do an automatic search and registration" p.13 Registering and deleting projectors for monitoring 10 Registering and deleting projectors for monitoring This operation is carried out when starting EMP Monitor for the projector will be displayed. Once a projector has been registered, the status for the first time after... time EMP Monitor is started from that point onwards. Starting EMP Monitor Procedure A Click Start - Programs (or All Programs) - EPSON Projector EMP Monitor V4.30 in red box is referred to as the computer in multiple segments of addresses to in the network. •...
Operation Guide - EMP Monitor v4.30
Page 41
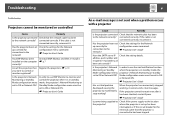
...configuration menu command. If the projector cannot be reset even after it . s p.10 you want to the network? Is the projector's Network In order to use the mail notification function Monitoring or Standby when the projector is connected to has been tripped... been checked, contact Epson. When the projector has momentarily stopped working ? Troubleshooting 41 Troubleshooting Projectors cannot be monitored or controlled Cause Remedy Is the projector connected Check that the projector is in standby Mode configuration menu mode, the projector's Network Monitoring or set...
...configuration menu command. If the projector cannot be reset even after it . s p.10 you want to the network? Is the projector's Network In order to use the mail notification function Monitoring or Standby when the projector is connected to has been tripped... been checked, contact Epson. When the projector has momentarily stopped working ? Troubleshooting 41 Troubleshooting Projectors cannot be monitored or controlled Cause Remedy Is the projector connected Check that the projector is in standby Mode configuration menu mode, the projector's Network Monitoring or set...

Operation Guide - EasyMP Monitor v4.40
Page 10
10 Using EasyMP Monitor
10 Using EasyMP Monitor
Operation Guide - EMP Monitor v4.22
Page 3
... registration 9 Setting the range of addresses to do an automatic search and registration 10 Procedures for automatic search 10 Procedures for registration 11 Registration by specifying an IP address (Manual registration 12 Registering several projectors to a monitoring group all at once 13 If the projector name or IP address changes after registration 15 For...
... registration 9 Setting the range of addresses to do an automatic search and registration 10 Procedures for automatic search 10 Procedures for registration 11 Registration by specifying an IP address (Manual registration 12 Registering several projectors to a monitoring group all at once 13 If the projector name or IP address changes after registration 15 For...

Operation Guide - EMP Monitor v4.22
Page 8
... would like to do an automatic search and registration" p.10 2 The main window will be displayed. s"Registering projectors using the automatic search will vary depending on where the projectors are in that point onwards. Starting EMP Monitor PROCEDURE 1 Click [Start] - [Programs] (or [All Programs]) - [EPSON Projector] - [EMP Monitor V4.22] in multiple segments of the...
... would like to do an automatic search and registration" p.10 2 The main window will be displayed. s"Registering projectors using the automatic search will vary depending on where the projectors are in that point onwards. Starting EMP Monitor PROCEDURE 1 Click [Start] - [Programs] (or [All Programs]) - [EPSON Projector] - [EMP Monitor V4.22] in multiple segments of the...

Operation Guide - EMP Monitor v4.22
Page 11
sp.17 10 2 Select the "Specify an address range and search" check box and then enter the starting address and ending address in "Grouping view" and select "New" - .... Automatic searching will be displayed. • If "Detail list view" is displayed, select "New" - The icon(s) of the window or click [Cancel]. Registering and deleting projectors for monitoring 5 To end the registration operation, click the in "Grouping view" or "Detail list view". Refer to do an automatic search and registration TIP...
sp.17 10 2 Select the "Specify an address range and search" check box and then enter the starting address and ending address in "Grouping view" and select "New" - .... Automatic searching will be displayed. • If "Detail list view" is displayed, select "New" - The icon(s) of the window or click [Cancel]. Registering and deleting projectors for monitoring 5 To end the registration operation, click the in "Grouping view" or "Detail list view". Refer to do an automatic search and registration TIP...
User Replaceable Parts List
Page 1
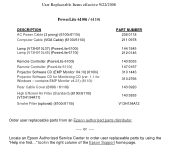
......" tool in the right column of the Epson Support home page. User Replaceable Items effective 9/22/2008 PowerLite 6100i / 6110i DESCRIPTION AC Power Cable (3 prong) (6100i/6110i) Computer Cable (VGA Cable) (6100i/6110i) Lamp (V13H010L37) (PowerLite 6100i) Lamp (V13H010L45) (PowerLite 6110i) Remote Controller (PowerLite 6100i) Remote Controller (PowrLite 6110i) Projector Software CD (EMP Monitor V4.10) (6100i) Projector Software CD for Monitoring CD (ver...
......" tool in the right column of the Epson Support home page. User Replaceable Items effective 9/22/2008 PowerLite 6100i / 6110i DESCRIPTION AC Power Cable (3 prong) (6100i/6110i) Computer Cable (VGA Cable) (6100i/6110i) Lamp (V13H010L37) (PowerLite 6100i) Lamp (V13H010L45) (PowerLite 6110i) Remote Controller (PowerLite 6100i) Remote Controller (PowrLite 6110i) Projector Software CD (EMP Monitor V4.10) (6100i) Projector Software CD for Monitoring CD (ver...

Installation Guide - ELPMBUNI Universal Mount Assembly
Page 4
... Screws (Qty 4) Portable Drill Pencil Level (Supplied) Stud Finder (Commercially Available) M5 Allen Wrench NOTE: Mounting screws will vary by projector. If there are missing and/or damaged before beginning installation. ELPMBUNI Parts List NOTE: This mount is not required for model specific hardware: ...Pages 10, 11, 12, and 13. Installation Manual Page - 5 - Lag Screws (#14 x 2") (Qty 3) M4 x 12 Security Head Screws (Qty 4) M3 x 16mm...
... Screws (Qty 4) Portable Drill Pencil Level (Supplied) Stud Finder (Commercially Available) M5 Allen Wrench NOTE: Mounting screws will vary by projector. If there are missing and/or damaged before beginning installation. ELPMBUNI Parts List NOTE: This mount is not required for model specific hardware: ...Pages 10, 11, 12, and 13. Installation Manual Page - 5 - Lag Screws (#14 x 2") (Qty 3) M4 x 12 Security Head Screws (Qty 4) M3 x 16mm...

Installation Guide - ELPMBUNI Universal Mount Assembly
Page 9
PowerLite 830p, 835p Hardware: M4 x 12mm (Qty 4) Installation Manual This mount works with all sub-25 pound projectors. ELPMBUNI NOTE: If your projector model is not shown, when arranging the leg combination, simply ensure access to filters and lamp housings when aligning brackets. PowerLite S3, S4, 62C, 76C, 82C, Hardware: M4 x 12mm (Qty 3) Page - 10 -
PowerLite 830p, 835p Hardware: M4 x 12mm (Qty 4) Installation Manual This mount works with all sub-25 pound projectors. ELPMBUNI NOTE: If your projector model is not shown, when arranging the leg combination, simply ensure access to filters and lamp housings when aligning brackets. PowerLite S3, S4, 62C, 76C, 82C, Hardware: M4 x 12mm (Qty 3) Page - 10 -
Installation Guide - ELPMBUNI Universal Mount Assembly
Page 15
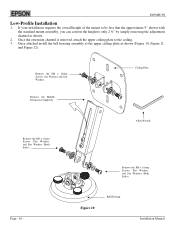
...of the mount to be less that the approximate 9" shown with the standard mount assembly, you can convert the height to the ceiling. 3. Figure 10 Bell Housing Installation Manual Remove the M8 x 16mm Screws, flat Washers and Star Washers Remove the Middle Extension Completely Ceiling Plate Remove the M8 x 16mm... 1. Once the extension channel is removed, attach the upper ceiling plate to only 2 ½" by simply removing the adjustment channel as shown (Figure 10, Figure 11, and Figure 12). Once attached install the bell housing assembly to the upper ceiling plate as shown. 2.
...of the mount to be less that the approximate 9" shown with the standard mount assembly, you can convert the height to the ceiling. 3. Figure 10 Bell Housing Installation Manual Remove the M8 x 16mm Screws, flat Washers and Star Washers Remove the Middle Extension Completely Ceiling Plate Remove the M8 x 16mm... 1. Once the extension channel is removed, attach the upper ceiling plate to only 2 ½" by simply removing the adjustment channel as shown (Figure 10, Figure 11, and Figure 12). Once attached install the bell housing assembly to the upper ceiling plate as shown. 2.
Product Brochure
Page 2
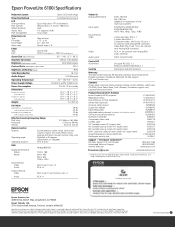
...password protection sticker Product/Accessory Part Numbers Epson PowerLite 6100i projector Replacement lamp High efficiency air filter (standard...Epson PowerLite 6100i Specifications Projection System Epson 3LCD technology Projection Method Front/rear/ceiling mount LCD Driving method Pixel number Native resolution Aspect ratio Pixel arrangement Epson Poly-silicon TFT Active Matrix 786,432 dots x 3 (1024 x 768) LCDs XGA...; - 40ºC) Power Supply Voltage 100-240 V ±10%, 50/60 Hz AC Power Consumption 330 W, 10 W standby Dimensions Excludes lens and feet (with cable cover) Includes...
...password protection sticker Product/Accessory Part Numbers Epson PowerLite 6100i projector Replacement lamp High efficiency air filter (standard...Epson PowerLite 6100i Specifications Projection System Epson 3LCD technology Projection Method Front/rear/ceiling mount LCD Driving method Pixel number Native resolution Aspect ratio Pixel arrangement Epson Poly-silicon TFT Active Matrix 786,432 dots x 3 (1024 x 768) LCDs XGA...; - 40ºC) Power Supply Voltage 100-240 V ±10%, 50/60 Hz AC Power Consumption 330 W, 10 W standby Dimensions Excludes lens and feet (with cable cover) Includes...

User's Guide
Page 3
CContents Welcome 7 Getting the Most from Your Projector 8 Using Your Documentation 9 Getting More Information 9 Registration and Warranty 10 Unpacking the Projector 11 Additional Components 11 Optional Accessories 12 1 Setting Up the Projector 13 Positioning the Projector 14 Connecting to Video Equipment 16 Connecting a Composite Video Source 17 Connecting an S-Video ... to a Computer 22 Connecting to the Computer Port 23 Connecting an External Monitor 24 Playing Sound Through the Projector 25 Connecting Audio Equipment to the Projector 25 Connecting External Speakers 26 3
CContents Welcome 7 Getting the Most from Your Projector 8 Using Your Documentation 9 Getting More Information 9 Registration and Warranty 10 Unpacking the Projector 11 Additional Components 11 Optional Accessories 12 1 Setting Up the Projector 13 Positioning the Projector 14 Connecting to Video Equipment 16 Connecting a Composite Video Source 17 Connecting an S-Video ... to a Computer 22 Connecting to the Computer Port 23 Connecting an External Monitor 24 Playing Sound Through the Projector 25 Connecting Audio Equipment to the Projector 25 Connecting External Speakers 26 3

User's Guide
Page 10
...special updates on new accessories, products, and service. 10 Welcome See the Extra Care Road Service brochure for customers who register their projector, Epson offers free Extra CareSM Road Service. Or you can register online at: http://www.epson.com/webreg Registering also lets you a replacement unit ...the registration card that let you won't have to wait for your unit to Epson. For details, see page 125 and the warranty brochure included with your projector. Registration and Warranty Your projector comes with a basic carry-in warranty as well as an international warranty that ...
...special updates on new accessories, products, and service. 10 Welcome See the Extra Care Road Service brochure for customers who register their projector, Epson offers free Extra CareSM Road Service. Or you can register online at: http://www.epson.com/webreg Registering also lets you a replacement unit ...the registration card that let you won't have to wait for your unit to Epson. For details, see page 125 and the warranty brochure included with your projector. Registration and Warranty Your projector comes with a basic carry-in warranty as well as an international warranty that ...

User's Guide
Page 14
... Also keep these considerations in the front of a grounded electrical outlet or extension cord. 14 Setting Up the Projector Do not set the projector on a sturdy, level surface. ■ Make sure there is within 10 feet of the room, face the audience, and remain close enough to the equipment to be able to... get a good-size image. Try to leave as much space as shown on page 15.low This lets you stand in mind: ■ Place the projector on top of...
... Also keep these considerations in the front of a grounded electrical outlet or extension cord. 14 Setting Up the Projector Do not set the projector on a sturdy, level surface. ■ Make sure there is within 10 feet of the room, face the audience, and remain close enough to the equipment to be able to... get a good-size image. Try to leave as much space as shown on page 15.low This lets you stand in mind: ■ Place the projector on top of...

User's Guide
Page 63
... menu to view information about 3000 in red, make sure you 've used the lamp for at least 10 hours. note The lamp usage timer doesn't register until you have been used . Configuring the Projector 63 Press the Menu button on the remote control, highlight Info, then press the Enter button to...
... menu to view information about 3000 in red, make sure you 've used the lamp for at least 10 hours. note The lamp usage timer doesn't register until you have been used . Configuring the Projector 63 Press the Menu button on the remote control, highlight Info, then press the Enter button to...

User's Guide
Page 64
... Features To prevent unauthorized use of time if you want to someone ■ Disable the projector's buttons; this can do the following: ■ Create an identifying user logo that is displayed at least 10 hours. ■ Air Filter Displays type of air filter and the number of hours it has been ...filter for at startup and/or when the A/V Mute button is pressed ■ Assign a password that's required to be disabled for a set period of the projector, you can be entered every time the projector is useful, for example, if you're projecting in a classroom and you want to loan the...
... Features To prevent unauthorized use of time if you want to someone ■ Disable the projector's buttons; this can do the following: ■ Create an identifying user logo that is displayed at least 10 hours. ■ Air Filter Displays type of air filter and the number of hours it has been ...filter for at startup and/or when the A/V Mute button is pressed ■ Assign a password that's required to be disabled for a set period of the projector, you can be entered every time the projector is useful, for example, if you're projecting in a classroom and you want to loan the...

User's Guide
Page 68
...for a password when entering the Password Protect menu. Press and hold down the Freeze button on page 71. After you forget it. 68 Configuring the Projector 8. Select Password and press Enter. 3. Enter the password again. 5. Setting a Password Follow the steps below to enter a 4-digit password. message... menu: 2. Press and hold down the Num key on the remote control while you see "Starting the Projector with a Password" on the remote control until you 're prompted for the projector. 1. Make a note of the password and keep it in a safe place in case you enter the...
...for a password when entering the Password Protect menu. Press and hold down the Freeze button on page 71. After you forget it. 68 Configuring the Projector 8. Select Password and press Enter. 3. Enter the password again. 5. Setting a Password Follow the steps below to enter a 4-digit password. message... menu: 2. Press and hold down the Num key on the remote control while you see "Starting the Projector with a Password" on the remote control until you 're prompted for the projector. 1. Make a note of the password and keep it in a safe place in case you enter the...

User's Guide
Page 92
...see the confirmation message, select Yes, then press Enter. 4. Turn projector upside down on the two tabs to exit the menu system. 92 Maintaining the Projector Close the air filter cover. 7. When you 've used the filter for at least 10 hours. When you're finished, press Menu to release them. 4.... note If the air filter has been stained by tobacco smoke, it on. 2. Remove the air filter by pulling the center of the projector. 6....
...see the confirmation message, select Yes, then press Enter. 4. Turn projector upside down on the two tabs to exit the menu system. 92 Maintaining the Projector Close the air filter cover. 7. When you 've used the filter for at least 10 hours. When you're finished, press Menu to release them. 4.... note If the air filter has been stained by tobacco smoke, it on. 2. Remove the air filter by pulling the center of the projector. 6....
User's Guide
Page 95
...press Enter. 4. If you do not have the original packaging, use the original packaging material if possible. Maintaining the Projector 95 Transporting the Projector The projector contains many glass and precision parts. note The lamp usage timer shows 0H until you've used the lamp for any... button on a table). ■ When shipping the projector for example, to set it only a short distance (for repairs, use equivalent materials, placing plenty of cushioning around the case. note Epson shall not be liable for at least 10 hours. Resetting the Lamp Timer After you replace the ...
...press Enter. 4. If you do not have the original packaging, use the original packaging material if possible. Maintaining the Projector 95 Transporting the Projector The projector contains many glass and precision parts. note The lamp usage timer shows 0H until you've used the lamp for any... button on a table). ■ When shipping the projector for example, to set it only a short distance (for repairs, use equivalent materials, placing plenty of cushioning around the case. note Epson shall not be liable for at least 10 hours. Resetting the Lamp Timer After you replace the ...