User Manual
Page 3
Control Panel ...24 Projector Parts - Contents BrightLink 575Wi/585Wi/595Wi User's Guide 11 Introduction to Your Projector ...12 Projector Features...12 Product Box Contents...14 Additional Components ...15 Optional Equipment and Replacement Parts 16 ... USB Video and Audio 36 Connecting to a Computer for VGA Video 38 Connecting to a Computer for HDMI Video and Audio 38 Connecting to a Computer for Pen Use or USB Mouse Control 39 Connecting to Go for Sound 40 3 Base...23 Projector Parts - Side...20 Projector Parts - Interactive...
Control Panel ...24 Projector Parts - Contents BrightLink 575Wi/585Wi/595Wi User's Guide 11 Introduction to Your Projector ...12 Projector Features...12 Product Box Contents...14 Additional Components ...15 Optional Equipment and Replacement Parts 16 ... USB Video and Audio 36 Connecting to a Computer for VGA Video 38 Connecting to a Computer for HDMI Video and Audio 38 Connecting to a Computer for Pen Use or USB Mouse Control 39 Connecting to Go for Sound 40 3 Base...23 Projector Parts - Side...20 Projector Parts - Interactive...
User Manual
Page 4
... 49 Connecting to a Document Camera 49 Connecting Multiple Projectors of the Same Model 50 Installing Batteries in the Remote Control 52 Installing Batteries in the Pens ...53 Using the Projector on a Network ...55 Wired Network Projection...55 Connecting to a Wired Network ...56 Selecting Wired Network Settings 56 Wireless Network Projection ...59...
... 49 Connecting to a Document Camera 49 Connecting Multiple Projectors of the Same Model 50 Installing Batteries in the Remote Control 52 Installing Batteries in the Pens ...53 Using the Projector on a Network ...55 Wired Network Projection...55 Connecting to a Wired Network ...56 Selecting Wired Network Settings 56 Wireless Network Projection ...59...

User Manual
Page 6
... Image (Annotation Mode 118 Controlling Computer Features from a Projected Screen (PC Interactive Mode 119 PC Interactive Mode System Requirements 121 Using the Interactive Pens ...122 Using the Pens ...122 Pen Calibration ...125 Calibrating Automatically ...126 Calibrating Manually ...128 Using Finger Touch Interactivity ...131 Touch Unit Safety Instructions...132 Calibrating for Finger Touch Interactivity...
... Image (Annotation Mode 118 Controlling Computer Features from a Projected Screen (PC Interactive Mode 119 PC Interactive Mode System Requirements 121 Using the Interactive Pens ...122 Using the Pens ...122 Pen Calibration ...125 Calibrating Automatically ...126 Calibrating Manually ...128 Using Finger Touch Interactivity ...131 Touch Unit Safety Instructions...132 Calibrating for Finger Touch Interactivity...
User Manual
Page 7
... Setup Settings - Settings Menu 161 Projector Setup Settings - Adjusting the Pen Operation Area 141 Easy Interactive Tools ...143 Windows Pen Input and Ink Tools ...144 Enabling Windows Pen Input and Ink Tools 144 Using Windows Pen Input and Ink Tools 146 Using BrightLink Without a Computer 147 Using... PC Free Annotation ...147 Built-in Tools for Use Without a Computer 148 Using the Built-in Whiteboard Annotation Mode 150 Changing Pen Width and Color Using the Built-in Toolbar 151 Projector Control Toolbar ...151 Selecting Network Device Display from the Projector Control Toolbar ...
... Setup Settings - Settings Menu 161 Projector Setup Settings - Adjusting the Pen Operation Area 141 Easy Interactive Tools ...143 Windows Pen Input and Ink Tools ...144 Enabling Windows Pen Input and Ink Tools 144 Using Windows Pen Input and Ink Tools 146 Using BrightLink Without a Computer 147 Using... PC Free Annotation ...147 Built-in Tools for Use Without a Computer 148 Using the Built-in Whiteboard Annotation Mode 150 Changing Pen Width and Color Using the Built-in Toolbar 151 Projector Control Toolbar ...151 Selecting Network Device Display from the Projector Control Toolbar ...
User Manual
Page 8
Resetting the Lamp Timer...194 Replacing the Remote Control Batteries 195 Replacing the Interactive Pen Batteries 197 Replacing the Interactive Pen Tips 198 Transporting the Projector...199 Solving Problems ...200 Projection Problem Tips ...200 Projector Light Status ...200 Using the Projector Help ...Device Not Found" Message Appears 214 Solutions When "Error Occurred in the Easy Interactive Function" Message Appears 214 Solutions When the Interactive Pens Do Not Work 214 Solutions When Finger Touch Interactivity Does Not Work 215 Solutions When Manual Calibration Does Not Work 216 8
Resetting the Lamp Timer...194 Replacing the Remote Control Batteries 195 Replacing the Interactive Pen Batteries 197 Replacing the Interactive Pen Tips 198 Transporting the Projector...199 Solving Problems ...200 Projection Problem Tips ...200 Projector Light Status ...200 Using the Projector Help ...Device Not Found" Message Appears 214 Solutions When "Error Occurred in the Easy Interactive Function" Message Appears 214 Solutions When the Interactive Pens Do Not Work 214 Solutions When Finger Touch Interactivity Does Not Work 215 Solutions When Manual Calibration Does Not Work 216 8
User Manual
Page 9
...) Does Not Work 216 Solutions When the Interactive Pen Position Is Not Accurate 216 Solutions When the Interactive Pens Are Slow or Difficult to Use 217 Solutions When the Interactive Pens Cause Interference or Unwanted Effects 217 Solutions When Network...Received 217 Where to Get Help...218 Technical Specifications ...220 General Projector Specifications ...220 Projector Lamp Specifications...222 Interactive Pen Specifications ...222 Remote Control Specifications ...223 Touch Unit Specifications ...223 Projector Dimension Specifications 223 Projector Electrical Specifications ...223 ...
...) Does Not Work 216 Solutions When the Interactive Pen Position Is Not Accurate 216 Solutions When the Interactive Pens Are Slow or Difficult to Use 217 Solutions When the Interactive Pens Cause Interference or Unwanted Effects 217 Solutions When Network...Received 217 Where to Get Help...218 Technical Specifications ...220 General Projector Specifications ...220 Projector Lamp Specifications...222 Interactive Pen Specifications ...222 Remote Control Specifications ...223 Touch Unit Specifications ...223 Projector Dimension Specifications 223 Projector Electrical Specifications ...223 ...
User Manual
Page 12
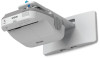
... Refer to these special features: Unique interactive functions • Annotation with or without a computer • Annotation with two pens at the same time • Enhanced Easy Interactive toolbar for Windows and Mac • BrightLink 595Wi: Touch-based interactivity for...light output measured in accordance with the optional table projection mount) for Additional Information Projector Part Locations Projector Features The BrightLink 575Wi/585Wi/595Wi projectors include these sections to 3300 lumens of color brightness (color light output) and 3300 lumens of white brightness (white...
... Refer to these special features: Unique interactive functions • Annotation with or without a computer • Annotation with two pens at the same time • Enhanced Easy Interactive toolbar for Windows and Mac • BrightLink 595Wi: Touch-based interactivity for...light output measured in accordance with the optional table projection mount) for Additional Information Projector Part Locations Projector Features The BrightLink 575Wi/585Wi/595Wi projectors include these sections to 3300 lumens of color brightness (color light output) and 3300 lumens of white brightness (white...

User Manual
Page 15
...the following additional components: • To receive a composite video signal, you need an S-Video cable compatible with 2 AA rechargeable batteries 6 Pen tray 7 USB cable 8 Power cord 9 VGA computer cable 10 Touch Unit connection cable (BrightLink 595Wi) 11 Password Protected sticker 12 Projector ... use the projector, you may need to -VGA video cable. 3 Remote control batteries (two AA alkaline) 4 Pens and batteries (one from Epson or an authorized Epson reseller. 15 See your local computer or electronics dealer for purchase information. • To receive a component video signal...
...the following additional components: • To receive a composite video signal, you need an S-Video cable compatible with 2 AA rechargeable batteries 6 Pen tray 7 USB cable 8 Power cord 9 VGA computer cable 10 Touch Unit connection cable (BrightLink 595Wi) 11 Password Protected sticker 12 Projector ... use the projector, you may need to -VGA video cable. 3 Remote control batteries (two AA alkaline) 4 Pens and batteries (one from Epson or an authorized Epson reseller. 15 See your local computer or electronics dealer for purchase information. • To receive a component video signal...

User Manual
Page 17
... part Table projection mount (ELPMB29) Epson DC-06 document camera (ELPDC06) Epson DC-11 document camera (ELPDC11) Epson DC-12 document camera (ELPDC12) Epson DC-20 document camera (ELPDC20) PowerLite Pilot 2 (ELPCB02) Active speakers (ELPSP02) Additional interactive pen A (ELPN04A) (orange) Additional interactive pen B (ELPN04B) (blue) Replacement set of 6 pen tips (ELPPS02) Interactive Pen Extension (ELPPE01) USB extension cable...
... part Table projection mount (ELPMB29) Epson DC-06 document camera (ELPDC06) Epson DC-11 document camera (ELPDC11) Epson DC-12 document camera (ELPDC12) Epson DC-20 document camera (ELPDC20) PowerLite Pilot 2 (ELPCB02) Active speakers (ELPSP02) Additional interactive pen A (ELPN04A) (orange) Additional interactive pen B (ELPN04B) (blue) Replacement set of 6 pen tips (ELPPS02) Interactive Pen Extension (ELPPE01) USB extension cable...
User Manual
Page 19
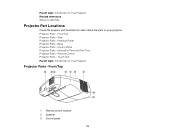
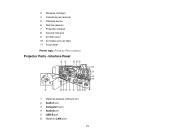
Base Projector Parts - Projector Parts - Touch Unit Parent topic: Introduction to learn about the parts on your projector. Interface Panel Projector Parts - Front/Top 1 Remote control receiver 2 Speaker 3 Control panel 19 Interactive Pens and Pen Tray Projector Parts - Remote Control Projector Parts - Control Panel Projector Parts - Front/Top Projector Parts - Side Projector Parts - Parent topic: Introduction to Your Projector Related references Where to Get Help Projector Part Locations Check the projector part illustrations to Your Projector Projector Parts -
Base Projector Parts - Projector Parts - Touch Unit Parent topic: Introduction to learn about the parts on your projector. Interface Panel Projector Parts - Front/Top 1 Remote control receiver 2 Speaker 3 Control panel 19 Interactive Pens and Pen Tray Projector Parts - Remote Control Projector Parts - Control Panel Projector Parts - Front/Top Projector Parts - Side Projector Parts - Parent topic: Introduction to Your Projector Related references Where to Get Help Projector Part Locations Check the projector part illustrations to Your Projector Projector Parts -
User Manual
Page 21
Interface Panel 1 Optional wireless LAN unit slot 2 Audio1 port 3 Computer1 port 4 Audio2 port 5 USB-B port 6 Network (LAN) port 21 3 Wireless LAN light 4 Interactive pen receiver 5 Obstacle sensor 6 Remote receiver 7 Projection window 8 Security lock port 9 Air filter cover 10 Air intake vent (air filter) 11 Focus lever Parent topic: Projector Part Locations Projector Parts -
Interface Panel 1 Optional wireless LAN unit slot 2 Audio1 port 3 Computer1 port 4 Audio2 port 5 USB-B port 6 Network (LAN) port 21 3 Wireless LAN light 4 Interactive pen receiver 5 Obstacle sensor 6 Remote receiver 7 Projection window 8 Security lock port 9 Air filter cover 10 Air intake vent (air filter) 11 Focus lever Parent topic: Projector Part Locations Projector Parts -
User Manual
Page 25
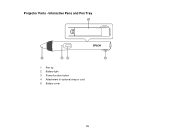
Projector Parts - Interactive Pens and Pen Tray 1 Pen tip 2 Battery light 3 Power/function button 4 Attachment for optional strap or cord 5 Battery cover 25
Projector Parts - Interactive Pens and Pen Tray 1 Pen tip 2 Battery light 3 Power/function button 4 Attachment for optional strap or cord 5 Battery cover 25
User Manual
Page 28
... up /down buttons (adjust speaker volume) 19 Pointer button (activates on-screen pointer) 20 Esc button (cancels/exits functions and controls wireless mouse functions) 21 Pen Mode button (cycles between PC Interactive and PC Free Annotation modes) 22 Color Mode button (selects display modes) 23 MHL Menu button (displays settings or...
... up /down buttons (adjust speaker volume) 19 Pointer button (activates on-screen pointer) 20 Esc button (cancels/exits functions and controls wireless mouse functions) 21 Pen Mode button (cycles between PC Interactive and PC Free Annotation modes) 22 Color Mode button (selects display modes) 23 MHL Menu button (displays settings or...
User Manual
Page 31
Projector Placement Removing and Attaching the Cable Cover Projector Connections Installing Batteries in the Remote Control Installing Batteries in the Pens Projector Placement Your ultra-short throw projector is required. Keep these sections to set up your projector in the following ways: Mounted on the wall ...
Projector Placement Removing and Attaching the Cable Cover Projector Connections Installing Batteries in the Remote Control Installing Batteries in the Pens Projector Placement Your ultra-short throw projector is required. Keep these sections to set up your projector in the following ways: Mounted on the wall ...
User Manual
Page 36
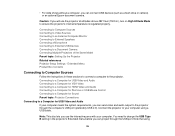
...Follow the instructions in the projector's Extended menu before you can connect USB devices (such as a flash drive or camera) or an optional Epson document camera. Note that using a USB cable. Caution: If you use the projector at altitudes above 4921 feet (1500 m), turn on ... without a computer, you can project through the computer's USB port (preferably USB 2.0). Note: This also lets you will use the interactive pens with your computer. Extended Menu Product Box Contents Connecting to a Document Camera Connecting Multiple Projectors of the Same Model Parent topic: Setting Up the...
...Follow the instructions in the projector's Extended menu before you can connect USB devices (such as a flash drive or camera) or an optional Epson document camera. Note that using a USB cable. Caution: If you use the projector at altitudes above 4921 feet (1500 m), turn on ... without a computer, you can project through the computer's USB port (preferably USB 2.0). Note: This also lets you will use the interactive pens with your computer. Extended Menu Product Box Contents Connecting to a Document Camera Connecting Multiple Projectors of the Same Model Parent topic: Setting Up the...
User Manual
Page 37
...recommended. 1. Select USB Display Installer and follow the on -screen instructions. Follow any available USB port on your computer. 2. USB Display will slow interactive pen function. Parent topic: Connecting to the computer. To use USB Display, do one of the following: • Windows 8.x: Click EPSON_PJ_UD in the upper... right-corner, then select Run EMP_UDSE.exe in the dialog box that appears to install the Epson USB Display software. • Windows 7/Windows Vista: Select Run EMP_UDSE.exe in the dialog box that appears to install the...
...recommended. 1. Select USB Display Installer and follow the on -screen instructions. Follow any available USB port on your computer. 2. USB Display will slow interactive pen function. Parent topic: Connecting to the computer. To use USB Display, do one of the following: • Windows 8.x: Click EPSON_PJ_UD in the upper... right-corner, then select Run EMP_UDSE.exe in the dialog box that appears to install the Epson USB Display software. • Windows 7/Windows Vista: Select Run EMP_UDSE.exe in the dialog box that appears to install the...
User Manual
Page 39
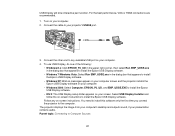
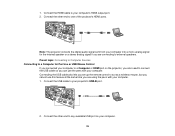
... lets you are connecting to any available USB port on the projector, you also need to connect the USB cable so you are using the pens with your computer. 39 Note: The projector converts the digital audio signal sent from your computer into a mono analog signal for... Pen Use or USB Mouse Control If you connected your computer to a Computer or HDMI port on your computer. Connect the other end to your computer. 1. ...
... lets you are connecting to any available USB port on the projector, you also need to connect the USB cable so you are using the pens with your computer. 39 Note: The projector converts the digital audio signal sent from your computer into a mono analog signal for... Pen Use or USB Mouse Control If you connected your computer to a Computer or HDMI port on your computer. Connect the other end to your computer. 1. ...
User Manual
Page 53
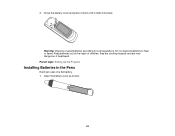
Keep batteries out of the reach of used batteries according to heat or flame. Parent topic: Setting Up the Projector Installing Batteries in the Pens Each pen uses one AA battery. 1. 3. they are choking hazards and are very dangerous if swallowed. Do not expose batteries to local regulations. Open the battery cover as shown. 53 Warning: Dispose of children; Close the battery cover and press it down until it clicks into place.
Keep batteries out of the reach of used batteries according to heat or flame. Parent topic: Setting Up the Projector Installing Batteries in the Pens Each pen uses one AA battery. 1. 3. they are choking hazards and are very dangerous if swallowed. Do not expose batteries to local regulations. Open the battery cover as shown. 53 Warning: Dispose of children; Close the battery cover and press it down until it clicks into place.
User Manual
Page 55
... up your computer for network projection. Use the following software and documentation to set up your projector for use the interactive pens with your projector. 55 See the EasyMP Multi PC Projection Operation Guide for instructions. • EasyMP Network Updater software (Windows... a Networked Projector Using a Web Browser Crestron RoomView Support Wired Network Projection You can download the latest software and documentation from the Epson web site. See the EasyMP Network Updater Operation Guide for instructions. • EasyMP Monitor software (Windows only) lets you connect...
... up your computer for network projection. Use the following software and documentation to set up your projector for use the interactive pens with your projector. 55 See the EasyMP Multi PC Projection Operation Guide for instructions. • EasyMP Network Updater software (Windows... a Networked Projector Using a Web Browser Crestron RoomView Support Wired Network Projection You can download the latest software and documentation from the Epson web site. See the EasyMP Network Updater Operation Guide for instructions. • EasyMP Monitor software (Windows only) lets you connect...

User Manual
Page 90
... (press it twice to double-click). • To right-click, press the Esc button. • To drag-and-drop, hold the button as the interactive pens. Using the Remote Control as a Wireless Mouse You can control projection at a distance from the computer. If you want to change the USB Type B setting...
... (press it twice to double-click). • To right-click, press the Esc button. • To drag-and-drop, hold the button as the interactive pens. Using the Remote Control as a Wireless Mouse You can control projection at a distance from the computer. If you want to change the USB Type B setting...