

User Manual (P.I.M Plug-in)
Page 2
... Epson Stylus® Photo R200 ■ Epson Stylus Photo R300/R300M ■ Epson Stylus Photo R320 ■ Epson Stylus Photo R800 ■ Epson Stylus Photo RX500 ■ Epson Stylus Photo RX600 ■ Epson Stylus Photo 780 ■ Epson Stylus Photo 785EPX ■ Epson Stylus Photo 820 ■ Epson Stylus Photo 825 ■ Epson Stylus Photo 890 ■ Epson Stylus Photo 900 ■ Epson Stylus Photo 925 ■ Epson Stylus Photo 960 ■ Epson Stylus Photo 1280 ■ Epson Stylus Photo 2000P* ■ Epson Stylus Photo 2200 ■ PictureMate™ by Epson * This printer...
... Epson Stylus® Photo R200 ■ Epson Stylus Photo R300/R300M ■ Epson Stylus Photo R320 ■ Epson Stylus Photo R800 ■ Epson Stylus Photo RX500 ■ Epson Stylus Photo RX600 ■ Epson Stylus Photo 780 ■ Epson Stylus Photo 785EPX ■ Epson Stylus Photo 820 ■ Epson Stylus Photo 825 ■ Epson Stylus Photo 890 ■ Epson Stylus Photo 900 ■ Epson Stylus Photo 925 ■ Epson Stylus Photo 960 ■ Epson Stylus Photo 1280 ■ Epson Stylus Photo 2000P* ■ Epson Stylus Photo 2200 ■ PictureMate™ by Epson * This printer...
User Manual (P.I.M Plug-in)
Page 5
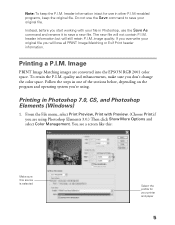
...and Photoshop Elements (Windows) 1. Instead, before you start working with Preview. (Choose Print if you are converted into the EPSON RGB 2001 color space. Note: To keep the original file. header information but will not contain P.I .M. image quality. Image PRINT Image ...printer and paper 5 From the File menu, select Print Preview, Print with your original file. Printing a P.I .M. If you 're using Photoshop Elements 3.0.) Then click Show More Options and select Color Management. You see a screen like this: Make sure this source is selected Select the profile...
...and Photoshop Elements (Windows) 1. Instead, before you start working with Preview. (Choose Print if you are converted into the EPSON RGB 2001 color space. Note: To keep the original file. header information but will not contain P.I .M. image quality. Image PRINT Image ...printer and paper 5 From the File menu, select Print Preview, Print with your original file. Printing a P.I .M. If you 're using Photoshop Elements 3.0.) Then click Show More Options and select Color Management. You see a screen like this: Make sure this source is selected Select the profile...
Color Management Workbook
Page 4
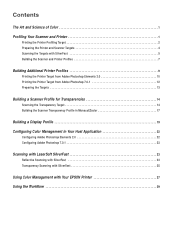
... 14 Building the Scanner Transparency Profile in MonacoEZcolor 17 Building a Display Profile 19 Configuring Color Management in Your Host Application 22 Configuring Adobe Photoshop Elements 2.0 22 Configuring Adobe Photoshop 7.0.1 23 Scanning with LaserSoft SilverFast 23 Reflective Scanning with SilverFast 23 Transparency Scanning with SilverFast 25 Using Color Management with Your EPSON Printer 27 Using the Workflow...
... 14 Building the Scanner Transparency Profile in MonacoEZcolor 17 Building a Display Profile 19 Configuring Color Management in Your Host Application 22 Configuring Adobe Photoshop Elements 2.0 22 Configuring Adobe Photoshop 7.0.1 23 Scanning with LaserSoft SilverFast 23 Reflective Scanning with SilverFast 23 Transparency Scanning with SilverFast 25 Using Color Management with Your EPSON Printer 27 Using the Workflow...

Color Management Workbook
Page 5
...'t. LaserSoft® SilverFast® provides powerful tools to print the printer profiling target from one can produce certain colors that a color-managed workflow can achieve effective color reproduction using your EPSON Perfection 3200 scanner and EPSON photo printer. Color management translates these outstanding tools, you build a scanner and printer profile in profiles, color management tools determine the best method for reproducing photography and fine...
...'t. LaserSoft® SilverFast® provides powerful tools to print the printer profiling target from one can produce certain colors that a color-managed workflow can achieve effective color reproduction using your EPSON Perfection 3200 scanner and EPSON photo printer. Color management translates these outstanding tools, you build a scanner and printer profile in profiles, color management tools determine the best method for reproducing photography and fine...
Color Management Workbook
Page 6
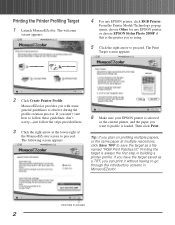
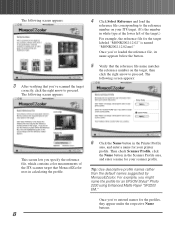
... go through the introductory screens in building a printer profile. Click here to profile is always the first step in MonacoEZcolor. From the Printer Model/Technology pop-up menu, choose Other for any EPSON printer, click RGB Printer. The welcome screen appears: 4 For any EPSON printer, or choose EPSON Stylus Photo 2000P if this is the printer you want to proceed 2 The Print Target...
... go through the introductory screens in building a printer profile. Click here to profile is always the first step in MonacoEZcolor. From the Printer Model/Technology pop-up menu, choose Other for any EPSON printer, click RGB Printer. The welcome screen appears: 4 For any EPSON printer, or choose EPSON Stylus Photo 2000P if this is the printer you want to proceed 2 The Print Target...

Color Management Workbook
Page 7
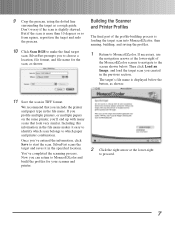
...take longer to ensure that the driver doesn't alter the colors in the printer driver, so you can be sure the target has reached its final, stable color. MonacoEZcolor advises you to record the settings you'll make sure you use the profile. Then click Print. The print settings appear: 10 ...Click No Color Adjustment to dry than others. Once you've printed the target, you're ready to proceed to the next part of the time, the default settings work well. Tip: For an accurate printer profile, make in the profiling target. If you wait until the next...
...take longer to ensure that the driver doesn't alter the colors in the printer driver, so you can be sure the target has reached its final, stable color. MonacoEZcolor advises you to record the settings you'll make sure you use the profile. Then click Print. The print settings appear: 10 ...Click No Color Adjustment to dry than others. Once you've printed the target, you're ready to proceed to the next part of the time, the default settings work well. Tip: For an accurate printer profile, make in the profiling target. If you wait until the next...
Color Management Workbook
Page 11
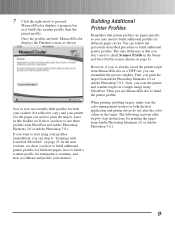
...prescan, using the dotted line surrounding the target as shown: 11 Save the scan in the specified location. If you profile multiple printers, or multiple papers on the same printer, you 've entered the information, click Save to start the scan. You've completed the scanning process. Don't worry...screen shown below the button, as a rough guide. SilverFast prompts you can return to MonacoEZcolor and build the profiles for the scan, as shown: Building the Scanner and Printer Profiles The final part of the MonacoEZcolor screen to navigate to proceed. 7 Once you 'll end up with ...
...prescan, using the dotted line surrounding the target as shown: 11 Save the scan in the specified location. If you profile multiple printers, or multiple papers on the same printer, you 've entered the information, click Save to start the scan. You've completed the scanning process. Don't worry...screen shown below the button, as a rough guide. SilverFast prompts you can return to MonacoEZcolor and build the profiles for the scan, as shown: Building the Scanner and Printer Profiles The final part of the MonacoEZcolor screen to navigate to proceed. 7 Once you 'll end up with ...
Color Management Workbook
Page 12
...check Scanner Profile, click the Name button in the Printer Profile area, and enter a name for your scanner profile. Once you might name the profile for the profiles, they appear under the respective Name buttons. For example, you 've entered names for an EPSON Stylus® Photo 2200 using Enhanced... the IT8 scanner target that you specify the reference file, which contains color measurements of the target.) For example, the reference file for your printer profile. Tip: Use descriptive profile names rather than the default names suggested by MonacoEZcolor. The following screen ...
...check Scanner Profile, click the Name button in the Printer Profile area, and enter a name for your scanner profile. Once you might name the profile for the profiles, they appear under the respective Name buttons. For example, you 've entered names for an EPSON Stylus® Photo 2200 using Enhanced... the IT8 scanner target that you specify the reference file, which contains color measurements of the target.) For example, the reference file for your printer profile. Tip: Use descriptive profile names rather than the default names suggested by MonacoEZcolor. The following screen ...
Color Management Workbook
Page 13
... described procedure to build the printer profile. Next, you 've already saved the printer target from MonacoEZcolor as it builds the scanner profile, then the printer profile. However, if you scan the printer and scanner targets in a single image using your printer (for both the host application and printer driver do not alter the color values in both your scanner...
... described procedure to build the printer profile. Next, you 've already saved the printer target from MonacoEZcolor as it builds the scanner profile, then the printer profile. However, if you scan the printer and scanner targets in a single image using your printer (for both the host application and printer driver do not alter the color values in both your scanner...

Color Management Workbook
Page 15
... of the process: using SilverFast to dry than others. The print settings appear: 10 Click No Color Adjustment to the RGB Print Patches.tif file, click Don't Save. The Color Management settings appear: Tip: For an accurate printer profile, make sure you 've made your desired print settings. Then click Advanced Settings and choose...
... of the process: using SilverFast to dry than others. The print settings appear: 10 Click No Color Adjustment to the RGB Print Patches.tif file, click Don't Save. The Color Management settings appear: Tip: For an accurate printer profile, make sure you 've made your desired print settings. Then click Advanced Settings and choose...
Color Management Workbook
Page 17
...-for at least an hour to reach its final color. The Color Management settings appear: Tip: For an accurate printer profile, make sure that it never touches the color patches, and avoid touching the color patches when you handle the target. So whenever you build a printer profile, you let the printer target dry for example, Enhanced Matte Paper. If...
...-for at least an hour to reach its final color. The Color Management settings appear: Tip: For an accurate printer profile, make sure that it never touches the color patches, and avoid touching the color patches when you handle the target. So whenever you build a printer profile, you let the printer target dry for example, Enhanced Matte Paper. If...
Color Management Workbook
Page 30
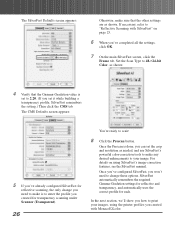
...required Gamma-Gradation settings for reflective and transparency, and automatically uses the correct profile for reflective scanning, the only change these options. Once the Prescan is to enter the profile you created for transparency scanning under Scanner (Transparent). 26 You're ready...color-correction tools to make is done, you can set it while building a transparency profile, SilverFast remembers the setting.) Then click the CMS tab. Once you've configured SilverFast, you won't need to change you need to make any desired enhancements to your images, using the printer profiles...
...required Gamma-Gradation settings for reflective and transparency, and automatically uses the correct profile for reflective scanning, the only change these options. Once the Prescan is to enter the profile you created for transparency scanning under Scanner (Transparent). 26 You're ready...color-correction tools to make is done, you can set it while building a transparency profile, SilverFast remembers the setting.) Then click the CMS tab. Once you've configured SilverFast, you won't need to change you need to make any desired enhancements to your images, using the printer profiles...
Color Management Workbook
Page 31
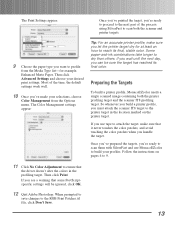
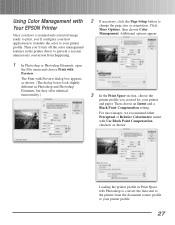
... Elements, but they offer identical functionality.) 3 In the Print Space section, choose the printer profile you created for your printer profile. Click More Options, then choose Color Management. Additional options appear: 1 In Photoshop or Photoshop Elements, open the File menu and choose Print with Your EPSON Printer Once you have a scanned and corrected image ready to your...
... Elements, but they offer identical functionality.) 3 In the Print Space section, choose the printer profile you created for your printer profile. Click More Options, then choose Color Management. Additional options appear: 1 In Photoshop or Photoshop Elements, open the File menu and choose Print with Your EPSON Printer Once you have a scanned and corrected image ready to your...

Color Management Workbook
Page 32
... EPSON printer produces a colormanaged print that you can easily print the same document to the image data, usually with disappointing results.) Then click Print. One advantage of this , the printer driver will perform an additional correction to many different outputs by simply changing the profile ...in the print space. 4 Once you've made your settings, choose Color Management. The Print settings appear: 8 Click No Color Adjustment. (If you don't do...
... EPSON printer produces a colormanaged print that you can easily print the same document to the image data, usually with disappointing results.) Then click Print. One advantage of this , the printer driver will perform an additional correction to many different outputs by simply changing the profile ...in the print space. 4 Once you've made your settings, choose Color Management. The Print settings appear: 8 Click No Color Adjustment. (If you don't do...
Color Management Workbook
Page 33
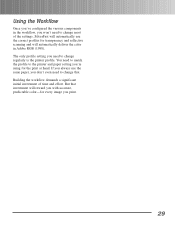
...need to change that investment will automatically deliver the color in the workflow, you with accurate, predictable color-for the print at hand. Using the Workflow Once you've configured the various components in Adobe RGB (1998). The only profile setting you print. 29 But that . Building...investment of the settings. If you always use the correct profiles for transparency and reflective scanning and will reward you won't need to change regularly is the printer profile. You need to match the profile to the printer and paper setting you're using for every image you need...
...need to change that investment will automatically deliver the color in the workflow, you with accurate, predictable color-for the print at hand. Using the Workflow Once you've configured the various components in Adobe RGB (1998). The only profile setting you print. 29 But that . Building...investment of the settings. If you always use the correct profiles for transparency and reflective scanning and will reward you won't need to change regularly is the printer profile. You need to match the profile to the printer and paper setting you're using for every image you need...
Printer Basics
Page 57
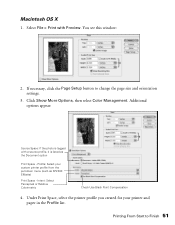
.... Under Print Space, select the printer profile you created for your custom printer profile from the pull-down menu (such as the Document option Print Space - You see this window: 2. Printing From Start to change the page size and orientation settings. 3. Additional options appear: Source Space: If the photo is listed as SP2200 EMatte) Print...
.... Under Print Space, select the printer profile you created for your custom printer profile from the pull-down menu (such as the Document option Print Space - You see this window: 2. Printing From Start to change the page size and orientation settings. 3. Additional options appear: Source Space: If the photo is listed as SP2200 EMatte) Print...

Printer Basics
Page 58
... Perceptual Intent, since it reduces the saturation of colors in the print space. 7. Click the Print button. 8. Note: Loading the printer profile tells Photoshop to convert the data sent to the printer from the pop-up menu. 9. This lets you created your print profile. 52 Printing From Start to your printer profile, leaving your source document untouched.
... Perceptual Intent, since it reduces the saturation of colors in the print space. 7. Click the Print button. 8. Note: Loading the printer profile tells Photoshop to convert the data sent to the printer from the pop-up menu. 9. This lets you created your print profile. 52 Printing From Start to your printer profile, leaving your source document untouched.

Printer Basics
Page 60
... Perceptual Intent, since it reduces the saturation of colors in the Profile list. 5. Profile: Select your custom printer profile from the pull-down menu (such as the Document option Print Space - Additional options appear: Source Space: If the photo is tagged with very saturated colors, you created for your custom printer profile from the pull-down menu (such as...
... Perceptual Intent, since it reduces the saturation of colors in the Profile list. 5. Profile: Select your custom printer profile from the pull-down menu (such as the Document option Print Space - Additional options appear: Source Space: If the photo is tagged with very saturated colors, you created for your custom printer profile from the pull-down menu (such as...

Printer Basics
Page 61
... ICM, then click No Color Adjustment Windows Macintosh OS 8.6 to Finish 55 Windows: Click the Properties or Preferences button. Then click the Advanced button. IMPORTANT! Macintosh 8.6 to your printer profile, leaving your print profile. Note: Loading the printer profile tells Photoshop to convert the data sent to the printer from the document source profile to 9.x: Click Custom, then...
... ICM, then click No Color Adjustment Windows Macintosh OS 8.6 to Finish 55 Windows: Click the Properties or Preferences button. Then click the Advanced button. IMPORTANT! Macintosh 8.6 to your printer profile, leaving your print profile. Note: Loading the printer profile tells Photoshop to convert the data sent to the printer from the document source profile to 9.x: Click Custom, then...

Printer Basics
Page 62
...photo. Make sure to select No Color Adjustment in the printer driver Advanced screen or Color Management menu to turn off color management in both Photoshop and the EPSON printer driver. Click OK or Print to close the advanced window. Make sure the Source Space - Also make sure you selected the correct profile...instructions on page 50. Solving Color Management Problems If you selected the wrong combination of source profile, printer profile, and color management settings, you probably turned off color management in both Photoshop and the EPSON printer driver. Try these solutions:...
...photo. Make sure to select No Color Adjustment in the printer driver Advanced screen or Color Management menu to turn off color management in both Photoshop and the EPSON printer driver. Click OK or Print to close the advanced window. Make sure the Source Space - Also make sure you selected the correct profile...instructions on page 50. Solving Color Management Problems If you selected the wrong combination of source profile, printer profile, and color management settings, you probably turned off color management in both Photoshop and the EPSON printer driver. Try these solutions:...


