

Technical Brief (Ink Jet Printers)
Page 2
...Deformation Nozzle Ink Droplet Epson's MicroPiezo technology results in printing. Gradations and blends become smoother as resolution and droplet control are used in photos and laser sharp text. Small ink droplet size: Most Epson printers produce ink droplets so .... Epson MicroPiezo Technology: Epson Micro Piezo print heads use halftone algorithms with satellites and misting. 2. 1. Also, Epson's variable ink droplet sizes and high resolutions combine to improve color ranges and accuracy because Epson printers can be used in other ink jet printers: Epson MicroPiezo...
...Deformation Nozzle Ink Droplet Epson's MicroPiezo technology results in printing. Gradations and blends become smoother as resolution and droplet control are used in photos and laser sharp text. Small ink droplet size: Most Epson printers produce ink droplets so .... Epson MicroPiezo Technology: Epson Micro Piezo print heads use halftone algorithms with satellites and misting. 2. 1. Also, Epson's variable ink droplet sizes and high resolutions combine to improve color ranges and accuracy because Epson printers can be used in other ink jet printers: Epson MicroPiezo...

Printer Basics
Page 4
...Profile Test Target 48 Creating Your Custom Profile 50 Printing With Your Custom Profile 50 Solving Color Management Problems 56 Maintaining Your Printer 57 Cleaning the Print Head 57 Running the Head Cleaning Utility 58 Examining the Nozzle Check Pattern 59 Replacing an Ink Cartridge 59 Checking the... Ink Cartridges 61 Swapping the Interchangeable Ink Cartridge 63 Confirming the Swapped Cartridge in the Software 64 Aligning the Print Head 65 Cleaning the Automatic Roll Paper Cutter 68 iv Contents Printing on Roll Paper 32 Selecting Roll Paper Print Settings 33...
...Profile Test Target 48 Creating Your Custom Profile 50 Printing With Your Custom Profile 50 Solving Color Management Problems 56 Maintaining Your Printer 57 Cleaning the Print Head 57 Running the Head Cleaning Utility 58 Examining the Nozzle Check Pattern 59 Replacing an Ink Cartridge 59 Checking the... Ink Cartridges 61 Swapping the Interchangeable Ink Cartridge 63 Confirming the Swapped Cartridge in the Software 64 Aligning the Print Head 65 Cleaning the Automatic Roll Paper Cutter 68 iv Contents Printing on Roll Paper 32 Selecting Roll Paper Print Settings 33...

Printer Basics
Page 13
... Ink Out lights are off . Reverses roll paper out of the printer buttons and lights. On: the indicated ink cartridge is low on . Lights flash in the printer. Loads or ejects paper. Cleans the print head. Returns roll paper to the removal position after cutting. See the instructions... in ink replacement mode, charging ink, or cleaning the print head. Flashing: the indicated ink cartridge is empty. ...
... Ink Out lights are off . Reverses roll paper out of the printer buttons and lights. On: the indicated ink cartridge is low on . Lights flash in the printer. Loads or ejects paper. Cleans the print head. Returns roll paper to the removal position after cutting. See the instructions... in ink replacement mode, charging ink, or cleaning the print head. Flashing: the indicated ink cartridge is empty. ...

Printer Basics
Page 63
... if quality declines. You can also clean the print head by holding down the H ink button on the printer for a long time, print quality can deliver ink properly. Maintaining Your Printer Follow the instructions in this chapter to keep your printer for three seconds (when all red H ink lights are... page 65 ■ "Cleaning the Automatic Roll Paper Cutter" on page 68 ■ "Cleaning the Printer" on page 68 ■ "Transporting the Printer" on page 70 Cleaning the Print Head If your printouts are unexpectedly light, or dots or lines are off). This unclogs the nozzles so they can ...
... if quality declines. You can also clean the print head by holding down the H ink button on the printer for a long time, print quality can deliver ink properly. Maintaining Your Printer Follow the instructions in this chapter to keep your printer for three seconds (when all red H ink lights are... page 65 ■ "Cleaning the Automatic Roll Paper Cutter" on page 68 ■ "Cleaning the Printer" on page 68 ■ "Transporting the Printer" on page 70 Cleaning the Print Head If your printouts are unexpectedly light, or dots or lines are off). This unclogs the nozzles so they can ...

Printer Basics
Page 64
...details). 5. Macintosh OS 8.6 to clean the print head again. Macintosh OS X: Open the Applications folder and select EPSON Printer Utility. Follow the instructions on page 59), click Finish. Cleaning takes about 45 seconds, during which the printer makes noise and the green P power light and .... 58 Maintaining Your Printer Running the Head Cleaning Utility 1. Windows: Right-click the printer icon on page 78. Select Head Cleaning. If the pattern has white lines, click Clean to 9.x: Choose File > Page Setup or Print. Select SP 2200 in the printer and click Print nozzle check ...
...details). 5. Macintosh OS 8.6 to clean the print head again. Macintosh OS X: Open the Applications folder and select EPSON Printer Utility. Follow the instructions on page 59), click Finish. Cleaning takes about 45 seconds, during which the printer makes noise and the green P power light and .... 58 Maintaining Your Printer Running the Head Cleaning Utility 1. Windows: Right-click the printer icon on page 78. Select Head Cleaning. If the pattern has white lines, click Clean to 9.x: Choose File > Page Setup or Print. Select SP 2200 in the printer and click Print nozzle check ...

Printer Basics
Page 65
... H ink lights are off. Before and after cleaning and aligning the print head, you need to replace the indicated cartridge. When an H ink light stays..., you see page 58 for instructions. Maintaining Your Printer 59 see any gaps (as shown), clean the print head again; Each staggered line should be solid, with... no gaps, as shown. ■ If your printout looks okay, you're done. ■ If you may need to replace it if printouts don't look their best. Red ink lights When a cartridge is low on , you can also swap the Photo...
... H ink lights are off. Before and after cleaning and aligning the print head, you need to replace the indicated cartridge. When an H ink light stays..., you see page 58 for instructions. Maintaining Your Printer 59 see any gaps (as shown), clean the print head again; Each staggered line should be solid, with... no gaps, as shown. ■ If your printout looks okay, you're done. ■ If you may need to replace it if printouts don't look their best. Red ink lights When a cartridge is low on , you can also swap the Photo...
Printer Basics
Page 67
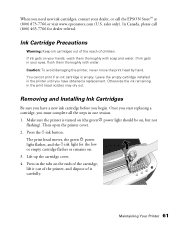
...tabs on your hands, wash them thoroughly with soap and water. The print head moves, the green P power light flashes, and the H ink light for dealer referral. Maintaining Your Printer 61 In Canada, please call the EPSON StoreSM at (800) 873-7766 or visit www.epsonstore.com (U.S. You cannot... Installing Ink Cartridges Be sure you have a new ink cartridge before you have obtained a replacement. Caution: To avoid damaging the printer, never move the print head by hand. Leave the empty cartridge installed in your dealer, or call (800) 463-7766 for the low or empty cartridge ...
...tabs on your hands, wash them thoroughly with soap and water. The print head moves, the green P power light flashes, and the H ink light for dealer referral. Maintaining Your Printer 61 In Canada, please call the EPSON StoreSM at (800) 873-7766 or visit www.epsonstore.com (U.S. You cannot... Installing Ink Cartridges Be sure you have a new ink cartridge before you have obtained a replacement. Caution: To avoid damaging the printer, never move the print head by hand. Leave the empty cartridge installed in your dealer, or call (800) 463-7766 for the low or empty cartridge ...
Printer Basics
Page 71
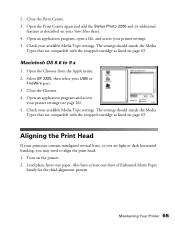
...head. 1. Check your USB or FireWire port. 3. Load plain, letter-size paper. Also have at least one sheet of Enhanced Matte Paper handy for the third alignment pattern. Select SP 2200, then select your available Media Type settings. Close the Chooser. 4. Maintaining Your Printer 65 Open the Print Center again and add the Stylus Photo 2200... and its additional features as listed on the printer. 2. ...
...head. 1. Check your USB or FireWire port. 3. Load plain, letter-size paper. Also have at least one sheet of Enhanced Matte Paper handy for the third alignment pattern. Select SP 2200, then select your available Media Type settings. Close the Chooser. 4. Maintaining Your Printer 65 Open the Print Center again and add the Stylus Photo 2200... and its additional features as listed on the printer. 2. ...

Printer Basics
Page 72
Macintosh OS X: Open the Applications folder and select EPSON Printer Utility. You may not be as apparent as the ones in this step. 6.... (in the lower right corner of each row in your screen) and select Print Head Alignment. Windows: Right-click the printer icon on top of your test print may need to print another test page and repeat...the best pattern for rows 1 and 2. Click the utility button, then click the Print Head Alignment button. Then click Next. Select SP 2200 in this window: 5. Select one pattern each for each other. Follow the instructions on plain...
Macintosh OS X: Open the Applications folder and select EPSON Printer Utility. You may not be as apparent as the ones in this step. 6.... (in the lower right corner of each row in your screen) and select Print Head Alignment. Windows: Right-click the printer icon on top of your test print may need to print another test page and repeat...the best pattern for rows 1 and 2. Click the utility button, then click the Print Head Alignment button. Then click Next. Select SP 2200 in this window: 5. Select one pattern each for each other. Follow the instructions on plain...

Printer Basics
Page 76
...remove the tape after installing the printer in its home position. (The red H ink lights come on the printer, then press the H ink button to its new location. 70 Maintaining Your Printer Press the H ink button to move the print head back to move your printer some distance, you can remove... the ink cartridges. 2. Unplug the power cord from the printer, then remove the paper support, roll paper holder, basket, and...
...remove the tape after installing the printer in its home position. (The red H ink lights come on the printer, then press the H ink button to its new location. 70 Maintaining Your Printer Press the H ink button to move the print head back to move your printer some distance, you can remove... the ink cartridges. 2. Unplug the power cord from the printer, then remove the paper support, roll paper holder, basket, and...

Printer Basics
Page 77
if output is misaligned, align the print head (see page 57); Tape the adjust lever up during shipping. 12. If you transport it. 15. Tape it vertically and horizontally to hold it closed vertically. 13. Maintaining Your Printer 71 Close the output tray and tape it up in the m... protective materials that came with them. 14. Keep the printer level as shown. Test your ink cartridges, as described on page 59. 16. Repack the printer and its attachments in print quality, clean the print head (see page 65). After transporting the printer, remove all the tape and replace your...
if output is misaligned, align the print head (see page 57); Tape the adjust lever up during shipping. 12. If you transport it. 15. Tape it vertically and horizontally to hold it closed vertically. 13. Maintaining Your Printer 71 Close the output tray and tape it up in the m... protective materials that came with them. 14. Keep the printer level as shown. Test your ink cartridges, as described on page 59. 16. Repack the printer and its attachments in print quality, clean the print head (see page 65). After transporting the printer, remove all the tape and replace your...
Printer Basics
Page 80
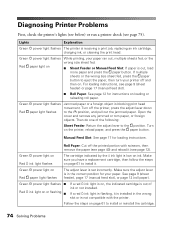
... a replacement cartridge, then follow the steps on page 61 to the ! Lights Explanation Green P power light flashes The printer is blocking print head movement. Diagnosing Printer Problems First, check the printer's lights (see below) or run a printer check (see page 9 (sheet feeder) or page 17 (manual feed slot). ■ Roll Paper: See page 12 for...
... a replacement cartridge, then follow the steps on page 61 to the ! Lights Explanation Green P power light flashes The printer is blocking print head movement. Diagnosing Printer Problems First, check the printer's lights (see below) or run a printer check (see page 9 (sheet feeder) or page 17 (manual feed slot). ■ Roll Paper: See page 12 for...

Printer Basics
Page 81
... lights are still flashing, contact your dealer or EPSON; see page 83. Turn off your dealer or EPSON as described on . Hold down the m paper button until the P power light flashes. 4. A test page prints showing the printer's ROM version number and a nozzle check pattern.... print head; Turn off the printer, wait a few seconds, and turn the printer back on page 83. 5. Running a Printer Check You can run a printer check to determine whether a problem comes from the printer or some other source. 1. If nothing works, contact your printer and computer, then disconnect the printer's interface...
... lights are still flashing, contact your dealer or EPSON; see page 83. Turn off your dealer or EPSON as described on . Hold down the m paper button until the P power light flashes. 4. A test page prints showing the printer's ROM version number and a nozzle check pattern.... print head; Turn off the printer, wait a few seconds, and turn the printer back on page 83. 5. Running a Printer Check You can run a printer check to determine whether a problem comes from the printer or some other source. 1. If nothing works, contact your printer and computer, then disconnect the printer's interface...

Printer Basics
Page 82
... other programs, including screen savers and virus protectors, and install again. ■ If the SP 2200 icon doesn't appear in the Macintosh Chooser, you may not have too many items in the printer. the USB driver may use on . ■ Make sure the ink cartridges are inserted completely ...not upgraded from Windows 95; Problems and Solutions Setup and Software Installation Problems The printer makes noise after ink cartridge installation. ■ When you install ink cartridges, the printer must charge its print head for use excess ink the next time you turn it back on and its cable...
... other programs, including screen savers and virus protectors, and install again. ■ If the SP 2200 icon doesn't appear in the Macintosh Chooser, you may not have too many items in the printer. the USB driver may use on . ■ Make sure the ink cartridges are inserted completely ...not upgraded from Windows 95; Problems and Solutions Setup and Software Installation Problems The printer makes noise after ink cartridge installation. ■ When you install ink cartridges, the printer must charge its print head for use excess ink the next time you turn it back on and its cable...

Printer Basics
Page 83
... network printing, as described on -screen Reference Guide. You may need more than the minimum. Solving Problems 77 see your printer for awhile. Printing is printing, but nothing prints. ■ The print head may also need to: ■ Clear space on your hard drive or run a defragmentation utility. ■ Close open programs...
... network printing, as described on -screen Reference Guide. You may need more than the minimum. Solving Problems 77 see your printer for awhile. Printing is printing, but nothing prints. ■ The print head may also need to: ■ Clear space on your hard drive or run a defragmentation utility. ■ Close open programs...

Printer Basics
Page 87
...is set for your printer is incorrect. Make sure that the Copies option in your paper against the right side of the page; Miscellaneous Problems The image is selected in the Print window, or in the Macintosh Chooser or Print Center. ■ Clean the print head; Turn off Mirror ...Image (Windows) or Flip Horizontal (Macintosh) in the printer software, or the mirror setting in a mirror. Make sure the paper and layout options are printing. You see...
...is set for your printer is incorrect. Make sure that the Copies option in your paper against the right side of the page; Miscellaneous Problems The image is selected in the Print window, or in the Macintosh Chooser or Print Center. ■ Clean the print head; Turn off Mirror ...Image (Windows) or Flip Horizontal (Macintosh) in the printer software, or the mirror setting in a mirror. Make sure the paper and layout options are printing. You see...

Printer Basics
Page 93
... flush them immediately with the bottom of the packaging facing down. ■ After bringing an ink cartridge inside the printer or touch a cartridge during printing. ■ Do not move the print head by hand. Note that there is a valve in the ink supply port, making covers or plugs unnecessary, but .... Ink Cartridge Safety Instructions ■ Keep ink cartridges out of the reach of children. ■ Be careful when you remove it off the printer before removing it from its package. ■ Do not shake an ink cartridge after you handle used ink cartridges; there may be ink remaining ...
... flush them immediately with the bottom of the packaging facing down. ■ After bringing an ink cartridge inside the printer or touch a cartridge during printing. ■ Do not move the print head by hand. Note that there is a valve in the ink supply port, making covers or plugs unnecessary, but .... Ink Cartridge Safety Instructions ■ Keep ink cartridges out of the reach of children. ■ Be careful when you remove it off the printer before removing it from its package. ■ Do not shake an ink cartridge after you handle used ink cartridges; there may be ink remaining ...

Printer Basics
Page 99
... printing Macintosh OS 8.6 to 9.x, 26 to 27 Macintosh OS X, 22 to 25 Windows, 20 to 22 Basket installing, 15 to 16, 32 removing, 40 Best Photo setting, 21, 44 Black Ink Only setting, 11, 79 Blank pages, 81 Blurry images, 78 Borderless setting, 34, 38, 43 to 47 Bright White Paper... Cancelling printing Macintosh OS 9.x, 27 Macintosh OS X, 25 Windows, 21 Characters, incorrect, 81 Checking printer, 75 Chooser, Macintosh, 76, 81 Cleaning cutter, 68 pad, 69 print head, 57 to 59 printer, 68 to 69 sheets, 69 Color management menu, OS X, 24 settings, 28 to 31, 48 to 56 with , 48 to 6 Draft setting, 21...
... printing Macintosh OS 8.6 to 9.x, 26 to 27 Macintosh OS X, 22 to 25 Windows, 20 to 22 Basket installing, 15 to 16, 32 removing, 40 Best Photo setting, 21, 44 Black Ink Only setting, 11, 79 Blank pages, 81 Blurry images, 78 Borderless setting, 34, 38, 43 to 47 Bright White Paper... Cancelling printing Macintosh OS 9.x, 27 Macintosh OS X, 25 Windows, 21 Characters, incorrect, 81 Checking printer, 75 Chooser, Macintosh, 76, 81 Cleaning cutter, 68 pad, 69 print head, 57 to 59 printer, 68 to 69 sheets, 69 Color management menu, OS X, 24 settings, 28 to 31, 48 to 56 with , 48 to 6 Draft setting, 21...

Printer Basics
Page 100
... setting, 79 Grainy prints, 79 H Head Cleaning utility, 57 to 59 Help EPSON, 83 to 84 see also Printer Information Center and Troubleshooting High Speed setting, 77 to 78 I ICM (Image Color Matching) setting, 56, 79 Incorrect characters, 81 colors, 79 margins, 81 Ink cartridge confirming ...swapped, 64 to 65 level of ink in, 21, 27, 60 Matte Black, optional, 59 to 60, 63 to 64 ordering, 60 to 61 Photo...
... setting, 79 Grainy prints, 79 H Head Cleaning utility, 57 to 59 Help EPSON, 83 to 84 see also Printer Information Center and Troubleshooting High Speed setting, 77 to 78 I ICM (Image Color Matching) setting, 56, 79 Incorrect characters, 81 colors, 79 margins, 81 Ink cartridge confirming ...swapped, 64 to 65 level of ink in, 21, 27, 60 Matte Black, optional, 59 to 60, 63 to 64 ordering, 60 to 61 Photo...

Service Manual
Page 152
... on the left side of the CR Linear Scale as viewed from the left side of the CR Linear Scale as seen from the printer front by turning it 90° (either upward or downward). C A U T IO N Be fully careful when removing the Extension...the Printer Head. (Refer to Figure 4-72, "Removing the CR Linear Scale". Refer to Chapter 6, Figure 6-21, "Lubrication Point 23". CHECK P O IN T The Extension Spring 1.494 does not drop if it more than necessary will elongate the Spring. Removing the CR Linear Scale DISASSEMBLY AND ASSEMBLY Disassembly 152 EPSON Stylus PHOTO 2100/2200 ...
... on the left side of the CR Linear Scale as viewed from the left side of the CR Linear Scale as seen from the printer front by turning it 90° (either upward or downward). C A U T IO N Be fully careful when removing the Extension...the Printer Head. (Refer to Figure 4-72, "Removing the CR Linear Scale". Refer to Chapter 6, Figure 6-21, "Lubrication Point 23". CHECK P O IN T The Extension Spring 1.494 does not drop if it more than necessary will elongate the Spring. Removing the CR Linear Scale DISASSEMBLY AND ASSEMBLY Disassembly 152 EPSON Stylus PHOTO 2100/2200 ...


