
User Manual (P.I.M Plug-in)
Page 3
... 1.0, 2.0, or 3.0. II quality. Open the Edit menu or Photoshop menu (Mac OS X) and select Color Settings. Instead, use filters, and even make selective color adjustments to save a new file. Note: If you want to import a P.I .M. image. If you '...color space called EPSON RGB 2001. Your screens will not be recognized as Auto Levels, Auto Contrast, Auto Color, etc.). image. II enhancements if you need to change your image (such as a P.I .M.-enabled software program, it will look different if you're using Photoshop Elements, you apply global color adjustments...
... 1.0, 2.0, or 3.0. II quality. Open the Edit menu or Photoshop menu (Mac OS X) and select Color Settings. Instead, use filters, and even make selective color adjustments to save a new file. Note: If you want to import a P.I .M. image. If you '...color space called EPSON RGB 2001. Your screens will not be recognized as Auto Levels, Auto Contrast, Auto Color, etc.). image. II enhancements if you need to change your image (such as a P.I .M.-enabled software program, it will look different if you're using Photoshop Elements, you apply global color adjustments...

Service Manual
Page 14
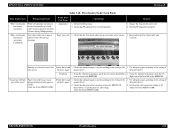
... digits for input from adjustment program) - 5 digits 1.27mm +/− 0.1mm 1.2mm +/− 0.1mm Main shaft/sub shaft adjustment jig necessary - Yes (within 0.1mm of standard) G-26 33900 points PRODUCTION DESCRIPTION Basic Specifications 14 EPSON Stylus PHOTO 2100/2200 Revision B Adjustment Item Market initial setting information Head ID input Head inclination adjustment Head height adjustment Bi-D adjustment USB ID input IEEE1394 ID...
... digits for input from adjustment program) - 5 digits 1.27mm +/− 0.1mm 1.2mm +/− 0.1mm Main shaft/sub shaft adjustment jig necessary - Yes (within 0.1mm of standard) G-26 33900 points PRODUCTION DESCRIPTION Basic Specifications 14 EPSON Stylus PHOTO 2100/2200 Revision B Adjustment Item Market initial setting information Head ID input Head inclination adjustment Head height adjustment Bi-D adjustment USB ID input IEEE1394 ID...

Service Manual
Page 81
... Stylus PHOTO 2100/2200. 2. Check that the connected printer is...Printer driver Main board 1. EPSON Stylus PHOTO 2100/2200 Revision B Table 3-3. TROUBLESHOOTING Troubleshooting 81 driver. 2. Remedy 1. Connect the Stylus PHOTO 2100/2200 printer. 1. "Phenomenon-Based Communication Error Check Points" Occurrence Timing Phenomenon Detail At operation Operation at D4 to the printer. Using the adjustment program, enter the correct model name (save 02 into E0). Install the Stylus PHOTO 2100/2200 printer installed. Check that the Stylus PHOTO 2100/2200 printer...
... Stylus PHOTO 2100/2200. 2. Check that the connected printer is...Printer driver Main board 1. EPSON Stylus PHOTO 2100/2200 Revision B Table 3-3. TROUBLESHOOTING Troubleshooting 81 driver. 2. Remedy 1. Connect the Stylus PHOTO 2100/2200 printer. 1. "Phenomenon-Based Communication Error Check Points" Occurrence Timing Phenomenon Detail At operation Operation at D4 to the printer. Using the adjustment program, enter the correct model name (save 02 into E0). Install the Stylus PHOTO 2100/2200 printer installed. Check that the Stylus PHOTO 2100/2200 printer...

Service Manual
Page 95
EPSON Stylus PHOTO 2100/2200 Revision B Table 3-16. Phenomenon-Based Maintenance Request Check Points Occurrence Timing Phenomenon Detail Faulty Part/Part Name Check Point Remedy At power-on At power-on, the printer does not operate at all. Waste ink pads 1. Change the Waste ink pads and perform panel operation to 1.3.6 "Special Setting Mode Function". Refer to reset the Protection counter A value (20, 21). TROUBLESHOOTING Troubleshooting 95 Using the adjustment program, check that the Protection counter A value is 60352 points or more. 1.
EPSON Stylus PHOTO 2100/2200 Revision B Table 3-16. Phenomenon-Based Maintenance Request Check Points Occurrence Timing Phenomenon Detail Faulty Part/Part Name Check Point Remedy At power-on At power-on, the printer does not operate at all. Waste ink pads 1. Change the Waste ink pads and perform panel operation to 1.3.6 "Special Setting Mode Function". Refer to reset the Protection counter A value (20, 21). TROUBLESHOOTING Troubleshooting 95 Using the adjustment program, check that the Protection counter A value is 60352 points or more. 1.
Service Manual
Page 108
...the adjustment program, check that adequate paper is used according to the setting of print paper or CD-R. (Only for Stylus PHOTO 2100) Printhead 1. Check that adequate paper is executed properly. Set the print color ...Stylus PHOTO 2100) TROUBLESHOOTING Troubleshooting 108 Check that PF adjustment is used according to ±0. (Only for Stylus PHOTO 2100) 1. Check that the Star wheel roller unit has not come off or rotates. 1. the printer driver. EPSON Stylus PHOTO 2100/2200 Revision B Table 3-18. Check that the print color correction setting for EPSON...
...the adjustment program, check that adequate paper is used according to the setting of print paper or CD-R. (Only for Stylus PHOTO 2100) Printhead 1. Check that adequate paper is executed properly. Set the print color ...Stylus PHOTO 2100) TROUBLESHOOTING Troubleshooting 108 Check that PF adjustment is used according to ±0. (Only for Stylus PHOTO 2100) 1. Check that the Star wheel roller unit has not come off or rotates. 1. the printer driver. EPSON Stylus PHOTO 2100/2200 Revision B Table 3-18. Check that the print color correction setting for EPSON...

Service Manual
Page 190
... the printers. Select/execute this function in the pattern is made to the specific EEPROM address on the Main board. Exclusive servicing program Exclusive servicing program Exclusive servicing program Exclusive servicing program Used Media Roll Paper Non-target Non-target Plain paper ADJUSTMENT Adjustment Items and Overview 190 The correction value is fitted. Main adjustment items EPSON Stylus PHOTO 2100/2200 Revision...
... the printers. Select/execute this function in the pattern is made to the specific EEPROM address on the Main board. Exclusive servicing program Exclusive servicing program Exclusive servicing program Exclusive servicing program Used Media Roll Paper Non-target Non-target Plain paper ADJUSTMENT Adjustment Items and Overview 190 The correction value is fitted. Main adjustment items EPSON Stylus PHOTO 2100/2200 Revision...

Service Manual
Page 197
... the same Error is used to perform each adjustment requested after specific parts have been repaired or replaced. ! CR motor drive torque dispersion measurement ! The adjustment program can be explained here. Servicing program usage outline ! USB ID input ! Bi-d adjustment ! IEEE 1394 ! EPSON Stylus PHOTO 2100/2200 Revision B 5.2 Adjustments The procedures of the adjustment items will be restored to normal by...
... the same Error is used to perform each adjustment requested after specific parts have been repaired or replaced. ! CR motor drive torque dispersion measurement ! The adjustment program can be explained here. Servicing program usage outline ! USB ID input ! Bi-d adjustment ! IEEE 1394 ! EPSON Stylus PHOTO 2100/2200 Revision B 5.2 Adjustments The procedures of the adjustment items will be restored to normal by...

Service Manual
Page 199
...being damaged at the time of the CR motor and PSB/PSE board are performed automatically. Enter the 25-digit code of the adjustment program. 2. Head ID Label Revision B 5.2.3 CR motor drive torque dispersion measurement When the Main board, CR motor or PSB/PSE...Following the screen prompts, turn on the necessary Replacement part check box and click the OK button. Adjustments 199 CR motor drive torque dispersion measurement Screen 2. EPSON Stylus PHOTO 2100/2200 5.2.2 Head ID Input Function This function is designed to correct ink discharge amount variations due to individual...
...being damaged at the time of the CR motor and PSB/PSE board are performed automatically. Enter the 25-digit code of the adjustment program. 2. Head ID Label Revision B 5.2.3 CR motor drive torque dispersion measurement When the Main board, CR motor or PSB/PSE...Following the screen prompts, turn on the necessary Replacement part check box and click the OK button. Adjustments 199 CR motor drive torque dispersion measurement Screen 2. EPSON Stylus PHOTO 2100/2200 5.2.2 Head ID Input Function This function is designed to correct ink discharge amount variations due to individual...

Service Manual
Page 201
... on the unstable table that occurs before contact of the Adjust parallel bushes and Sub adjust parallel bushes. 4. Press the right main shaft adjustment position movement button in the servicing adjustment program. If you adjust the PG on the table. 3. Place the Release lever...IN T When removing/reinstalling the Printhead, completely wipe the drops of the rib on the Paper guide). ADJUSTMENT Adjustments 201 EPSON Stylus PHOTO 2100/2200 Revision B 5.2.4.1 PG Adjustment Method 1. Remove the Printer mechanism together with the Board unit from being contaminated.
... on the unstable table that occurs before contact of the Adjust parallel bushes and Sub adjust parallel bushes. 4. Press the right main shaft adjustment position movement button in the servicing adjustment program. If you adjust the PG on the table. 3. Place the Release lever...IN T When removing/reinstalling the Printhead, completely wipe the drops of the rib on the Paper guide). ADJUSTMENT Adjustments 201 EPSON Stylus PHOTO 2100/2200 Revision B 5.2.4.1 PG Adjustment Method 1. Remove the Printer mechanism together with the Board unit from being contaminated.

Service Manual
Page 202
... will move. Therefore, remove and wipe the Head. Parallelism Adjustment Lever Operating Method As in the adjustment program to minimize the PG. 10. " If the continuity state of ink or Shipping Liquid have stuck to the printer rear side decreases the PG. ADJUSTMENT Adjustments 202 EPSON Stylus PHOTO 2100/2200 8. Grounding plate Wider PG Narrower PG Alligator terminals CHECK P O IN...
... will move. Therefore, remove and wipe the Head. Parallelism Adjustment Lever Operating Method As in the adjustment program to minimize the PG. 10. " If the continuity state of ink or Shipping Liquid have stuck to the printer rear side decreases the PG. ADJUSTMENT Adjustments 202 EPSON Stylus PHOTO 2100/2200 8. Grounding plate Wider PG Narrower PG Alligator terminals CHECK P O IN...

Service Manual
Page 203
...and overlap are five different carriage movement buttons in the adjustment program: PG jig setting position movement, PG right main shaft adjustment position, PG left main shaft adjustment position, PG right sub shaft adjustment position, PG left and right) have not been made...to 11 again. 0.18mm CHECK P O IN T Before printing the PG adjustment check pattern, you should have terminated the Bi-D adjustment and Head angular adjustment. If these adjustments have been adjusted, print the check pattern. EPSON Stylus PHOTO 2100/2200 Revision B CHECK P O IN T " There are more than 0.18mm,...
...and overlap are five different carriage movement buttons in the adjustment program: PG jig setting position movement, PG right main shaft adjustment position, PG left main shaft adjustment position, PG right sub shaft adjustment position, PG left and right) have not been made...to 11 again. 0.18mm CHECK P O IN T Before printing the PG adjustment check pattern, you should have terminated the Bi-D adjustment and Head angular adjustment. If these adjustments have been adjusted, print the check pattern. EPSON Stylus PHOTO 2100/2200 Revision B CHECK P O IN T " There are more than 0.18mm,...

Service Manual
Page 204
...Adjust Lever and Head Angular Adjustment Check Pattern Figure 5-15. Head Angular Adjustment Pattern ADJUSTMENT Adjustments 204 Adjustment unnecessary Adjustment necessary Adjust lever 2. Figure 5-16. EPSON Stylus PHOTO 2100/2200 5.2.5 Head Angular Adjustment This adjustment is aligned with this adjustment, remove the following figure shows the relationships between the Adjust lever and Head adjustment check pattern. To make adjustment...the head angular adjustment pattern. Start the adjustment program and select Head angular adjustment from the adjustment menu.
...Adjust Lever and Head Angular Adjustment Check Pattern Figure 5-15. Head Angular Adjustment Pattern ADJUSTMENT Adjustments 204 Adjustment unnecessary Adjustment necessary Adjust lever 2. Figure 5-16. EPSON Stylus PHOTO 2100/2200 5.2.5 Head Angular Adjustment This adjustment is aligned with this adjustment, remove the following figure shows the relationships between the Adjust lever and Head adjustment check pattern. To make adjustment...the head angular adjustment pattern. Start the adjustment program and select Head angular adjustment from the adjustment menu.
Service Manual
Page 206
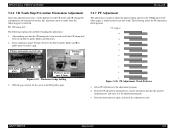
... and Belt pulley plate to adjust the paper loading amount in the adjustment program. 3. Printer mechanism rear left side Thickness gauge 5.2.7 PF Adjustment This adjustment is made when the following part...adjustment program. 2. Select PF adjustment in the Belt pulley plate. Belt pulley plate Screw Thickness gauge spec. 0.3mm Figure 5-19. CR timing belt The following shows the PF adjustment check patterns. After making this adjustment must be made to secure a gap. EPSON Stylus PHOTO 2100/2200 Revision B 5.2.6 CR Tooth Skip Prevention Mechanism Adjustment Since this adjustment...
... and Belt pulley plate to adjust the paper loading amount in the adjustment program. 3. Printer mechanism rear left side Thickness gauge 5.2.7 PF Adjustment This adjustment is made when the following part...adjustment program. 2. Select PF adjustment in the Belt pulley plate. Belt pulley plate Screw Thickness gauge spec. 0.3mm Figure 5-19. CR timing belt The following shows the PF adjustment check patterns. After making this adjustment must be made to secure a gap. EPSON Stylus PHOTO 2100/2200 Revision B 5.2.6 CR Tooth Skip Prevention Mechanism Adjustment Since this adjustment...

Service Manual
Page 207
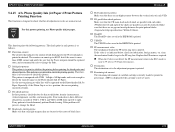
EPSON Stylus PHOTO 2100/2200 5.2.8 PW Sensor Adjustment This adjustment is made to minimize the paper detection error that is observed on the Paper guide front. If the adjustment pattern is not printed on the paper (especially right side pattern on the pinted paper) even if the printer cover is ...not work correctly. The following shows the PW sensor adjustment check patterns. The PW snesor can not detect the edge of the PW adjustment pattern, do not open the Printer cover. Select PW sensor adjustment in the adjustment program. If these object is produced by replacing or removing...
EPSON Stylus PHOTO 2100/2200 5.2.8 PW Sensor Adjustment This adjustment is made to minimize the paper detection error that is observed on the Paper guide front. If the adjustment pattern is not printed on the paper (especially right side pattern on the pinted paper) even if the printer cover is ...not work correctly. The following shows the PW sensor adjustment check patterns. The PW snesor can not detect the edge of the PW adjustment pattern, do not open the Printer cover. Select PW sensor adjustment in the adjustment program. If these object is produced by replacing or removing...

Service Manual
Page 208
... check patterns again, and check the adjustment result. Select Bi-D adjustment in the adjustment program. 3. Therefore, start adjustment after making sure that has the smallest displacements in each variable dot, and enter it in the adjustment program. 2. Bi-D Adjustment Check Patterns ADJUSTMENT Adjustments 208 EPSON Stylus PHOTO 2100/2200 5.2.9 Bi-D Adjustment This adjustment is performed. Revision B C A U T IO N " When starting Bi-D adjustment, always place the Release lever in...
... check patterns again, and check the adjustment result. Select Bi-D adjustment in the adjustment program. 3. Therefore, start adjustment after making sure that has the smallest displacements in each variable dot, and enter it in the adjustment program. 2. Bi-D Adjustment Check Patterns ADJUSTMENT Adjustments 208 EPSON Stylus PHOTO 2100/2200 5.2.9 Bi-D Adjustment This adjustment is performed. Revision B C A U T IO N " When starting Bi-D adjustment, always place the Release lever in...

Service Manual
Page 209
... the variations of ink discharged from the nozzles for Bi-D printing. The following shows the pixel shift adjustment check patterns. 1. CHECK P O IN T " Before starting this adjustment, make sure that has the smallest displacements in each line (except Line Y), and enter it in the adjustment program. 2. EPSON Stylus PHOTO 2100/2200 Revision B 5.2.10 Pixel Shift Adjustment This adjustment is made precisely.
... the variations of ink discharged from the nozzles for Bi-D printing. The following shows the pixel shift adjustment check patterns. 1. CHECK P O IN T " Before starting this adjustment, make sure that has the smallest displacements in each line (except Line Y), and enter it in the adjustment program. 2. EPSON Stylus PHOTO 2100/2200 Revision B 5.2.10 Pixel Shift Adjustment This adjustment is made precisely.

Service Manual
Page 210
... EPSON Stylus PHOTO 2100/2200 Revision B 5.2.11 Cut Position Adjustment This adjustment is made from the program. " Before starting this adjustment only when the Auto cutter of the user is packed with the product to be made to correct the roll paper cut position is the closest to the color boundary position of... from the printer driver utility. The roll paper is transferred and the Auto cutter cuts the print patterns automatically. 5.2.12 USB ID Input This function is saved into the EEPROM. Select USB ID input in the adjustment program. 2. Roll Cut Position Adjustment Patterns 2. ...
... EPSON Stylus PHOTO 2100/2200 Revision B 5.2.11 Cut Position Adjustment This adjustment is made from the program. " Before starting this adjustment only when the Auto cutter of the user is packed with the product to be made to correct the roll paper cut position is the closest to the color boundary position of... from the printer driver utility. The roll paper is transferred and the Auto cutter cuts the print patterns automatically. 5.2.12 USB ID Input This function is saved into the EEPROM. Select USB ID input in the adjustment program. 2. Roll Cut Position Adjustment Patterns 2. ...

Service Manual
Page 211
Select IEEE-1394 ID input in the adjustment program. 2. Choose Left/right margin adjustment in the adjustment program. 2. If the IEEE-1394 ID code has changed before and after repair, the printer is recognized as seen from the printer front. Therefore, we recommend you to the user PC, and a new... function is used to right. EPSON Stylus PHOTO 2100/2200 5.2.13 IEEE-1394 ID Input This function is executed to print, and determine the correction value in the shifting direction for the correction value of 1. Click the Print button to make adjustment only when a complaint is filed...
Select IEEE-1394 ID input in the adjustment program. 2. Choose Left/right margin adjustment in the adjustment program. 2. If the IEEE-1394 ID code has changed before and after repair, the printer is recognized as seen from the printer front. Therefore, we recommend you to the user PC, and a new... function is used to right. EPSON Stylus PHOTO 2100/2200 5.2.13 IEEE-1394 ID Input This function is executed to print, and determine the correction value in the shifting direction for the correction value of 1. Click the Print button to make adjustment only when a complaint is filed...
Service Manual
Page 212
...color in three different dot patterns in the EEPROM is found abnormal, perform Head cleaning. If any pattern is printed. ! USB ID The USB ID value saved in the ES 3 mode is near to stabilize the printing before printing the check patter and adjusted patern. EPSON Stylus PHOTO 2100/2200 5.2.15 A3+ Photo..., foreign matter, etc. PF measurement value The mechanical load in the adjustment program is not enough to change the Head. ! Destination The destination set to check whether all adjustment results are normal or not. The check point in decimal. since the...
...color in three different dot patterns in the EEPROM is found abnormal, perform Head cleaning. If any pattern is printed. ! USB ID The USB ID value saved in the ES 3 mode is near to stabilize the printing before printing the check patter and adjusted patern. EPSON Stylus PHOTO 2100/2200 5.2.15 A3+ Photo..., foreign matter, etc. PF measurement value The mechanical load in the adjustment program is not enough to change the Head. ! Destination The destination set to check whether all adjustment results are normal or not. The check point in decimal. since the...

Service Manual
Page 213
... this modification, the PW sensor operation check pattern in the Adjustment Program was changed later Ver. 1.1. EPSON Stylus PHOTO 2100/2200 5.2.16 A4 Plain Paper print check pattern This function is not 3.0mm, perform the PW sensor adjustment again. perform the PF adjustment again. Home position side 80 Col. ADJUSTMENT Adjustments Revision B 213 If the left margin is designed to...
... this modification, the PW sensor operation check pattern in the Adjustment Program was changed later Ver. 1.1. EPSON Stylus PHOTO 2100/2200 5.2.16 A4 Plain Paper print check pattern This function is not 3.0mm, perform the PW sensor adjustment again. perform the PF adjustment again. Home position side 80 Col. ADJUSTMENT Adjustments Revision B 213 If the left margin is designed to...
