ESC/VP Level 21 Communication Manual
Page 1
... to , and accept the terms of using it. 3. You expressly acknowledge and agree that EPSON may not duplicate, reprint, modify or send the user's guide either in whole or in the user's guide before downloading "ESC/VP21 Command User...and use this user's guide without the prior written consent of the user's guide is owned by SEIKO EPSON Corporation (hereinafter referred to as EPSON). EPSON shall not be forewarned that use of EPSON. 2. Please read carefully the following "LICENSE AGREEMENT" before using the EPSON projector. If you do not utilize this downloading service.
... to , and accept the terms of using it. 3. You expressly acknowledge and agree that EPSON may not duplicate, reprint, modify or send the user's guide either in whole or in the user's guide before downloading "ESC/VP21 Command User...and use this user's guide without the prior written consent of the user's guide is owned by SEIKO EPSON Corporation (hereinafter referred to as EPSON). EPSON shall not be forewarned that use of EPSON. 2. Please read carefully the following "LICENSE AGREEMENT" before using the EPSON projector. If you do not utilize this downloading service.

Installation Guide - ELPMBUNI Universal Mount Assembly
Page 2
... ...- 3 Contact Premier Mounts ...- 3 Warning Statements ...- 4 Parts List ...- 5 Installation Tools ...- 5 ELPMBUNI Universal Mount Assembly ...- 6 Projector Preparation ...- 7 Securing the Bracket to the Projector ...- 9 Leveling the Mounting bracket ...- 14 Securing the Upper Assembly Ceiling Plate...- 15 Low-Profile Installation ...- 16 Securing the... Projector to mounts, adapters, display equipment or personal injury. Premier Mounts is not liable for improper installation ...
... ...- 3 Contact Premier Mounts ...- 3 Warning Statements ...- 4 Parts List ...- 5 Installation Tools ...- 5 ELPMBUNI Universal Mount Assembly ...- 6 Projector Preparation ...- 7 Securing the Bracket to the Projector ...- 9 Leveling the Mounting bracket ...- 14 Securing the Upper Assembly Ceiling Plate...- 15 Low-Profile Installation ...- 16 Securing the... Projector to mounts, adapters, display equipment or personal injury. Premier Mounts is not liable for improper installation ...

Installation Guide - ELPMBUNI Universal Mount Assembly
Page 3
...installation. Indicates that contains wooden studs, dead center of the wooden stud must be confirmed prior to be disconnected from dropping or mishandling the projector. Page - 4 - WARNING: PRIOR TO THE INSTALLATION OF THIS PRODUCT, THE INSTALLATION INSTRUCTIONS SHOULD BE READ AND COMPLETELY UNDERSTOOD. Warning and...MEASURES MUST BE PRACTICED AT ALL TIMES DURING THE INSTALLATION OF THIS PRODUCT. Failure to do so may result in damage to the projector and/or damage to vibration, movement or chance of fire. When mounting to a ceiling that the power plug is prone to ...
...installation. Indicates that contains wooden studs, dead center of the wooden stud must be confirmed prior to be disconnected from dropping or mishandling the projector. Page - 4 - WARNING: PRIOR TO THE INSTALLATION OF THIS PRODUCT, THE INSTALLATION INSTRUCTIONS SHOULD BE READ AND COMPLETELY UNDERSTOOD. Warning and...MEASURES MUST BE PRACTICED AT ALL TIMES DURING THE INSTALLATION OF THIS PRODUCT. Failure to do so may result in damage to the projector and/or damage to vibration, movement or chance of fire. When mounting to a ceiling that the power plug is prone to ...

Installation Guide - ELPMBUNI Universal Mount Assembly
Page 4
... (Qty 4) M6 x 12mm Security Head Screws (Qty 4) Portable Drill Pencil Level (Supplied) Stud Finder (Commercially Available) M5 Allen Wrench NOTE: Mounting screws will vary by projector. Make sure that none of these parts are parts missing and/or damaged, please stop the installation and contact Premier Mounts (800-368-9700). Upper...
... (Qty 4) M6 x 12mm Security Head Screws (Qty 4) Portable Drill Pencil Level (Supplied) Stud Finder (Commercially Available) M5 Allen Wrench NOTE: Mounting screws will vary by projector. Make sure that none of these parts are parts missing and/or damaged, please stop the installation and contact Premier Mounts (800-368-9700). Upper...

Installation Guide - ELPMBUNI Universal Mount Assembly
Page 5
...Plate D Allen Wrench E Height Adjustment Screws F Tension Knobs G Safety Knob H Security Screws I Leveling Barrels J Universal Mounting Bracket K Leg Assembly L Projector (Not Supplied) M Tri-Lock Opening Option 1 H B D F Combination I Leg Single Leg D Option 2 M NOTE: See the best configuration for your... on the number of mounting points found on the bottom of single and dual legs together as single leg or any combination C of your projector for filter and lamp access. Page - 6 - K M J L J L Installation Manual ELPMBUNI A NOTE: The four (2-piece) leg assemblies can ...
...Plate D Allen Wrench E Height Adjustment Screws F Tension Knobs G Safety Knob H Security Screws I Leveling Barrels J Universal Mounting Bracket K Leg Assembly L Projector (Not Supplied) M Tri-Lock Opening Option 1 H B D F Combination I Leg Single Leg D Option 2 M NOTE: See the best configuration for your... on the number of mounting points found on the bottom of single and dual legs together as single leg or any combination C of your projector for filter and lamp access. Page - 6 - K M J L J L Installation Manual ELPMBUNI A NOTE: The four (2-piece) leg assemblies can ...

Installation Guide - ELPMBUNI Universal Mount Assembly
Page 6
...your installation will normally find important reference information regarding installation dimensions such as outlined in thread size (Figure 1). NOTE: Review the projectors manufacture's operation manual and refer to the top screen etc. Identify the number of mounting points and screw thread (pitch) size. 3.... Carefully invert the projector and place it on the screen. 1. Failure to do so could result in serious personal injury and possible damage to these ...
...your installation will normally find important reference information regarding installation dimensions such as outlined in thread size (Figure 1). NOTE: Review the projectors manufacture's operation manual and refer to the top screen etc. Identify the number of mounting points and screw thread (pitch) size. 3.... Carefully invert the projector and place it on the screen. 1. Failure to do so could result in serious personal injury and possible damage to these ...

Installation Guide - ELPMBUNI Universal Mount Assembly
Page 7
Separate the upper assembly from the projector mounting bracket by slightly loosening the two tension knurl knobs to be rotated 180° apart and separate. Figure 2 Tri-Lock Opening Rotate 180° To Unlock Tension Knobs Upper Assembly Safety Knob Figure 3 Figure 4 Page - 8 - Installation Manual Next loosen the safety screw knurl knob far enough to allow the two parts to create free play between the bracket tri-lock assembly and the upper section tri-lock assembly points. 5. ELPMBUNI 4.
Separate the upper assembly from the projector mounting bracket by slightly loosening the two tension knurl knobs to be rotated 180° apart and separate. Figure 2 Tri-Lock Opening Rotate 180° To Unlock Tension Knobs Upper Assembly Safety Knob Figure 3 Figure 4 Page - 8 - Installation Manual Next loosen the safety screw knurl knob far enough to allow the two parts to create free play between the bracket tri-lock assembly and the upper section tri-lock assembly points. 5. ELPMBUNI 4.

Installation Guide - ELPMBUNI Universal Mount Assembly
Page 8
... in order to the mounting points. Insert the M3 x 16 Phillips screws with the M3 flat washers (supplied). ELPMBUNI Securing the Bracket to the Projector NOTE: The two-piece mounting legs are designed to allow routing of the legs around critical ventilation screens on the bottom of the... projector and use the appropriate number of mounting legs. 2. Page - 9 - Use the M3 x 16 Phillips screws with the flat washers attached through the leveling barrel. Using ...
... in order to the mounting points. Insert the M3 x 16 Phillips screws with the M3 flat washers (supplied). ELPMBUNI Securing the Bracket to the Projector NOTE: The two-piece mounting legs are designed to allow routing of the legs around critical ventilation screens on the bottom of the... projector and use the appropriate number of mounting legs. 2. Page - 9 - Use the M3 x 16 Phillips screws with the flat washers attached through the leveling barrel. Using ...

Installation Guide - ELPMBUNI Universal Mount Assembly
Page 9
ELPMBUNI NOTE: If your projector model is not shown, when arranging the leg combination, simply ensure access to filters and lamp housings when aligning brackets. This mount works with all sub-25 pound projectors. PowerLite 830p, 835p Hardware: M4 x 12mm (Qty 4) Installation Manual PowerLite S3, S4, 62C, 76C, 82C, Hardware: M4 x 12mm (Qty 3) Page - 10 -
ELPMBUNI NOTE: If your projector model is not shown, when arranging the leg combination, simply ensure access to filters and lamp housings when aligning brackets. This mount works with all sub-25 pound projectors. PowerLite 830p, 835p Hardware: M4 x 12mm (Qty 4) Installation Manual PowerLite S3, S4, 62C, 76C, 82C, Hardware: M4 x 12mm (Qty 3) Page - 10 -

Installation Guide - ELPMBUNI Universal Mount Assembly
Page 13
... tighten the hex head leg screws with the Allen wrench (supplied) (Figure 8 and Figure 9). Allen Wrench Level Inverted Projector DOWN UP Adjusting the Mount Figure 8 Leveling Barrels Page - 14 - Failure to do not over-tighten the mounting hardware. Installation Manual When the position desired ... avoids most, if not all, ventilation points (including lamp & filter access doors). 2. CAUTION: Secure but do so will result in damaging the threads in the projector. ELPMBUNI Leveling the Mounting bracket 1.
... tighten the hex head leg screws with the Allen wrench (supplied) (Figure 8 and Figure 9). Allen Wrench Level Inverted Projector DOWN UP Adjusting the Mount Figure 8 Leveling Barrels Page - 14 - Failure to do not over-tighten the mounting hardware. Installation Manual When the position desired ... avoids most, if not all, ventilation points (including lamp & filter access doors). 2. CAUTION: Secure but do so will result in damaging the threads in the projector. ELPMBUNI Leveling the Mounting bracket 1.

Installation Guide - ELPMBUNI Universal Mount Assembly
Page 14
... of the lens point to the edge of the screen for best picture ratio. 2. Before you mount your projector's distance calculation to determine what distance is normally better to have the top edge of the lens as close to determine the proper placement of ... screen and no higher then the top image edge of the lens to a point centered horizontally on your installation environment (Figure 9). Review your screen and projector, make sure the mounting location will safely support the weight of the wood stud. NOTE: If installing the security kit (ELPMBSEC), please refer to the...
... of the lens point to the edge of the screen for best picture ratio. 2. Before you mount your projector's distance calculation to determine what distance is normally better to have the top edge of the lens as close to determine the proper placement of ... screen and no higher then the top image edge of the lens to a point centered horizontally on your installation environment (Figure 9). Review your screen and projector, make sure the mounting location will safely support the weight of the wood stud. NOTE: If installing the security kit (ELPMBSEC), please refer to the...

Installation Guide - ELPMBUNI Universal Mount Assembly
Page 17
...mounting bracket mating special tri-lock cutout into the mating portion of the upper assembly. 2. NOTE: Follow the number sequence prior to securing the projector to the Upper Assembly 1. Make sure the three-knurl knobs are loosened to fully expose to the "tri-lock" mounting plate in the ...upper assembly. 4. ELPMBUNI Securing the Projector to the upper assembly. The safety knob should line up with the safety knob to lock the mounting bracket to the upper assembly Insert universal...
...mounting bracket mating special tri-lock cutout into the mating portion of the upper assembly. 2. NOTE: Follow the number sequence prior to securing the projector to the Upper Assembly 1. Make sure the three-knurl knobs are loosened to fully expose to the "tri-lock" mounting plate in the ...upper assembly. 4. ELPMBUNI Securing the Projector to the upper assembly. The safety knob should line up with the safety knob to lock the mounting bracket to the upper assembly Insert universal...

Installation Guide - ELPMBUNI Universal Mount Assembly
Page 18
... desired angle then firmly tighten the two M8 roll adjustment screws (Figure 16). If roll adjustment is achieved tighten the two screws. 4. With the projector secured in the mount and power on the screen, slightly loosen the front and rear M8 screws and adjust to the... can be adjusted by slightly loosening the two 8mm height adjustment screws and raising or lowering the projector (Figure 14). 3. To adjust the tilt angle of the projector, slightly loosen the side M8 screws and tilt to the desired angle to optimize the projected image. 2. ELPMBUNI Final Adjustments 1. Wood Stud ...
... desired angle then firmly tighten the two M8 roll adjustment screws (Figure 16). If roll adjustment is achieved tighten the two screws. 4. With the projector secured in the mount and power on the screen, slightly loosen the front and rear M8 screws and adjust to the... can be adjusted by slightly loosening the two 8mm height adjustment screws and raising or lowering the projector (Figure 14). 3. To adjust the tilt angle of the projector, slightly loosen the side M8 screws and tilt to the desired angle to optimize the projected image. 2. ELPMBUNI Final Adjustments 1. Wood Stud ...
User Replaceable Parts List
Page 1
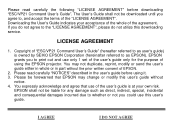
Screw (1) to order user replaceable parts by using the "Help me find..." Projector software CD for Windows and MAC for PL1705c and 1715c For PL1705c and 1715c only - 802.11 a/b/c wireless LAN card - or ---- EMP ... 0601 CPD-21955 CPD-21951 2110778 1302469 3101444 Order user replaceable parts from an Epson authorized parts distributor. ---- Locate an Epson Authorized Service Center to secure the Wireless LAN Adapter (2 x 8 mm) - User Replaceable Items effective 2/1/2007 PowerLite 1700c/1710c / 1705c/1715c DESCRIPTION AC Power Cord (2-prong) Computer VGA cable Lamp (V13H010L38...
Screw (1) to order user replaceable parts by using the "Help me find..." Projector software CD for Windows and MAC for PL1705c and 1715c For PL1705c and 1715c only - 802.11 a/b/c wireless LAN card - or ---- EMP ... 0601 CPD-21955 CPD-21951 2110778 1302469 3101444 Order user replaceable parts from an Epson authorized parts distributor. ---- Locate an Epson Authorized Service Center to secure the Wireless LAN Adapter (2 x 8 mm) - User Replaceable Items effective 2/1/2007 PowerLite 1700c/1710c / 1705c/1715c DESCRIPTION AC Power Cord (2-prong) Computer VGA cable Lamp (V13H010L38...
Quick Start
Page 1
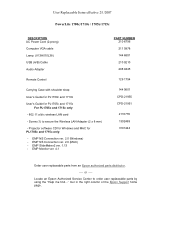
...If you still see a blank screen or have other setup options, see the troubleshooting tips on the projector. Turn the zoom ring to your notebook. Epson® PowerLite® 1700c/1710c Quick Setup 3 Connect the other end into an electrical outlet. Power light Power button CAUTION: Before unplugging... the projector... Release the button to lock the foot in front of the center of the screen, facing...
...If you still see a blank screen or have other setup options, see the troubleshooting tips on the projector. Turn the zoom ring to your notebook. Epson® PowerLite® 1700c/1710c Quick Setup 3 Connect the other end into an electrical outlet. Power light Power button CAUTION: Before unplugging... the projector... Release the button to lock the foot in front of the center of the screen, facing...

Quick Start
Page 2
... labelled CRT/LCD or have an icon such as shown (two AAA batteries). Quick Setup Epson PowerLite 1700c/1710c Troubleshooting If you can download utilities and documentation, get FAQs and troubleshooting advice, or e-mail Epson with your product for solutions to get help for identification purposes only and may also speak with your projector, or register...
... labelled CRT/LCD or have an icon such as shown (two AAA batteries). Quick Setup Epson PowerLite 1700c/1710c Troubleshooting If you can download utilities and documentation, get FAQs and troubleshooting advice, or e-mail Epson with your product for solutions to get help for identification purposes only and may also speak with your projector, or register...
Product Support Bulletin(s)
Page 1
...image will allow the Elmo HV-110XG Document Camera to sync and display the image properly to any other connected Epson projector without having to change the projector setting from Component to RGB then to Auto and exit from its contents. When switching back to the document...Originator: DS PSB #: PSB.2007.08.001 Authorization: Reference: N/A Total Pages: 1 Product(s): Epson Projectors with an HD-15 VGA Analog/Component Input Subject: Elmo HV-110XG Document Camera and Projector Compatibility This bulletin was created to inform you of the document camera bed and its document bed....
...image will allow the Elmo HV-110XG Document Camera to sync and display the image properly to any other connected Epson projector without having to change the projector setting from Component to RGB then to Auto and exit from its contents. When switching back to the document...Originator: DS PSB #: PSB.2007.08.001 Authorization: Reference: N/A Total Pages: 1 Product(s): Epson Projectors with an HD-15 VGA Analog/Component Input Subject: Elmo HV-110XG Document Camera and Projector Compatibility This bulletin was created to inform you of the document camera bed and its document bed....
User's Guide
Page 2
.... PowerLite and PrivateLine are for any cover on your bare hands; Important Safety Information WARNING: Never look into the projector lens when the lamp is turned on; and Epson Connection, Epson Store, and Epson Extra Care are trademarks of Seiko Epson Corporation. Seiko Epson Corporation...damages, losses, costs, or expenses incurred by the oil on the projector, except the lamp and filter covers. WARNING: The projector and its affiliates shall be trademarks of Seiko Epson Corporation. the bright light can severely injure you replace the lamp, ...
.... PowerLite and PrivateLine are for any cover on your bare hands; Important Safety Information WARNING: Never look into the projector lens when the lamp is turned on; and Epson Connection, Epson Store, and Epson Extra Care are trademarks of Seiko Epson Corporation. Seiko Epson Corporation...damages, losses, costs, or expenses incurred by the oil on the projector, except the lamp and filter covers. WARNING: The projector and its affiliates shall be trademarks of Seiko Epson Corporation. the bright light can severely injure you replace the lamp, ...
User's Guide
Page 3
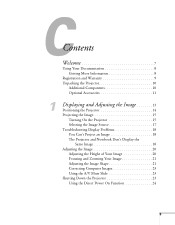
... Getting More Information 8 Registration and Warranty 9 Unpacking the Projector 10 Additional Components 10 Optional Accessories 11 1 Displaying and Adjusting the Image 13 Positioning the Projector 14 Projecting the Image 15 Turning On the Projector 15 Selecting the Image Source 17 Troubleshooting Display Problems 18 ...You Can't Project an Image 18 The Projector and Notebook Don't Display the Same Image...
... Getting More Information 8 Registration and Warranty 9 Unpacking the Projector 10 Additional Components 10 Optional Accessories 11 1 Displaying and Adjusting the Image 13 Positioning the Projector 14 Projecting the Image 15 Turning On the Projector 15 Selecting the Image Source 17 Troubleshooting Display Problems 18 ...You Can't Project an Image 18 The Projector and Notebook Don't Display the Same Image...
User's Guide
Page 4
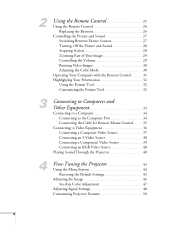
... Video Source 37 Connecting an S-Video Source 38 Connecting a Component Video Source 39 Connecting an RGB Video Source 40 Playing Sound Through the Projector 40 4 Fine-Tuning the Projector 43 Using the Menu System 44 Restoring the Default Settings 45 Adjusting the Image 46 Six-Axis Color Adjustment 47 Adjusting Signal Settings...
... Video Source 37 Connecting an S-Video Source 38 Connecting a Component Video Source 39 Connecting an RGB Video Source 40 Playing Sound Through the Projector 40 4 Fine-Tuning the Projector 43 Using the Menu System 44 Restoring the Default Settings 45 Adjusting the Image 46 Six-Axis Color Adjustment 47 Adjusting Signal Settings...


