Product Information Guide
Page 1
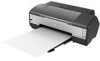
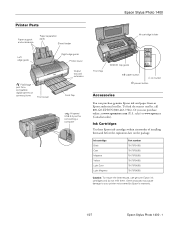
...to your printer not covered by Epson's warranty. 1/07 Epson Stylus Photo 1400 - 1 Or you can purchase genuine Epson ink and paper from an Epson authorized reseller. To find the nearest reseller, call 800-GO-EPSON (800-463-7766). Epson Stylus Photo 1400 Printer Parts Paper...Printer cover Output tray and extension Front flap CD/DVD tray guide ) paper button ink button P power button Front flap Hi-speed USB 2.0 port for connecting a computer Accessories You can purchase online at www.epsonstore.com (U.S. Ink Cartridges Use these Epson ink cartridges within six months of installing...
...to your printer not covered by Epson's warranty. 1/07 Epson Stylus Photo 1400 - 1 Or you can purchase genuine Epson ink and paper from an Epson authorized reseller. To find the nearest reseller, call 800-GO-EPSON (800-463-7766). Epson Stylus Photo 1400 Printer Parts Paper...Printer cover Output tray and extension Front flap CD/DVD tray guide ) paper button ink button P power button Front flap Hi-speed USB 2.0 port for connecting a computer Accessories You can purchase online at www.epsonstore.com (U.S. Ink Cartridges Use these Epson ink cartridges within six months of installing...
Product Information Guide
Page 8
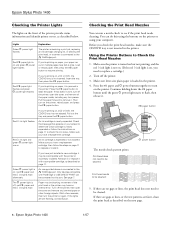
... test patterns are on If you have a replacement cartridge, then follow the instructions on the printer, reload paper, and press the ) paper button. Epson Stylus Photo 1400 1/07 Then turn off the printer, then open the cover, and remove all the paper inside, including any jammed paper or ... 11 to the PictBridge port. An ink cartridge is loaded in the printer. Only devices compatible with the printer or incorrectly installed. Turn off the printer, open the cover and remove any torn pieces. Using the Printer Buttons to be cleaned. Red H ink light flashes Red H ink ...
... test patterns are on If you have a replacement cartridge, then follow the instructions on the printer, reload paper, and press the ) paper button. Epson Stylus Photo 1400 1/07 Then turn off the printer, then open the cover, and remove all the paper inside, including any jammed paper or ... 11 to the PictBridge port. An ink cartridge is loaded in the printer. Only devices compatible with the printer or incorrectly installed. Turn off the printer, open the cover and remove any torn pieces. Using the Printer Buttons to be cleaned. Red H ink light flashes Red H ink ...
Product Information Guide
Page 11
...: Click here to replace it . 1/07 Epson Stylus Photo 1400 - 11 This could damage the print head. You see a message on the package. Ink Cartridge Precautions Warning: Keep ink cartridges out of the reach of installing them . The IC chip on these Epson ink cartridges within six months of your screen... on the package. Do not use up at least three hours before the expiration date on your taskbar (in the printer list, click OK, and select EPSON StatusMonitor. If the quality doesn't improve after cleaning and aligning the print head, you which cartridge is low (for ...
...: Click here to replace it . 1/07 Epson Stylus Photo 1400 - 11 This could damage the print head. You see a message on the package. Ink Cartridge Precautions Warning: Keep ink cartridges out of the reach of installing them . The IC chip on these Epson ink cartridges within six months of your screen... on the package. Do not use up at least three hours before the expiration date on your taskbar (in the printer list, click OK, and select EPSON StatusMonitor. If the quality doesn't improve after cleaning and aligning the print head, you which cartridge is low (for ...
Product Information Guide
Page 12
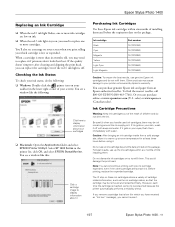
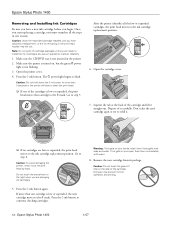
...5. Press the H ink button. The P power light begins to step 5. After the printer identifies all the steps in one of it straight out. Press the H ink button again. Epson Stylus Photo 1400 Removing and Installing Ink Cartridges Be sure you have obtained a replacement, or the ink remaining in the print... the tab at the back of the cartridge. Remove the new cartridge from its package. Epson Stylus Photo 1400 1/07 Caution: Do not hold down the H ink button for more than 3 seconds or the printer will start replacing a cartridge, you are low or expended, the print head moves to ...
...5. Press the H ink button. The P power light begins to step 5. After the printer identifies all the steps in one of it straight out. Press the H ink button again. Epson Stylus Photo 1400 Removing and Installing Ink Cartridges Be sure you have obtained a replacement, or the ink remaining in the print... the tab at the back of the cartridge. Remove the new cartridge from its package. Epson Stylus Photo 1400 1/07 Caution: Do not hold down the H ink button for more than 3 seconds or the printer will start replacing a cartridge, you are low or expended, the print head moves to ...
Product Information Guide
Page 13
... and case. Close the cartridge cover. Press the H ink button. Remove the yellow tape from getting inside the printer. 1/07 Epson Stylus Photo 1400 - 13 otherwise, print quality may not be installed correctly. Do not remove or tear the label or other cartridges that need to charge the ink. Place the new ink cartridge into the...
... and case. Close the cartridge cover. Press the H ink button. Remove the yellow tape from getting inside the printer. 1/07 Epson Stylus Photo 1400 - 13 otherwise, print quality may not be installed correctly. Do not remove or tear the label or other cartridges that need to charge the ink. Place the new ink cartridge into the...
Product Information Guide
Page 14
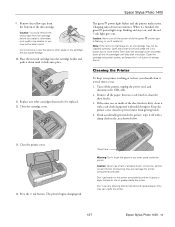
... Epson Stylus Photo 1400 Start Here Epson Stylus Photo 1400 User's Guide Epson Stylus Photo 1400 CD-ROM with it for transportation by packing the printer in its original box or one of a similar size. Push in the original box using the protective materials that came with on . Then disconnect the USB cable from the electrical outlet. If you must prepare it . Epson Stylus Photo 1400 1/07 Epson Stylus Photo 1400...
... Epson Stylus Photo 1400 Start Here Epson Stylus Photo 1400 User's Guide Epson Stylus Photo 1400 CD-ROM with it for transportation by packing the printer in its original box or one of a similar size. Push in the original box using the protective materials that came with on . Then disconnect the USB cable from the electrical outlet. If you must prepare it . Epson Stylus Photo 1400 1/07 Epson Stylus Photo 1400...
Start Here
Page 1
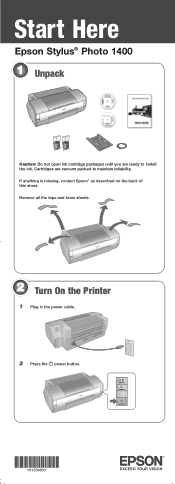
Cartridges are ready to maintain reliability. Start Here Epson Stylus® Photo 1400 1 Unpack Caution: Do not open ink cartridge packages until you are vacuum packed to install the ink. Remove all the tape and foam sheets. 2 Turn On the Printer 1 Plug in the power cable. 2 Press the power button. *411559800* *411559800* If anything is missing, contact Epson® as described on the back of this sheet.
Cartridges are ready to maintain reliability. Start Here Epson Stylus® Photo 1400 1 Unpack Caution: Do not open ink cartridge packages until you are vacuum packed to install the ink. Remove all the tape and foam sheets. 2 Turn On the Printer 1 Plug in the power cable. 2 Press the power button. *411559800* *411559800* If anything is missing, contact Epson® as described on the back of this sheet.
Start Here
Page 6
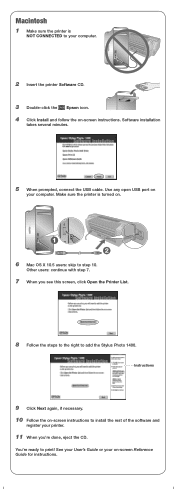
...! See your User's Guide or your printer. 11 When you see this screen, click Open the Printer List. 8 Follow the steps to the right to add the Stylus Photo 1400. Instructions 9 Click Next again, if necessary. 10 Follow the on-screen instructions to install the rest of the software and register...CD. Make sure the printer is NOT CONNECTED to your computer. Macintosh 1 Make sure the printer is turned on. 1 2 6 Mac OS X 10.5 users: skip to step 10. Use any open USB port on your computer. 2 Insert the printer Software CD. 3 Double-click the Epson icon. 4 Click Install and follow the on-...
...! See your User's Guide or your printer. 11 When you see this screen, click Open the Printer List. 8 Follow the steps to the right to add the Stylus Photo 1400. Instructions 9 Click Next again, if necessary. 10 Follow the on-screen instructions to install the rest of the software and register...CD. Make sure the printer is NOT CONNECTED to your computer. Macintosh 1 Make sure the printer is turned on. 1 2 6 Mac OS X 10.5 users: skip to step 10. Use any open USB port on your computer. 2 Insert the printer Software CD. 3 Double-click the Epson icon. 4 Click Install and follow the on-...
Start Here
Page 7
... (Epson Stylus Photo 1400) • Product serial number (located on , contact Epson as described in "Any Questions?". • Turn off the printer, then make sure the ink cartridges are instructed to the computer until charging finishes (the green power light stops flashing) before you turn off the printer, or it may apply. You're having problems installing the printer...
... (Epson Stylus Photo 1400) • Product serial number (located on , contact Epson as described in "Any Questions?". • Turn off the printer, then make sure the ink cartridges are instructed to the computer until charging finishes (the green power light stops flashing) before you turn off the printer, or it may apply. You're having problems installing the printer...
User's Guide
Page 64
... on the Start Here sheet. If the light is still flashing after ink cartridge installation. ■ The first time you can also click Start or , select Programs or All Programs, select EPSON, and click EPSON Stylus Photo 1400 Series Driver Update for printer driver updates. Problems and Solutions Tip: If you don't find the information you're...
... on the Start Here sheet. If the light is still flashing after ink cartridge installation. ■ The first time you can also click Start or , select Programs or All Programs, select EPSON, and click EPSON Stylus Photo 1400 Series Driver Update for printer driver updates. Problems and Solutions Tip: If you don't find the information you're...
User's Guide
Page 74
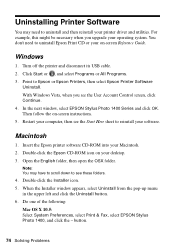
... to Epson or Epson Printers, then select Epson Printer Software Uninstall. Then follow the on-screen instructions. 5. When the Installer window appears, select Uninstall from the pop-up menu in the upper left and click the Uninstall button. 6. In the next window, select EPSON Stylus Photo 1400 Series... System Preferences, select Print & Fax, select EPSON Stylus Photo 1400, and click the - Double-click the Installer icon. 5. For example, this might be necessary when you see these folders. 4. button. 74 Solving Problems Uninstalling Printer Software You may have to scroll down to ...
... to Epson or Epson Printers, then select Epson Printer Software Uninstall. Then follow the on-screen instructions. 5. When the Installer window appears, select Uninstall from the pop-up menu in the upper left and click the Uninstall button. 6. In the next window, select EPSON Stylus Photo 1400 Series... System Preferences, select Print & Fax, select EPSON Stylus Photo 1400, and click the - Double-click the Installer icon. 5. For example, this might be necessary when you see these folders. 4. button. 74 Solving Problems Uninstalling Printer Software You may have to scroll down to ...


