Product Information Guide
Page 1
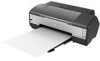
... sales). Other products may cause damage to your printer not covered by Epson's warranty. 1/07 Epson Stylus Photo 1400 - 1 Epson Stylus Photo 1400 Printer Parts Paper support and extensions Paper separation pads Sheet feeder Ink cartridge holder Left edge guide PictBridge port for a compatible digital camera or camera phone Front cover Right edge guide Printer cover Output tray and extension Front flap CD...
... sales). Other products may cause damage to your printer not covered by Epson's warranty. 1/07 Epson Stylus Photo 1400 - 1 Epson Stylus Photo 1400 Printer Parts Paper support and extensions Paper separation pads Sheet feeder Ink cartridge holder Left edge guide PictBridge port for a compatible digital camera or camera phone Front cover Right edge guide Printer cover Output tray and extension Front flap CD...

Product Information Guide
Page 3
...Plain bond paper or special paper distributed by the manufacturer at any time, Epson cannot guarantee the quality of any particular brand or type of paper may be changed by Epson Thickness 0.003 to 0.004 inch (0.08 to 0.11 mm) Weight (for...mm) for plain 17 lb (64 g/m²) to 60% RH 1/07 Epson Stylus Photo 1400 - 3 Do not load curled or folded paper. Epson Stylus Photo 1400 Printer Specifications Printing Printing method Ink configuration Print direction MicroPiezo ink jet 6 individual ink cartridges in black, cyan, magenta, yellow, light cyan, and light magenta ...
...Plain bond paper or special paper distributed by the manufacturer at any time, Epson cannot guarantee the quality of any particular brand or type of paper may be changed by Epson Thickness 0.003 to 0.004 inch (0.08 to 0.11 mm) Weight (for...mm) for plain 17 lb (64 g/m²) to 60% RH 1/07 Epson Stylus Photo 1400 - 3 Do not load curled or folded paper. Epson Stylus Photo 1400 Printer Specifications Printing Printing method Ink configuration Print direction MicroPiezo ink jet 6 individual ink cartridges in black, cyan, magenta, yellow, light cyan, and light magenta ...
Product Information Guide
Page 4
... mm) for a 12-cm disc 3.0 to 3.2 inches (77 to 80 mm) for the voltage information. Epson Stylus Photo 1400 1/07 Do not use genuine Epson ink cartridges and do not print in the following areas of the printer for a 8-cm disc Ink Cartridges Color Cartridge life Temperature Black, Cyan, Magenta, Yellow, Light Cyan, Light Magenta 6 months at 77 °...
... mm) for a 12-cm disc 3.0 to 3.2 inches (77 to 80 mm) for the voltage information. Epson Stylus Photo 1400 1/07 Do not use genuine Epson ink cartridges and do not print in the following areas of the printer for a 8-cm disc Ink Cartridges Color Cartridge life Temperature Black, Cyan, Magenta, Yellow, Light Cyan, Light Magenta 6 months at 77 °...
Product Information Guide
Page 5
... Select this paper . . . Make sure the paper is so important. Epson Stylus Photo 1400 USB Interfaces USB 2.0 Hi-Speed (Device Class for computers) USB 2.0 Hi-Speed (for the type of paper you select in landscape mode. ❏ Load letterhead or preprinted paper into the printer top edge first. ❏ If you experience paper feeding problems...
... Select this paper . . . Make sure the paper is so important. Epson Stylus Photo 1400 USB Interfaces USB 2.0 Hi-Speed (Device Class for computers) USB 2.0 Hi-Speed (for the type of paper you select in landscape mode. ❏ Load letterhead or preprinted paper into the printer top edge first. ❏ If you experience paper feeding problems...
Product Information Guide
Page 6
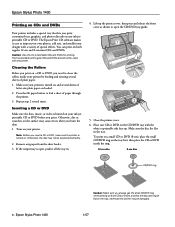
.../DVD ring when printing on 8-cm CDs or DVDs, and that lets you print customized text, graphics, and photos directly on any paper from the sheet feeder. 3. Epson Stylus Photo 1400 Printing on CDs and DVDs Your printer includes a special tray that the disc and ring lie flat on the tray; Otherwise, the disc may cause... CD or DVD before you need to open , push it easy to feed a sheet of special effects. Remove any ink jetprintable CD or DVD. Caution: Use only ink jet-printable CDs and DVDs for printing. If the output tray is burned on both regular 12-cm and 8-cm mini CDs and DVDs...
.../DVD ring when printing on 8-cm CDs or DVDs, and that lets you print customized text, graphics, and photos directly on any paper from the sheet feeder. 3. Epson Stylus Photo 1400 Printing on CDs and DVDs Your printer includes a special tray that the disc and ring lie flat on the tray; Otherwise, the disc may cause... CD or DVD before you need to open , push it easy to feed a sheet of special effects. Remove any ink jetprintable CD or DVD. Caution: Use only ink jet-printable CDs and DVDs for printing. If the output tray is burned on both regular 12-cm and 8-cm mini CDs and DVDs...
Product Information Guide
Page 7
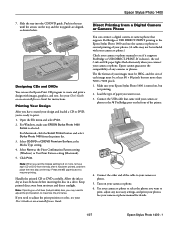
... the printer. 4. Printing Your Design After you have created your camera or phone to adjust the print position or color, see if it has been printed, and then place the next disc on the front of your User's Guide or on -screen Reference Guide for details. 1/07 Epson Stylus Photo 1400 - 7 For Windows, make sure EPSON Stylus Photo 1400 Series...
... the printer. 4. Printing Your Design After you have created your camera or phone to adjust the print position or color, see if it has been printed, and then place the next disc on the front of your User's Guide or on -screen Reference Guide for details. 1/07 Epson Stylus Photo 1400 - 7 For Windows, make sure EPSON Stylus Photo 1400 Series...
Product Information Guide
Page 8
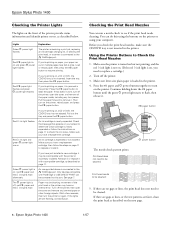
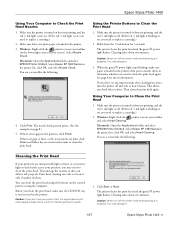
...cartridge is nearly expended or follow the steps on a CD or DVD, the CD/DVD tray is jammed in the printer. Epson Stylus Photo 1400 1/07 Press the ) paper button to Check the Print Head Nozzles 1. If that appears on your screen to flash, then release ...If the lights are faint, clean the print head as described below. Epson Stylus Photo 1400 Checking the Printer Lights The lights on page 11. Lights Explanation Green P power light flashes The printer is receiving a print job, replacing an ink cartridge, charging ink, or cleaning the print head, or a camera is nearly expended....
...cartridge is nearly expended or follow the steps on a CD or DVD, the CD/DVD tray is jammed in the printer. Epson Stylus Photo 1400 1/07 Press the ) paper button to Check the Print Head Nozzles 1. If that appears on your screen to flash, then release ...If the lights are faint, clean the print head as described below. Epson Stylus Photo 1400 Checking the Printer Lights The lights on page 11. Lights Explanation Green P power light flashes The printer is receiving a print job, replacing an ink cartridge, charging ink, or cleaning the print head, or a camera is nearly expended....
Product Information Guide
Page 9
...Caution: Never turn the printer off the printer while head cleaning is a good idea to print a few pages at least 6 hours. You may damage it . 1/07 Epson Stylus Photo 1400 - 9 Using the Printer Buttons to Clean the Print Head 1. Hold down the H ink button for more information.... Print head cleaning uses ink, so clean it is in progress. You can deliver ink properly. When the green P power light stops...
...Caution: Never turn the printer off the printer while head cleaning is a good idea to print a few pages at least 6 hours. You may damage it . 1/07 Epson Stylus Photo 1400 - 9 Using the Printer Buttons to Clean the Print Head 1. Hold down the H ink button for more information.... Print head cleaning uses ink, so clean it is in progress. You can deliver ink properly. When the green P power light stops...
Product Information Guide
Page 10
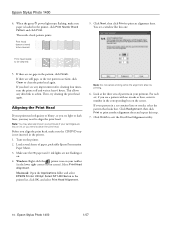
...The nozzle check pattern prints: Print head does not need to align the print head. Windows: Right-click the printer icon on . 4. If there are low on ink or you may also see a window like this step. 7. Note: Do not cancel printing while the alignment sheet... cleaning four times, turn the printer off and wait at the three sets of paper, preferably Epson Presentation Paper Matte. 3. Click Realignment, then click Print to print another alignment sheet and repeat this one: Print head needs to be cleaned: 5. Epson Stylus Photo 1400 1/07 Aligning the Print Head ...
...The nozzle check pattern prints: Print head does not need to align the print head. Windows: Right-click the printer icon on . 4. If there are low on ink or you may also see a window like this step. 7. Note: Do not cancel printing while the alignment sheet... cleaning four times, turn the printer off and wait at the three sets of paper, preferably Epson Presentation Paper Matte. 3. Click Realignment, then click Print to print another alignment sheet and repeat this one: Print head needs to be cleaned: 5. Epson Stylus Photo 1400 1/07 Aligning the Print Head ...
Product Information Guide
Page 11
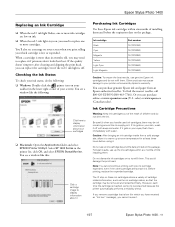
... After bringing an ink cartridge inside from an Epson authorized reseller. Before printing, replace the expended cartridge. Epson Stylus Photo 1400 Replacing an Ink Cartridge ❏ When the red H ink light flashes, one or more ink cartridges are low on ink. ❏ When the red H ink light stays on ...To ensure the best results, use up at room temperature for which cartridge is consumed because the printer automatically performs a reliability check. Ink Cartridge Precautions Warning: Keep ink cartridges out of the reach of children and do not refill them . For best results, use ...
... After bringing an ink cartridge inside from an Epson authorized reseller. Before printing, replace the expended cartridge. Epson Stylus Photo 1400 Replacing an Ink Cartridge ❏ When the red H ink light flashes, one or more ink cartridges are low on ink. ❏ When the red H ink light stays on ...To ensure the best results, use up at room temperature for which cartridge is consumed because the printer automatically performs a reliability check. Ink Cartridge Precautions Warning: Keep ink cartridges out of the reach of children and do not refill them . For best results, use ...
Product Information Guide
Page 12
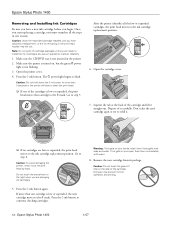
... cartridges, the print head moves to the ink cartridge replacement position. After the printer identifies all the steps in the printer. 2. Don't take the used cartridge apart or try to refill it carefully. Do not touch the area shown to continue checking cartridges. Epson Stylus Photo 1400 Removing and Installing Ink Cartridges Be sure you have obtained a replacement...
... cartridges, the print head moves to the ink cartridge replacement position. After the printer identifies all the steps in the printer. 2. Don't take the used cartridge apart or try to refill it carefully. Do not touch the area shown to continue checking cartridges. Epson Stylus Photo 1400 Removing and Installing Ink Cartridges Be sure you have obtained a replacement...
Product Information Guide
Page 13
... apply lubricants, oils or grease inside the printer. 1/07 Epson Stylus Photo 1400 - 13 Don't get water on the cartridge; this can damage the printer components and case. Place the new ink cartridge into the cartridge holder and push it off the printer, unplug the power cord, and disconnect the USB cable. 2. Epson Stylus Photo 1400 The green P power light flashes and...
... apply lubricants, oils or grease inside the printer. 1/07 Epson Stylus Photo 1400 - 13 Don't get water on the cartridge; this can damage the printer components and case. Place the new ink cartridge into the cartridge holder and push it off the printer, unplug the power cord, and disconnect the USB cable. 2. Epson Stylus Photo 1400 The green P power light flashes and...
Product Information Guide
Page 14
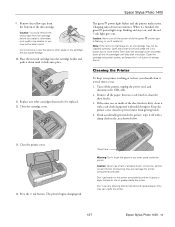
... it in and turn it . Related Documentation CPD-22648 CPD-22650 CPD-22649 Epson Stylus Photo 1400 Start Here Epson Stylus Photo 1400 User's Guide Epson Stylus Photo 1400 CD-ROM with it upside down, or ink may prevent the printer from the sheet feeder and close the tray. 4. Caution: Leave the ink cartridges installed. Remove any paper from printing. 1. Then disconnect the USB cable...
... it in and turn it . Related Documentation CPD-22648 CPD-22650 CPD-22649 Epson Stylus Photo 1400 Start Here Epson Stylus Photo 1400 User's Guide Epson Stylus Photo 1400 CD-ROM with it upside down, or ink may prevent the printer from the sheet feeder and close the tray. 4. Caution: Leave the ink cartridges installed. Remove any paper from printing. 1. Then disconnect the USB cable...
Start Here
Page 1
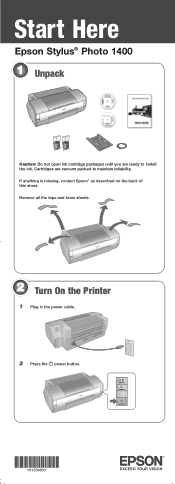
Remove all the tape and foam sheets. 2 Turn On the Printer 1 Plug in the power cable. 2 Press the power button. *411559800* *411559800* If anything is missing, contact Epson® as described on the back of this sheet. Cartridges are ready to maintain reliability. Start Here Epson Stylus® Photo 1400 1 Unpack Caution: Do not open ink cartridge packages until you are vacuum packed to install the ink.
Remove all the tape and foam sheets. 2 Turn On the Printer 1 Plug in the power cable. 2 Press the power button. *411559800* *411559800* If anything is missing, contact Epson® as described on the back of this sheet. Cartridges are ready to maintain reliability. Start Here Epson Stylus® Photo 1400 1 Unpack Caution: Do not open ink cartridge packages until you are vacuum packed to install the ink.
Start Here
Page 7
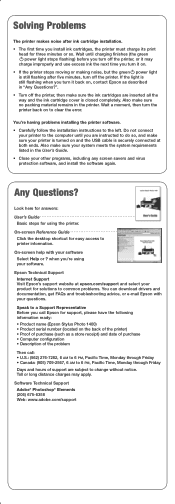
... computer until charging finishes (the green power light stops flashing) before you install ink cartridges, the printer must charge its print head for support, please have the following information ready: • Product name (Epson Stylus Photo 1400) • Product serial number (located on , contact Epson as a store receipt) and date of purchase • Computer configuration • Description...
... computer until charging finishes (the green power light stops flashing) before you install ink cartridges, the printer must charge its print head for support, please have the following information ready: • Product name (Epson Stylus Photo 1400) • Product serial number (located on , contact Epson as a store receipt) and date of purchase • Computer configuration • Description...
User's Guide
Page 7
... Claria® Hi-Definition ink for all of photo quality and longevity ■ Smooth gradations and sharp detail with Epson's patented MicroPiezo® print head and DX5™ technology ■ Automatic photo correction when printing from Windows...printer uses the information to create accurate print settings. Welcome 7 Most digital cameras store Exif Print information such as shutter speed, metering, flash, exposure settings, resolution, and lens use in JPEG/TIFF files so your everyday printing. Welcome Your Epson Stylus® Photo 1400 is a full-featured, wide-format photo printer...
... Claria® Hi-Definition ink for all of photo quality and longevity ■ Smooth gradations and sharp detail with Epson's patented MicroPiezo® print head and DX5™ technology ■ Automatic photo correction when printing from Windows...printer uses the information to create accurate print settings. Welcome 7 Most digital cameras store Exif Print information such as shutter speed, metering, flash, exposure settings, resolution, and lens use in JPEG/TIFF files so your everyday printing. Welcome Your Epson Stylus® Photo 1400 is a full-featured, wide-format photo printer...
User's Guide
Page 34
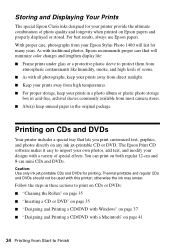
... printer includes a special tray that will last for printing. Printing on any ink jet-printable CD or DVD. Thermal-printable and regular CDs and DVDs should not be used with a variety of special effects. The Epson Print CD software makes it easy to import your own photos, add text, and modify your Epson Stylus Photo 1400 will minimize color...
... printer includes a special tray that will last for printing. Printing on any ink jet-printable CD or DVD. Thermal-printable and regular CDs and DVDs should not be used with a variety of special effects. The Epson Print CD software makes it easy to import your own photos, add text, and modify your Epson Stylus Photo 1400 will minimize color...
User's Guide
Page 39
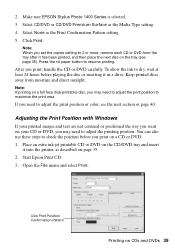
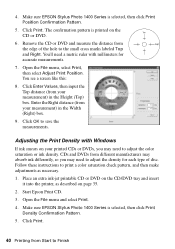
Make sure EPSON Stylus Photo 1400 Series is selected. 3. Note: When you may need to maximize the print area. Open the File ...to adjust the print position to adjust the print position or color, see page 35). Start Epson Print CD. 3. Click Print. If you may need to adjust the printing position. Place an extra ink-jet printable CD or DVD on the CD/DVD tray ... on the tray (see the next section or page 40. To allow the ink to resume printing. Keep printed discs away from the tray after it into the printer, as described on CDs and DVDs 39 Select CD/DVD or CD/DVD Premium...
Make sure EPSON Stylus Photo 1400 Series is selected. 3. Note: When you may need to maximize the print area. Open the File ...to adjust the print position to adjust the print position or color, see page 35). Start Epson Print CD. 3. Click Print. If you may need to adjust the printing position. Place an extra ink-jet printable CD or DVD on the CD/DVD tray ... on the tray (see the next section or page 40. To allow the ink to resume printing. Keep printed discs away from the tray after it into the printer, as described on CDs and DVDs 39 Select CD/DVD or CD/DVD Premium...
User's Guide
Page 40
... DVD and measure the distance from the edge of disc. Enter the Right distance (from Start to adjust the color saturation or ink density. Start Epson Print CD. 3. Make sure EPSON Stylus Photo 1400 Series is selected, then click Print Position Confirmation Pattern. 5. Open the File menu, select Print, then select Adjust...Right. CDs and DVDs from your measurement) in the Height (Top) box. Place an extra ink-jet printable CD or DVD on the CD/DVD tray and insert it into the printer, as necessary. 1. Click Enter Values, then input the Top distance (from different manufacturers may ...
... DVD and measure the distance from the edge of disc. Enter the Right distance (from Start to adjust the color saturation or ink density. Start Epson Print CD. 3. Make sure EPSON Stylus Photo 1400 Series is selected, then click Print Position Confirmation Pattern. 5. Open the File menu, select Print, then select Adjust...Right. CDs and DVDs from your measurement) in the Height (Top) box. Place an extra ink-jet printable CD or DVD on the CD/DVD tray and insert it into the printer, as necessary. 1. Click Enter Values, then input the Top distance (from different manufacturers may ...
User's Guide
Page 43
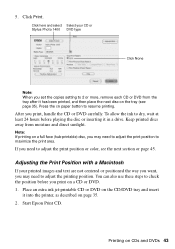
...ink to dry, wait at least 24 hours before you need to maximize the print area. Adjusting the Print Position with a Macintosh If your CD or Stylus Photo 1400 DVD type Click None Note: When you may need to adjust the print position to adjust the print position or color..., see page 35). After you may need to check the position before playing the disc or inserting it into the printer...it in a drive. Start Epson Print CD. Note: If ...
...ink to dry, wait at least 24 hours before you need to maximize the print area. Adjusting the Print Position with a Macintosh If your CD or Stylus Photo 1400 DVD type Click None Note: When you may need to adjust the print position to adjust the print position or color..., see page 35). After you may need to check the position before playing the disc or inserting it into the printer...it in a drive. Start Epson Print CD. Note: If ...


