Managing Color Guide
Page 6
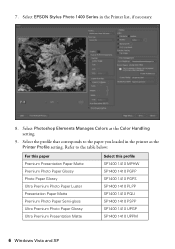
... Photoshop Elements Manages Colors as the Printer Profile setting. Select the profile that corresponds to the table below: For this paper Premium Presentation Paper Matte Premium Photo Paper Glossy Photo Paper Glossy Ultra Premium Photo Paper Luster Presentation Paper Matte Premium Photo Paper Semi-gloss Ultra Premium Photo Paper Glossy Ultra Premium... SP1400 1410 PLPP SP1400 1410 PQIJ SP1400 1410 PSPP SP1400 1410 UPGP SP1400 1410 UPPM 6 Windows Vista and XP Select EPSON Stylus Photo 1400 Series in the printer as the Color Handling setting. 9. Refer to the paper you loaded in the...
... Photoshop Elements Manages Colors as the Printer Profile setting. Select the profile that corresponds to the table below: For this paper Premium Presentation Paper Matte Premium Photo Paper Glossy Photo Paper Glossy Ultra Premium Photo Paper Luster Presentation Paper Matte Premium Photo Paper Semi-gloss Ultra Premium Photo Paper Glossy Ultra Premium... SP1400 1410 PLPP SP1400 1410 PQIJ SP1400 1410 PSPP SP1400 1410 UPGP SP1400 1410 UPPM 6 Windows Vista and XP Select EPSON Stylus Photo 1400 Series in the printer as the Color Handling setting. 9. Refer to the paper you loaded in the...

Managing Color Guide
Page 7
Make sure EPSON Stylus Photo 1400 Series is selected, then click the Preferences or Properties button. This reduces the color saturation so that the colors fit within the printer's color gamut. 11. Windows Vista and XP 7 Note: If your image contains very saturated colors, select Perceptual. 10. Select Relative Colorimetric as the Rendering Intent setting. Click the Print button. 12.
Make sure EPSON Stylus Photo 1400 Series is selected, then click the Preferences or Properties button. This reduces the color saturation so that the colors fit within the printer's color gamut. 11. Windows Vista and XP 7 Note: If your image contains very saturated colors, select Perceptual. 10. Select Relative Colorimetric as the Rendering Intent setting. Click the Print button. 12.
Managing Color Guide
Page 12
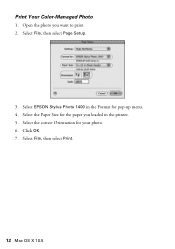
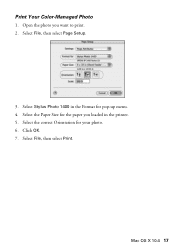
Select EPSON Stylus Photo 1400 in the printer. 5. Open the photo you loaded in the Format for your photo. 6. Select the correct Orientation for pop-up menu. 4. Select the Paper Size for the paper you want to print. 2. Click OK. 7. Select File, then select Print. 12 Mac OS X 10.5 Select File, then select Page Setup. 3. Print Your Color-Managed Photo 1.
Select EPSON Stylus Photo 1400 in the printer. 5. Open the photo you loaded in the Format for your photo. 6. Select the correct Orientation for pop-up menu. 4. Select the Paper Size for the paper you want to print. 2. Click OK. 7. Select File, then select Print. 12 Mac OS X 10.5 Select File, then select Page Setup. 3. Print Your Color-Managed Photo 1.
Managing Color Guide
Page 13
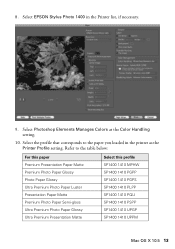
... paper you loaded in the Printer list, if necessary. 9. Select EPSON Stylus Photo 1400 in the printer as the Color Handling setting. 10. 8. Select the profile that corresponds to the table below: For this paper Premium Presentation Paper Matte Premium Photo Paper Glossy Photo Paper Glossy Ultra Premium Photo Paper Luster Presentation Paper Matte Premium Photo Paper Semi-gloss Ultra Premium...
... paper you loaded in the Printer list, if necessary. 9. Select EPSON Stylus Photo 1400 in the printer as the Color Handling setting. 10. 8. Select the profile that corresponds to the table below: For this paper Premium Presentation Paper Matte Premium Photo Paper Glossy Photo Paper Glossy Ultra Premium Photo Paper Luster Presentation Paper Matte Premium Photo Paper Semi-gloss Ultra Premium...
Managing Color Guide
Page 17
Select File, then select Page Setup. 3. Select Stylus Photo 1400 in the printer. 5. Select the Paper Size for the paper you want to print. 2. Select the correct Orientation for pop-up menu. 4. Click OK. 7. Open the photo you loaded in the Format for your photo. 6. Select File, then select Print. Print Your Color-Managed Photo 1. Mac OS X 10.4 17
Select File, then select Page Setup. 3. Select Stylus Photo 1400 in the printer. 5. Select the Paper Size for the paper you want to print. 2. Select the correct Orientation for pop-up menu. 4. Click OK. 7. Open the photo you loaded in the Format for your photo. 6. Select File, then select Print. Print Your Color-Managed Photo 1. Mac OS X 10.4 17
Managing Color Guide
Page 18
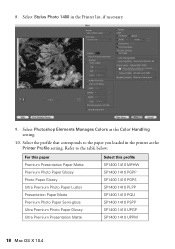
Select Stylus Photo 1400 in the printer as the Color Handling setting. 10. Select the profile that corresponds to the table below: For this paper Premium Presentation Paper Matte Premium Photo Paper Glossy Photo Paper Glossy Ultra Premium Photo Paper Luster Presentation Paper Matte Premium Photo Paper Semi-gloss Ultra Premium Photo Paper Glossy Ultra Premium ...SP1400 1410 PSPP SP1400 1410 UPGP SP1400 1410 UPPM 18 Mac OS X 10.4 Refer to the paper you loaded in the Printer list, if necessary. 9. 8. Select Photoshop Elements Manages Colors as the Printer Profile setting.
Select Stylus Photo 1400 in the printer as the Color Handling setting. 10. Select the profile that corresponds to the table below: For this paper Premium Presentation Paper Matte Premium Photo Paper Glossy Photo Paper Glossy Ultra Premium Photo Paper Luster Presentation Paper Matte Premium Photo Paper Semi-gloss Ultra Premium Photo Paper Glossy Ultra Premium ...SP1400 1410 PSPP SP1400 1410 UPGP SP1400 1410 UPPM 18 Mac OS X 10.4 Refer to the paper you loaded in the Printer list, if necessary. 9. 8. Select Photoshop Elements Manages Colors as the Printer Profile setting.
Product Information Guide
Page 4
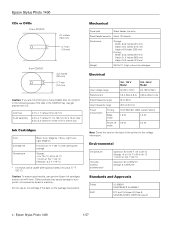
...cartridge if the date on the back of the disc or the CD/DVD tray may cause damage to your printer not covered by Epson's warranty. Epson Stylus Photo 1400 1/07 Mechanical Paper path Sheet feeder, top entry Sheet feeder capacity About 120 sheets Dimensions Storage: Width: 24.2...W 0.2 W 0.4 W Note: Check the label on the package has expired. Do not use genuine Epson ink cartridges and do not print in the following areas of the printer for a 8-cm disc Ink Cartridges Color Cartridge life Temperature Black, Cyan, Magenta, Yellow, Light Cyan, Light Magenta 6 months at 77 °...
...cartridge if the date on the back of the disc or the CD/DVD tray may cause damage to your printer not covered by Epson's warranty. Epson Stylus Photo 1400 1/07 Mechanical Paper path Sheet feeder, top entry Sheet feeder capacity About 120 sheets Dimensions Storage: Width: 24.2...W 0.2 W 0.4 W Note: Check the label on the package has expired. Do not use genuine Epson ink cartridges and do not print in the following areas of the printer for a 8-cm disc Ink Cartridges Color Cartridge life Temperature Black, Cyan, Magenta, Yellow, Light Cyan, Light Magenta 6 months at 77 °...
Product Information Guide
Page 7
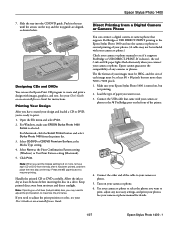
... on the front of your camera or phone. Turn on the tray. Epson Stylus Photo 1400 7. Slide the tray into the CD/DVD guide. See your camera or phone manual for instructions. For Macintosh, click the Select Printer button and select Stylus Photo 1400 from moisture and direct sunlight. Handle the printed CD or DVD carefully. ...of your images must be JPEG, and the size of paper you want to use the camera or phone to adjust the print position or color, see if it supports PictBridge or USB DIRECT-PRINT. Load the type of each CD or DVD from a Digital Camera or Camera Phone You...
... on the front of your camera or phone. Turn on the tray. Epson Stylus Photo 1400 7. Slide the tray into the CD/DVD guide. See your camera or phone manual for instructions. For Macintosh, click the Select Printer button and select Stylus Photo 1400 from moisture and direct sunlight. Handle the printed CD or DVD carefully. ...of your images must be JPEG, and the size of paper you want to use the camera or phone to adjust the print position or color, see if it supports PictBridge or USB DIRECT-PRINT. Load the type of each CD or DVD from a Digital Camera or Camera Phone You...

User's Guide
Page 24
.... 24 Printing from the Printer pop-up menu, then select the following settings as the Orientation setting. 6. You see a window like this one: Select Stylus Photo 1400 Select Print Settings 8. 5. Click OK. 7. Open the File menu and select Print. Select portrait or landscape as necessary: Select your Media Type Select Color or Grayscale Select higher...
.... 24 Printing from the Printer pop-up menu, then select the following settings as the Orientation setting. 6. You see a window like this one: Select Stylus Photo 1400 Select Print Settings 8. 5. Click OK. 7. Open the File menu and select Print. Select portrait or landscape as necessary: Select your Media Type Select Color or Grayscale Select higher...
User's Guide
Page 34
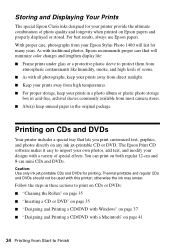
... the steps in acid-free, archival sleeves commonly available from your printer provide the ultimate combination of special effects. For best results, always use Epson papers. Printing on CDs and DVDs Your printer includes a special tray that will last for printing. Thermal-printable ...: Use only ink jet-printable CDs and DVDs for many years. Storing and Displaying Your Prints The special Epson Claria inks designed for your Epson Stylus Photo 1400 will minimize color changes and lengthen display life: ■ Frame prints under glass or a protective plastic sleeve to import your...
... the steps in acid-free, archival sleeves commonly available from your printer provide the ultimate combination of special effects. For best results, always use Epson papers. Printing on CDs and DVDs Your printer includes a special tray that will last for printing. Thermal-printable ...: Use only ink jet-printable CDs and DVDs for many years. Storing and Displaying Your Prints The special Epson Claria inks designed for your Epson Stylus Photo 1400 will minimize color changes and lengthen display life: ■ Frame prints under glass or a protective plastic sleeve to import your...
User's Guide
Page 39
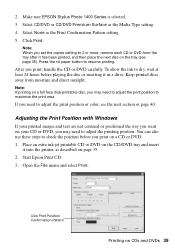
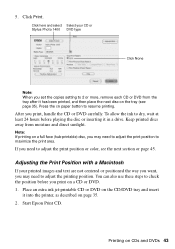
... from moisture and direct sunlight. Adjusting the Print Position with Windows If your CD or DVD, you may need to adjust the print position or color, see page 35). Select None as the Media Type setting. 4. To allow the ink to resume printing. Press the ) paper button to dry, ... insert it has been printed, and then place the next disc on a CD or DVD. 1. Make sure EPSON Stylus Photo 1400 Series is selected. 3. Keep printed discs away from the tray after it into the printer, as described on CDs and DVDs 39 You can also use these steps to adjust the printing position.
... from moisture and direct sunlight. Adjusting the Print Position with Windows If your CD or DVD, you may need to adjust the print position or color, see page 35). Select None as the Media Type setting. 4. To allow the ink to resume printing. Press the ) paper button to dry, ... insert it has been printed, and then place the next disc on a CD or DVD. 1. Make sure EPSON Stylus Photo 1400 Series is selected. 3. Keep printed discs away from the tray after it into the printer, as described on CDs and DVDs 39 You can also use these steps to adjust the printing position.
User's Guide
Page 40
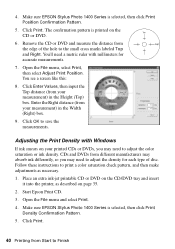
... density for accurate measurements. 7. Place an extra ink-jet printable CD or DVD on the CD/DVD tray and insert it into the printer, as necessary. 1. The confirmation pattern is printed on page 35. 2. CDs and DVDs from your measurement) in the Width (Right...color saturation or ink density. Start Epson Print CD. 3. Open the File menu and select Print. 4. 4. Click Print. Click Print. 40 Printing from the edge of disc. Make sure EPSON Stylus Photo 1400 Series is selected, then click Print Density Confirmation Pattern. 5. Click OK to Finish Make sure EPSON Stylus Photo 1400 ...
... density for accurate measurements. 7. Place an extra ink-jet printable CD or DVD on the CD/DVD tray and insert it into the printer, as necessary. 1. The confirmation pattern is printed on page 35. 2. CDs and DVDs from your measurement) in the Width (Right...color saturation or ink density. Start Epson Print CD. 3. Open the File menu and select Print. 4. 4. Click Print. Click Print. 40 Printing from the edge of disc. Make sure EPSON Stylus Photo 1400 Series is selected, then click Print Density Confirmation Pattern. 5. Click OK to Finish Make sure EPSON Stylus Photo 1400 ...
User's Guide
Page 42
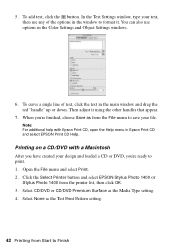
...from the File menu to print. 1. Select CD/DVD or CD/DVD Premium Surface as the Test Print Pattern setting. 42 Printing from the printer list, then click OK. 3. To add text, click the button. To curve a single line of the options in the main window and... on a CD/DVD with Epson Print CD, open the Help menu in the Color Settings and Object Settings windows. 6. 5. When you have created your text, then use options in Epson Print CD and select EPSON Print CD Help. Click the Select Printer button and select EPSON Stylus Photo 1400 or Stylus Photo 1400 from Start to format it ...
...from the File menu to print. 1. Select CD/DVD or CD/DVD Premium Surface as the Test Print Pattern setting. 42 Printing from the printer list, then click OK. 3. To add text, click the button. To curve a single line of the options in the main window and... on a CD/DVD with Epson Print CD, open the Help menu in the Color Settings and Object Settings windows. 6. 5. When you have created your text, then use options in Epson Print CD and select EPSON Print CD Help. Click the Select Printer button and select EPSON Stylus Photo 1400 or Stylus Photo 1400 from Start to format it ...
User's Guide
Page 43
...inserting it in a drive. You can also use these steps to adjust the print position or color, see page 35). Printing on a CD or DVD. 1. 5. Keep printed discs away from the tray after it into the printer, as described on page 35. 2. If you print, handle the CD or DVD carefully. ... print area. Start Epson Print CD. Note: If printing on the tray (see the next section or page 45. Press the ) paper button to 2 or more, remove each CD or DVD from moisture and direct sunlight. Adjusting the Print Position with a Macintosh If your CD or Stylus Photo 1400 DVD type Click None...
...inserting it in a drive. You can also use these steps to adjust the print position or color, see page 35). Printing on a CD or DVD. 1. 5. Keep printed discs away from the tray after it into the printer, as described on page 35. 2. If you print, handle the CD or DVD carefully. ... print area. Start Epson Print CD. Note: If printing on the tray (see the next section or page 45. Press the ) paper button to 2 or more, remove each CD or DVD from moisture and direct sunlight. Adjusting the Print Position with a Macintosh If your CD or Stylus Photo 1400 DVD type Click None...

User's Guide
Page 45
...Make sure Stylus Photo 1400 is printed, examine the print. Place an extra ink jet-printable CD or DVD on the CD/DVD tray and insert it dry for each type of disc. Note: You can also use the Brightness and Contrast settings in Epson Print CD to adjust the color, make adjustments... as necessary. Remove the CD or DVD and let it into the printer, as the Print Density Check Pattern Position setting to adjust the color saturation or ink density. For additional information, open ...
...Make sure Stylus Photo 1400 is printed, examine the print. Place an extra ink jet-printable CD or DVD on the CD/DVD tray and insert it dry for each type of disc. Note: You can also use the Brightness and Contrast settings in Epson Print CD to adjust the color, make adjustments... as necessary. Remove the CD or DVD and let it into the printer, as the Print Density Check Pattern Position setting to adjust the color saturation or ink density. For additional information, open ...


