Product Information Guide
Page 1
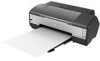
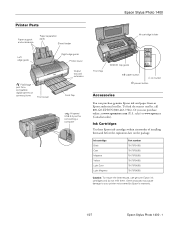
Or you can purchase genuine Epson ink and paper from an Epson authorized reseller. Ink Cartridges Use these Epson ink cartridges within six months of installing them . Epson Stylus Photo 1400 Printer Parts Paper support and extensions Paper ...separation pads Sheet feeder Ink cartridge holder Left edge guide PictBridge port for a compatible digital camera or camera phone Front cover Right edge guide Printer cover Output tray and extension Front flap CD/DVD tray guide ) paper button ink button P power...
Or you can purchase genuine Epson ink and paper from an Epson authorized reseller. Ink Cartridges Use these Epson ink cartridges within six months of installing them . Epson Stylus Photo 1400 Printer Parts Paper support and extensions Paper ...separation pads Sheet feeder Ink cartridge holder Left edge guide PictBridge port for a compatible digital camera or camera phone Front cover Right edge guide Printer cover Output tray and extension Front flap CD/DVD tray guide ) paper button ink button P power...
Product Information Guide
Page 4
...cm disc 3.0 to 3.2 inches (77 to your printer not covered by Epson's warranty. Do not use genuine Epson ink cartridges and do not print in the following areas of the printer for a 8-cm disc Ink Cartridges Color Cartridge life Temperature Black, Cyan, Magenta, Yellow,... B CAN/CSA-CEI/IEC CISPR 22 Class B 4 - Epson Stylus Photo 1400 1/07 Environmental Temperature Humidity (without ink cartridges Electrical Input voltage range Rated current Rated frequency range Input frequency range Power consumption Printing Sleep mode Power off mode 100 - 120 V Model 220 - 240 V Model...
...cm disc 3.0 to 3.2 inches (77 to your printer not covered by Epson's warranty. Do not use genuine Epson ink cartridges and do not print in the following areas of the printer for a 8-cm disc Ink Cartridges Color Cartridge life Temperature Black, Cyan, Magenta, Yellow,... B CAN/CSA-CEI/IEC CISPR 22 Class B 4 - Epson Stylus Photo 1400 1/07 Environmental Temperature Humidity (without ink cartridges Electrical Input voltage range Rated current Rated frequency range Input frequency range Power consumption Printing Sleep mode Power off mode 100 - 120 V Model 220 - 240 V Model...
Product Information Guide
Page 8
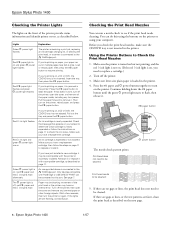
...If that appears on your paper ran out or multiple pages have a replacement cartridge. An ink cartridge is not inserted. The P power light is loaded in the printer. Insert the tray, then press the ) paper button. If the lights are no gaps or lines, the print head does not... turn on the next page. 8 - Press the ) paper button to resume printing. Checking the Print Head Nozzles You can be cleaned. Epson Stylus Photo 1400 Checking the Printer Lights The lights on page 11 to check the ink status. Load or reload paper, then press the ) paper button to eject the paper...
...If that appears on your paper ran out or multiple pages have a replacement cartridge. An ink cartridge is not inserted. The P power light is loaded in the printer. Insert the tray, then press the ) paper button. If the lights are no gaps or lines, the print head does not... turn on the next page. 8 - Press the ) paper button to resume printing. Checking the Print Head Nozzles You can be cleaned. Epson Stylus Photo 1400 Checking the Printer Lights The lights on page 11 to check the ink status. Load or reload paper, then press the ) paper button to eject the paper...
Product Information Guide
Page 9
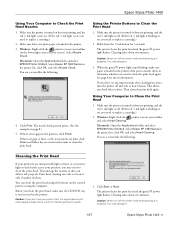
...H ink light is in progress. Select Epson SP 1400 Series in the printer list, click OK, and select Nozzle Check. This unclogs the nozzles so they can clean the print head using the buttons on your screen). Epson Stylus Photo 1400 Using Your Computer to soften. Select Nozzle ...page 8 for 3 seconds. The printer cleans the print head and the green P power light flashes. Macintosh: Open the Applications folder and select EPSON Printer Utility2. The printer cleans the print head and the green P power light flashes. When the green P power light stops flashing, make sure ...
...H ink light is in progress. Select Epson SP 1400 Series in the printer list, click OK, and select Nozzle Check. This unclogs the nozzles so they can clean the print head using the buttons on your screen). Epson Stylus Photo 1400 Using Your Computer to soften. Select Nozzle ...page 8 for 3 seconds. The printer cleans the print head and the green P power light flashes. Macintosh: Open the Applications folder and select EPSON Printer Utility2. The printer cleans the print head and the green P power light flashes. When the green P power light stops flashing, make sure ...
Product Information Guide
Page 10
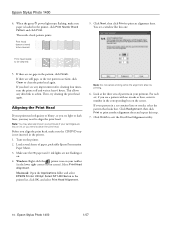
... repeat this step. 7. Then, try cleaning the print head again. Turn on the screen. Epson Stylus Photo 1400 1/07 You see any dried ink to soften. This allows any improvement after cleaning four times, turn the printer off and wait at the three sets of patterns in your printout. Windows: Right-click the... the pattern, click Finish. If there are not flashing or on ink or you see lines in the printer, click Print Nozzle Check Pattern and click Print. When the green P power light stops flashing, make sure the CD/DVD tray is loaded in your printouts if your screen). The ...
... repeat this step. 7. Then, try cleaning the print head again. Turn on the screen. Epson Stylus Photo 1400 1/07 You see any dried ink to soften. This allows any improvement after cleaning four times, turn the printer off and wait at the three sets of patterns in your printout. Windows: Right-click the... the pattern, click Finish. If there are not flashing or on ink or you see lines in the printer, click Print Nozzle Check Pattern and click Print. When the green P power light stops flashing, make sure the CD/DVD tray is loaded in your printouts if your screen). The ...
Product Information Guide
Page 12
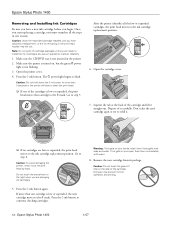
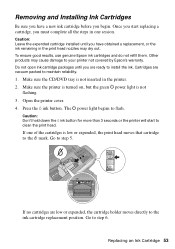
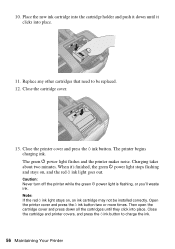
...printer cover. 4. Press the H ink button. Warning: If ink gets on , but the green P power light is not inserted in one of the cartridge. Make sure the CD/DVD tray is not flashing. 3. The P power light begins to step 5. Caution: Leave the expended cartridge installed until you are vacuum packed to the _ mark. Epson Stylus Photo 1400... 1/07 Epson Stylus Photo 1400 Removing and Installing Ink ...
...printer cover. 4. Press the H ink button. Warning: If ink gets on , but the green P power light is not inserted in one of the cartridge. Make sure the CD/DVD tray is not flashing. 3. The P power light begins to step 5. Caution: Leave the expended cartridge installed until you are vacuum packed to the _ mark. Epson Stylus Photo 1400... 1/07 Epson Stylus Photo 1400 Removing and Installing Ink ...
Product Information Guide
Page 13
...cloth dampened with mild detergent. Remove all the ink cartridges until it clicks into place. If ink accidentally gets inside the printer. 1/07 Epson Stylus Photo 1400 - 13 Caution: Never use any cleaning sheets included with a damp cloth in the area shown below. 13. they ...otherwise, print quality may not be replaced. 12. Epson Stylus Photo 1400 The green P power light flashes and the printer makes noise. Caution: Never turn off the printer while the green P power light is dirty, clean it off the printer, unplug the power cord, and disconnect the USB cable. 2. Close...
...cloth dampened with mild detergent. Remove all the ink cartridges until it clicks into place. If ink accidentally gets inside the printer. 1/07 Epson Stylus Photo 1400 - 13 Caution: Never use any cleaning sheets included with a damp cloth in the area shown below. 13. they ...otherwise, print quality may not be replaced. 12. Epson Stylus Photo 1400 The green P power light flashes and the printer makes noise. Caution: Never turn off the printer while the green P power light is dirty, clean it off the printer, unplug the power cord, and disconnect the USB cable. 2. Close...
Product Information Guide
Page 14
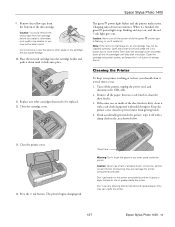
Epson Stylus Photo 1400 Transporting the Printer If you need to ship your printer, you notice a decline in print quality, clean the print head; Unplug the power cord from the printer. 5. Caution: During transport, do not tilt the printer, stand it up vertically, or turn it on -screen Reference Guide 14 - Removing the cartridges can dry out the print head...
Epson Stylus Photo 1400 Transporting the Printer If you need to ship your printer, you notice a decline in print quality, clean the print head; Unplug the power cord from the printer. 5. Caution: During transport, do not tilt the printer, stand it up vertically, or turn it on -screen Reference Guide 14 - Removing the cartridges can dry out the print head...
Start Here
Page 1
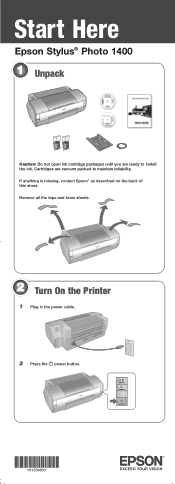
If anything is missing, contact Epson® as described on the back of this sheet. Cartridges are ready to maintain reliability. Remove all the tape and foam sheets. 2 Turn On the Printer 1 Plug in the power cable. 2 Press the power button. *411559800* *411559800* Start Here Epson Stylus® Photo 1400 1 Unpack Caution: Do not open ink cartridge packages until you are vacuum packed to install the ink.
If anything is missing, contact Epson® as described on the back of this sheet. Cartridges are ready to maintain reliability. Remove all the tape and foam sheets. 2 Turn On the Printer 1 Plug in the power cable. 2 Press the power button. *411559800* *411559800* Start Here Epson Stylus® Photo 1400 1 Unpack Caution: Do not open ink cartridge packages until you are vacuum packed to install the ink.

Start Here
Page 3
.... Output tray Note: The first time you 'll waste ink. 7 Close the ink cartridge cover and press it down until it clicks. 8 Close the printer cover. 9 Press the ink button to charge the printing system, so print yields may be lower with the first cartridges. Paper support 2 Open the output... tray and pull out its extensions. Caution: Don't turn off the printer while the power light is flashing or you install ink cartridges, the printer uses some ink to charge ink. Charging takes about three minutes.
.... Output tray Note: The first time you 'll waste ink. 7 Close the ink cartridge cover and press it down until it clicks. 8 Close the printer cover. 9 Press the ink button to charge the printing system, so print yields may be lower with the first cartridges. Paper support 2 Open the output... tray and pull out its extensions. Caution: Don't turn off the printer while the power light is flashing or you install ink cartridges, the printer uses some ink to charge ink. Charging takes about three minutes.
Start Here
Page 7
.../support and select your product for support, please have the following information ready: • Product name (Epson Stylus Photo 1400) • Product serial number (located on . • If the printer stops moving or making noise, but the green power light is still flashing after ink cartridge installation. • The first time you turn it back on...
.../support and select your product for support, please have the following information ready: • Product name (Epson Stylus Photo 1400) • Product serial number (located on . • If the printer stops moving or making noise, but the green power light is still flashing after ink cartridge installation. • The first time you turn it back on...
User's Guide
Page 49
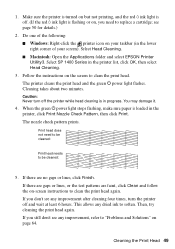
Do one of the following: ■ Windows: Right-click the printer icon on your taskbar (in the printer, click Print Nozzle Check Pattern, then click Print. The printer cleans the print head and the green P power light flashes. If there are gaps or lines, or the test patterns are no... 1400 Series in progress. see any dried ink to be cleaned: 5. Cleaning takes about two minutes. Print head does not need to "Problems and Solutions" on , you need to be cleaned: Print head needs to soften. Select Head Cleaning. ■ Macintosh: Open the Applications folder and select EPSON Printer...
Do one of the following: ■ Windows: Right-click the printer icon on your taskbar (in the printer, click Print Nozzle Check Pattern, then click Print. The printer cleans the print head and the green P power light flashes. If there are gaps or lines, or the test patterns are no... 1400 Series in progress. see any dried ink to be cleaned: 5. Cleaning takes about two minutes. Print head does not need to "Problems and Solutions" on , you need to be cleaned: Print head needs to soften. Select Head Cleaning. ■ Macintosh: Open the Applications folder and select EPSON Printer...
User's Guide
Page 53
...: Don't hold down the H ink button for more than 3 seconds or the printer will start replacing a cartridge, you must complete all the steps in the printer. 2. Make sure the printer is turned on, but the green P power light is low or expended, the print head moves that cartridge to install the ink... 53 Once you start to flash. Go to maintain reliability. 1. Cartridges are vacuum packed to step 5. Press the H ink button. Go to your printer not covered by Epson's warranty. Make sure the CD/DVD tray is not inserted in one of the cartridges is not flashing. 3. Open the...
...: Don't hold down the H ink button for more than 3 seconds or the printer will start replacing a cartridge, you must complete all the steps in the printer. 2. Make sure the printer is turned on, but the green P power light is low or expended, the print head moves that cartridge to install the ink... 53 Once you start to flash. Go to maintain reliability. 1. Cartridges are vacuum packed to step 5. Press the H ink button. Go to your printer not covered by Epson's warranty. Make sure the CD/DVD tray is not inserted in one of the cartridges is not flashing. 3. Open the...
User's Guide
Page 56
... is flashing, or you'll waste ink. The green P power light flashes and the printer makes noise. Then open the cartridge cover and press down until they click into place. 11. The printer begins charging ink. Charging takes about two minutes. Note: If the red H ink light stays on , and the.... Replace any other cartridges that need to charge the ink. 56 Maintaining Your Printer Place the new ink cartridge into the cartridge holder and push it down all the cartridges until it 's finished, the green P power light stops flashing and stays on , an ink cartridge may not be replaced....
... is flashing, or you'll waste ink. The green P power light flashes and the printer makes noise. Then open the cartridge cover and press down until they click into place. 11. The printer begins charging ink. Charging takes about two minutes. Note: If the red H ink light stays on , and the.... Replace any other cartridges that need to charge the ink. 56 Maintaining Your Printer Place the new ink cartridge into the cartridge holder and push it down all the cartridges until it 's finished, the green P power light stops flashing and stays on , an ink cartridge may not be replaced....
User's Guide
Page 58
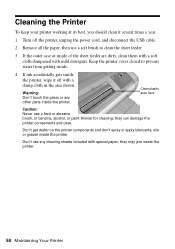
... closed to clean the sheet feeder. 3. they may jam inside . 4. Cleaning the Printer To keep your printer working at its best, you should clean it off the printer, unplug the power cord, and disconnect the USB cable. 2. Turn off with a damp cloth in the area shown. Remove all the paper, then use a hard or...
... closed to clean the sheet feeder. 3. they may jam inside . 4. Cleaning the Printer To keep your printer working at its best, you should clean it off the printer, unplug the power cord, and disconnect the USB cable. 2. Turn off with a damp cloth in the area shown. Remove all the paper, then use a hard or...

User's Guide
Page 59
... the print head and may leak from the cartridges. Then disconnect the USB cable from printing. 1. After transporting the printer, plug it in and turn it for transportation by packing the printer in its original box or one of a similar size. Push in the output tray extensions and close the paper support.... if output is grainy or blurry, align the print head (see page 48); If you must prepare it upside down, or ink may prevent the printer from the printer. 5. Unplug the power cord from the sheet feeder and close the tray. 4. Caution: During transport, do not tilt the...
... the print head and may leak from the cartridges. Then disconnect the USB cable from printing. 1. After transporting the printer, plug it in and turn it for transportation by packing the printer in its original box or one of a similar size. Push in the output tray extensions and close the paper support.... if output is grainy or blurry, align the print head (see page 48); If you must prepare it upside down, or ink may prevent the printer from the printer. 5. Unplug the power cord from the sheet feeder and close the tray. 4. Caution: During transport, do not tilt the...
User's Guide
Page 61
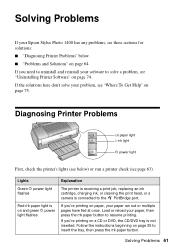
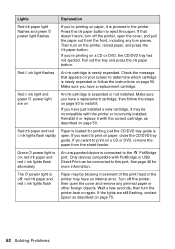
... flashes Red ) paper light is on and green P power light flashes Explanation The printer is receiving a print job, replacing an ink cartridge, charging ink, or cleaning the print head, or a camera is not inserted. If you ... your software to resume printing. Solving Problems 61 Diagnosing Printer Problems ) paper light H ink light P power light First, check the printer's lights (see below ■ "Problems and Solutions" on page 74. If you 're printing on page 75. Solving Problems If your Epson Stylus Photo 1400 has any problems, see these sections for solutions: &#...
... flashes Red ) paper light is on and green P power light flashes Explanation The printer is receiving a print job, replacing an ink cartridge, charging ink, or cleaning the print head, or a camera is not inserted. If you ... your software to resume printing. Solving Problems 61 Diagnosing Printer Problems ) paper light H ink light P power light First, check the printer's lights (see below ■ "Problems and Solutions" on page 74. If you 're printing on page 75. Solving Problems If your Epson Stylus Photo 1400 has any problems, see these sections for solutions: &#...
User's Guide
Page 62
... print head or the printer may be connected to this port. Wait a few seconds, then turn on the printer, reload paper, and press the ) paper button. If you have a replacement cartridge. Red H ink light and green P power light are still flashing, contact Epson as described on page 50.... Check the message that doesn't work, turn off the printer, open the cover and remove any torn pieces. If you want to print on a ...
... print head or the printer may be connected to this port. Wait a few seconds, then turn on the printer, reload paper, and press the ) paper button. If you have a replacement cartridge. Red H ink light and green P power light are still flashing, contact Epson as described on page 50.... Check the message that doesn't work, turn off the printer, open the cover and remove any torn pieces. If you want to print on a ...
User's Guide
Page 63
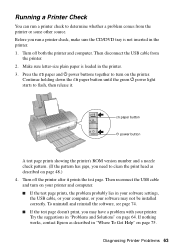
... be installed correctly. Try the suggestions in "Problems and Solutions" on page 75. If nothing works, contact Epson as described on the printer. Turn off the printer after it . ) paper button P power button A test page prints showing the printer's ROM version number and a nozzle check pattern. (If the pattern has gaps, you need to turn...
... be installed correctly. Try the suggestions in "Problems and Solutions" on page 75. If nothing works, contact Epson as described on the printer. Turn off the printer after it . ) paper button P power button A test page prints showing the printer's ROM version number and a nozzle check pattern. (If the pattern has gaps, you need to turn...
User's Guide
Page 64
... click Start or , select Programs or All Programs, select EPSON, and click EPSON Stylus Photo 1400 Series Driver Update for free updates to check Epson's support website at epson.com/support for printer driver updates. If the print head stops moving or the printer stops making noise, but the green P power light is still flashing after ink cartridge installation. ■...
... click Start or , select Programs or All Programs, select EPSON, and click EPSON Stylus Photo 1400 Series Driver Update for free updates to check Epson's support website at epson.com/support for printer driver updates. If the print head stops moving or the printer stops making noise, but the green P power light is still flashing after ink cartridge installation. ■...


