Managing Color Guide
Page 1
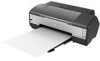
Epson Stylus® Photo 1400 Managing Color Printing With Adobe® Photoshop® Elements 6.0
Epson Stylus® Photo 1400 Managing Color Printing With Adobe® Photoshop® Elements 6.0

Managing Color Guide
Page 3
To print using these profiles with Adobe® Photoshop® Elements 6.0, follow the instructions in your prints, use these sections for your printer model and paper type are installed with your printer driver. Introduction Color profiles designed specifically for your operating system: ■ "Windows Vista and XP" on page 4 ■ "Mac OS X 10.5" on page 11 ■ "Mac OS X 10.4" on page 16 Introduction 3 For the most precise color in these profiles whenever you print.
To print using these profiles with Adobe® Photoshop® Elements 6.0, follow the instructions in your prints, use these sections for your printer model and paper type are installed with your printer driver. Introduction Color profiles designed specifically for your operating system: ■ "Windows Vista and XP" on page 4 ■ "Mac OS X 10.5" on page 11 ■ "Mac OS X 10.4" on page 16 Introduction 3 For the most precise color in these profiles whenever you print.
Managing Color Guide
Page 4
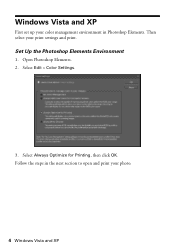
Set Up the Photoshop Elements Environment 1. Select Edit > Color Settings. 3. Select Always Optimize for Printing, then click OK. Follow the steps in Photoshop Elements. Windows Vista and XP First set up your color management environment in the next section to open and print your print settings and print. Open Photoshop Elements. 2. Then select your photo. 4 Windows Vista and XP
Set Up the Photoshop Elements Environment 1. Select Edit > Color Settings. 3. Select Always Optimize for Printing, then click OK. Follow the steps in Photoshop Elements. Windows Vista and XP First set up your color management environment in the next section to open and print your print settings and print. Open Photoshop Elements. 2. Then select your photo. 4 Windows Vista and XP

Managing Color Guide
Page 5
Select the Size of your photo. 5. Select File, then select Print. Windows Vista and XP 5 Select the correct Orientation for your paper. 4. Click OK. 6. Select File, then select Page Setup. 3. Print Your Color-Managed Photo 1. Open the photo you want to print. 2.
Select the Size of your photo. 5. Select File, then select Print. Windows Vista and XP 5 Select the correct Orientation for your paper. 4. Click OK. 6. Select File, then select Page Setup. 3. Print Your Color-Managed Photo 1. Open the photo you want to print. 2.

Managing Color Guide
Page 7
This reduces the color saturation so that the colors fit within the printer's color gamut. 11. Click the Print button. 12. Note: If your image contains very saturated colors, select Perceptual. Windows Vista and XP 7 10. Select Relative Colorimetric as the Rendering Intent setting. Make sure EPSON Stylus Photo 1400 Series is selected, then click the Preferences or Properties button.
This reduces the color saturation so that the colors fit within the printer's color gamut. 11. Click the Print button. 12. Note: If your image contains very saturated colors, select Perceptual. Windows Vista and XP 7 10. Select Relative Colorimetric as the Rendering Intent setting. Make sure EPSON Stylus Photo 1400 Series is selected, then click the Preferences or Properties button.

Managing Color Guide
Page 9
Select a Quality Option for your print. 16. Select the Paper Type setting that the Grayscale and Edge Smoothing options are unchecked. Make sure that matches the paper you loaded. 15. Windows Vista and XP 9 14.
Select a Quality Option for your print. 16. Select the Paper Type setting that the Grayscale and Edge Smoothing options are unchecked. Make sure that matches the paper you loaded. 15. Windows Vista and XP 9 14.

Managing Color Guide
Page 10
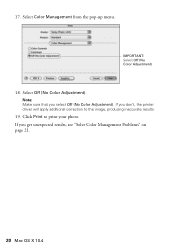
Select ICM as the Color Management setting, then choose Off (No Color Adjustment). IMPORTANT: Select ICM, then select Off (No Color Adjustment) Note: Make sure that you get unexpected results, see "Solve Color Management Problems" on page 21. 10 Windows Vista and XP If you select Off (No Color Adjustment). Click OK or Print to the image, producing inaccurate results. 18. If you don't, the printer driver will apply additional correction to print. 17. Click OK. 19.
Select ICM as the Color Management setting, then choose Off (No Color Adjustment). IMPORTANT: Select ICM, then select Off (No Color Adjustment) Note: Make sure that you get unexpected results, see "Solve Color Management Problems" on page 21. 10 Windows Vista and XP If you select Off (No Color Adjustment). Click OK or Print to the image, producing inaccurate results. 18. If you don't, the printer driver will apply additional correction to print. 17. Click OK. 19.
Managing Color Guide
Page 11
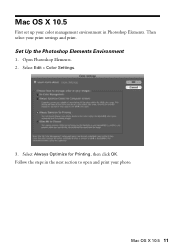
Set Up the Photoshop Elements Environment 1. Open Photoshop Elements. 2. Follow the steps in Photoshop Elements. Mac OS X 10.5 11 Select Edit > Color Settings. 3. Mac OS X 10.5 First set up your color management environment in the next section to open and print your print settings and print. Then select your photo. Select Always Optimize for Printing, then click OK.
Set Up the Photoshop Elements Environment 1. Open Photoshop Elements. 2. Follow the steps in Photoshop Elements. Mac OS X 10.5 11 Select Edit > Color Settings. 3. Mac OS X 10.5 First set up your color management environment in the next section to open and print your print settings and print. Then select your photo. Select Always Optimize for Printing, then click OK.
Managing Color Guide
Page 12
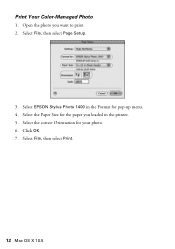
Select File, then select Print. 12 Mac OS X 10.5 Print Your Color-Managed Photo 1. Select the Paper Size for the paper you want to print. 2. Select the correct Orientation for pop-up menu. 4. Select File, then select Page Setup. 3. Open the photo you loaded in the Format for your photo. 6. Select EPSON Stylus Photo 1400 in the printer. 5. Click OK. 7.
Select File, then select Print. 12 Mac OS X 10.5 Print Your Color-Managed Photo 1. Select the Paper Size for the paper you want to print. 2. Select the correct Orientation for pop-up menu. 4. Select File, then select Page Setup. 3. Open the photo you loaded in the Format for your photo. 6. Select EPSON Stylus Photo 1400 in the printer. 5. Click OK. 7.
Managing Color Guide
Page 14
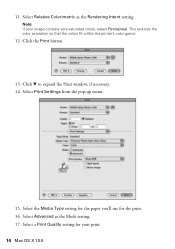
Select Advanced as the Rendering Intent setting. Select Relative Colorimetric as the Mode setting. 17. Click d to expand the Print window, if necessary. 14. Select a Print Quality setting for the print. 16. Click the Print button. 13. Select Print Settings from the pop-up menu. 15. 11. This reduces the color saturation so that the colors fit within the printer's color gamut. 12. Select the Media Type setting for the paper you'll use for your image contains very saturated colors, select Perceptual. Note: If your print. 14 Mac OS X 10.5
Select Advanced as the Rendering Intent setting. Select Relative Colorimetric as the Mode setting. 17. Click d to expand the Print window, if necessary. 14. Select a Print Quality setting for the print. 16. Click the Print button. 13. Select Print Settings from the pop-up menu. 15. 11. This reduces the color saturation so that the colors fit within the printer's color gamut. 12. Select the Media Type setting for the paper you'll use for your image contains very saturated colors, select Perceptual. Note: If your print. 14 Mac OS X 10.5
Managing Color Guide
Page 15
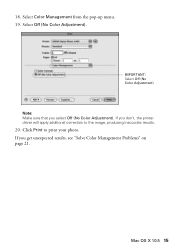
Select Color Management from the pop-up menu. 19. Mac OS X 10.5 15 Click Print to the image, producing inaccurate results. 20. If you select Off (No Color Adjustment). IMPORTANT: Select Off (No Color Adjustment) Note: Make sure that you don't, the printer driver will apply additional correction to print your photo. 18. If you get unexpected results, see "Solve Color Management Problems" on page 21. Select Off (No Color Adjustment).
Select Color Management from the pop-up menu. 19. Mac OS X 10.5 15 Click Print to the image, producing inaccurate results. 20. If you select Off (No Color Adjustment). IMPORTANT: Select Off (No Color Adjustment) Note: Make sure that you don't, the printer driver will apply additional correction to print your photo. 18. If you get unexpected results, see "Solve Color Management Problems" on page 21. Select Off (No Color Adjustment).

Managing Color Guide
Page 16
Mac OS X 10.4 First set up your color management environment in the next section to open and print your print settings and print. Then select your photo. 16 Mac OS X 10.4 Select Always Optimize for Printing, then click OK. Follow the steps in Photoshop Elements. Set Up the Photoshop Elements Environment 1. Open Photoshop Elements. 2. Select Edit > Color Settings. 3.
Mac OS X 10.4 First set up your color management environment in the next section to open and print your print settings and print. Then select your photo. 16 Mac OS X 10.4 Select Always Optimize for Printing, then click OK. Follow the steps in Photoshop Elements. Set Up the Photoshop Elements Environment 1. Open Photoshop Elements. 2. Select Edit > Color Settings. 3.
Managing Color Guide
Page 17
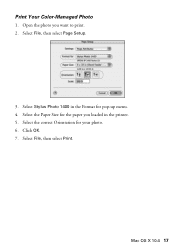
Print Your Color-Managed Photo 1. Select the Paper Size for your photo. 6. Select the correct Orientation for the paper you want to print. 2. Click OK. 7. Open the photo you loaded in the Format for pop-up menu. 4. Mac OS X 10.4 17 Select Stylus Photo 1400 in the printer. 5. Select File, then select Page Setup. 3. Select File, then select Print.
Print Your Color-Managed Photo 1. Select the Paper Size for your photo. 6. Select the correct Orientation for the paper you want to print. 2. Click OK. 7. Open the photo you loaded in the Format for pop-up menu. 4. Mac OS X 10.4 17 Select Stylus Photo 1400 in the printer. 5. Select File, then select Page Setup. 3. Select File, then select Print.

Managing Color Guide
Page 19
Click the Print button. 13. Select Print Settings from the pop-up menu. 14. Select a Print Quality setting for the print. 15. Mac OS X 10.4 19 11. This reduces the color saturation so that the colors fit within the printer's color gamut. 12. Select Advanced as the Rendering Intent setting. Select Relative Colorimetric as the Mode setting. 16. Select the Media Type setting for the paper you'll use for your image contains very saturated colors, select Perceptual. Note: If your print.
Click the Print button. 13. Select Print Settings from the pop-up menu. 14. Select a Print Quality setting for the print. 15. Mac OS X 10.4 19 11. This reduces the color saturation so that the colors fit within the printer's color gamut. 12. Select Advanced as the Rendering Intent setting. Select Relative Colorimetric as the Mode setting. 16. Select the Media Type setting for the paper you'll use for your image contains very saturated colors, select Perceptual. Note: If your print.
Managing Color Guide
Page 20
IMPORTANT: Select Off (No Color Adjustment) 18. Click Print to the image, producing inaccurate results. 19. If you get unexpected results, see "Solve Color Management Problems" on page 21. 20 Mac OS X 10.4 If you don't, the printer driver will apply additional correction to print your photo. 17. Select Off (No Color Adjustment). Select Color Management from the pop-up menu. Note: Make sure that you select Off (No Color Adjustment).
IMPORTANT: Select Off (No Color Adjustment) 18. Click Print to the image, producing inaccurate results. 19. If you get unexpected results, see "Solve Color Management Problems" on page 21. 20 Mac OS X 10.4 If you don't, the printer driver will apply additional correction to print your photo. 17. Select Off (No Color Adjustment). Select Color Management from the pop-up menu. Note: Make sure that you select Off (No Color Adjustment).
Managing Color Guide
Page 21
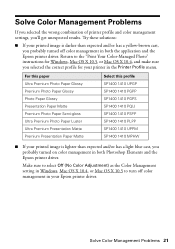
... Mac OS X 10.5 to the "Print Your Color-Managed Photo" instructions for Windows, Mac OS X 10.5, or Mac OS X 10.4, and make sure you probably turned off color management in your printer in both Photoshop Elements and the Epson printer driver. For this paper Ultra Premium Photo Paper Glossy Premium Photo Paper Glossy Photo Paper Glossy Presentation Paper Matte Premium...
... Mac OS X 10.5 to the "Print Your Color-Managed Photo" instructions for Windows, Mac OS X 10.5, or Mac OS X 10.4, and make sure you probably turned off color management in your printer in both Photoshop Elements and the Epson printer driver. For this paper Ultra Premium Photo Paper Glossy Premium Photo Paper Glossy Photo Paper Glossy Presentation Paper Matte Premium...

Product Information Guide
Page 3
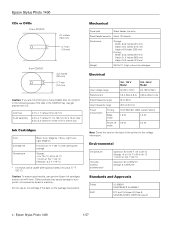
...higher grade paper. C: The minimum bottom margin is 0.12 inch (3.0 mm). Before printing large jobs using the borderless setting, print a single sheet to 60% RH 1/07 Epson Stylus Photo 1400 - 3 Load envelopes flap edge left margin is 0.12 inch (3.0 mm) for ...sheets A B-L Normal Borderless* B-R C Envelopes A: The minimum top margin is 0.12 inch (3.0 mm). Epson Stylus Photo 1400 Printer Specifications Printing Printing method Ink configuration Print direction MicroPiezo ink jet 6 individual ink cartridges in the expanded area. Note: Always load paper into the ...
...higher grade paper. C: The minimum bottom margin is 0.12 inch (3.0 mm). Before printing large jobs using the borderless setting, print a single sheet to 60% RH 1/07 Epson Stylus Photo 1400 - 3 Load envelopes flap edge left margin is 0.12 inch (3.0 mm) for ...sheets A B-L Normal Borderless* B-R C Envelopes A: The minimum top margin is 0.12 inch (3.0 mm). Epson Stylus Photo 1400 Printer Specifications Printing Printing method Ink configuration Print direction MicroPiezo ink jet 6 individual ink cartridges in the expanded area. Note: Always load paper into the ...
Product Information Guide
Page 4
Epson Stylus Photo 1400 1/07 Do not use genuine Epson ink cartridges and do not print in the following areas of the printer for a 8-cm disc Ink Cartridges Color Cartridge life Temperature Black, Cyan, Magenta, Yellow, Light Cyan, Light Magenta 6 months at 77 °F (25 °C) after opening the package ...Class B CAN/CSA-CEI/IEC CISPR 22 Class B 4 - Epson Stylus Photo 1400 CDs or DVDs 12-cm CD/DVD 4.7 inches (120 mm) 0.7 inch (18 mm) 8-cm CD/DVD 3.2 inches (80 mm) 0.7 inch (18 mm) Caution: If you are not printing on a hub-printable disc, do not refill them. Caution: ...
Epson Stylus Photo 1400 1/07 Do not use genuine Epson ink cartridges and do not print in the following areas of the printer for a 8-cm disc Ink Cartridges Color Cartridge life Temperature Black, Cyan, Magenta, Yellow, Light Cyan, Light Magenta 6 months at 77 °F (25 °C) after opening the package ...Class B CAN/CSA-CEI/IEC CISPR 22 Class B 4 - Epson Stylus Photo 1400 CDs or DVDs 12-cm CD/DVD 4.7 inches (120 mm) 0.7 inch (18 mm) 8-cm CD/DVD 3.2 inches (80 mm) 0.7 inch (18 mm) Caution: If you are not printing on a hub-printable disc, do not refill them. Caution: ...
Product Information Guide
Page 5
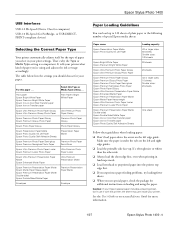
... 2.0 Hi-Speed (for more information. 1/07 Epson Stylus Photo 1400 - 5 It tells your print settings. It's often glossier or whiter than the other side. ❏ Always load the short edge first, even when printing in your printer what kind of special Epson media sheets: Paper name Loading capacity Epson Presentation Paper Matte Epson Photo Quality Ink Jet Paper A3 or larger...
... 2.0 Hi-Speed (for more information. 1/07 Epson Stylus Photo 1400 - 5 It tells your print settings. It's often glossier or whiter than the other side. ❏ Always load the short edge first, even when printing in your printer what kind of special Epson media sheets: Paper name Loading capacity Epson Presentation Paper Matte Epson Photo Quality Ink Jet Paper A3 or larger...
Product Information Guide
Page 6
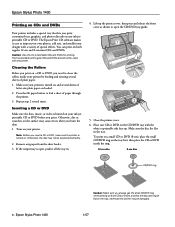
...DVDs should not be positioned correctly. 2. otherwise the printer may not be used with this printer. Turn on your printer is turned on the tray; Epson Stylus Photo 1400 Caution: Make sure you always use the small CD/DVD ring when printing on 8-cm CDs or DVDs, and that lets ...guide. 5. Remove any ink jetprintable CD or DVD. If the output tray is burned on your printer by feeding and ejecting several times. Epson Stylus Photo 1400 Printing on CDs and DVDs Your printer includes a special tray that the disc and ring lie flat on . Cleaning the Rollers Before you...
...DVDs should not be positioned correctly. 2. otherwise the printer may not be used with this printer. Turn on your printer is turned on the tray; Epson Stylus Photo 1400 Caution: Make sure you always use the small CD/DVD ring when printing on 8-cm CDs or DVDs, and that lets ...guide. 5. Remove any ink jetprintable CD or DVD. If the output tray is burned on your printer by feeding and ejecting several times. Epson Stylus Photo 1400 Printing on CDs and DVDs Your printer includes a special tray that the disc and ring lie flat on . Cleaning the Rollers Before you...


