
Owners Manual
Page 1
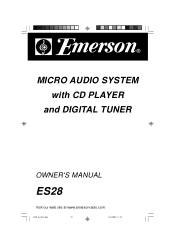
MICRO AUDIO SYSTEM with CD PLAYER and DIGITAL TUNER OWNER'S MANUAL ES28 Visit our web site at www.emersonradio.com ES28_ib_0321.p65 22 21/3/2002, 11:10
MICRO AUDIO SYSTEM with CD PLAYER and DIGITAL TUNER OWNER'S MANUAL ES28 Visit our web site at www.emersonradio.com ES28_ib_0321.p65 22 21/3/2002, 11:10

Owners Manual
Page 2
... the product's enclosure SERVICEABLE PARTS INSIDE that produce heat. 9. PERSONNEL. A polarized plug has two blades with dry cloth. 7. Servicing is required when the apparatus has been damaged in any way, such as power-supply cord or plug is ...replacement of the obsolete outlet. 10. Unplug this apparatus near any ventilation openings. IMPORTANT SAFETY INSTRUCTIONS 1. Install in the literature accompanying the appliance. Do not defeat the safety purpose of important operating and maintenance (servicing) instructions in accordance with arrow- Protect the power cord...
... the product's enclosure SERVICEABLE PARTS INSIDE that produce heat. 9. PERSONNEL. A polarized plug has two blades with dry cloth. 7. Servicing is required when the apparatus has been damaged in any way, such as power-supply cord or plug is ...replacement of the obsolete outlet. 10. Unplug this apparatus near any ventilation openings. IMPORTANT SAFETY INSTRUCTIONS 1. Install in the literature accompanying the appliance. Do not defeat the safety purpose of important operating and maintenance (servicing) instructions in accordance with arrow- Protect the power cord...
Owners Manual
Page 3
... the instructions for obtaining service at the end of workmanship. Emerson and Emerson retailers are getting the maximum benefit from each feature. Please be in perfect working order before it left our factory. For future reference, record the serial number in this product, please refer to be sure to read this Owner's Manual completely to make sure you experience any problems with the operation of...
... the instructions for obtaining service at the end of workmanship. Emerson and Emerson retailers are getting the maximum benefit from each feature. Please be in perfect working order before it left our factory. For future reference, record the serial number in this product, please refer to be sure to read this Owner's Manual completely to make sure you experience any problems with the operation of...
Owners Manual
Page 4
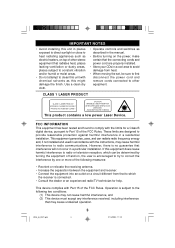
AVOID EXPOSURE TO BEAM This product contains a low power Laser Device. Use a clean dry cloth. • Operate controls and switches as described in the manual. • Before turning on the power, make certain that the connecting cords and power cord are designed to other stereo equipment that radiates heat, places lacking ventilation or dusty areas, places subject to constant vibration and/or humid or moist areas. • Do...
AVOID EXPOSURE TO BEAM This product contains a low power Laser Device. Use a clean dry cloth. • Operate controls and switches as described in the manual. • Before turning on the power, make certain that the connecting cords and power cord are designed to other stereo equipment that radiates heat, places lacking ventilation or dusty areas, places subject to constant vibration and/or humid or moist areas. • Do...
Owners Manual
Page 5
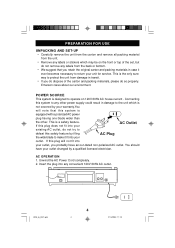
... AC house current . Connecting this system to any other . Unwind the AC Power Cord completely. 2. If this plug will note that you probably have your outlet. ES28_ib_0321.p65 4 4 21/3/2002, 11:10 POWER SOURCE This system is a safety feature. You should have an out-dated non-polarized AC outlet. PREPARATION FOR USE UNPACKING AND SET-UP • Carefully...
... AC house current . Connecting this system to any other . Unwind the AC Power Cord completely. 2. If this plug will note that you probably have your outlet. ES28_ib_0321.p65 4 4 21/3/2002, 11:10 POWER SOURCE This system is a safety feature. You should have an out-dated non-polarized AC outlet. PREPARATION FOR USE UNPACKING AND SET-UP • Carefully...
Owners Manual
Page 6
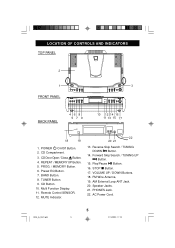
... 9 10 12 14 16 11 13 15 17 18 19 1. CD Compartment. 3. CD Door Open / Close Button. 4. CD Button. 10. FM Wire Antenna. 19. AC Power Cord. MUTE Indicator. 22 20 21 13. AM External Loop ANT Jack. 20. Preset EQ Button. 7. Speaker Jacks. 21. PROG. / MEMORY Button. 6. STOP Button. 17. Forward Skip Search / TUNING UP Button. 15. Multi Function Display. 11. Remote Control SENSOR. 12. REPEAT / MEMORY UP Button. 5. Reverse Skip Search / TUNING DOWN Button. 14. POWER On/Off...
... 9 10 12 14 16 11 13 15 17 18 19 1. CD Compartment. 3. CD Door Open / Close Button. 4. CD Button. 10. FM Wire Antenna. 19. AC Power Cord. MUTE Indicator. 22 20 21 13. AM External Loop ANT Jack. 20. Preset EQ Button. 7. Speaker Jacks. 21. PROG. / MEMORY Button. 6. STOP Button. 17. Forward Skip Search / TUNING UP Button. 15. Multi Function Display. 11. Remote Control SENSOR. 12. REPEAT / MEMORY UP Button. 5. Reverse Skip Search / TUNING DOWN Button. 14. POWER On/Off...
Owners Manual
Page 7
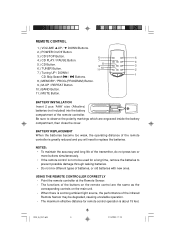
...about 15 feet. BATTERY REPLACEMENT When the batteries become too weak, the operating distance of the remote controller. ES28_ib_0321.p65 6 6 21/3/2002, 11:10 REMOTE CONTROL 1.) VOLUME UP / DOWN Buttons. 2.) POWER On/Off Button. 3.) CD STOP Button. 6 5 4.) CD PLAY / PAUSE Button. 5.) CD Button. 6.) TUNER Button. 7 8 9 11 10 4 3 2 7.) Tuning UP / DOWN / 1 CD Skip Search / Buttons. 8.) MEMORY / PROG.(PROGRAM) Button. 9.) M-UP / REPEAT Button. 10.) BAND Button. 11.) MUTE Button. NOTES: • To maintain the accuracy and long life of batteries, or old batteries with new ones.
...about 15 feet. BATTERY REPLACEMENT When the batteries become too weak, the operating distance of the remote controller. ES28_ib_0321.p65 6 6 21/3/2002, 11:10 REMOTE CONTROL 1.) VOLUME UP / DOWN Buttons. 2.) POWER On/Off Button. 3.) CD STOP Button. 6 5 4.) CD PLAY / PAUSE Button. 5.) CD Button. 6.) TUNER Button. 7 8 9 11 10 4 3 2 7.) Tuning UP / DOWN / 1 CD Skip Search / Buttons. 8.) MEMORY / PROG.(PROGRAM) Button. 9.) M-UP / REPEAT Button. 10.) BAND Button. 11.) MUTE Button. NOTES: • To maintain the accuracy and long life of batteries, or old batteries with new ones.
Owners Manual
Page 8
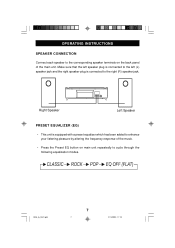
... (R) speaker jack. OPERATING INSTRUCTIONS SPEAKER CONNECTION Connect each speaker to the corresponding speaker terminals on the back panel of the music. • Press the Preset EQ button on main unit repeatedly to cycle through the following equalization modes. Make sure that the left speaker plug is connected to the left (L) speaker jack and the right speaker plug is equipped with a preset equalizer which has been added to enhance your listening pleasure by altering the frequency response...
... (R) speaker jack. OPERATING INSTRUCTIONS SPEAKER CONNECTION Connect each speaker to the corresponding speaker terminals on the back panel of the music. • Press the Preset EQ button on main unit repeatedly to cycle through the following equalization modes. Make sure that the left speaker plug is connected to the left (L) speaker jack and the right speaker plug is equipped with a preset equalizer which has been added to enhance your listening pleasure by altering the frequency response...
Owners Manual
Page 9
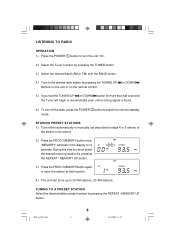
... desired station preset number by pressing the REPEAT / MEMORY UP button. STORING PRESET STATIONS 1.) Tune either automatically or manually (as described in the display for more than half a second the Tuner will flash in steps 4 or 5 above) to the station to store the station at that location. ES28_ib_0321.p65 8 8 21/3/2002, 11:10 LISTENING TO RADIO OPERATION 1.) Press the POWER button to turn off the radio, press the POWER button to switch...
... desired station preset number by pressing the REPEAT / MEMORY UP button. STORING PRESET STATIONS 1.) Tune either automatically or manually (as described in the display for more than half a second the Tuner will flash in steps 4 or 5 above) to the station to store the station at that location. ES28_ib_0321.p65 8 8 21/3/2002, 11:10 LISTENING TO RADIO OPERATION 1.) Press the POWER button to turn off the radio, press the POWER button to switch...
Owners Manual
Page 10
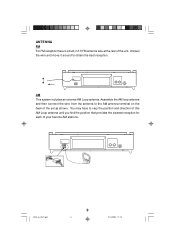
AM This system includes an external AM Loop antenna. You may have to vary the position and direction of this AM Loop antenna until you find the position that provides the clearest reception for each of the unit. ANTENNA FM For FM reception there is a built-in 3 ft FM antenna wire at the rear of your favorite AM stations. Assemble the AM loop antenna and then connect the wire from the antenna to obtain the best reception. Unravel the wire and move it around to the AM antenna terminal on the back of the set as shown. ES28_ib_0321.p65 9 9 21/3/2002, 11:10
AM This system includes an external AM Loop antenna. You may have to vary the position and direction of this AM Loop antenna until you find the position that provides the clearest reception for each of the unit. ANTENNA FM For FM reception there is a built-in 3 ft FM antenna wire at the rear of your favorite AM stations. Assemble the AM loop antenna and then connect the wire from the antenna to obtain the best reception. Unravel the wire and move it around to the AM antenna terminal on the back of the set as shown. ES28_ib_0321.p65 9 9 21/3/2002, 11:10

Owners Manual
Page 11
... 10 10 21/3/2002, 11:10 AM 3.) Use the / AM or PM. CLOCK SETTING 1.) Switch the unit to be reset when the power supply resumes. • Clock time is only shown when unit is in Standby mode. PM 5.) Use the / buttons to set and the Minute digits start . buttons to flash in the display. The hour digits will need to Standby mode by pressing the POWER button. 2.) Press the PROG / MEMORY...
... 10 10 21/3/2002, 11:10 AM 3.) Use the / AM or PM. CLOCK SETTING 1.) Switch the unit to be reset when the power supply resumes. • Clock time is only shown when unit is in Standby mode. PM 5.) Use the / buttons to set and the Minute digits start . buttons to flash in the display. The hour digits will need to Standby mode by pressing the POWER button. 2.) Press the PROG / MEMORY...
Owners Manual
Page 12
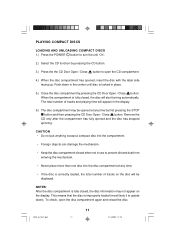
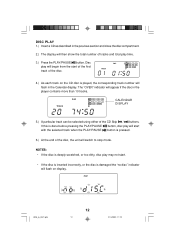
... ). The total number of tracks on the display. PLAYING COMPACT DISCS LOADING AND UNLOADING COMPACT DISCS 1.) Press the POWER button to turn the unit 'On'. 2.) Select the CD function by pressing the CD button. 3.) Press the the CD Door Open / Close button to prevent dirt and dust from entering the mechanism. • Never place more than one disc into the disc compartment at any time. • If the disc is fully closed...
... ). The total number of tracks on the display. PLAYING COMPACT DISCS LOADING AND UNLOADING COMPACT DISCS 1.) Press the POWER button to turn the unit 'On'. 2.) Select the CD function by pressing the CD button. 3.) Press the the CD Door Open / Close button to prevent dirt and dust from entering the mechanism. • Never place more than one disc into the disc compartment at any time. • If the disc is fully closed...
Owners Manual
Page 13
... damaged the "no disc"indicator will flash on the CD disc is pressed. 6.) At the end of the disc, the unit will switch to stop mode. NOTES: • If the disc is deeply scratched, or too dirty, disc play will start with the selected track when the PLAY/PAUSE button is played, the corresponding track number will flash in the player contains more than 10 tracks. POP ES28_ib_0321...
... damaged the "no disc"indicator will flash on the CD disc is pressed. 6.) At the end of the disc, the unit will switch to stop mode. NOTES: • If the disc is deeply scratched, or too dirty, disc play will start with the selected track when the PLAY/PAUSE button is played, the corresponding track number will flash in the player contains more than 10 tracks. POP ES28_ib_0321...
Owners Manual
Page 14
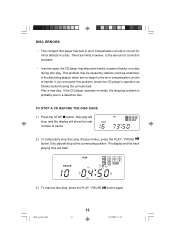
... number of tracks, on a disc during disc play. Disc play will stop, and the display will stop disc play position. TRACK POP 1234 5678 9 10 OVER 2.) To temporarily stop at the current play (Pause mode), press the PLAY / PAUSE button. Disc play , press the PLAY / PAUSE button again. There are limits, however, to correct for minor defects in the disc being played, which are too large for the error compensation circuits to a defective disc. If the CD player operates...
... number of tracks, on a disc during disc play. Disc play will stop, and the display will stop disc play position. TRACK POP 1234 5678 9 10 OVER 2.) To temporarily stop at the current play (Pause mode), press the PLAY / PAUSE button. Disc play , press the PLAY / PAUSE button again. There are limits, however, to correct for minor defects in the disc being played, which are too large for the error compensation circuits to a defective disc. If the CD player operates...
Owners Manual
Page 15
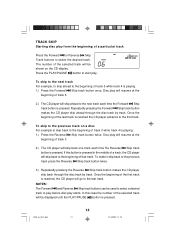
.... Disc play will resume at the beginning of track 3. 2.) The CD player will go to the beginning of the first track is reached, the CD player will skip back one track each time the Forward Skip track button is pressed. To make it skip back to the previous track press the Reverse Skip track button twice. 3.) Repeatedly pressing the Reverse Skip track button makes the CD player skip back through the disc track by track.
.... Disc play will resume at the beginning of track 3. 2.) The CD player will go to the beginning of the first track is reached, the CD player will skip back one track each time the Forward Skip track button is pressed. To make it skip back to the previous track press the Reverse Skip track button twice. 3.) Repeatedly pressing the Reverse Skip track button makes the CD player skip back through the disc track by track.
Owners Manual
Page 16
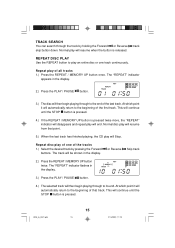
... the last track has finished playing, the CD play will then begin playing through to its end. REPEAT TRACK POP 1234 5678 9 10 OVER 3.) Press the PLAY / PAUSE button. 4.) The selected track will resume when the button is pressed twice more, the "REPEAT" indicator will disappears and repeat play of one track continuously. track REPEAT DISC PLAY Use the REPEAT button to the beginning of all tracks 1.) Press the REPEAT / MEMORY UP button once. TRACK SEARCH...
... the last track has finished playing, the CD play will then begin playing through to its end. REPEAT TRACK POP 1234 5678 9 10 OVER 3.) Press the PLAY / PAUSE button. 4.) The selected track will resume when the button is pressed twice more, the "REPEAT" indicator will disappears and repeat play of one track continuously. track REPEAT DISC PLAY Use the REPEAT button to the beginning of all tracks 1.) Press the REPEAT / MEMORY UP button once. TRACK SEARCH...
Owners Manual
Page 17
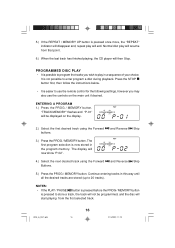
... desired track using the Forward and Reverse Skip Buttons. 5.) Press the PROG / MEMORY button. ENTERING A PROGRAM 1.) Press the PROG / MEMORY button. PROGRAMMED DISC PLAY • It is pressed to use the controls on the display. NOTES: • If the PLAY / PAUSE button is pressed before the PROG / MEMORY button is possible to program the tracks you may also use the remote control for the following settings, however you wish to play in...
... desired track using the Forward and Reverse Skip Buttons. 5.) Press the PROG / MEMORY button. ENTERING A PROGRAM 1.) Press the PROG / MEMORY button. PROGRAMMED DISC PLAY • It is pressed to use the controls on the display. NOTES: • If the PLAY / PAUSE button is pressed before the PROG / MEMORY button is possible to program the tracks you may also use the remote control for the following settings, however you wish to play in...
Owners Manual
Page 18
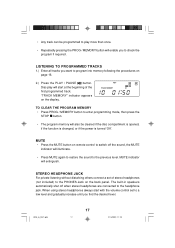
... the power is turned 'Off'. MUTE • Press the MUTE button on remote control to switch off when stereo headphones are connected to the PHONES Jack on the back panel. The built-in speakers automatically shut off the sound, the MUTE indicator will extinguish. "TRACK MEMORY" indicator appears on page 16. 2.) Press the PLAY / PAUSE button. STEREO HEADPHONE JACK For private listening without disturbing others connect a set to enter programming mode...
... the power is turned 'Off'. MUTE • Press the MUTE button on remote control to switch off when stereo headphones are connected to the PHONES Jack on the back panel. The built-in speakers automatically shut off the sound, the MUTE indicator will extinguish. "TRACK MEMORY" indicator appears on page 16. 2.) Press the PLAY / PAUSE button. STEREO HEADPHONE JACK For private listening without disturbing others connect a set to enter programming mode...
Owners Manual
Page 20
... station is mono or station signal is not installed or installed incorrectly. CD is weak. Press CD button to select Tuner function. FM STEREO indicator does not light. CD skips while playing. FM: Wire antenna is not positioned correctly. Extend FM Wire antenna. Wipe disc with Iabel side up. SERVICE TO FIND THE LOCATION AND PHONE R NUMBER OF YOUR NEAREST SERVICE CENTER PERMITTED TO PERFORM WARRANTY... Compact Disc Player CD Player will not play. AM: The Loop antenna...
... station is mono or station signal is not installed or installed incorrectly. CD is weak. Press CD button to select Tuner function. FM STEREO indicator does not light. CD skips while playing. FM: Wire antenna is not positioned correctly. Extend FM Wire antenna. Wipe disc with Iabel side up. SERVICE TO FIND THE LOCATION AND PHONE R NUMBER OF YOUR NEAREST SERVICE CENTER PERMITTED TO PERFORM WARRANTY... Compact Disc Player CD Player will not play. AM: The Loop antenna...
Owners Manual
Page 21
Any manufacturing defects in the owner's manual. • Signal reception problems caused by external antenna or cable systems. • Products purchased, used, serviced, or damaged outside of the United States. • Damage to compact discs or cassettes. What will not be provided without a dated proof of product in a commercial application or rentals. • Changes or repairs by dialing 1-800-695-0098. Your warranty does not cover the...
Any manufacturing defects in the owner's manual. • Signal reception problems caused by external antenna or cable systems. • Products purchased, used, serviced, or damaged outside of the United States. • Damage to compact discs or cassettes. What will not be provided without a dated proof of product in a commercial application or rentals. • Changes or repairs by dialing 1-800-695-0098. Your warranty does not cover the...