Use and Care Manual
Page 1
Use & Care Guide Built-In Wall Oven 318 205 122 (0710) Rev. B
Use & Care Guide Built-In Wall Oven 318 205 122 (0710) Rev. B
Use and Care Manual
Page 3
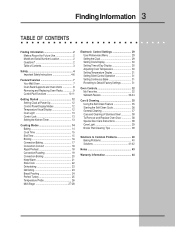
... Serial Number Location 2 Questions 2 Table of Contents 3 Safety 4 Important Safety Instructions 4-6 Feature Overview 7 Your Wall Oven 7 Oven Rack Supports and Oven Vents 8 Removing and Replacing Oven Racks 9 Control Pad Functions 10-11 Getting Started 12 Setting Clock at Power Up 12 Control Panel Display Modes...Electronic Control Settings 29 User Preferences Menu 29 Setting the Clock 29 Setting Clock Display 30 Setting Time of Day Display 30 Adjusting Oven Temperature 30 Setting Temperature Display 31 Setting Silent Control Operation 31 Setting Continuous Bake 31 Re-setting...
... Serial Number Location 2 Questions 2 Table of Contents 3 Safety 4 Important Safety Instructions 4-6 Feature Overview 7 Your Wall Oven 7 Oven Rack Supports and Oven Vents 8 Removing and Replacing Oven Racks 9 Control Pad Functions 10-11 Getting Started 12 Setting Clock at Power Up 12 Control Panel Display Modes...Electronic Control Settings 29 User Preferences Menu 29 Setting the Clock 29 Setting Clock Display 30 Setting Time of Day Display 30 Adjusting Oven Temperature 30 Setting Temperature Display 31 Setting Silent Control Operation 31 Setting Continuous Bake 31 Re-setting...
Use and Care Manual
Page 4
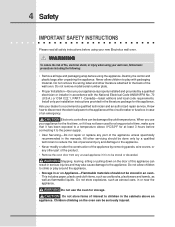
... manuals. Stepping, leaning, sitting or pulling down on the oven can be stored or discarded. 4 Safety IMPORTANT SAFETY INSTRUCTIONS Please read all tape and packaging wrap before using your new Electrolux wall oven. ! Do not remove the wiring label and other part of... the product. • Remove the oven door from any part of the wall oven. Ask your dealer to the appliance at least 3 hours before using the appliance. Children climbing on the door of an emergency. Know how to disconnect the electrical...
... manuals. Stepping, leaning, sitting or pulling down on the oven can be stored or discarded. 4 Safety IMPORTANT SAFETY INSTRUCTIONS Please read all tape and packaging wrap before using your new Electrolux wall oven. ! Do not remove the wiring label and other part of... the product. • Remove the oven door from any part of the wall oven. Ask your dealer to the appliance at least 3 hours before using the appliance. Children climbing on the door of an emergency. Know how to disconnect the electrical...
Use and Care Manual
Page 5
... or heating the room. • Do Not Use Water or Flour on any part of the appliance. • DO NOT TOUCH INTERIOR OVEN ELEMENTS OR INTERIOR SURFACES OF THE WALL OVEN UNTIL THEY HAVE COOLED. Let hot air or steam escape before removing rack. If rack must be left alone or unattended in... sufficient time to cool. Do not use baking soda, a dry chemical or foam-type extinguisher. • When heating fat or grease, watch it closely. The wall oven is hot, use . Safety 5 To reduce the risk of tipping of pressure may cause the container to burst and result in injury.
... or heating the room. • Do Not Use Water or Flour on any part of the appliance. • DO NOT TOUCH INTERIOR OVEN ELEMENTS OR INTERIOR SURFACES OF THE WALL OVEN UNTIL THEY HAVE COOLED. Let hot air or steam escape before removing rack. If rack must be left alone or unattended in... sufficient time to cool. Do not use baking soda, a dry chemical or foam-type extinguisher. • When heating fat or grease, watch it closely. The wall oven is hot, use . Safety 5 To reduce the risk of tipping of pressure may cause the container to burst and result in injury.
Use and Care Manual
Page 6
...the appliance before removing and replacing the bulb. Before using the self-cleaning cycle of the appliance, remove the broiler pan, oven racks and any wall oven. Care should be kept clean. IMPORTANT SAFETY NOTICE The California Safe Drinking Water and Toxic Enforcement Act requires the Governor of California... in this Owner's Guide. Also the side rails of potential exposure to operate. • Do not clean the oven door gasket. IMPORTANT INSTRUCTIONS FOR CLEANING YOUR OVEN • Clean the appliance regularly to keep all parts free of any part of the appliance The health of some...
...the appliance before removing and replacing the bulb. Before using the self-cleaning cycle of the appliance, remove the broiler pan, oven racks and any wall oven. Care should be kept clean. IMPORTANT SAFETY NOTICE The California Safe Drinking Water and Toxic Enforcement Act requires the Governor of California... in this Owner's Guide. Also the side rails of potential exposure to operate. • Do not clean the oven door gasket. IMPORTANT INSTRUCTIONS FOR CLEANING YOUR OVEN • Clean the appliance regularly to keep all parts free of any part of the appliance The health of some...
Use and Care Manual
Page 7
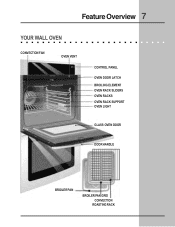
Feature Overview 7 YOUR WALL OVEN CONVECTION FAN OVEN VENT CONTROL PANEL OVEN DOOR LATCH BROILING ELEMENT OVEN RACK SLIDERS OVEN RACKS OVEN RACK SUPPORT OVEN LIGHT GLASS OVEN DOOR DOOR HANDLE BROILER PAN BROILER PAN GRID CONVECTION ROASTING RACK
Feature Overview 7 YOUR WALL OVEN CONVECTION FAN OVEN VENT CONTROL PANEL OVEN DOOR LATCH BROILING ELEMENT OVEN RACK SLIDERS OVEN RACKS OVEN RACK SUPPORT OVEN LIGHT GLASS OVEN DOOR DOOR HANDLE BROILER PAN BROILER PAN GRID CONVECTION ROASTING RACK
Use and Care Manual
Page 16
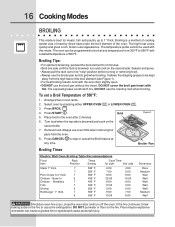
... browned and cook on the fire or use a fire extinguisher. DO NOT cover the broil pan insert with this mode. LOWER OVEN 3. Grid Figure 1 6. Broiler Pan Broiling Times Electric Wall Oven Broiling Table Recommendations Food Item Rack Position Temp Setting Cook Time 1st side 2nd side Steak 1" thick 7 7 Pork Chops 3/4"...00 10:00 6:00 0:00 0:00 7:00 8:00 Doneness Rare Medium Well Well Well Well Well Medium Well Should an oven fire occur, close the oven door and turn and cook on the fire. It allows the dripping grease to broil at any temperature from 300°F to...
... browned and cook on the fire or use a fire extinguisher. DO NOT cover the broil pan insert with this mode. LOWER OVEN 3. Grid Figure 1 6. Broiler Pan Broiling Times Electric Wall Oven Broiling Table Recommendations Food Item Rack Position Temp Setting Cook Time 1st side 2nd side Steak 1" thick 7 7 Pork Chops 3/4"...00 10:00 6:00 0:00 0:00 7:00 8:00 Doneness Rare Medium Well Well Well Well Well Medium Well Should an oven fire occur, close the oven door and turn and cook on the fire. It allows the dripping grease to broil at any temperature from 300°F to...

Use and Care Manual
Page 24
...: • No need to preheat for this feature. • Proof bread until dough has doubled in the oven. 2. Select oven by pressing either UPPER OVEN UPPER OVEN or LOWER OVEN . Remove food. 7. Select oven by activating the yeast. Press START to begin the bread proofing. 5. Press START to continue ...door openings to stop or cancel the Bread Proof feature at any temperature between edge of pan and walls of 100°F. LOWER OVEN 2. This feature is active: 1. The oven can be programmed for directions). 6. Press the HI + hi or LO lo pads to get ...
...: • No need to preheat for this feature. • Proof bread until dough has doubled in the oven. 2. Select oven by pressing either UPPER OVEN UPPER OVEN or LOWER OVEN . Remove food. 7. Select oven by activating the yeast. Press START to begin the bread proofing. 5. Press START to continue ...door openings to stop or cancel the Bread Proof feature at any temperature between edge of pan and walls of 100°F. LOWER OVEN 2. This feature is active: 1. The oven can be programmed for directions). 6. Press the HI + hi or LO lo pads to get ...

Use and Care Manual
Page 26
... the probe so that the tip rests in use the default target temperature of 170°F. PlugtheTemperatureProbeintoitsoutletintheoven.(Theoutletislocatedonthetoplefthand side of the cavity wall, near front of the food. Make sure it . 5. After 5-8 seconds, the display will not allow probe to 210... convection broil while the probe is connected. When the food reach the target temperature, the oven will be damaged by pressing either UPPER OVEN UPPER OVEN or LOWER OVEN . 26 Cooking Modes TEMPERATURE PROBE For many foods, especially roasts and poultry, testing the ...
... the probe so that the tip rests in use the default target temperature of 170°F. PlugtheTemperatureProbeintoitsoutletintheoven.(Theoutletislocatedonthetoplefthand side of the cavity wall, near front of the food. Make sure it . 5. After 5-8 seconds, the display will not allow probe to 210... convection broil while the probe is connected. When the food reach the target temperature, the oven will be damaged by pressing either UPPER OVEN UPPER OVEN or LOWER OVEN . 26 Cooking Modes TEMPERATURE PROBE For many foods, especially roasts and poultry, testing the ...
Use and Care Manual
Page 35
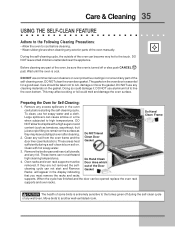
...appliance. Before cleaning any exterior parts of the oven, be taken not to rub, damage or move the gasket. Care should be sure the oven is essential for Self-Cleaning: 1. DO NOT use any wall oven. Remove any excess spillovers in the oven cavity before cleaning. • Wear rubber ...gloves when cleaning any part of the oven manually. Clean any foil. When the cycle has ...
...appliance. Before cleaning any exterior parts of the oven, be taken not to rub, damage or move the gasket. Care should be sure the oven is essential for Self-Cleaning: 1. DO NOT use any wall oven. Remove any excess spillovers in the oven cavity before cleaning. • Wear rubber ...gloves when cleaning any part of the oven manually. Clean any foil. When the cycle has ...
Use and Care Manual
Page 36
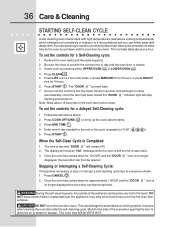
... 5. Press CANCEL . 2. they touch the hot oven door surfaces. To set the controls for 3 hours, or press HEAVY 6. Remove the oven racks and the racks supports. 2. Note: Allow about one hour. Press END TIME . 4. Stand to the side of the wall oven can become very hot to the touch. LOWER... OVEN 4. Press START . As soon as the control is closed. 3. Follow the instructions above cooking temperatures) which eliminate...
... 5. Press CANCEL . 2. they touch the hot oven door surfaces. To set the controls for 3 hours, or press HEAVY 6. Remove the oven racks and the racks supports. 2. Note: Allow about one hour. Press END TIME . 4. Stand to the side of the wall oven can become very hot to the touch. LOWER... OVEN 4. Press START . As soon as the control is closed. 3. Follow the instructions above cooking temperatures) which eliminate...
Use and Care Manual
Page 39
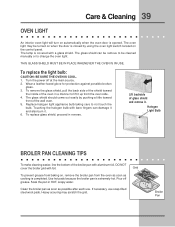
... shield can damage it and also burn it . DO NOT cover the broiler grid with a glass shield. Grid To prevent grease from the oven as soon as possible after each use soap-filled steel wool pads. Pour off at the main source. 2. Heavy scouring may be cleaned manually... pan as soon as cooking is covered with foil. Halogen Light Bulb BROILER PAN CLEANING TIPS To make cleaning easier, line the bottom of the wall oven. 5. Turn the power off grease. The lamp is completed. Wear a leather-faced glove for protection against possible broken glass. 3. Replace halogen light...
... shield can damage it and also burn it . DO NOT cover the broiler grid with a glass shield. Grid To prevent grease from the oven as soon as possible after each use soap-filled steel wool pads. Pour off at the main source. 2. Heavy scouring may be cleaned manually... pan as soon as cooking is covered with foil. Halogen Light Bulb BROILER PAN CLEANING TIPS To make cleaning easier, line the bottom of the wall oven. 5. Turn the power off grease. The lamp is completed. Wear a leather-faced glove for protection against possible broken glass. 3. Replace halogen light...
Use and Care Manual
Page 40
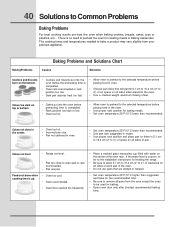
... proper rack position for leveling the range. • Be sure to allow 5.1 cm to 10.2 cm (2" to the installation instructions for baking needs. • Set oven temperature 25°F/12°C lower than recommended. If the water level is 5.1 cm to 10.2 cm (2" to 4") of air space on the center of... space on all pans from your previous appliance. 40 Solutions to oven wall or rack overcrowded. • Pan warped. Cakes too dark on all sides of each pan in recipe. • Use proper rack position and place pan...
... proper rack position for leveling the range. • Be sure to allow 5.1 cm to 10.2 cm (2" to the installation instructions for baking needs. • Set oven temperature 25°F/12°C lower than recommended. If the water level is 5.1 cm to 10.2 cm (2" to 4") of air space on the center of... space on all pans from your previous appliance. 40 Solutions to oven wall or rack overcrowded. • Pan warped. Cakes too dark on all sides of each pan in recipe. • Use proper rack position and place pan...

