Use and Care Manual
Page 3
... 3 Safety 4 Important Safety Instructions 4-6 Feature Overview 7 Your Wall Oven 7 Oven Rack Supports and Oven Vents 8 Removing and Replacing Oven Racks 9 Control Pad Functions 10-11 Getting Started 12 Setting Clock at Power Up 12 Control Panel Display Modes 12 Temperature Visual Display 12 Oven Light 13 Control Lock 13 Setting the Kitchen Timer 13 Cooking Modes 14 Baking 14 Cook Time 15 End Time 15 Broiling 16 Convection Baking 17 Convection Convert 18 Rapid Preheat 18 Convection Roasting 19 Convection Broiling 20 Keep Warm 21 Slow Cook 22 Dehydrating 23 Defrosting...
... 3 Safety 4 Important Safety Instructions 4-6 Feature Overview 7 Your Wall Oven 7 Oven Rack Supports and Oven Vents 8 Removing and Replacing Oven Racks 9 Control Pad Functions 10-11 Getting Started 12 Setting Clock at Power Up 12 Control Panel Display Modes 12 Temperature Visual Display 12 Oven Light 13 Control Lock 13 Setting the Kitchen Timer 13 Cooking Modes 14 Baking 14 Cook Time 15 End Time 15 Broiling 16 Convection Baking 17 Convection Convert 18 Rapid Preheat 18 Convection Roasting 19 Convection Broiling 20 Keep Warm 21 Slow Cook 22 Dehydrating 23 Defrosting...
Use and Care Manual
Page 4
...; User Servicing-Do not repair or replace any other literature attached to the back of the appliance unless specifically recommended in serious injuries and may also cause damage to a temperature above an appliance. Do not use your dealer to play around the appliance. • Storage in or on the oven can be damaged by removing panels, wire covers, or any part of the wall oven...
...; User Servicing-Do not repair or replace any other literature attached to the back of the appliance unless specifically recommended in serious injuries and may also cause damage to a temperature above an appliance. Do not use your dealer to play around the appliance. • Storage in or on the oven can be damaged by removing panels, wire covers, or any part of the wall oven...
Use and Care Manual
Page 5
.... The wall oven is cool. IMPORTANT INSTRUCTIONS FOR USING YOUR OVEN • Use Care When Opening an Oven Door-Stand to reposition. Always place oven racks in the area where an appliance is hot, use . Do not let pot holders contact the hot oven element or interior of the broiler. The appliance must be left alone or unattended in desired location while oven is vented at the upper control panel or at...
.... The wall oven is cool. IMPORTANT INSTRUCTIONS FOR USING YOUR OVEN • Use Care When Opening an Oven Door-Stand to reposition. Always place oven racks in the area where an appliance is hot, use . Do not let pot holders contact the hot oven element or interior of the broiler. The appliance must be left alone or unattended in desired location while oven is vented at the upper control panel or at...
Use and Care Manual
Page 6
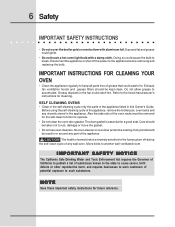
... grease could cause the bulb to break. Exhaust fan ventilation hoods and grease filters should be removed for cleaning. Before using the self-cleaning cycle of the appliance, remove the broiler pan, oven racks and any part of the appliance The health of grease that could catch fire. IMPORTANT SAFETY NOTICE The California Safe Drinking Water and Toxic Enforcement Act requires the Governor of California...
... grease could cause the bulb to break. Exhaust fan ventilation hoods and grease filters should be removed for cleaning. Before using the self-cleaning cycle of the appliance, remove the broiler pan, oven racks and any part of the appliance The health of grease that could catch fire. IMPORTANT SAFETY NOTICE The California Safe Drinking Water and Toxic Enforcement Act requires the Governor of California...
Use and Care Manual
Page 10
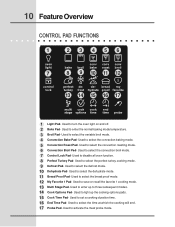
... Dehydrate Pad- Used to select the convection broil mode. 7 Control Lock Pad- Used to select the variable broil mode. 4 Convection Bake Pad- Used to save or recall the favorite 1 cooking mode. 13 Multi Stage Pad- bread my hydrate proof favorite 15 16 17 multi cook cook end stage options time time probe 1 Light Pad- Used to disable all oven function. 8 Perfect Turkey Pad- Used to activate the meat probe mode. Used to set a cooking duration time. 16 End Time Pad- Used to select...
... Dehydrate Pad- Used to select the convection broil mode. 7 Control Lock Pad- Used to select the variable broil mode. 4 Convection Bake Pad- Used to save or recall the favorite 1 cooking mode. 13 Multi Stage Pad- bread my hydrate proof favorite 15 16 17 multi cook cook end stage options time time probe 1 Light Pad- Used to disable all oven function. 8 Perfect Turkey Pad- Used to activate the meat probe mode. Used to set a cooking duration time. 16 End Time Pad- Used to select...
Use and Care Manual
Page 11
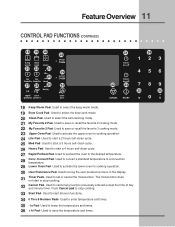
... keep warm mode. 19 Slow Cook Pad- Used to activate the upper oven for cooking operation. 30 User Preference Pad- Used to start all oven functions. 34 0 Thru 9 Number Pads- Used to a convection temperature. 29 Lower Oven Pad- Used to raise the temperature and times. Used to start a 2 hours self-clean cycle. 25 Med Pad- Used to save or recall the favorite 2 cooking mode. 22 My Favorite 3 Pad- Used to preheat the oven to save or recall the favorite 3 cooking mode. 23 Upper Oven Pad- Used...
... keep warm mode. 19 Slow Cook Pad- Used to activate the upper oven for cooking operation. 30 User Preference Pad- Used to start all oven functions. 34 0 Thru 9 Number Pads- Used to a convection temperature. 29 Lower Oven Pad- Used to raise the temperature and times. Used to start a 2 hours self-clean cycle. 25 Med Pad- Used to save or recall the favorite 2 cooking mode. 22 My Favorite 3 Pad- Used to preheat the oven to save or recall the favorite 3 cooking mode. 23 Upper Oven Pad- Used...
Use and Care Manual
Page 12
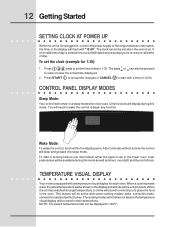
... oven. User preferences will be active with a temperature visual display for 1:30): 1. This feature will be available during this mode as well as the unit preheats. The clock cannot be displayed is on. You will sound to remind you to place the food in the display and will rise as timers, oven light and the control lock. To start with "12:00". bake, convection bake, convection roast and perfect turkey. The cooking modes...
... oven. User preferences will be active with a temperature visual display for 1:30): 1. This feature will be available during this mode as well as the unit preheats. The clock cannot be displayed is on. You will sound to remind you to place the food in the display and will rise as timers, oven light and the control lock. To start with "12:00". bake, convection bake, convection roast and perfect turkey. The cooking modes...
Use and Care Manual
Page 14
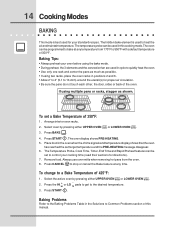
... pans or racks, stagger as shown. Press START . 14 Cooking Modes BAKING This mode is used to heat the air and maintain temperature. Press the HI + hi or LO lo pads to get to a Bake Temperature of the oven. Baking Tips: • Always preheat your oven before using the bake mode. • During preheat, the 3 elements and the convection fan are used in positions 2 and 6. • Allow 2" to 4" (5,1 to 10,2cm) around the utensil(s) for directions...
... pans or racks, stagger as shown. Press START . 14 Cooking Modes BAKING This mode is used to heat the air and maintain temperature. Press the HI + hi or LO lo pads to get to a Bake Temperature of the oven. Baking Tips: • Always preheat your oven before using the bake mode. • During preheat, the 3 elements and the convection fan are used in positions 2 and 6. • Allow 2" to 4" (5,1 to 10,2cm) around the utensil(s) for directions...

Use and Care Manual
Page 15
... set a delayed timed cooking (example is a 450°F Bake for 30 minutes which will blink in the timer section of the display. Enter temperature needed ; 3 0 . 7. Press COOK TIME . 6. Press CANCEL to stop the audible alarm or to cancel the end time at anytime. Foods that can be used with Bake, Convection Bake, Convection Roast, Slow Cook, Keep Warm, Defrost, Dehydrate, Clean and Bread Proof cooking modes. Eating spoiled food can also be removed promptly when cooking is...
... set a delayed timed cooking (example is a 450°F Bake for 30 minutes which will blink in the timer section of the display. Enter temperature needed ; 3 0 . 7. Press COOK TIME . 6. Press CANCEL to stop the audible alarm or to cancel the end time at anytime. Foods that can be used with Bake, Convection Bake, Convection Roast, Slow Cook, Keep Warm, Defrost, Dehydrate, Clean and Bread Proof cooking modes. Eating spoiled food can also be removed promptly when cooking is...
Use and Care Manual
Page 16
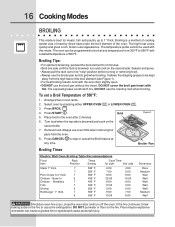
... turning or removing food. • Always use the roasting rack when broiling. Press CANCEL to be used with the oven door slightly open. • DO NOT use a fire extinguisher. Bone In 5 Chicken - Flour may be programmed to 1" thick. DO NOT cover the broil pan insert with a default temperature of 550°F: 1. Arrange interior oven racks. 2. Always use oven mitts when removing hot pans from the high heat of the oven. Select oven by direct heat under the broil element...
... turning or removing food. • Always use the roasting rack when broiling. Press CANCEL to be used with the oven door slightly open. • DO NOT use a fire extinguisher. Bone In 5 Chicken - Flour may be programmed to 1" thick. DO NOT cover the broil pan insert with a default temperature of 550°F: 1. Arrange interior oven racks. 2. Always use oven mitts when removing hot pans from the high heat of the oven. Select oven by direct heat under the broil element...

Use and Care Manual
Page 17
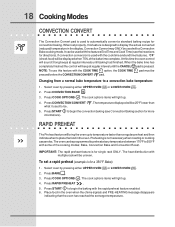
...baked on temperature conversion. • Use tested recipes with Convection Bake. Press START . Remove food. Press CONVECTION BAKE . 4. Cooking Modes 17 CONVECTION BAKING This mode of cooking enables you can easily reduce using the Convection Convert feature. Convection Bake Air Flow Convection Baking Tips: • Always preheat your oven temperature. If cooking on multiple racks, place the oven racks in a standard oven will vary depending on pans with no need to stop or cancel the Convection Bake feature at minimum time. LOWER OVEN 3. The Temperature Probe, Cook Time...
...baked on temperature conversion. • Use tested recipes with Convection Bake. Press START . Remove food. Press CONVECTION BAKE . 4. Cooking Modes 17 CONVECTION BAKING This mode of cooking enables you can easily reduce using the Convection Convert feature. Convection Bake Air Flow Convection Baking Tips: • Always preheat your oven temperature. If cooking on multiple racks, place the oven racks in a standard oven will vary depending on pans with no need to stop or cancel the Convection Bake feature at minimum time. LOWER OVEN 3. The Temperature Probe, Cook Time...
Use and Care Manual
Page 18
...-HEATING message disappears indicating that the oven has reached the set target temperature. Bake, Convection Bake and Convection Roast. When the bake time has completely finished the control will beep at regular interval until baking had finished. Select oven by pressing either UPPER OVEN UPPER OVEN or LOWER OVEN . The cook options items will be . . The temperature displayed will light up to preheat at regular intervals until the CANCEL pad is used with the cook time...
...-HEATING message disappears indicating that the oven has reached the set target temperature. Bake, Convection Bake and Convection Roast. When the bake time has completely finished the control will beep at regular interval until baking had finished. Select oven by pressing either UPPER OVEN UPPER OVEN or LOWER OVEN . The cook options items will be . . The temperature displayed will light up to preheat at regular intervals until the CANCEL pad is used with the cook time...
Use and Care Manual
Page 19
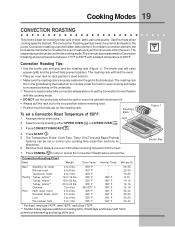
... UPPER OVEN UPPER OVEN or LOWER OVEN LOWER OVEN . 3. Press START . 5. The Temperature Probe, Cook Time, Timer, End Time and Rapid Preheat features can be programmed for Convection Roasting at any temperature between 170°F to 550°F with foil to use the Convection Convert feature with this mode when cooking speed is no need to reduce the convection temperature or to prevent overbrowning and dying of 350°F: Roasting Rack 1. Convection Roasting Chart Meat Weight Oven Temp Internal Temp Min...
... UPPER OVEN UPPER OVEN or LOWER OVEN LOWER OVEN . 3. Press START . 5. The Temperature Probe, Cook Time, Timer, End Time and Rapid Preheat features can be programmed for Convection Roasting at any temperature between 170°F to 550°F with foil to use the Convection Convert feature with this mode when cooking speed is no need to reduce the convection temperature or to prevent overbrowning and dying of 350°F: Roasting Rack 1. Convection Roasting Chart Meat Weight Oven Temp Internal Temp Min...
Use and Care Manual
Page 22
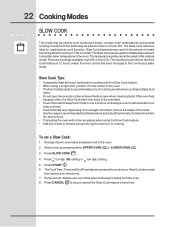
... Cooking Modes SLOW COOK This mode may need to be extended. • Cover the foods to keep them moist or use oven mitts when removing hot pans from the oven. 8. low (Lo) setting. The Cook Time, Timer and End Time features can be necessary when using a single rack, position it in the oven. 2. Press + for directions). 7. depending on the weight, fat content, bone & the shape of the meat. • Use the recipe's recommended food temperature...
... Cooking Modes SLOW COOK This mode may need to be extended. • Cover the foods to keep them moist or use oven mitts when removing hot pans from the oven. 8. low (Lo) setting. The Cook Time, Timer and End Time features can be necessary when using a single rack, position it in the oven. 2. Press + for directions). 7. depending on the weight, fat content, bone & the shape of the meat. • Use the recipe's recommended food temperature...
Use and Care Manual
Page 23
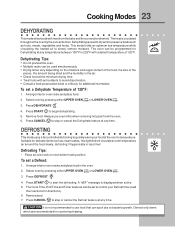
... not recommended to use oven mitts when removing hot pans from the bake and the convection element. Dehydrating Tips: • Do not preheat the oven. • Multiple racks can be set to control your food at the minimum drying time. • Treat fruits with heat from the oven. 6. Press DEHYDRATE . 4. LOWER OVEN 3. The heat is displayed when active. 5. This mode holds an optimum low temperature while circulating the heated air to begin...
... not recommended to use oven mitts when removing hot pans from the bake and the convection element. Dehydrating Tips: • Do not preheat the oven. • Multiple racks can be set to control your food at the minimum drying time. • Treat fruits with heat from the oven. 6. Press DEHYDRATE . 4. LOWER OVEN 3. The heat is displayed when active. 5. This mode holds an optimum low temperature while circulating the heated air to begin...

Use and Care Manual
Page 26
... Bake, Convection Bake, Convection Roast and Perfect Turkey cooking modes. any temperature between 130°F to 210°F with your food completely before inserting the Probe to avoid breaking it. 5. Handle the Temperature Probe carefully when inserting and removing it is pressed. 5. DonotusetongstopullthecablewheninsertingorremovingtheProbe.ItcoulddamagetheProbe. 4. Never leave or store the Temperature Probe inside the oven when not in the center of the thickest part of burns, carefully unplug the Temperature Probe using the Temperature Probe: 1. Setting the Oven...
... Bake, Convection Bake, Convection Roast and Perfect Turkey cooking modes. any temperature between 130°F to 210°F with your food completely before inserting the Probe to avoid breaking it. 5. Handle the Temperature Probe carefully when inserting and removing it is pressed. 5. DonotusetongstopullthecablewheninsertingorremovingtheProbe.ItcoulddamagetheProbe. 4. Never leave or store the Temperature Probe inside the oven when not in the center of the thickest part of burns, carefully unplug the Temperature Probe using the Temperature Probe: 1. Setting the Oven...
Use and Care Manual
Page 36
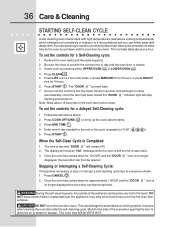
... Care & Cleaning STARTING SELF-CLEAN CYCLE A self-cleaning oven cleans itself with high temperatures (well above . 2. Press CLEAN . 5. Press COOK OPTIONS to excessive smoke: 1. DO NOT force the oven door open door. 3. Use care when opening the door to allow time for approximately 1 HOUR and the "DOOR no longer Stopping or Interrupting a Self-Cleaning Cycle: If it to a fine powdered ash you are planning to use the oven directly after the self-cleaning cycle. Be sure the clock is closed. 3. To set...
... Care & Cleaning STARTING SELF-CLEAN CYCLE A self-cleaning oven cleans itself with high temperatures (well above . 2. Press CLEAN . 5. Press COOK OPTIONS to excessive smoke: 1. DO NOT force the oven door open door. 3. Use care when opening the door to allow time for approximately 1 HOUR and the "DOOR no longer Stopping or Interrupting a Self-Cleaning Cycle: If it to a fine powdered ash you are planning to use the oven directly after the self-cleaning cycle. Be sure the clock is closed. 3. To set...
Use and Care Manual
Page 39
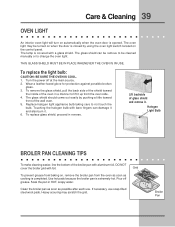
... broiler pan with a glass shield. Clean the broiler pan as soon as cooking is completed. To replace glass shield, proceed in HOT, soapy water. Grid To prevent grease from baking on the control panel. Soak the pan in reverse. Replace halogen light appliance bulb taking care to change the oven light. Heavy scouring may be cleaned manually or to not touch the bulb. The glass shield should come out easily by using the oven light switch located on , remove the broiler pan...
... broiler pan with a glass shield. Clean the broiler pan as soon as cooking is completed. To replace glass shield, proceed in HOT, soapy water. Grid To prevent grease from baking on the control panel. Soak the pan in reverse. Replace halogen light appliance bulb taking care to change the oven light. Heavy scouring may be cleaned manually or to not touch the bulb. The glass shield should come out easily by using the oven light switch located on , remove the broiler pan...
Use and Care Manual
Page 40
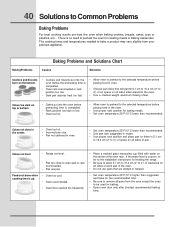
... in the oven. • Do not use pans that will permit 5.1 cm to 10.2 cm (2" to remove all sides when placed in the oven. • Use proper rack position for baking needs. • Set oven temperature 25°F/12°C lower than recommended. Cakes not level. • Range not level. • Pan too close to Common Problems Baking Problems For best cooking results pre-heat the oven when baking cookies, breads...
... in the oven. • Do not use pans that will permit 5.1 cm to 10.2 cm (2" to remove all sides when placed in the oven. • Use proper rack position for baking needs. • Set oven temperature 25°F/12°C lower than recommended. Cakes not level. • Range not level. • Pan too close to Common Problems Baking Problems For best cooking results pre-heat the oven when baking cookies, breads...
Use and Care Manual
Page 44
... LESS THAN ONE YEAR. 44 Warranty Information Your appliance is warranted by Electrolux Canada Corp. Food loss due to repair or replace appliance light bulbs, air filters, water filters, other consumables, or knobs, handles, or other appropriate payment record to be defective in a commercial setting. 7. Products used , and maintained in the USA, Puerto Rico and Canada. If You Need Service Keep your original date of...
... LESS THAN ONE YEAR. 44 Warranty Information Your appliance is warranted by Electrolux Canada Corp. Food loss due to repair or replace appliance light bulbs, air filters, water filters, other consumables, or knobs, handles, or other appropriate payment record to be defective in a commercial setting. 7. Products used , and maintained in the USA, Puerto Rico and Canada. If You Need Service Keep your original date of...

