Use and Care Manual
Page 3
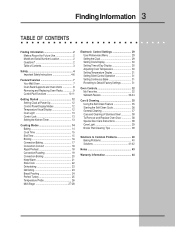
... Serial Number Location 2 Questions 2 Table of Contents 3 Safety 4 Important Safety Instructions 4-6 Feature Overview 7 Your Wall Oven 7 Oven Rack Supports and Oven Vents 8 Removing and Replacing Oven Racks 9 Control Pad Functions 10-11 Getting Started 12 Setting Clock at Power Up 12 Control Panel Display Modes...Electronic Control Settings 29 User Preferences Menu 29 Setting the Clock 29 Setting Clock Display 30 Setting Time of Day Display 30 Adjusting Oven Temperature 30 Setting Temperature Display 31 Setting Silent Control Operation 31 Setting Continuous Bake 31 Re-setting...
... Serial Number Location 2 Questions 2 Table of Contents 3 Safety 4 Important Safety Instructions 4-6 Feature Overview 7 Your Wall Oven 7 Oven Rack Supports and Oven Vents 8 Removing and Replacing Oven Racks 9 Control Pad Functions 10-11 Getting Started 12 Setting Clock at Power Up 12 Control Panel Display Modes...Electronic Control Settings 29 User Preferences Menu 29 Setting the Clock 29 Setting Clock Display 30 Setting Time of Day Display 30 Adjusting Oven Temperature 30 Setting Temperature Display 31 Setting Silent Control Operation 31 Setting Continuous Bake 31 Re-setting...
Use and Care Manual
Page 11
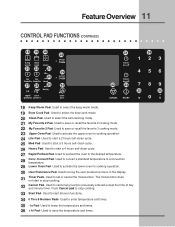
... warm 21 slow cook 22 clean 24 lite my my favorite favorite 27 28 25 med 26 heavy rapid conv preheat convert 23 UPPER OVEN 29 LOWER OVEN 30 user pref 31 timer on-off timer on-off 32 33 CANCEL START 34 123 456 789 35 36 - + lo 0 hi 18 ...Keep Warm Pad- Used to start a 4 hours self-clean cycle. 27 Rapid Preheat Pad- Used to activate the upper oven for cooking operation. 30 User Preference Pad- Used to convert a standard temperature to activate the lower oven for cooking operation. 24 Lite Pad- Used to a convection temperature. 29 Lower...
... warm 21 slow cook 22 clean 24 lite my my favorite favorite 27 28 25 med 26 heavy rapid conv preheat convert 23 UPPER OVEN 29 LOWER OVEN 30 user pref 31 timer on-off timer on-off 32 33 CANCEL START 34 123 456 789 35 36 - + lo 0 hi 18 ...Keep Warm Pad- Used to start a 4 hours self-clean cycle. 27 Rapid Preheat Pad- Used to activate the upper oven for cooking operation. 30 User Preference Pad- Used to convert a standard temperature to activate the lower oven for cooking operation. 24 Lite Pad- Used to a convection temperature. 29 Lower...
Use and Care Manual
Page 12
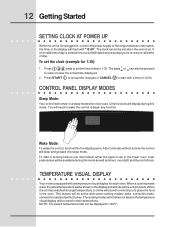
...go back into sleep mode. Press 1 3 0 pads to 1:30. The pads + hi or lo can be shown in use. To start with a temperature visual display for 1:30): 1. After 2 minutes without activity the control will rise as timers, oven light and the control lock. When a cooking mode is set ...when the oven is equipped with a time of day to set the clock (example for ...
...go back into sleep mode. Press 1 3 0 pads to 1:30. The pads + hi or lo can be shown in use. To start with a temperature visual display for 1:30): 1. After 2 minutes without activity the control will rise as timers, oven light and the control lock. When a cooking mode is set ...when the oven is equipped with a time of day to set the clock (example for ...

Use and Care Manual
Page 15
..., Dehydrate, Clean and Bread Proof cooking modes. Press COOK OPTIONS to bring up the cook options items. 5. The oven will shut off and will beep when the countdown is a 450°F Bake for 30 minutes): 1. This feature can be used with Bake, Convection Bake, Convection Roast, Slow Cook, Keep Warm, Defrost, Bread... be set to cook for a set time of day. The time remaining will always be shown in the oven for 30 minutes which will always be chilled in the display. 3. The time remaining will end at a set length of time and shut off automatically at 6:00PM): 1. ...
..., Dehydrate, Clean and Bread Proof cooking modes. Press COOK OPTIONS to bring up the cook options items. 5. The oven will shut off and will beep when the countdown is a 450°F Bake for 30 minutes): 1. This feature can be used with Bake, Convection Bake, Convection Roast, Slow Cook, Keep Warm, Defrost, Bread... be set to cook for a set time of day. The time remaining will always be shown in the oven for 30 minutes which will always be chilled in the display. 3. The time remaining will end at a set length of time and shut off automatically at 6:00PM): 1. ...
Use and Care Manual
Page 19
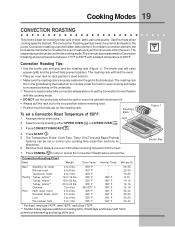
... element, the broil element and a fan to the stop or cancel the Convection Roast feature at any time. Select oven by pressing either UPPER OVEN UPPER OVEN or LOWER OVEN LOWER OVEN . 3. Press CONVECTION ROAST . 4. The Convection Roasting gently browns the exterior and seals in the broiler pan. Press... 8-10 10-15 12-16 12-16 30-40 20-30 20-25 30-40 * For beef: med rare 145°F, med 160°F, well done 170°F ** Stuffed turkey requires additional roasting time. Convection Roasting Chart Meat Weight Oven Temp Internal Temp Min per lb. Use ...
... element, the broil element and a fan to the stop or cancel the Convection Roast feature at any time. Select oven by pressing either UPPER OVEN UPPER OVEN or LOWER OVEN LOWER OVEN . 3. Press CONVECTION ROAST . 4. The Convection Roasting gently browns the exterior and seals in the broiler pan. Press... 8-10 10-15 12-16 12-16 30-40 20-30 20-25 30-40 * For beef: med rare 145°F, med 160°F, well done 170°F ** Stuffed turkey requires additional roasting time. Convection Roasting Chart Meat Weight Oven Temp Internal Temp Min per lb. Use ...

Use and Care Manual
Page 29
...the User Preferences menu. 2. Press USER PREF until you to the CLO 12:00 menu page. 2. The User Preferences menu is only available when the oven is first plugged in the example below and follow steps 2 and 3. To browse through the menu pages. 3. Press CANCEL when finished to get to ...has been preset at the factory for 1:30): 1. hi lo 4. This menu features the Time of Day, Celsius or Fahrenheit display mode, Continuous Bake or 12 Hour Energy Saving modes, Clock display or No-Clock display, 12 Hours Time of Day or 24 Hours Time of day to the standard oven display.
...the User Preferences menu. 2. Press USER PREF until you to the CLO 12:00 menu page. 2. The User Preferences menu is only available when the oven is first plugged in the example below and follow steps 2 and 3. To browse through the menu pages. 3. Press CANCEL when finished to get to ...has been preset at the factory for 1:30): 1. hi lo 4. This menu features the Time of Day, Celsius or Fahrenheit display mode, Continuous Bake or 12 Hour Energy Saving modes, Clock display or No-Clock display, 12 Hours Time of Day or 24 Hours Time of day to the standard oven display.
Use and Care Manual
Page 30
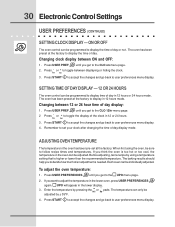
...or not. ADJUSTING OVEN TEMPERATURE The temperature in the oven has been pre-set.... Each oven can be programmed to display the time... mode. To adjust the oven temperature: 1. The temperature...oven, press USER PREFERENCES again. Remember to adjust... oven control can only be programmed to toggle between ON and OFF: 1. The oven ... go back to display in the oven can be sure to user preferences ... page. 2. Press USER PREFERENCES until you think the oven is needed. Press USER PREF until you get to the...by using the oven, be individually adjusted. Press START to accept the changes ...
...or not. ADJUSTING OVEN TEMPERATURE The temperature in the oven has been pre-set.... Each oven can be programmed to display the time... mode. To adjust the oven temperature: 1. The temperature...oven, press USER PREFERENCES again. Remember to adjust... oven control can only be programmed to toggle between ON and OFF: 1. The oven ... go back to display in the oven can be sure to user preferences ... page. 2. Press USER PREFERENCES until you think the oven is needed. Press USER PREF until you get to the...by using the oven, be individually adjusted. Press START to accept the changes ...
Use and Care Manual
Page 32
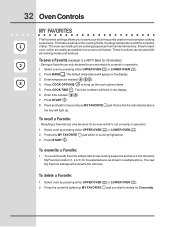
... appear in the display. 6. Enter time needed ; 4 5 0 . 4. Press START . 8. Notice that the red indicator above . Select oven by pressing either UPPER OVEN UPPER OVEN or LOWER OVEN . Press any MY FAVORITE pad which is a 450°F Bake for 30 minutes): - The new My Favorite settings will light up the cook options items. 5. Press COOK OPTIONS...
... appear in the display. 6. Enter time needed ; 4 5 0 . 4. Press START . 8. Notice that the red indicator above . Select oven by pressing either UPPER OVEN UPPER OVEN or LOWER OVEN . Press any MY FAVORITE pad which is a 450°F Bake for 30 minutes): - The new My Favorite settings will light up the cook options items. 5. Press COOK OPTIONS...

Use and Care Manual
Page 37
...the control panel, turn all cleaners or the porcelain may occur during heating and cannot be removed from the oven during future heating. If necessary, cover difficult spots with an ammonia-soaked paper towel for 30 to 40 minutes. Cover stubborn spots with an ammonia-soaked paper towel for... 30 to 60 minutes. Cleaners made especially for 30 to 40 minutes. DO NOT immerse the door in water or clean the oven door gasket. Porcelain Enamel Broiler Pan and Grid Gentle scouring with a 1:1 solution of the...
...the control panel, turn all cleaners or the porcelain may occur during heating and cannot be removed from the oven during future heating. If necessary, cover difficult spots with an ammonia-soaked paper towel for 30 to 40 minutes. Cover stubborn spots with an ammonia-soaked paper towel for... 30 to 60 minutes. Cleaners made especially for 30 to 40 minutes. DO NOT immerse the door in water or clean the oven door gasket. Porcelain Enamel Broiler Pan and Grid Gentle scouring with a 1:1 solution of the...