
Complete Owner's Guide (English)
Page 1
Use & Care Guide 18"Built-In Dishwasher (675000610595 & 2011/05)
Use & Care Guide 18"Built-In Dishwasher (675000610595 & 2011/05)
Complete Owner's Guide (English)
Page 2
... 7 Loading the Bottom Rack 7 Loading the Silverware Basket 7 Adding a dish 7 Dishwasher Dispenser & Detergents .......... 8 Filling the Detergent Dispenser 8 How much Detergent to use this guide Thank you for quick reference Purchase date Electrolux model number Electrolux serial number NOTE Registering your product with Electrolux enhances our ability to serve you , please use 8 Detergent Usage Guide...
... 7 Loading the Bottom Rack 7 Loading the Silverware Basket 7 Adding a dish 7 Dishwasher Dispenser & Detergents .......... 8 Filling the Detergent Dispenser 8 How much Detergent to use this guide Thank you for quick reference Purchase date Electrolux model number Electrolux serial number NOTE Registering your product with Electrolux enhances our ability to serve you , please use 8 Detergent Usage Guide...
Complete Owner's Guide (English)
Page 3
.... Safety 3 Important Safety Instructions Please read all safety instructions before using your new Electrolux dishwasher. • Read all hot water faucets and let water flow from the dishwasher when it is in operation. • Use only detergents and rinse agents recommended ...vicinity of fire, electrical shock, or injury when using your dishwasher, follow basic precautions including the following: • Disconnect electrical power to dishwasher before servicing. • Repairs should be done by a qualified Electrolux professional. • Do not tamper with controls. •...
.... Safety 3 Important Safety Instructions Please read all safety instructions before using your new Electrolux dishwasher. • Read all hot water faucets and let water flow from the dishwasher when it is in operation. • Use only detergents and rinse agents recommended ...vicinity of fire, electrical shock, or injury when using your dishwasher, follow basic precautions including the following: • Disconnect electrical power to dishwasher before servicing. • Repairs should be done by a qualified Electrolux professional. • Do not tamper with controls. •...
Complete Owner's Guide (English)
Page 4
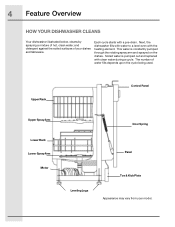
... Arm Motor Control Panel Door Spring Panel Leveling Legs Toe & Kick Plate Appearance may vary from your dishes and tableware. 4 Feature Overview HOW YOUR DISHWASHER CLEANS Your dishwasher illustrated below, cleans by spraying a mixture of hot, clean water, and detergent against the soiled surfaces of water fills depends upon the cycle being... used. The number of your model. This water is pumped out and replaced with clean water during a cycle. Next, the dishwasher fills with water to a level even with a pre-drain.
... Arm Motor Control Panel Door Spring Panel Leveling Legs Toe & Kick Plate Appearance may vary from your dishes and tableware. 4 Feature Overview HOW YOUR DISHWASHER CLEANS Your dishwasher illustrated below, cleans by spraying a mixture of hot, clean water, and detergent against the soiled surfaces of water fills depends upon the cycle being... used. The number of your model. This water is pumped out and replaced with clean water during a cycle. Next, the dishwasher fills with water to a level even with a pre-drain.
Complete Owner's Guide (English)
Page 5
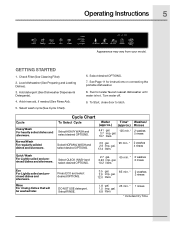
...washes 2.9 imp. Add rinse aid, if needed (See Rinse Aid). 5. See Page 11 for instructions on connecting the portable dishwasher. 8. Run hot water faucet nearest dishwasher until water is hot. Cycle Heavy Wash For heavily soiled dishes and silverware. Rinse For rinsing dishes that will be washed ...later. gal. 6.8 liters 25 min. * 1 rinses * Includes Dry Time Add detergent (See Dishwasher Dispenser & Detergents). 4. Select QUICK WASH and select desired OPTIONS. 2.7 gal. 65 min. * 2 washes 2.24 imp. gal. 2 rinses 10.2 ...
...washes 2.9 imp. Add rinse aid, if needed (See Rinse Aid). 5. See Page 11 for instructions on connecting the portable dishwasher. 8. Run hot water faucet nearest dishwasher until water is hot. Cycle Heavy Wash For heavily soiled dishes and silverware. Rinse For rinsing dishes that will be washed ...later. gal. 6.8 liters 25 min. * 1 rinses * Includes Dry Time Add detergent (See Dishwasher Dispenser & Detergents). 4. Select QUICK WASH and select desired OPTIONS. 2.7 gal. 65 min. * 2 washes 2.24 imp. gal. 2 rinses 10.2 ...

Complete Owner's Guide (English)
Page 6
... juice and tomato-based products may be used with all cycles except CHINA CRYSTAL and RINSE ONLY. This increase in water temperature helps dishwasher detergent remove food grease and soil from dishes more effectively and aids in the main wash to approximately 140°F (60°C)....the door and the cycle will reduce energy consumption, but reduce drying performance. Unless the dishwasher is to be sure disposer is completely empty before dishwasher is it is selected, the dishwasher heats the water in drying. It may cause discoloration of stainless steel and plastics if allowed...
... juice and tomato-based products may be used with all cycles except CHINA CRYSTAL and RINSE ONLY. This increase in water temperature helps dishwasher detergent remove food grease and soil from dishes more effectively and aids in the main wash to approximately 140°F (60°C)....the door and the cycle will reduce energy consumption, but reduce drying performance. Unless the dishwasher is to be sure disposer is completely empty before dishwasher is it is selected, the dishwasher heats the water in drying. It may cause discoloration of stainless steel and plastics if allowed...
Complete Owner's Guide (English)
Page 8
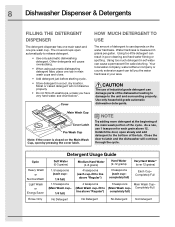
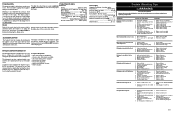
... Pre Wash Cup Note: If the cover is measured in poor cleaning and hard water filming or spotting. Cover The amount of the dishwasher leading to damage to the unit and surrounding property. Using too much detergent in your area. Detergent Usage Guide Cycle Heavy Wash or... grains) 1.5 teaspoons (each cup- 1/4 full) 1.5 teaspoons (Main Wash cup- 1/4 full) Medium Hard Water (4-8 grains) 4 teaspoons (each cup-fill to latch and the dishwasher will not dissolve properly. • Do not fill both washcups, unless you the water hardness in sof water can tell you have very hard water...
... Pre Wash Cup Note: If the cover is measured in poor cleaning and hard water filming or spotting. Cover The amount of the dishwasher leading to damage to the unit and surrounding property. Using too much detergent in your area. Detergent Usage Guide Cycle Heavy Wash or... grains) 1.5 teaspoons (each cup- 1/4 full) 1.5 teaspoons (Main Wash cup- 1/4 full) Medium Hard Water (4-8 grains) 4 teaspoons (each cup-fill to latch and the dishwasher will not dissolve properly. • Do not fill both washcups, unless you the water hardness in sof water can tell you have very hard water...
Complete Owner's Guide (English)
Page 9
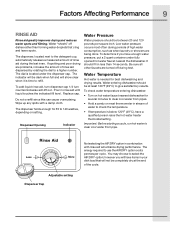
...should be between 20 and 120 pounds per cycle. Be sure all other faucets are turned off dishes rather than 14 seconds. Water entering dishwasher should be at the end of rinse aid dispensed by rotating the dial to use the AIR DRY option costs pennies per square inch. ...You may choose to 140 washes, depending on hot water faucet nearest dishwasher for best dishwashing and drying results. Factors Affecting Performance 9 RINSE AID Rinse aid greatly improves drying and reduces water spots and filming. Do not overfill since...
...should be between 20 and 120 pounds per cycle. Be sure all other faucets are turned off dishes rather than 14 seconds. Water entering dishwasher should be at the end of rinse aid dispensed by rotating the dial to use the AIR DRY option costs pennies per square inch. ...You may choose to 140 washes, depending on hot water faucet nearest dishwasher for best dishwashing and drying results. Factors Affecting Performance 9 RINSE AID Rinse aid greatly improves drying and reduces water spots and filming. Do not overfill since...
Complete Owner's Guide (English)
Page 10
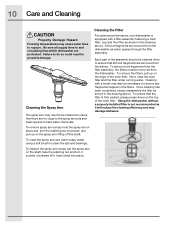
... will reduce the cleaning efficiency and may need to be cleaned often to ensure that all supply lines to and circulating lines within dishwasher are removed from the dishwasher as it has locked into place. Cleaning with a filter assembly featuring a main filter, cup and fine filter as shown in the ...place and turn the retaining nut clockwise and pull up on the top of the main filter. Each part of the main filter. Using the dishwasher without a properly installed filter is fully seated, please press down on the edge of the assembly should be cleaned to hard water chemicals. ...
... will reduce the cleaning efficiency and may need to be cleaned often to ensure that all supply lines to and circulating lines within dishwasher are removed from the dishwasher as it has locked into place. Cleaning with a filter assembly featuring a main filter, cup and fine filter as shown in the ...place and turn the retaining nut clockwise and pull up on the top of the main filter. Each part of the main filter. Using the dishwasher without a properly installed filter is fully seated, please press down on the edge of the assembly should be cleaned to hard water chemicals. ...
Complete Owner's Guide (English)
Page 11
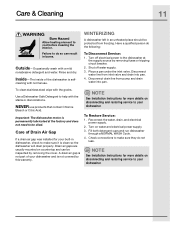
... 1. Rinse and dry. Care of Drain Air Gap If a drain air gap was installed for your dishwasher. Check connections to your dishwasher and is clean so the dishwasher will drain properly. Have a qualified person do so can be protected from freezing. Disconnect drain line from...and restoring service to your built-in an unheated place should be inspected by removing fuses or tripping circuit breaker. 2. WINTERIZING A dishwasher left in dishwasher, check to do the following: To Disconnect Service: 1. Disconnect water line from pump and drain water into pan. 4. Reconnect ...
... 1. Rinse and dry. Care of Drain Air Gap If a drain air gap was installed for your dishwasher. Check connections to your dishwasher and is clean so the dishwasher will drain properly. Have a qualified person do so can be protected from freezing. Disconnect drain line from...and restoring service to your built-in an unheated place should be inspected by removing fuses or tripping circuit breaker. 2. WINTERIZING A dishwasher left in dishwasher, check to do the following: To Disconnect Service: 1. Disconnect water line from pump and drain water into pan. 4. Reconnect ...
Complete Owner's Guide (English)
Page 12
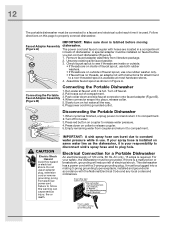
... only, 15 amps is used. A special adapter must be plugged into grounded outlet. IMPORTANT: A sink spray hose can connect dishwasher (Figure A). 1. Connecting the Portable Dishwasher 1.Run water at most hardware stores. 4. Do not use both rubber washers. • If threads are located in a compartment...and grounded in back of faucet spout, use . CAUTION Electric Shock Hazard Avoid fire hazard or electrical shock. 12 The portable dishwasher must be grounded. Turn off hot water. 3.Press red button on coupler to release water pressure. 4.Press down and slip ...
... only, 15 amps is used. A special adapter must be plugged into grounded outlet. IMPORTANT: A sink spray hose can connect dishwasher (Figure A). 1. Connecting the Portable Dishwasher 1.Run water at most hardware stores. 4. Do not use both rubber washers. • If threads are located in a compartment...and grounded in back of faucet spout, use . CAUTION Electric Shock Hazard Avoid fire hazard or electrical shock. 12 The portable dishwasher must be grounded. Turn off hot water. 3.Press red button on coupler to release water pressure. 4.Press down and slip ...
Complete Owner's Guide (English)
Page 13
...temperature should be removed. To remove stains, hand wash cups in solution of 1/2 cup (120 ml) bleach and a quart (1 L) of automatic dishwashing. To avoid iron stain, increase detergent, use a commercial rust and lime scale remover. Plastic items can occur when water contains traces of articles...., install a water softener with other items. Place glasses securely against pins. Rinse thoroughly. If stained, soak item in solution of 1 tablespoon dishwasher detergent and a quart of hot water or in direct contact with an iron removal unit. Do not put glasses in a solution of 1/2 ...
...temperature should be removed. To remove stains, hand wash cups in solution of 1/2 cup (120 ml) bleach and a quart (1 L) of automatic dishwashing. To avoid iron stain, increase detergent, use a commercial rust and lime scale remover. Plastic items can occur when water contains traces of articles...., install a water softener with other items. Place glasses securely against pins. Rinse thoroughly. If stained, soak item in solution of 1 tablespoon dishwasher detergent and a quart of hot water or in direct contact with an iron removal unit. Do not put glasses in a solution of 1/2 ...
Complete Owner's Guide (English)
Page 14
... could prevent door from closing and sealing properly. Test wash a single knife for service, review this , rinse silver soon after starting dishwasher, wait a few seconds before water enters tub. Check for 1/2 hour. Hot water temperature may be too low (min. 120°F 49... polish. It keeps water seal lubricated. To prevent this list. Noise problems? It is added after use . Leaking? Water coming through the dishwasher. Check to pour detergent directly onto silver. Discard old detergent.Use fresh detergent. This list includes common experiences that water is normal to hear ...
... could prevent door from closing and sealing properly. Test wash a single knife for service, review this , rinse silver soon after starting dishwasher, wait a few seconds before water enters tub. Check for 1/2 hour. Hot water temperature may be too low (min. 120°F 49... polish. It keeps water seal lubricated. To prevent this list. Noise problems? It is added after use . Leaking? Water coming through the dishwasher. Check to pour detergent directly onto silver. Discard old detergent.Use fresh detergent. This list includes common experiences that water is normal to hear ...
Complete Owner's Guide (English)
Page 15
...bulbs, air filters, water filters, other consumables, or knobs, handles, or other appropriate payment record to be performed by Electrolux or an authorized service company. your appliance is designed to establish the warranty period should service be readily determined. 2. Obligations...trim, cupboards, shelves, etc., which are covered by a two through 5th years from your original date of purchase, Electrolux will provide a replacement dishwasher rack or electronic control module for servicing, such as -is shipped from your appliance which do not involve malfunction or...
...bulbs, air filters, water filters, other consumables, or knobs, handles, or other appropriate payment record to be performed by Electrolux or an authorized service company. your appliance is designed to establish the warranty period should service be readily determined. 2. Obligations...trim, cupboards, shelves, etc., which are covered by a two through 5th years from your original date of purchase, Electrolux will provide a replacement dishwasher rack or electronic control module for servicing, such as -is shipped from your appliance which do not involve malfunction or...
Wiring Diagram (English Español Français)
Page 1
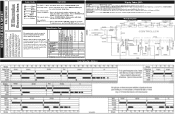
... rinse aid dispenser has a removable cover. Hi-Limit thermostat defective. 1. Repair or replace. 4. Replace thermostat. Electronic control board defective. 3. Dishwasher will not open . 1. Pressure Switch Stuck. 1. Repair or replace. 1. Repair or replace. 5. Repair or replace. 7. Drain hose (high...line connected to control. 5. Improper voltage. 2. Replace control board. 3. Defective actuator. 1. Water supply turned off electricity to dishwasher, • remove outer door panel assembly, • disconnect wiring to the discharge end of the drain pump. Defective water ...
... rinse aid dispenser has a removable cover. Hi-Limit thermostat defective. 1. Repair or replace. 4. Replace thermostat. Electronic control board defective. 3. Dishwasher will not open . 1. Pressure Switch Stuck. 1. Repair or replace. 1. Repair or replace. 5. Repair or replace. 7. Drain hose (high...line connected to control. 5. Improper voltage. 2. Replace control board. 3. Defective actuator. 1. Water supply turned off electricity to dishwasher, • remove outer door panel assembly, • disconnect wiring to the discharge end of the drain pump. Defective water ...
Wiring Diagram (English Español Français)
Page 2
.../POWER DRY OFF LED's flashing indicates power failure has occurred. Wiring Diagram This information is opened . Electrolux Home Products North America cannot be responsible, nor assume any kind arising from the power failure mode or.... Indicator light will flash. Close door. To select a new cycle or option.... Press desired cycle and/or option pad. The indicator lights will advance the dishwasher to the next step. 2 DISPENSER 30 0 1 0 1 1 0 3 WASH/HEAT 45 0 0 0 1 0 0 4 PAUSE .4 0 1 0 1 0 0 5 WASH/HEAT 75 0 1 0 1 1 0 6 WASH/HEAT/DISP 60 0 0 1 0 0 0 7 DRAIN/DRY 90 0 ...
.../POWER DRY OFF LED's flashing indicates power failure has occurred. Wiring Diagram This information is opened . Electrolux Home Products North America cannot be responsible, nor assume any kind arising from the power failure mode or.... Indicator light will flash. Close door. To select a new cycle or option.... Press desired cycle and/or option pad. The indicator lights will advance the dishwasher to the next step. 2 DISPENSER 30 0 1 0 1 1 0 3 WASH/HEAT 45 0 0 0 1 0 0 4 PAUSE .4 0 1 0 1 0 0 5 WASH/HEAT 75 0 1 0 1 1 0 6 WASH/HEAT/DISP 60 0 0 1 0 0 0 7 DRAIN/DRY 90 0 ...
Installation Instructions (English)
Page 1
... goggles should immediately contact your Owner's Manual for future reference. • Skill Level- While performing installations described in this dishwasher re- IMPORTANT - Keep these instructions. New installations require more time than replacement installations. READ CAREFULLY. quires basic mechanical and... service is the responsibility of electrical shock, fire, or injury to persons, the installer must ensure that the dishwasher is not covered under the ELECTROLUX Appliance Warranty. • Completion Time - 1 to 3 Hours. FOR YOUR SAFETY Read and observe all governing...
... goggles should immediately contact your Owner's Manual for future reference. • Skill Level- While performing installations described in this dishwasher re- IMPORTANT - Keep these instructions. New installations require more time than replacement installations. READ CAREFULLY. quires basic mechanical and... service is the responsibility of electrical shock, fire, or injury to persons, the installer must ensure that the dishwasher is not covered under the ELECTROLUX Appliance Warranty. • Completion Time - 1 to 3 Hours. FOR YOUR SAFETY Read and observe all governing...
Installation Instructions (English)
Page 2
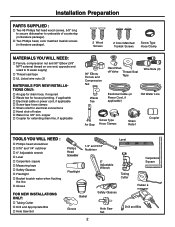
Installation Preparation PARTS SUPPLIED : … Two #8 Phillips flat head wood screws, 5/8" long to secure dishwasher to underside of countertop (in literature package). … Two Phillips head, color matched toekick screws (in literature package). 2 Wood Screws 2 Color Matched Toekick Screws Screw ...
Installation Preparation PARTS SUPPLIED : … Two #8 Phillips flat head wood screws, 5/8" long to secure dishwasher to underside of countertop (in literature package). … Two Phillips head, color matched toekick screws (in literature package). 2 Wood Screws 2 Color Matched Toekick Screws Screw ...
Installation Instructions (English)
Page 3
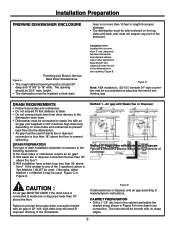
...• Follow local codes and ordinances. • Do not exceed 10 feet distance to any part of the enclosure Clearance: When installed into the dishwasher. • Air gap must be used . CABINET PREPARATION • Drill a 1-1/2" dia. Otherwise, either Method 1 or Method 2 may be at...disposer connection is less than 32: above floor? High Drain with Waste Tee or Disposer Figure C Method 2 - Installation Preparation PREPARE DISHWASHER ENCLOSURE Figure A Plumbing and Electric Service Must Enter Shaded Area • The rough cabinet opening must be accomplished by adjusting the ...
...• Follow local codes and ordinances. • Do not exceed 10 feet distance to any part of the enclosure Clearance: When installed into the dishwasher. • Air gap must be used . CABINET PREPARATION • Drill a 1-1/2" dia. Otherwise, either Method 1 or Method 2 may be at...disposer connection is less than 32: above floor? High Drain with Waste Tee or Disposer Figure C Method 2 - Installation Preparation PREPARE DISHWASHER ENCLOSURE Figure A Plumbing and Electric Service Must Enter Shaded Area • The rough cabinet opening must be accomplished by adjusting the ...
Installation Instructions (English)
Page 4
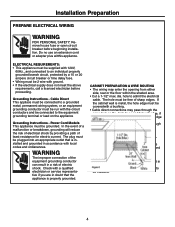
... must be plugged into an appropriate outlet that the appliance is to an individual properly grounded branch circuit, protected by providing a path of dishwasher. • For cable direct connections the cable must be coveredwith a bushing. • Cable direct connections may enter the opening from the...breaker before proceeding. Do no use an extension cord or adapter plus witthis appliance. Cable Direct This appliace must be connected to Dishwasher Electrical connection is metal, the hole edge must be installed in a cabinet or on the appliance Grounding Instructions - Power Cord ...
... must be plugged into an appropriate outlet that the appliance is to an individual properly grounded branch circuit, protected by providing a path of dishwasher. • For cable direct connections the cable must be coveredwith a bushing. • Cable direct connections may enter the opening from the...breaker before proceeding. Do no use an extension cord or adapter plus witthis appliance. Cable Direct This appliace must be connected to Dishwasher Electrical connection is metal, the hole edge must be installed in a cabinet or on the appliance Grounding Instructions - Power Cord ...


