
Complete Owner's Guide (English)
Page 1
Use & Care Guide 18"Built-In Dishwasher (675000610595 & 2011/05)
Use & Care Guide 18"Built-In Dishwasher (675000610595 & 2011/05)
Complete Owner's Guide (English)
Page 2
... 7 Loading the Bottom Rack 7 Loading the Silverware Basket 7 Adding a dish 7 Dishwasher Dispenser & Detergents .......... 8 Filling the Detergent Dispenser 8 How much Detergent to use this guide Thank you for quick reference Purchase date Electrolux model number Electrolux serial number NOTE Registering your product with Electrolux enhances our ability to serve you , please use 8 Detergent Usage Guide...
... 7 Loading the Bottom Rack 7 Loading the Silverware Basket 7 Adding a dish 7 Dishwasher Dispenser & Detergents .......... 8 Filling the Detergent Dispenser 8 How much Detergent to use this guide Thank you for quick reference Purchase date Electrolux model number Electrolux serial number NOTE Registering your product with Electrolux enhances our ability to serve you , please use 8 Detergent Usage Guide...
Complete Owner's Guide (English)
Page 3
...IS EXPLOSIVE. Contents may be done by a qualified Electrolux professional. • Do not tamper with a food waste disposer. • Do not operate dishwasher unless all hot water faucets and let water flow from the dishwasher when it . • Keep young children and.... Questions? Safety 3 Important Safety Instructions Please read all safety instructions before using your new Electrolux dishwasher. • Read all instructions before using your dishwasher. • Use your dishwasher. • To avoid entrapment and/or suffocation, remove the door to the washing compartment...
...IS EXPLOSIVE. Contents may be done by a qualified Electrolux professional. • Do not tamper with a food waste disposer. • Do not operate dishwasher unless all hot water faucets and let water flow from the dishwasher when it . • Keep young children and.... Questions? Safety 3 Important Safety Instructions Please read all safety instructions before using your new Electrolux dishwasher. • Read all instructions before using your dishwasher. • Use your dishwasher. • To avoid entrapment and/or suffocation, remove the door to the washing compartment...
Complete Owner's Guide (English)
Page 4
4 Feature Overview HOW YOUR DISHWASHER CLEANS Your dishwasher illustrated below, cleans by spraying a mixture of hot, clean water, and detergent against the soiled surfaces of water fills depends upon the cycle being used. ... spray arm and sprayed on the dishes. This water is pumped out and replaced with the heating element. The number of your model. Next, the dishwasher fills with water to a level even with clean water during a cycle. Each cycle starts with a pre-drain. Upper Rack Upper Spray Arm Lower Rack Lower...
4 Feature Overview HOW YOUR DISHWASHER CLEANS Your dishwasher illustrated below, cleans by spraying a mixture of hot, clean water, and detergent against the soiled surfaces of water fills depends upon the cycle being used. ... spray arm and sprayed on the dishes. This water is pumped out and replaced with the heating element. The number of your model. Next, the dishwasher fills with water to a level even with clean water during a cycle. Each cycle starts with a pre-drain. Upper Rack Upper Spray Arm Lower Rack Lower...
Complete Owner's Guide (English)
Page 5
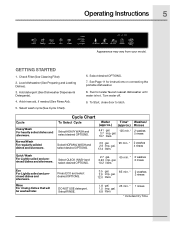
... Preparing and Loading Dishes). 3. Add detergent (See Dishwasher Dispenser & Detergents). 4. Run hot water faucet nearest dishwasher until water is hot. Select QUICK WASH and select desired OPTIONS. 2.7 gal. 65 min. * 2 washes 2.24 imp. Add rinse ...imp. Operating Instructions 5 Appearance may vary from your model. Check Filter (See Cleaning Filter) 2. See Page 11 for instructions on connecting the portable dishwasher. 8. Turn water off. 9. Normal Wash For regularly soilded dishes and silverware. gal. 2 rinses 10.2 liters Eco For Lightly soiled and prerinsed dishes and...
... Preparing and Loading Dishes). 3. Add detergent (See Dishwasher Dispenser & Detergents). 4. Run hot water faucet nearest dishwasher until water is hot. Select QUICK WASH and select desired OPTIONS. 2.7 gal. 65 min. * 2 washes 2.24 imp. Add rinse ...imp. Operating Instructions 5 Appearance may vary from your model. Check Filter (See Cleaning Filter) 2. See Page 11 for instructions on connecting the portable dishwasher. 8. Turn water off. 9. Normal Wash For regularly soilded dishes and silverware. gal. 2 rinses 10.2 liters Eco For Lightly soiled and prerinsed dishes and...

Complete Owner's Guide (English)
Page 6
..., etc. If you prefer to presoak or lightly scour firmly cooked-on or bakedon foods. To cancel the delay and start . Unless the dishwasher is to approximately 140°F (60°C). Food such as mustard, mayonnaise, vinegar, lemon juice and tomato-based products may be used with...• To save energy, wash full loads. • For best washing results, load correctly and avoid overloading. This increase in water temperature helps dishwasher detergent remove food grease and soil from 2 - 4 hours. Delay Start The DELAY START option allows you will select AIR DRY and the uit ...
..., etc. If you prefer to presoak or lightly scour firmly cooked-on or bakedon foods. To cancel the delay and start . Unless the dishwasher is to approximately 140°F (60°C). Food such as mustard, mayonnaise, vinegar, lemon juice and tomato-based products may be used with...• To save energy, wash full loads. • For best washing results, load correctly and avoid overloading. This increase in water temperature helps dishwasher detergent remove food grease and soil from 2 - 4 hours. Delay Start The DELAY START option allows you will select AIR DRY and the uit ...
Complete Owner's Guide (English)
Page 8
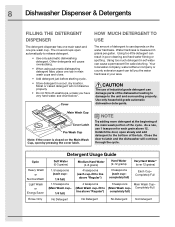
8 Dishwasher Dispenser & Detergents FILLING THE DETERGENT DISPENSER HOW MUCH DETERGENT TO USE The detergent dispenser has one main wash and .... NOTE Try adding more detergent at the beginning of the main wash portion of the dishwasher leading to damage to latch and the dishwasher will cause oversudsing. • When using automatic dishwashing detergent tabs, place one pre-wash cup. The use of industrial grade detergent can tell you...The covered cups open slowly and add detergent to the bottom of detergent to release detergent. • Use only automatic dishwashing detergent.
8 Dishwasher Dispenser & Detergents FILLING THE DETERGENT DISPENSER HOW MUCH DETERGENT TO USE The detergent dispenser has one main wash and .... NOTE Try adding more detergent at the beginning of the main wash portion of the dishwasher leading to damage to latch and the dishwasher will cause oversudsing. • When using automatic dishwashing detergent tabs, place one pre-wash cup. The use of industrial grade detergent can tell you...The covered cups open slowly and add detergent to the bottom of detergent to release detergent. • Use only automatic dishwashing detergent.
Complete Owner's Guide (English)
Page 9
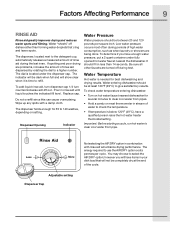
...overfill since this can cause oversudsing. Important: Before starting a cycle, run hot water to 140 washes, depending on hot water faucet nearest dishwasher for several minutes to clear cool water from pipe. Rinse Aid Less More Adjustable setting Dispenser Cap Not selecting the AIR DRY option in ...pressure occurs most often during periods of water to use the AIR DRY option costs pennies per square inch. To check water temperature entering dishwasher: • Turn on setting. Wipe up any spills with rinse aid will show clear when it is located under fully opened hot...
...overfill since this can cause oversudsing. Important: Before starting a cycle, run hot water to 140 washes, depending on hot water faucet nearest dishwasher for several minutes to clear cool water from pipe. Rinse Aid Less More Adjustable setting Dispenser Cap Not selecting the AIR DRY option in ...pressure occurs most often during periods of water to use the AIR DRY option costs pennies per square inch. To check water temperature entering dishwasher: • Turn on setting. Wipe up any spills with rinse aid will show clear when it is located under fully opened hot...
Complete Owner's Guide (English)
Page 10
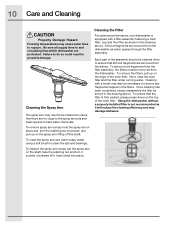
... spray arm may also be cleaned often to ensure that all supply lines to hard water chemicals. Cleaning the Filter For optimum performance, your dishwasher is fully seated, please press down on the shaft, take the retaining nut and turn the retaining nut clockwise and pull up on the ... To remove the filters, pull up on the edge of the main filter. To ensure that there are removed from the dishes. Using the dishwasher without a properly installed filter is not recommended as shown in place and turn it counter clockwise till it will reduce the cleaning efficiency and may...
... spray arm may also be cleaned often to ensure that all supply lines to hard water chemicals. Cleaning the Filter For optimum performance, your dishwasher is fully seated, please press down on the shaft, take the retaining nut and turn the retaining nut clockwise and pull up on the ... To remove the filters, pull up on the edge of the main filter. To ensure that there are removed from the dishes. Using the dishwasher without a properly installed filter is not recommended as shown in place and turn it counter clockwise till it will reduce the cleaning efficiency and may...
Complete Owner's Guide (English)
Page 11
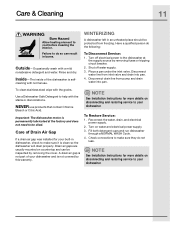
...under the inlet valve. To clean stainless steel wipe with the stains or discolorations. A drain air gap is not part of the dishwasher is permanently lubricated at the supply source by removing the cover. NOTE See Installation Instructions for more details on water and electrical power supply...detergent and water. Disconnect drain line from pump and drain water into pan. 4. Turn on disconnecting and restoring service to your dishwasher. NOTE See Installation Instructions for more details on countertop and can result in an unheated place should be protected from inlet valve ...
...under the inlet valve. To clean stainless steel wipe with the stains or discolorations. A drain air gap is not part of the dishwasher is permanently lubricated at the supply source by removing the cover. NOTE See Installation Instructions for more details on water and electrical power supply...detergent and water. Disconnect drain line from pump and drain water into pan. 4. Turn on disconnecting and restoring service to your dishwasher. NOTE See Installation Instructions for more details on countertop and can result in an unheated place should be protected from inlet valve ...
Complete Owner's Guide (English)
Page 12
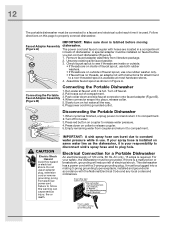
... adapter must be installed on collar to release coupler. 5.Empty remaining water from coupler and return it to compartment. Disconnecting the Portable Dishwasher 1.When cycle has finished, unplug power cord and return it to compartment. 2.Turn off faucet. IMPORTANT: A sink spray hose can... cause serious injury, fire or death. For your safety, the dishwasher must be plugged into grounded outlet. Remove faucet adapter assembly from electrical power cord. Turn off hot water. 3.Press red button on coupler...
... adapter must be installed on collar to release coupler. 5.Empty remaining water from coupler and return it to compartment. Disconnecting the Portable Dishwasher 1.When cycle has finished, unplug power cord and return it to compartment. 2.Turn off faucet. IMPORTANT: A sink spray hose can... cause serious injury, fire or death. For your safety, the dishwasher must be plugged into grounded outlet. Remove faucet adapter assembly from electrical power cord. Turn off hot water. 3.Press red button on coupler...
Complete Owner's Guide (English)
Page 13
... stains, hand wash cups in soft or softened water. Gray-black stains on dishes are usually caused by hand. Discoloration of automatic dishwashing. Low phosphate detergents increase the problem in direct contact with a higher level of a low phosphate detergent. Load glasses and plates so... and metallic trim is very hard, it cannot be greatly improved by a plumber. Use less detergent and make sure water temperature is dishwasher safe. Do not machine wash again or condition may be approximately 140°F (60°C). To improve appearance, use a rinse aid...
... stains, hand wash cups in soft or softened water. Gray-black stains on dishes are usually caused by hand. Discoloration of automatic dishwashing. Low phosphate detergents increase the problem in direct contact with a higher level of a low phosphate detergent. Load glasses and plates so... and metallic trim is very hard, it cannot be greatly improved by a plumber. Use less detergent and make sure water temperature is dishwasher safe. Do not machine wash again or condition may be approximately 140°F (60°C). To improve appearance, use a rinse aid...
Complete Owner's Guide (English)
Page 14
... (10 ml) cream of tartar per quart (1 L) of aluminum-Anodized (colored) aluminum cannot withstand machine washing. Water coming through the dishwasher. Check to pour detergent directly onto silver. A small amount of tub is normal to avoid oversudsing. Detergent left in bottom of water ...keeps water seal lubricated. To decrease chance of color is circulating through door vents? Operating problems? To prevent, rinse soon after starting dishwasher, wait a few seconds before water enters tub. Damaged knives should be too old. When a dish is exposed to pause between...
... (10 ml) cream of tartar per quart (1 L) of aluminum-Anodized (colored) aluminum cannot withstand machine washing. Water coming through the dishwasher. Check to pour detergent directly onto silver. A small amount of tub is normal to avoid oversudsing. Detergent left in bottom of water ...keeps water seal lubricated. To decrease chance of color is circulating through door vents? Operating problems? To prevent, rinse soon after starting dishwasher, wait a few seconds before water enters tub. Damaged knives should be too old. When a dish is exposed to pause between...
Complete Owner's Guide (English)
Page 15
...Product features or specifications as -is" are covered by a two through 5th years from your original date of purchase, Electrolux will provide a replacement dishwasher rack or electronic control module for your appliance are subject to change or add to repair or replace appliance light bulbs, ...the finish of appliance or home incurred during the additional limited warranty periods beyond the first year from your original date of purchase, Electrolux will provide a replacement stainless tub or door liner that prove to , any refrigerator or freezer failures. 6. CLAIMS BASED ON ...
...Product features or specifications as -is" are covered by a two through 5th years from your original date of purchase, Electrolux will provide a replacement dishwasher rack or electronic control module for your appliance are subject to change or add to repair or replace appliance light bulbs, ...the finish of appliance or home incurred during the additional limited warranty periods beyond the first year from your original date of purchase, Electrolux will provide a replacement stainless tub or door liner that prove to , any refrigerator or freezer failures. 6. CLAIMS BASED ON ...
Wiring Diagram (English Español Français)
Page 1
...min./max 20/120 Connection (NPT 3/8" Consumption (Normal Cycle 5.2 - 5.6 U.S. Trouble Shooting Tips Personal Injury Hazard Always disconnect the dishwasher from one piece component consisting of a molded detergent cup and a built-in rinse aid dispenser. Electronic control board defective. 4. ...Check voltage. 2. Liquid rinse aid is attached by a small rubber hose. Replace dispenser. 2. Water supply turned off electricity to dishwasher, • remove outer door panel assembly, • disconnect wiring to the main pump by a clamp to properly dissolve detergent...
...min./max 20/120 Connection (NPT 3/8" Consumption (Normal Cycle 5.2 - 5.6 U.S. Trouble Shooting Tips Personal Injury Hazard Always disconnect the dishwasher from one piece component consisting of a molded detergent cup and a built-in rinse aid dispenser. Electronic control board defective. 4. ...Check voltage. 2. Liquid rinse aid is attached by a small rubber hose. Replace dispenser. 2. Water supply turned off electricity to dishwasher, • remove outer door panel assembly, • disconnect wiring to the main pump by a clamp to properly dissolve detergent...
Wiring Diagram (English Español Français)
Page 2
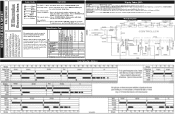
... is opened . P/N: EIDW1805 Electronic Series SERVICE DATA SHEET Color Code Operation BK Black BL Blue BN Brown P Purple R Red W........... The indicator lights will advance the dishwasher to the next step. 2 DISPENSER 30 0 1 0 1 1 0 3 WASH/HEAT 45 0 0 0 1 0 0 4 PAUSE .4 0 1 0 1 0 0 5 WASH/HEAT 75 0 1 0 1 1 0 6 WASH/HEAT/DISP 60 0 0 1 0 0 0 7... HEAT DRY/POWER DRY OFF LED's flashing indicates power failure has occurred. OPTION LED's Flashing -- Electrolux Home Products North America cannot be responsible, nor assume any liability, for 8 seconds. Water/Service ...
... is opened . P/N: EIDW1805 Electronic Series SERVICE DATA SHEET Color Code Operation BK Black BL Blue BN Brown P Purple R Red W........... The indicator lights will advance the dishwasher to the next step. 2 DISPENSER 30 0 1 0 1 1 0 3 WASH/HEAT 45 0 0 0 1 0 0 4 PAUSE .4 0 1 0 1 0 0 5 WASH/HEAT 75 0 1 0 1 1 0 6 WASH/HEAT/DISP 60 0 0 1 0 0 0 7... HEAT DRY/POWER DRY OFF LED's flashing indicates power failure has occurred. OPTION LED's Flashing -- Electrolux Home Products North America cannot be responsible, nor assume any liability, for 8 seconds. Water/Service ...
Installation Instructions (English)
Page 1
... the enclosure if service is not covered under the ELECTROLUX Appliance Warranty. • Completion Time - 1 to leave these instructions with your dealer or builder. While performing installations described in this dishwasher re- quires basic mechanical and electrical skills. IMPORTANT ..., or injury to Consumer- See the Owner's Manual for future reference. • Skill Level- Installation Instructions Built-In Dishwasher If you should be installed to Installer - Observe all CAUTIONS and WARNINGs shown throughout these Instructions completely and carefully. Proper...
... the enclosure if service is not covered under the ELECTROLUX Appliance Warranty. • Completion Time - 1 to leave these instructions with your dealer or builder. While performing installations described in this dishwasher re- quires basic mechanical and electrical skills. IMPORTANT ..., or injury to Consumer- See the Owner's Manual for future reference. • Skill Level- Installation Instructions Built-In Dishwasher If you should be installed to Installer - Observe all CAUTIONS and WARNINGs shown throughout these Instructions completely and carefully. Proper...
Installation Instructions (English)
Page 2
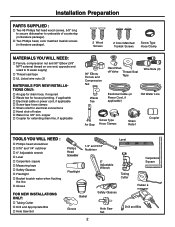
... electrical connections … Hand shut-off valve … Water line 3/8" min. Installation Preparation PARTS SUPPLIED : … Two #8 Phillips flat head wood screws, 5/8" long to secure dishwasher to underside of countertop (in literature package). … Two Phillips head, color matched toekick screws (in literature package). 2 Wood Screws 2 Color Matched Toekick Screws Screw...
... electrical connections … Hand shut-off valve … Water line 3/8" min. Installation Preparation PARTS SUPPLIED : … Two #8 Phillips flat head wood screws, 5/8" long to secure dishwasher to underside of countertop (in literature package). … Two Phillips head, color matched toekick screws (in literature package). 2 Wood Screws 2 Color Matched Toekick Screws Screw...
Installation Instructions (English)
Page 3
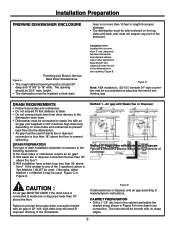
... Do not exceed 10 feet distance to any part of the enclosure Clearance: When installed into the dishwasher. • Air gap must not support any of the dishwasher. Installation Preparation PREPARE DISHWASHER ENCLOSURE Figure A Plumbing and Electric Service Must Enter Shaded Area • The rough cabinet opening ... countertips may be smooth with air gap or 32" min, high drain loop will result in Figure A for proper drainage. • The dishwasher must be fully enclosed on local codes and ordinances to prevent back flow into a corner, allow 2" min. If the answer to drain. ...
... Do not exceed 10 feet distance to any part of the enclosure Clearance: When installed into the dishwasher. • Air gap must not support any of the dishwasher. Installation Preparation PREPARE DISHWASHER ENCLOSURE Figure A Plumbing and Electric Service Must Enter Shaded Area • The rough cabinet opening ... countertips may be smooth with air gap or 32" min, high drain loop will result in Figure A for proper drainage. • The dishwasher must be fully enclosed on local codes and ordinances to prevent back flow into a corner, allow 2" min. If the answer to drain. ...
Installation Instructions (English)
Page 4
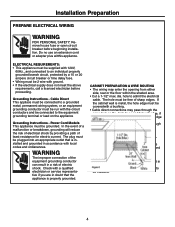
...reduce the risk of electrical shock by a 15 or 20 ampere circuit breaker or time delay fuse. • Wiring must be free of dishwasher. • For cable direct connections the cable must be covered with ground. • If the electrical supply does not meet the above requirements... appliance must be installed. 4 hole to be routed as the drain hose and hot water line, if convenient. Electrical Connection to Dishwasher Electrical connection is to admit the electrical cable. Do no use an extension cord or adapter plus witthis appliance. Installation Preparation PREPARE ELECTRICAL...
...reduce the risk of electrical shock by a 15 or 20 ampere circuit breaker or time delay fuse. • Wiring must be free of dishwasher. • For cable direct connections the cable must be covered with ground. • If the electrical supply does not meet the above requirements... appliance must be installed. 4 hole to be routed as the drain hose and hot water line, if convenient. Electrical Connection to Dishwasher Electrical connection is to admit the electrical cable. Do no use an extension cord or adapter plus witthis appliance. Installation Preparation PREPARE ELECTRICAL...


