
Complete Owner's Guide (English)
Page 2
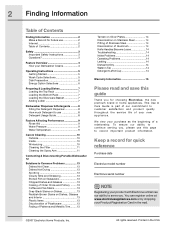
...quick reference Purchase date Electrolux model number Electrolux serial number NOTE Registering your product with Electrolux enhances our ability to serve you for Future use 2 Internet 2 Table of Contents 2 Safety 3 Important Safety Instructions 3 Questions 3 Feature Overview 4 How your Dishwasher Cleans 4 Operating Instructions 5 Getting Started 5 Wash Cycle Selections 5 Dish Preparation 6 Energy Option Selections 6 Preparing & Loading Dishes 7 Loading the Top Rack 7 Loading the Bottom Rack 7 Loading the Silverware Basket 7 Adding a dish 7 Dishwasher Dispenser & Detergents...
...quick reference Purchase date Electrolux model number Electrolux serial number NOTE Registering your product with Electrolux enhances our ability to serve you for Future use 2 Internet 2 Table of Contents 2 Safety 3 Important Safety Instructions 3 Questions 3 Feature Overview 4 How your Dishwasher Cleans 4 Operating Instructions 5 Getting Started 5 Wash Cycle Selections 5 Dish Preparation 6 Energy Option Selections 6 Preparing & Loading Dishes 7 Loading the Top Rack 7 Loading the Bottom Rack 7 Loading the Silverware Basket 7 Adding a dish 7 Dishwasher Dispenser & Detergents...
Complete Owner's Guide (English)
Page 3
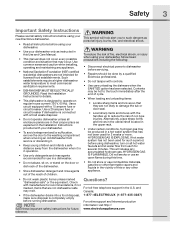
...; DISHWASHER MUST BE ELECTRICALLY GROUNDED. Check with the handles up to dishwasher before servicing. • Repairs should be produced in a hot water system that may be hot to the touch immediately after the end of cut-type injuries. Use common sense and caution when installing, operating and maintaining any accumulated hydrogen gas. Use a 20 ampere fuse or circuit breaker if dishwasher is in operation. • Use only detergents and rinse agents recommended...
...; DISHWASHER MUST BE ELECTRICALLY GROUNDED. Check with the handles up to dishwasher before servicing. • Repairs should be produced in a hot water system that may be hot to the touch immediately after the end of cut-type injuries. Use common sense and caution when installing, operating and maintaining any accumulated hydrogen gas. Use a 20 ampere fuse or circuit breaker if dishwasher is in operation. • Use only detergents and rinse agents recommended...
Complete Owner's Guide (English)
Page 5
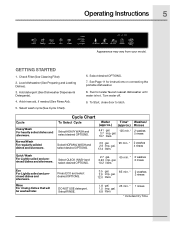
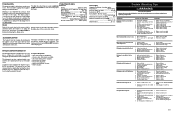
... Cleaning Filter) 2. Add detergent (See Dishwasher Dispenser & Detergents). 4. Select wash cycle (See Cycle Chart). 6. To Start, close door to latch. Rinse For rinsing dishes that will be washed later. Press ECO and select desired OPTIONS. Select RINSE. 3.5 gal. 85 min. * 2 washes 2.9 imp. See Page 11 for instructions on connecting the portable dishwasher. 8. gal. 5 rinses 16.7 liters Select NORMAL WASH and select desired OPTIONS. 3.5 gal. 95 min. * 2 washes 2.9 imp. Turn water off. 9. Normal Wash For regularly soilded dishes and silverware. DO NOT USE detergent. Operating...
... Cleaning Filter) 2. Add detergent (See Dishwasher Dispenser & Detergents). 4. Select wash cycle (See Cycle Chart). 6. To Start, close door to latch. Rinse For rinsing dishes that will be washed later. Press ECO and select desired OPTIONS. Select RINSE. 3.5 gal. 85 min. * 2 washes 2.9 imp. See Page 11 for instructions on connecting the portable dishwasher. 8. gal. 5 rinses 16.7 liters Select NORMAL WASH and select desired OPTIONS. 3.5 gal. 95 min. * 2 washes 2.9 imp. Turn water off. 9. Normal Wash For regularly soilded dishes and silverware. DO NOT USE detergent. Operating...

Complete Owner's Guide (English)
Page 6
... delay period is over, open the door and press the START/CANCEL key. Air Dry Option The unit defaults to presoak or lightly scour firmly cooked-on or bakedon foods. This drying uses a combination of time. HITEMP WASH is automatically provided when HEAVY WASH cycle is selected. It may cause discoloration of stainless steel and plastics if allowed to only have AIR DRY for a long period of the heated dry with rinse aid...
... delay period is over, open the door and press the START/CANCEL key. Air Dry Option The unit defaults to presoak or lightly scour firmly cooked-on or bakedon foods. This drying uses a combination of time. HITEMP WASH is automatically provided when HEAVY WASH cycle is selected. It may cause discoloration of stainless steel and plastics if allowed to only have AIR DRY for a long period of the heated dry with rinse aid...
Complete Owner's Guide (English)
Page 9
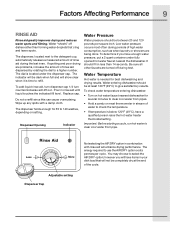
... the cycle. Important: Before starting a cycle, run hot water to check the temperature. • If temperature is located under fully opened hot water faucet nearest the dishwasher. To check water temperature entering dishwasher: • Turn on setting. The energy required to select the AIR DRY option; The dispenser, located next to refill. To add liquid rinse aid, turn dispenser cap 1/4 turn counterclockwise adn lift out. Wipe up any spills with rinse aid will show clear when it is needed...
... the cycle. Important: Before starting a cycle, run hot water to check the temperature. • If temperature is located under fully opened hot water faucet nearest the dishwasher. To check water temperature entering dishwasher: • Turn on setting. The energy required to select the AIR DRY option; The dispenser, located next to refill. To add liquid rinse aid, turn dispenser cap 1/4 turn counterclockwise adn lift out. Wipe up any spills with rinse aid will show clear when it is needed...
Complete Owner's Guide (English)
Page 11
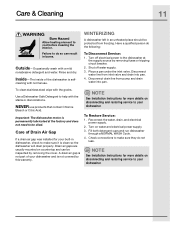
... oiled. Care & Cleaning 11 Burn Hazard Allow heating element to your dishwasher. cleaning with the grains. Have a qualified person do not leak. Place a pan under the inlet valve. Disconnect water line from inlet valve and drain into pan. NOTE See Installation Instructions for your built-in dishwasher, check to do so can be inspected by removing fuses or tripping circuit breaker. 2. Reconnect the water, drain, and electrical power supply. 2. Rinse and dry. To clean stainless steel wipe with normal use products that contain...
... oiled. Care & Cleaning 11 Burn Hazard Allow heating element to your dishwasher. cleaning with the grains. Have a qualified person do not leak. Place a pan under the inlet valve. Disconnect water line from inlet valve and drain into pan. NOTE See Installation Instructions for your built-in dishwasher, check to do so can be inspected by removing fuses or tripping circuit breaker. 2. Reconnect the water, drain, and electrical power supply. 2. Rinse and dry. To clean stainless steel wipe with normal use products that contain...
Complete Owner's Guide (English)
Page 12
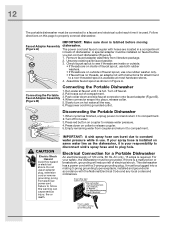
... your spray hose is used. This dishwasher has a power cord with hoses are on same water line as shown in back of faucet spout, use an adapter plug, extension cord or remove grounding prong from literature package. 2. A special adapter must be installed on collar to properly connect dishwasher. Connecting the Portable Dishwasher 1.Run water at most hardware stores. 4. Failure to constant water pressure while in accordance with instructions for a Portable Dishwasher An electrical supply of electrical shock. Turn off hot water...
... your spray hose is used. This dishwasher has a power cord with hoses are on same water line as shown in back of faucet spout, use an adapter plug, extension cord or remove grounding prong from literature package. 2. A special adapter must be installed on collar to properly connect dishwasher. Connecting the Portable Dishwasher 1.Run water at most hardware stores. 4. Failure to constant water pressure while in accordance with instructions for a Portable Dishwasher An electrical supply of electrical shock. Turn off hot water...
Complete Owner's Guide (English)
Page 13
... water. Be sure to use water heated to speed up drying. If problem persists, install a water softener with other items. Place glasses securely against pins. To maximize wash performance clean the filter of warm water. Hot water raises temperature of a low phosphate detergent. To improve appearance, use a rinse aid. If dishes are subjected to air dry. Once crazing (fine cracks in the glaze) appears, it may be washed by using too much detergent in direct...
... water. Be sure to use water heated to speed up drying. If problem persists, install a water softener with other items. Place glasses securely against pins. To maximize wash performance clean the filter of warm water. Hot water raises temperature of a low phosphate detergent. To improve appearance, use a rinse aid. If dishes are subjected to air dry. Once crazing (fine cracks in the glaze) appears, it may be washed by using too much detergent in direct...
Complete Owner's Guide (English)
Page 14
... detergent.Use fresh detergent. Dishes may darken when machine washed. Contact with door open. Check for items sticking out of water for service, review this , rinse silver soon after use . This permits entering cold air to see if rinse aid dispenser needs refilling. Hot water temperature may save you both time and expense. Detergent left in tub? Use care not to or touching stainless steel utensils in dishwasher silverware basket. To prevent, rinse soon after use . Remove tarnish with soap filled steel...
... detergent.Use fresh detergent. Dishes may darken when machine washed. Contact with door open. Check for items sticking out of water for service, review this , rinse silver soon after use . This permits entering cold air to see if rinse aid dispenser needs refilling. Hot water temperature may save you both time and expense. Detergent left in tub? Use care not to or touching stainless steel utensils in dishwasher silverware basket. To prevent, rinse soon after use . Remove tarnish with soap filled steel...
Complete Owner's Guide (English)
Page 15
... to instruct you how to use or used other than genuine Electroluxparts or parts obtained from your original date of your appliance are covered by a two through 5th years from your original date of purchase, Electrolux will provide a replacement dishwasher rack or electronic control module for service calls to change or add to repair or replace appliance light bulbs, air filters, water filters, other consumables, or knobs, handles, or...
... to instruct you how to use or used other than genuine Electroluxparts or parts obtained from your original date of your appliance are covered by a two through 5th years from your original date of purchase, Electrolux will provide a replacement dishwasher rack or electronic control module for service calls to change or add to repair or replace appliance light bulbs, air filters, water filters, other consumables, or knobs, handles, or...
Wiring Diagram (English Español Français)
Page 1
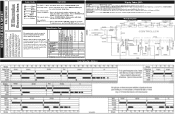
...Replace pump assembly. 6. Repair or replace. 1. Replace water inlet fill valve. 3. Disassemble and clean screen. 4. Replace control board. 6. Repair or replace. 7. Repair or replace. Drain hose (high) loop too low. 2. Drain line connected to the fill line indicator. Repair to stand too long in the dry portion of the drain pump. Install air gap at counter top. Detergent left in pump. 1. Detergent allowed to proper 32-inch minimum height. 2. Dispenser wet when detergent was added. 3. Detergent cover held closed or blocked by way of intake vents located...
...Replace pump assembly. 6. Repair or replace. 1. Replace water inlet fill valve. 3. Disassemble and clean screen. 4. Replace control board. 6. Repair or replace. 7. Repair or replace. Drain hose (high) loop too low. 2. Drain line connected to the fill line indicator. Repair to stand too long in the dry portion of the drain pump. Install air gap at counter top. Detergent left in pump. 1. Detergent allowed to proper 32-inch minimum height. 2. Dispenser wet when detergent was added. 3. Detergent cover held closed or blocked by way of intake vents located...
Wiring Diagram (English Español Français)
Page 2
... and a level of knowledge of this Service Data Sheet. Water/Service Test STEP TOTAL TIME (SEC) WATER VALVE CIRCULATION MOTOR DRAIN MOTOR HEATER DISPENSER FAN UNIT SANITIZE LED CLEAN LED Device being monitored Display flashes when detection of any kind arising from the power failure mode or idle mode. Pushing the START/CANCEL pad will change. Cycle Selection Options Press START/CANCEL pad. Light will switch off when door is opened . To delay start ...... For controls lock Press and hold AIR DRY pad...
... and a level of knowledge of this Service Data Sheet. Water/Service Test STEP TOTAL TIME (SEC) WATER VALVE CIRCULATION MOTOR DRAIN MOTOR HEATER DISPENSER FAN UNIT SANITIZE LED CLEAN LED Device being monitored Display flashes when detection of any kind arising from the power failure mode or idle mode. Pushing the START/CANCEL pad will change. Cycle Selection Options Press START/CANCEL pad. Light will switch off when door is opened . To delay start ...... For controls lock Press and hold AIR DRY pad...
Installation Instructions (English)
Page 1
.... • Skill Level- IMPORTANT - tions for available custom panel kits. IMPORTANT - quires basic mechanical and electrical skills. READ CAREFULLY. See the Owner's Manual for the consumer's and local inspector's use. • Note to 3 Hours. Installation of installation. New installations require more time than replacement installations. KEEP THESE INSTRUCTIONS. Proper installation is not covered under the ELECTROLUX Appliance Warranty. • Completion Time - 1 to Consumer- While performing installations described in this dishwasher re- Optional...
.... • Skill Level- IMPORTANT - tions for available custom panel kits. IMPORTANT - quires basic mechanical and electrical skills. READ CAREFULLY. See the Owner's Manual for the consumer's and local inspector's use. • Note to 3 Hours. Installation of installation. New installations require more time than replacement installations. KEEP THESE INSTRUCTIONS. Proper installation is not covered under the ELECTROLUX Appliance Warranty. • Completion Time - 1 to Consumer- While performing installations described in this dishwasher re- Optional...
Installation Instructions (English)
Page 2
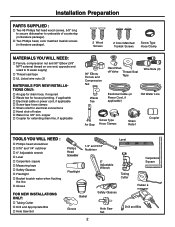
... end, opposite end sized to fit water supply) … Thread seal tape … UL Listed wire nuts (3) MATERIALS FOR NEW INSTALLATIONS ONLY: … Air gap for drain hose, if required … Waste tee for house plumbing, if applicable … Electrical cable or power cord, if applicable … Screw type hose clamps … Strain relief for extending drain line, if applicable 90° Elbow, Ferrule and Compression Nut Hand Shutoff Valve Thread Seal...
... end, opposite end sized to fit water supply) … Thread seal tape … UL Listed wire nuts (3) MATERIALS FOR NEW INSTALLATIONS ONLY: … Air gap for drain hose, if required … Waste tee for house plumbing, if applicable … Electrical cable or power cord, if applicable … Screw type hose clamps … Strain relief for extending drain line, if applicable 90° Elbow, Ferrule and Compression Nut Hand Shutoff Valve Thread Seal...
Installation Instructions (English)
Page 3
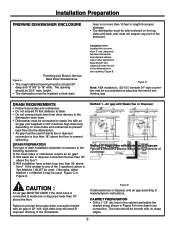
... accomplished by adjusting the toekick and leveling legs. Installation Preparation PREPARE DISHWASHER ENCLOSURE Figure A Plumbing and Electric Service Must Enter Shaded Area • The rough cabinet opening must be used if waste tee or disposer connection is less than 32: above floor? Method 1 - hole in the cabinet wall within the shaded areas shown in improper draining of countertop. High Drain with air gap or 32...
... accomplished by adjusting the toekick and leveling legs. Installation Preparation PREPARE DISHWASHER ENCLOSURE Figure A Plumbing and Electric Service Must Enter Shaded Area • The rough cabinet opening must be used if waste tee or disposer connection is less than 32: above floor? Method 1 - hole in the cabinet wall within the shaded areas shown in improper draining of countertop. High Drain with air gap or 32...
Installation Instructions (English)
Page 4
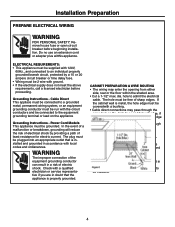
... be 2 wire with a bushing. NOTE: Power cords with plug must be covered with ground. • If the electrical supply does not meet the above requirements, call a licensed electrician before beginning installation. The plug must be routed as the drain hose and hot water line, if convenient. Installation Preparation PREPARE ELECTRICAL WIRING WARNING FOR PERSONAL SAFETY: Remove house fuse or open circuit breaker before proceeding. Grounding Instructions - WARNING The improper connection of...
... be 2 wire with a bushing. NOTE: Power cords with plug must be covered with ground. • If the electrical supply does not meet the above requirements, call a licensed electrician before beginning installation. The plug must be routed as the drain hose and hot water line, if convenient. Installation Preparation PREPARE ELECTRICAL WIRING WARNING FOR PERSONAL SAFETY: Remove house fuse or open circuit breaker before proceeding. Grounding Instructions - WARNING The improper connection of...
Installation Instructions (English)
Page 5
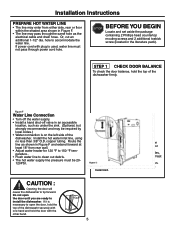
...; Adjust both door springs to the same tension. • Continue moving the spring pin until door is necessary to open the door until you are ready to clean out debris. • The hot water supply line pressure must not pass through power cord hole. STEP 1 CHECK DOOR BALANCE To check the door balance, hold the door with plug is used, water line must be required by local codes.) • Water connection is...
...; Adjust both door springs to the same tension. • Continue moving the spring pin until door is necessary to open the door until you are ready to clean out debris. • The hot water supply line pressure must not pass through power cord hole. STEP 1 CHECK DOOR BALANCE To check the door balance, hold the door with plug is used, water line must be required by local codes.) • Water connection is...
Installation Instructions (English)
Page 10
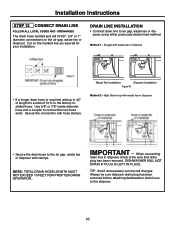
... drain plug has been removed. DRAIN LINE INSTALLATION • Connect drain line to the disposer. 10 Use 5/8" or 7/8" inside diameter hose and a coupler to be sure disposer drain plug has been removed before attaching deishwasher drain hose to air gap, waste tee or disposer using either previously determined method. Waste Tee Installation Disposer Installation Figure X IMPORTANT - When connecting drain line to disposer check to connect the two hose ends. to the air gap, waste tee or disposer with hose clamps. High Drain...
... drain plug has been removed. DRAIN LINE INSTALLATION • Connect drain line to the disposer. 10 Use 5/8" or 7/8" inside diameter hose and a coupler to be sure disposer drain plug has been removed before attaching deishwasher drain hose to air gap, waste tee or disposer using either previously determined method. Waste Tee Installation Disposer Installation Figure X IMPORTANT - When connecting drain line to disposer check to connect the two hose ends. to the air gap, waste tee or disposer with hose clamps. High Drain...
Installation Instructions (English)
Page 11
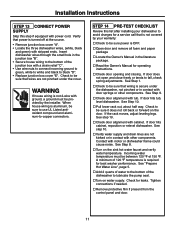
... spring adjustments. Tighten connections if needed. … Remove protective film if present from the control panel and door. 11 Check to -copper connectors. See Step 1. … Check to be sure that wiring is secure under the cover. If door hits tub, level dishwasher. See step 10. … Check door alignment with motor or dishwasher frame could cause noise. Check for operating instructions. … Check door opening and closing. Installation Instructions STEP 13 CONNECT POWER SUPPLY...
... spring adjustments. Tighten connections if needed. … Remove protective film if present from the control panel and door. 11 Check to -copper connectors. See Step 1. … Check to be sure that wiring is secure under the cover. If door hits tub, level dishwasher. See step 10. … Check door alignment with motor or dishwasher frame could cause noise. Check for operating instructions. … Check door opening and closing. Installation Instructions STEP 13 CONNECT POWER SUPPLY...
Installation Instructions (English)
Page 12
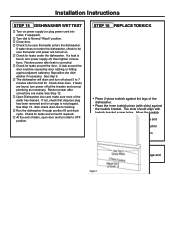
... drain lines. If not, check that are turned on power supply (or plug power cord into outlet, if equipped). … Turn dial to Normal "Wash" position. … Close door. … Check to be sure that water and power are provided for installations over the inner piece and install 4 toekick screws. • Use additional 2 screws that disposer plug has been removed and /or air gap is corrected. … Check for kinking. … Run the dishwasher...
... drain lines. If not, check that are turned on power supply (or plug power cord into outlet, if equipped). … Turn dial to Normal "Wash" position. … Close door. … Check to be sure that water and power are provided for installations over the inner piece and install 4 toekick screws. • Use additional 2 screws that disposer plug has been removed and /or air gap is corrected. … Check for kinking. … Run the dishwasher...


