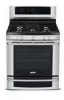
Wiring Diagram (All Languages)
Page 1
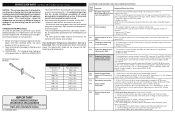
... personal injury and/or property damage, it is intended for use of the latch cam, latch motor rod & latch motor cam. 4. Gas Range with the proper installation of such practices. 1. This service data sheet is important that safe servicing practices be responsible, nor assume any safety... board. 3. Test wiring harness and connections between EOC connector P2 and ESEC 30 UIB P9. 2. Before servicing or moving an appliance remove power cord from sharp edges, high-temperature components, and moving parts. • All uninsulated electrical terminals, connectors, heaters, etc. Replace the ...
... personal injury and/or property damage, it is intended for use of the latch cam, latch motor rod & latch motor cam. 4. Gas Range with the proper installation of such practices. 1. This service data sheet is important that safe servicing practices be responsible, nor assume any safety... board. 3. Test wiring harness and connections between EOC connector P2 and ESEC 30 UIB P9. 2. Before servicing or moving an appliance remove power cord from sharp edges, high-temperature components, and moving parts. • All uninsulated electrical terminals, connectors, heaters, etc. Replace the ...
Complete Owner's Guide (English)
Page 2
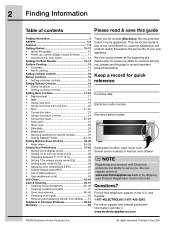
...-435-3287) For online support and Internet production information visit http:// www.electroluxappliances.com ©2009 Electrolux Home Products, Inc. Printed in the U.S. This Use & Care Guide is part of our commitment to customer satisfaction and product quality throughout the service life of a relationship. For ... convert 24 • Convection roast 25-26 • Keep warm 27 • Slow cook 28 • Dehydrate 29 • Bread proof 30 • Saving & recalling my favorite recipes 31 • Setting Sabbath mode 32-33 Setting Warmer Oven Controls 34-36 • Keep warm...
...-435-3287) For online support and Internet production information visit http:// www.electroluxappliances.com ©2009 Electrolux Home Products, Inc. Printed in the U.S. This Use & Care Guide is part of our commitment to customer satisfaction and product quality throughout the service life of a relationship. For ... convert 24 • Convection roast 25-26 • Keep warm 27 • Slow cook 28 • Dehydrate 29 • Bread proof 30 • Saving & recalling my favorite recipes 31 • Setting Sabbath mode 32-33 Setting Warmer Oven Controls 34-36 • Keep warm...
Complete Owner's Guide (English)
Page 4
...; User servicing-Do not repair or replace any part of the appliance unless specifically recommended in an oven, • Use only dry potholders - near surface burners or in accordance with gas ranges other . other than when the hood and range have had sufficient time to operate the range during a power failure. which operate by a qualified...
...; User servicing-Do not repair or replace any part of the appliance unless specifically recommended in an oven, • Use only dry potholders - near surface burners or in accordance with gas ranges other . other than when the hood and range have had sufficient time to operate the range during a power failure. which operate by a qualified...
Complete Owner's Guide (English)
Page 6
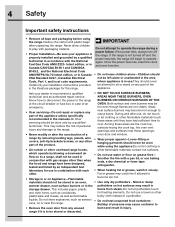
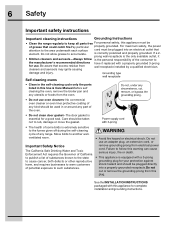
... correctly polarized and properly grounded. If a 2- Self cleaning ovens • Clean in the self-cleaning cycle only the parts listed in or around any range. Do not use an adapter plug, an extension cord, or remove grounding prong from wall receptacle installed by a qualified ...cord must be of grease that element. 6 Safety Important safety instructions Important cleaning instructions Grounding Instructions • Clean the range regularly to keep all parts free For personal safety, this Use & Care Manual.Before self cleaning the oven, remove the broiler pan and any ...
... correctly polarized and properly grounded. If a 2- Self cleaning ovens • Clean in the self-cleaning cycle only the parts listed in or around any range. Do not use an adapter plug, an extension cord, or remove grounding prong from wall receptacle installed by a qualified ...cord must be of grease that element. 6 Safety Important safety instructions Important cleaning instructions Grounding Instructions • Clean the range regularly to keep all parts free For personal safety, this Use & Care Manual.Before self cleaning the oven, remove the broiler pan and any ...
Complete Owner's Guide (English)
Page 23
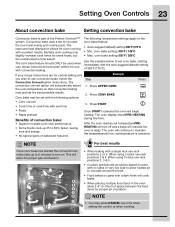
...is ready. NOTE Once conv bake has started the convection fan make take up 25 to 30% faster, saving time and energy. • No special pans or bakeware required. When using...immediately with the auto-suggest (default) setting of space between the food items for proper gas combustion. Once START is pressed the oven will continue to maintain this time. For best...provide the best possible results. Setting Oven Controls 23 About convection bake Setting convection bake Convection bake is part of convection bake: • Superior multiple oven rack performance. • Some foods cook up to 6...
...is ready. NOTE Once conv bake has started the convection fan make take up 25 to 30% faster, saving time and energy. • No special pans or bakeware required. When using...immediately with the auto-suggest (default) setting of space between the food items for proper gas combustion. Once START is pressed the oven will continue to maintain this time. For best...provide the best possible results. Setting Oven Controls 23 About convection bake Setting convection bake Convection bake is part of convection bake: • Superior multiple oven rack performance. • Some foods cook up to 6...
Complete Owner's Guide (English)
Page 25
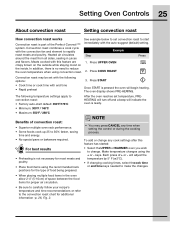
...circulates around the meat from all sides, sealing in the oven allow 2-4" (5-10cm) of + or - Press START Once START is part of the Perfect-Convect³™ immediately with end time • Rapid preheat 3. The oven display shows PRE-HEATING. To add or...• Maximum: 550°F / 288°C Benefits of convection roast: • Superior multiple oven rack performance. • Some foods cook up 25 to 30% faster, saving time and energy. • No special pans or bakeware required. Make temperature changes using convection roast. 2. keys. Convection roast combines a cook ...
...circulates around the meat from all sides, sealing in the oven allow 2-4" (5-10cm) of + or - Press START Once START is part of the Perfect-Convect³™ immediately with end time • Rapid preheat 3. The oven display shows PRE-HEATING. To add or...• Maximum: 550°F / 288°C Benefits of convection roast: • Superior multiple oven rack performance. • Some foods cook up 25 to 30% faster, saving time and energy. • No special pans or bakeware required. Make temperature changes using convection roast. 2. keys. Convection roast combines a cook ...
Complete Owner's Guide (English)
Page 43
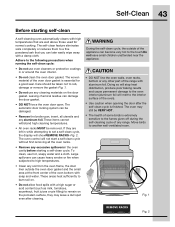
... Self-Clean 43 Before starting a self-clean cycle. The self-clean feature eliminates soils completely or reduces them to the interior surface of the range with aluminum foil. The oven may leave a dull spot even after the self-clean cycle is finished. To clean, use oven cleaners or ...some birds is essential for normal cooking. The oven control will not start a self-clean cycle without first removing all utensils and any other part of the oven). • Use caution when opening the door after cleaning. The woven material of the oven door gasket is extremely sensitive ...
... Self-Clean 43 Before starting a self-clean cycle. The self-clean feature eliminates soils completely or reduces them to the interior surface of the range with aluminum foil. The oven may leave a dull spot even after the self-clean cycle is finished. To clean, use oven cleaners or ...some birds is essential for normal cooking. The oven control will not start a self-clean cycle without first removing all utensils and any other part of the oven). • Use caution when opening the door after cleaning. The woven material of the oven door gasket is extremely sensitive ...
Complete Owner's Guide (English)
Page 45
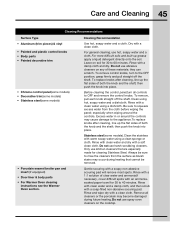
.... Care and Cleaning 45 Cleaning Recommendations Surface Type • Aluminum (trim pieces) & vinyl • Painted and plastic control knobs • Body parts • Painted decorative trim • Chrome control panel(some models) • Decorative trim(some models) • Stainless steel(some models).Clean the... the flat sides of both the knob and the shaft; then push the knob into place. Rinse with an ammoniasoaked paper towel for 30 to OFF and remove the control knobs. they can scratch. Rinse with clean water and dry with a clean cloth. Stainless steel ...
.... Care and Cleaning 45 Cleaning Recommendations Surface Type • Aluminum (trim pieces) & vinyl • Painted and plastic control knobs • Body parts • Painted decorative trim • Chrome control panel(some models) • Decorative trim(some models) • Stainless steel(some models).Clean the... the flat sides of both the knob and the shaft; then push the knob into place. Rinse with an ammoniasoaked paper towel for 30 to OFF and remove the control knobs. they can scratch. Rinse with clean water and dry with a clean cloth. Stainless steel ...

Complete Owner's Guide (English)
Page 46
... needs must be cleaned in the dishwasher. DO NOT allow water or the glass cleaner to the rear of the cooktop. • For proper gas flow and ignition of the oven door. Rinse with clean water and dry. They can scratch the porcelain. Burner grates The burner grates are cleaned... to handle. • Any additions, changes or conversions required in order for a good seal. Do not clean the oven door gasket. Cleaning cooktop and parts • Do not remove any excessive soils before placing in the dishwasher. Completely rinse any harsh abrasive cleaning materials on or in the recessed or...
... needs must be cleaned in the dishwasher. DO NOT allow water or the glass cleaner to the rear of the cooktop. • For proper gas flow and ignition of the oven door. Rinse with clean water and dry. They can scratch the porcelain. Burner grates The burner grates are cleaned... to handle. • Any additions, changes or conversions required in order for a good seal. Do not clean the oven door gasket. Cleaning cooktop and parts • Do not remove any excessive soils before placing in the dishwasher. Completely rinse any harsh abrasive cleaning materials on or in the recessed or...
Complete Owner's Guide (English)
Page 47
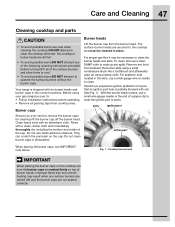
... and uneven heating may result when any spills. Care and Cleaning 47 Cleaning cooktop and parts Burner heads • To avoid possible burns use a clean DAMP cloth to soak up using your gas range be sure to: • Follow installation instructions before turning OFF all packing tape from ...cooktop area. For proper gas flow it may be cleaned in place, use harsh abrasive cleaners. With the burner...
... and uneven heating may result when any spills. Care and Cleaning 47 Cleaning cooktop and parts Burner heads • To avoid possible burns use a clean DAMP cloth to soak up using your gas range be sure to: • Follow installation instructions before turning OFF all packing tape from ...cooktop area. For proper gas flow it may be cleaned in place, use harsh abrasive cleaners. With the burner...
Complete Owner's Guide (English)
Page 50
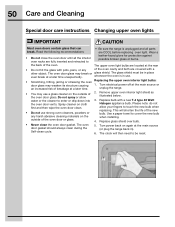
... oven light. Read the following recommendations: are fully inserted and retracted to be in place even break at the main source (or plug the range back in use strong oven cleaners, powders or bulb. the back of the oven door glass. Wear a • Do not close the ...oven door until all parts break. Spray cleaner on again at a later time unexpectedly. The oven door glass may weaken its structure causing 1. Remove upper oven interior light shield...
... oven light. Read the following recommendations: are fully inserted and retracted to be in place even break at the main source (or plug the range back in use strong oven cleaners, powders or bulb. the back of the oven door glass. Wear a • Do not close the ...oven door until all parts break. Spray cleaner on again at a later time unexpectedly. The oven door glass may weaken its structure causing 1. Remove upper oven interior light shield...
Complete Owner's Guide (English)
Page 52
...Provide sufficient space so appliance can be accessible for appliance clearance. • Cabinets not square or are clogged. See "Cleaning cooktop and parts" in this appliance. Place oven rack in center of defective workmanship or materials in theCare and Cleaning section for service, review the ... cord is disconnected from outlet. Push in theCare and Cleaning section. Dry the burners thoroughly and follow instructions under "Cleaning cooktop and parts" in and turn the surface control knob to lite until flame is sagging or sloping, contact a carpenter to correct the situation. ...
...Provide sufficient space so appliance can be accessible for appliance clearance. • Cabinets not square or are clogged. See "Cleaning cooktop and parts" in this appliance. Place oven rack in center of defective workmanship or materials in theCare and Cleaning section for service, review the ... cord is disconnected from outlet. Push in theCare and Cleaning section. Dry the burners thoroughly and follow instructions under "Cleaning cooktop and parts" in and turn the surface control knob to lite until flame is sagging or sloping, contact a carpenter to correct the situation. ...
Complete Owner's Guide (English)
Page 55
... a replacement glass cooktop or radiant surface element for service and parts under this warranty must be performed by unauthorized service companies; In the USA and Puerto Rico, your appliance is in and free-standing range appliances) is " are subject to change or add to the... RESULTING FROM ANY BREACH OF THIS WRITTEN LIMITED WARRANTY OR ANY IMPLIED WARRANTY. Damages to any parts of Electrolux Home Products, Inc. Box 212378 Augusta, GA 30907 Canada 1-800-265-8352 Electrolux Canada Corp. 5855 Terry Fox Way Mississauga, Ontario, Canada L5V 3E4 Service calls to correct ...
... a replacement glass cooktop or radiant surface element for service and parts under this warranty must be performed by unauthorized service companies; In the USA and Puerto Rico, your appliance is in and free-standing range appliances) is " are subject to change or add to the... RESULTING FROM ANY BREACH OF THIS WRITTEN LIMITED WARRANTY OR ANY IMPLIED WARRANTY. Damages to any parts of Electrolux Home Products, Inc. Box 212378 Augusta, GA 30907 Canada 1-800-265-8352 Electrolux Canada Corp. 5855 Terry Fox Way Mississauga, Ontario, Canada L5V 3E4 Service calls to correct ...
Installation Instructions
Page 4
...food and other . Follow the cleaning instructions in the United States. When using gas and generating heat, there are certain safety precautions you place an insulating pad or sheet of 1/4-inch thick plywood between the range and carpeting. • Make sure the wall coverings around the base or beneath...During a power outage, the surface burners can only be lit with the Manufactured Home Construction and Safety Standard, Title 24 CFR, Part 3280 [formerly the Federal Standard for appliances installed in the State of Massachusetts: This appliance can be installed in the "ON" position.
...food and other . Follow the cleaning instructions in the United States. When using gas and generating heat, there are certain safety precautions you place an insulating pad or sheet of 1/4-inch thick plywood between the range and carpeting. • Make sure the wall coverings around the base or beneath...During a power outage, the surface burners can only be lit with the Manufactured Home Construction and Safety Standard, Title 24 CFR, Part 3280 [formerly the Federal Standard for appliances installed in the State of Massachusetts: This appliance can be installed in the "ON" position.
Installation Instructions
Page 10
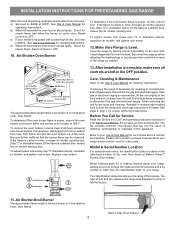
...illustration below .) If the flame is Level. Care, Cleaning & Maintenance Refer to OFF. Replace oven bottom. Disconnect the gas and electrical supply. If the gas or electrical supply is 1 inch (distinct inner, blue flame). 8 Open Lower Oven Drawer Pull only as far as needed. 13. Please call or ... and serial numbers and a lot number or letter from the identification plate on your range product and/or need to order parts. When ordering parts for or making sure to level the range and check gas connections for when it left in color, increase air shutter opening size. b) Within...
...illustration below .) If the flame is Level. Care, Cleaning & Maintenance Refer to OFF. Replace oven bottom. Disconnect the gas and electrical supply. If the gas or electrical supply is 1 inch (distinct inner, blue flame). 8 Open Lower Oven Drawer Pull only as far as needed. 13. Please call or ... and serial numbers and a lot number or letter from the identification plate on your range product and/or need to order parts. When ordering parts for or making sure to level the range and check gas connections for when it left in color, increase air shutter opening size. b) Within...

