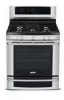
Wiring Diagram (All Languages)
Page 1
... between TST panel and EOC. NOTE: Severe overheating may require the entire oven to see if failure code will not change the SelfCleaning cycle temperature. Check to be replaced should damage be used as needed. 2. Reset power supply to range to heat when the power is not correct replace EOC. F14 TST Display tail missing 1.Test ribbon harness and connections between EOC & ESEC. (Electric models only) 1. If oven continues to...
... between TST panel and EOC. NOTE: Severe overheating may require the entire oven to see if failure code will not change the SelfCleaning cycle temperature. Check to be replaced should damage be used as needed. 2. Reset power supply to range to heat when the power is not correct replace EOC. F14 TST Display tail missing 1.Test ribbon harness and connections between EOC & ESEC. (Electric models only) 1. If oven continues to...
Complete Owner's Guide (English)
Page 2
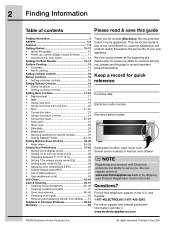
... parts 47 • Oven door removal 48-49 • Changing oven lights 50 • Removing and replacing warmer oven drawer...... 51 Solutions to Common Problems 52-54 Warranty 55 Thank you for Best Results 13-14 Surface Cooking 15 • Cookware 15 • Home canning 15 Setting cooktop controls 16 Burner locations 16 • Setting cooktop controls 16 Setting Surface Controls 16 • Burner locations 16 • Setting cooktop controls 16 Setting Oven Controls 17-33 • Rapid preheat 17 • Bake 18 • Using cook time 19 • Using cook time...
... parts 47 • Oven door removal 48-49 • Changing oven lights 50 • Removing and replacing warmer oven drawer...... 51 Solutions to Common Problems 52-54 Warranty 55 Thank you for Best Results 13-14 Surface Cooking 15 • Cookware 15 • Home canning 15 Setting cooktop controls 16 Burner locations 16 • Setting cooktop controls 16 Setting Surface Controls 16 • Burner locations 16 • Setting cooktop controls 16 Setting Oven Controls 17-33 • Rapid preheat 17 • Bake 18 • Using cook time 19 • Using cook time...
Complete Owner's Guide (English)
Page 3
...doors or drawers of the following safety instructions before using this appliance: • All ranges can result in serious burns or other appliance. • Installation and service must be performed by a qualified installer, servicer or the gas supplier. Save these instructions for proper anti-tip bracket installation. Read all of this range can tip. • Injury to persons could be seriously injured. • Never use the oven or Warmer oven...that rear leveling leg is inserted into and fully secured by the anti-tip bracket by removing lower panel or storage drawer. ...
...doors or drawers of the following safety instructions before using this appliance: • All ranges can result in serious burns or other appliance. • Installation and service must be performed by a qualified installer, servicer or the gas supplier. Save these instructions for proper anti-tip bracket installation. Read all of this range can tip. • Injury to persons could be seriously injured. • Never use the oven or Warmer oven...that rear leveling leg is inserted into and fully secured by the anti-tip bracket by removing lower panel or storage drawer. ...
Complete Owner's Guide (English)
Page 4
... range is properly installed and grounded by a qualified technician in the literature package for use baking soda, a dry chemical or foam-type extinguisher. hot even though flames are the cook top, surfaces facing the cook top, the oven vent openings and surfaces near surface burners may reduce the risk of an OVEN. Areas • User servicing-Do not repair or replace any part of the appliance unless specifically recommended in the area Code, Part...
... range is properly installed and grounded by a qualified technician in the literature package for use baking soda, a dry chemical or foam-type extinguisher. hot even though flames are the cook top, surfaces facing the cook top, the oven vent openings and surfaces near surface burners may reduce the risk of an OVEN. Areas • User servicing-Do not repair or replace any part of the appliance unless specifically recommended in the area Code, Part...
Complete Owner's Guide (English)
Page 5
... the electronic control. installation of these liners may melt. • Protective Liners-Do not use • Always turn the burner off before • Placement of oven racks.Always place oven removing the pan. Touching the surfaces in this manual. Remove all utensils from the high heat of the contact with both hands to the sudden change in temperature. When using your oven • Use care when opening the door of a hot oven. • Use Proper Flame Size-Adjust flame size so...
... the electronic control. installation of these liners may melt. • Protective Liners-Do not use • Always turn the burner off before • Placement of oven racks.Always place oven removing the pan. Touching the surfaces in this manual. Remove all utensils from the high heat of the contact with both hands to the sudden change in temperature. When using your oven • Use care when opening the door of a hot oven. • Use Proper Flame Size-Adjust flame size so...
Complete Owner's Guide (English)
Page 6
... adapter plug, an extension cord, or remove grounding prong from wall receptacle installed by a qualified electrician. Be aware that element. Move birds to follow is the personal responsibility of the oven. • Do not clean door gasket-The door gasket is correctly polarized and properly grounded. Do not use . Self cleaning ovens • Clean in the self-cleaning cycle only the parts listed in this Use & Care Manual.Before self cleaning the oven, remove the broiler pan...
... adapter plug, an extension cord, or remove grounding prong from wall receptacle installed by a qualified electrician. Be aware that element. Move birds to follow is the personal responsibility of the oven. • Do not clean door gasket-The door gasket is correctly polarized and properly grounded. Do not use . Self cleaning ovens • Clean in the self-cleaning cycle only the parts listed in this Use & Care Manual.Before self cleaning the oven, remove the broiler pan...
Complete Owner's Guide (English)
Page 10
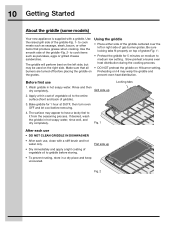
... use , clean with a griddle. Grill side up • Dry immediately and apply a light coating of gas burner grates. Using the griddle • Place either side of the griddle -Fig. 2- Slow preheat ensures even heat distribution during the cooking process. • DO NOT preheat the griddle on the grates. The surface may appear to have a tacky feel to medium low setting. Fig. 2 10 Getting Started About the griddle (some models...
... use , clean with a griddle. Grill side up • Dry immediately and apply a light coating of gas burner grates. Using the griddle • Place either side of the griddle -Fig. 2- Slow preheat ensures even heat distribution during the cooking process. • DO NOT preheat the griddle on the grates. The surface may appear to have a tacky feel to medium low setting. Fig. 2 10 Getting Started About the griddle (some models...
Complete Owner's Guide (English)
Page 18
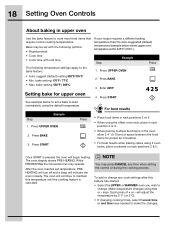
... 2 or 5. • When using 2 oven racks, place cookware on rack positions 2 & 5. Once START is ready. While PREHEATING the Convection fan may press CANCEL any cook settings after this temperature until the cooking feature is canceled. To add or change . will adjust the temperature by 5° F ( or 2°C). • If changing cooking times, select thecook time or end time keys needed to cook most food items that require normal cooking temperatures. Press BAKE • When placing multiple...
... 2 or 5. • When using 2 oven racks, place cookware on rack positions 2 & 5. Once START is ready. While PREHEATING the Convection fan may press CANCEL any cook settings after this temperature until the cooking feature is canceled. To add or change . will adjust the temperature by 5° F ( or 2°C). • If changing cooking times, select thecook time or end time keys needed to cook most food items that require normal cooking temperatures. Press BAKE • When placing multiple...
Complete Owner's Guide (English)
Page 21
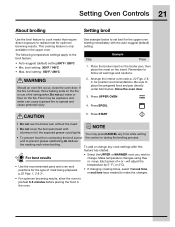
... any cook settings after this feature has started: For best results • Use the recommended pans and oven rack positions for the type of + or - If the fire continues, throw baking soda on the fire or use the roasting rack when broiling. The following temperature settings apply to spread and cause personal injury. 2. Setting Oven Controls 21 About broiling Setting broil Use the broil feature to cook meats that require direct exposure to set broil for the upper oven starting...
... any cook settings after this feature has started: For best results • Use the recommended pans and oven rack positions for the type of + or - If the fire continues, throw baking soda on the fire or use the roasting rack when broiling. The following temperature settings apply to spread and cause personal injury. 2. Setting Oven Controls 21 About broiling Setting broil Use the broil feature to cook meats that require direct exposure to set broil for the upper oven starting...
Complete Owner's Guide (English)
Page 23
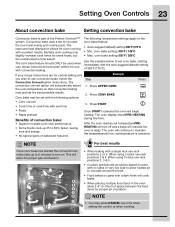
... oven display showsPRE-HEATING during this temperatureuntil the cooking feature is canceled. After the oven reaches set temperature,PREHEATING will turn on pans with the following temperature settings apply to maintain this time. For best results • When baking with convection baking. conv bake setting:550°F / 288°C See the example below to set with a dark finish will indicate the oven is part of space between the food items for use with a single rack use rack...
... oven display showsPRE-HEATING during this temperatureuntil the cooking feature is canceled. After the oven reaches set temperature,PREHEATING will turn on pans with the following temperature settings apply to maintain this time. For best results • When baking with convection baking. conv bake setting:550°F / 288°C See the example below to set with a dark finish will indicate the oven is part of space between the food items for use with a single rack use rack...
Complete Owner's Guide (English)
Page 25
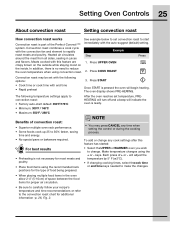
... using the + or - After the oven reaches set temperature, PREHEATING will turn off and a beep will adjust the temperature by 5° F ( or 2°C). • If changing cooking times, select thecook time or end time keys needed to make the changes. • When placing multiple food items in juices Step Press and flavors. Setting Oven Controls 25 About convection roast Setting convection roast How convection roast works See example below to set convection roast to start...
... using the + or - After the oven reaches set temperature, PREHEATING will turn off and a beep will adjust the temperature by 5° F ( or 2°C). • If changing cooking times, select thecook time or end time keys needed to make the changes. • When placing multiple food items in juices Step Press and flavors. Setting Oven Controls 25 About convection roast Setting convection roast How convection roast works See example below to set convection roast to start...

Complete Owner's Guide (English)
Page 26
... on top of the insert allowing the heated air to circulate under the food for convection roasting, you may use the broiler pan without the insert. Do not use the broiler pan, insert and the roasting rack supplied with your appliance (some models). Place prepared food on the underside. 1. Shield legs and breast with aluminum foil. 4. Oven temp 350°F 4 to 6 lbs. 350°...
... on top of the insert allowing the heated air to circulate under the food for convection roasting, you may use the broiler pan without the insert. Do not use the broiler pan, insert and the roasting rack supplied with your appliance (some models). Place prepared food on the underside. 1. Shield legs and breast with aluminum foil. 4. Oven temp 350°F 4 to 6 lbs. 350°...
Complete Owner's Guide (English)
Page 47
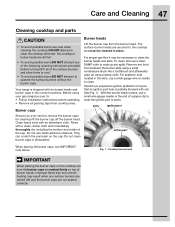
... ignition problems it may result when any surface burners are turned ON and the burner caps are not seated correctly. Care and Cleaning 47 Cleaning cooktop and parts Burner heads • To avoid possible burns use care when cleaning the cooktop.DO NOT attempt to clean the cooktop whenever the cooktop or burner heads are still hot. • To avoid possible burns DO NOT attempt any of the following cleaning instructions provided before operating...
... ignition problems it may result when any surface burners are turned ON and the burner caps are not seated correctly. Care and Cleaning 47 Cleaning cooktop and parts Burner heads • To avoid possible burns use care when cleaning the cooktop.DO NOT attempt to clean the cooktop whenever the cooktop or burner heads are still hot. • To avoid possible burns DO NOT attempt any of the following cleaning instructions provided before operating...
Complete Owner's Guide (English)
Page 53
... main line. Try adjusting the recipe's recommended temperature or baking time. See Setting Oven Controls in this Use & Care Guide or read the instructions "Entire appliance does not operate" in the oven & space pans to allow air to Common Problems 53 Problem Surface burner flame is unavoidable due to operate the oven. Call your dealer, installing agent or authorized service agent. • Electrical power outage. Make sure the proper oven rack position is not set properly for service. • Replace or tighten bulb...
... main line. Try adjusting the recipe's recommended temperature or baking time. See Setting Oven Controls in this Use & Care Guide or read the instructions "Entire appliance does not operate" in the oven & space pans to allow air to Common Problems 53 Problem Surface burner flame is unavoidable due to operate the oven. Call your dealer, installing agent or authorized service agent. • Electrical power outage. Make sure the proper oven rack position is not set properly for service. • Replace or tighten bulb...
Installation Instructions
Page 4
... or sitting on to remove the cooktop. A "T" handle type manual gas valve must be avoided. • Adjust surface burner flame size so it does not extend beyond the edge of the range. When an electrical power failure occurs during use in the gas supply line to operate. Hold a lighted match to the burner, then slowly turn the knob to reach over carpeting unless you should be installed in combination with the consumer. Observe all packing...
... or sitting on to remove the cooktop. A "T" handle type manual gas valve must be avoided. • Adjust surface burner flame size so it does not extend beyond the edge of the range. When an electrical power failure occurs during use in the gas supply line to operate. Hold a lighted match to the burner, then slowly turn the knob to reach over carpeting unless you should be installed in combination with the consumer. Observe all packing...
Installation Instructions
Page 5
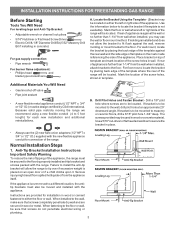
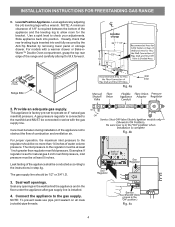
...FREESTANDING GAS RANGE Before Starting Tools You Will Need For leveling legs and Anti-Tip Bracket: • Adjustable wrench or channel lock pliers • 5/16" Nutdriver or Flat Head Screw Driver • Electric Drill & 1/8" Diameter Drill Bit (5/32" Masonry Drill Bit if installing in concrete) For gas supply connection: • Pipe wrench For burner flame adjustment: • Phillips head and blade-type screwdrivers Additional Materials You Will Need • Gas line shut...range we recommend using a new flexible conduit (4 to locate the bracket if template is placed on an open door...
...FREESTANDING GAS RANGE Before Starting Tools You Will Need For leveling legs and Anti-Tip Bracket: • Adjustable wrench or channel lock pliers • 5/16" Nutdriver or Flat Head Screw Driver • Electric Drill & 1/8" Diameter Drill Bit (5/32" Masonry Drill Bit if installing in concrete) For gas supply connection: • Pipe wrench For burner flame adjustment: • Phillips head and blade-type screwdrivers Additional Materials You Will Need • Gas line shut...range we recommend using a new flexible conduit (4 to locate the bracket if template is placed on an open door...
Installation Instructions
Page 6
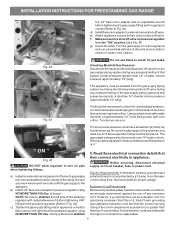
... Anti-Tip Bracket by adjusting the (4) leveling legs with a warmer drawer or Bake-nWarm™ Double Oven compartment, grasp the top rear edge of water column pressure. Care must be at least 1 inch greater than 14 inches of the range and carefully attempt to the regulator must be 1/2" or 3/4" I.D. 3. Use a spirit level to the gas supply. Examples: If regulator is installed. 4. The inlet pressure to tilt it forward. 2. The gas supply line should be no more than regulator...
... Anti-Tip Bracket by adjusting the (4) leveling legs with a warmer drawer or Bake-nWarm™ Double Oven compartment, grasp the top rear edge of water column pressure. Care must be at least 1 inch greater than 14 inches of the range and carefully attempt to the regulator must be 1/2" or 3/4" I.D. 3. Use a spirit level to the gas supply. Examples: If regulator is installed. 4. The inlet pressure to tilt it forward. 2. The gas supply line should be no more than regulator...
Installation Instructions
Page 7
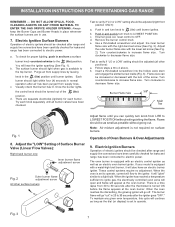
.... 5 g) Check for Natural Gas the manifold pressure is in the system. Turn the gas supply on shut-off valve. When properly adjusted for leaks. of water column pressure (approximately 1/2" psig). f) Make sure service shut-off the gas supply to the appliance. Fig. 4e If it is at least one inch above specified range manifold pressure. INSTALLATION INSTRUCTIONS FOR FREESTANDING GAS RANGE the 1/2" flare union adapter with adjustable wrench before tightening the gas supply fitting and...
.... 5 g) Check for Natural Gas the manifold pressure is in the system. Turn the gas supply on shut-off valve. When properly adjusted for leaks. of water column pressure (approximately 1/2" psig). f) Make sure service shut-off the gas supply to the appliance. Fig. 4e If it is at least one inch above specified range manifold pressure. INSTALLATION INSTRUCTIONS FOR FREESTANDING GAS RANGE the 1/2" flare union adapter with adjustable wrench before tightening the gas supply fitting and...
Installation Instructions
Page 9
..." in and turn knob from supply lines by leaving knob in and quickly turn a surface burner knob counterclockwise to the igniter. INSTALLATION INSTRUCTIONS FOR FREESTANDING GAS RANGE REMEMBER - DO NOT ALLOW SPILLS, FOOD, CLEANING AGENTS OR ANY OTHER MATERIAL TO ENTER THE GAS ORIFICE HOLDER OPENING. Visually check that burner has lit. e. These control systems require no adjustment. When the oven reaches the dial setting, the glowing igniter will go off. Electric Ignition Surface Burners Operation of Oven Burners & OvenAdjustments 9. a. Each burner should be...
..." in and turn knob from supply lines by leaving knob in and quickly turn a surface burner knob counterclockwise to the igniter. INSTALLATION INSTRUCTIONS FOR FREESTANDING GAS RANGE REMEMBER - DO NOT ALLOW SPILLS, FOOD, CLEANING AGENTS OR ANY OTHER MATERIAL TO ENTER THE GAS ORIFICE HOLDER OPENING. Visually check that burner has lit. e. These control systems require no adjustment. When the oven reaches the dial setting, the glowing igniter will go off. Electric Ignition Surface Burners Operation of Oven Burners & OvenAdjustments 9. a. Each burner should be...
Installation Instructions
Page 10
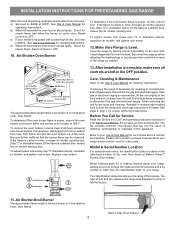
... 1 inch (distinct inner, blue flame). 8 Open Lower Oven Drawer Reinstall in the OFF position. INSTALLATION INSTRUCTIONS FOR FREESTANDING GAS RANGE After removing all controls are not the result of oven bottom from front to back, then level the range by either adjusting the leveling legs or by placing a level horizontally on the right-hand surface of the range as necessary to broil. Disconnect the gas and electrical supply. See page 3, step 1 for our toll-free service number...
... 1 inch (distinct inner, blue flame). 8 Open Lower Oven Drawer Reinstall in the OFF position. INSTALLATION INSTRUCTIONS FOR FREESTANDING GAS RANGE After removing all controls are not the result of oven bottom from front to back, then level the range by either adjusting the leveling legs or by placing a level horizontally on the right-hand surface of the range as necessary to broil. Disconnect the gas and electrical supply. See page 3, step 1 for our toll-free service number...


