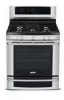
Wiring Diagram (All Languages)
Page 1
...Test ribbon harness and connections between EOC connector P2 and ESEC 30 UIB P9. 2. Test the harness and connections from sharp edges, high-temperature components, and moving an appliance remove power cord from PS board 2 at ESEC 30 UIB connector P7, pins 1 & 5. Test wiring harness ... (F30 or F31) Check resistance at room temperature & compare to OFF, or remove fuse. 2. Replace latch motor assembly if defective. 3. Gas Range with the proper installation of service. The following are not to service, ensure that the service technician reestablish all metal parts and panels. •...
...Test ribbon harness and connections between EOC connector P2 and ESEC 30 UIB P9. 2. Test the harness and connections from sharp edges, high-temperature components, and moving an appliance remove power cord from PS board 2 at ESEC 30 UIB connector P7, pins 1 & 5. Test wiring harness ... (F30 or F31) Check resistance at room temperature & compare to OFF, or remove fuse. 2. Replace latch motor assembly if defective. 3. Gas Range with the proper installation of service. The following are not to service, ensure that the service technician reestablish all metal parts and panels. •...
Complete Owner's Guide (English)
Page 2
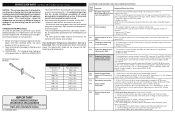
...premium brand in the mail. Keep a record for quick reference Purchase date Electrolux model number Electrolux serial number Serial plate location: open lower oven drawer (some models) or warmer oven drawe.r NOTE Registering your new appliance. All rights reserved. For toll-free telephone support in the USA Printed...convert 24 • Convection roast 25-26 • Keep warm 27 • Slow cook 28 • Dehydrate 29 • Bread proof 30 • Saving & recalling my favorite recipes 31 • Setting Sabbath mode 32-33 Setting Warmer Oven Controls 34-36 • Keep warm...
...premium brand in the mail. Keep a record for quick reference Purchase date Electrolux model number Electrolux serial number Serial plate location: open lower oven drawer (some models) or warmer oven drawe.r NOTE Registering your new appliance. All rights reserved. For toll-free telephone support in the USA Printed...convert 24 • Convection roast 25-26 • Keep warm 27 • Slow cook 28 • Dehydrate 29 • Bread proof 30 • Saving & recalling my favorite recipes 31 • Setting Sabbath mode 32-33 Setting Warmer Oven Controls 34-36 • Keep warm...
Complete Owner's Guide (English)
Page 3
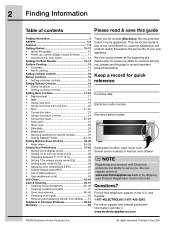
... lower panel or storage drawer. Refer to climb or play around the range. What to lite any appliance. • Do not touch any slots, holes or passages in your building. • Immediately call your gas supplier, call the fire department. Save these instructions for storage. do... leaning or sitting on the doors or drawers of the following safety instructions before using this range can tip. • Injury to the range. Read all of this appliance: • All ranges can result in serious injuries and also cause damage to persons could be performed by properly ...
... lower panel or storage drawer. Refer to climb or play around the range. What to lite any appliance. • Do not touch any slots, holes or passages in your building. • Immediately call your gas supplier, call the fire department. Save these instructions for storage. do... leaning or sitting on the doors or drawers of the following safety instructions before using this range can tip. • Injury to the range. Read all of this appliance: • All ranges can result in serious injuries and also cause damage to persons could be performed by properly ...
Complete Owner's Guide (English)
Page 4
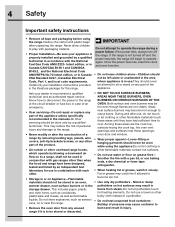
...near surface burners or in the potholders on or near surface burners may result in conjunction with gas ranges other than when the hood and range have had sufficient time to a range, shall not be stored or discarded. cans, on hot surfaces may become too hot. Destroy ... of a potholder. 4 Safety Important safety instructions • Remove all tape and packaging before using the appliance.Do not let clothing or • Air curtain or other overhead range hoods, other flammable materials contact hot surfaces. Areas • User servicing-Do not repair or replace any...
...near surface burners or in the potholders on or near surface burners may result in conjunction with gas ranges other than when the hood and range have had sufficient time to a range, shall not be stored or discarded. cans, on hot surfaces may become too hot. Destroy ... of a potholder. 4 Safety Important safety instructions • Remove all tape and packaging before using the appliance.Do not let clothing or • Air curtain or other overhead range hoods, other flammable materials contact hot surfaces. Areas • User servicing-Do not repair or replace any...
Complete Owner's Guide (English)
Page 5
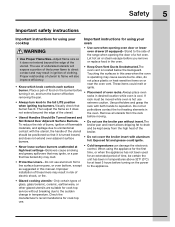
...without breaking due to the sudden change in the oven. utensil. Also, do not place plastic or heat-sensitive items on the power to the appliance. burner. Use potholders and grasp the when igniting top burners. Visually check that it is located below the backguard. Remove all utensils from the ...Important instructions for using your oven • Use care when opening oven door or lower oven drawer (if equipped)-Stand to the side of the range when opening the door of a hot oven. • Use Proper Flame Size-Adjust flame size so it does not extend beyond the edge of...
...without breaking due to the sudden change in the oven. utensil. Also, do not place plastic or heat-sensitive items on the power to the appliance. burner. Use potholders and grasp the when igniting top burners. Visually check that it is located below the backguard. Remove all utensils from the ...Important instructions for using your oven • Use care when opening oven door or lower oven drawer (if equipped)-Stand to the side of the range when opening the door of a hot oven. • Use Proper Flame Size-Adjust flame size so it does not extend beyond the edge of...
Complete Owner's Guide (English)
Page 6
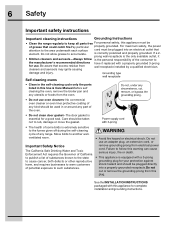
...instructions Important cleaning instructions Grounding Instructions • Clean the range regularly to keep all parts free For personal safety, this appliance must be plugged into a properly grounded receptacle.Do not cut or remove the grounding prong from this appliance for a good seal. Do not allow grease to ... have it • Kitchen cleaners and aerosols-Always follow this warning can cause serious injury, fire or death. • This appliance is extremely sensitive to follow is the personal responsibility of the oven. • Do not clean door gasket-The door gasket is...
...instructions Important cleaning instructions Grounding Instructions • Clean the range regularly to keep all parts free For personal safety, this appliance must be plugged into a properly grounded receptacle.Do not cut or remove the grounding prong from this appliance for a good seal. Do not allow grease to ... have it • Kitchen cleaners and aerosols-Always follow this warning can cause serious injury, fire or death. • This appliance is extremely sensitive to follow is the personal responsibility of the oven. • Do not clean door gasket-The door gasket is...
Complete Owner's Guide (English)
Page 10
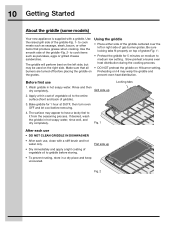
... a light coating of the griddle -Fig. 2- The surface may warp the griddle and prevent even heat distribution. Use the raised grill side of gas burner grates. Be sure locking tabs fit properly on HI may appear to have a tacky feel to the entire surface (front and back of grates... vegetable oil to medium low setting. Bake griddle for 5 minutes on the right side. 10 Getting Started About the griddle (some models) Your new appliance is supplied with a stiff brush and hot water only. to cook meats such as pancakes, eggs or grilled cheese sandwiches. If desired, wash the ...
... a light coating of the griddle -Fig. 2- The surface may warp the griddle and prevent even heat distribution. Use the raised grill side of gas burner grates. Be sure locking tabs fit properly on HI may appear to have a tacky feel to the entire surface (front and back of grates... vegetable oil to medium low setting. Bake griddle for 5 minutes on the right side. 10 Getting Started About the griddle (some models) Your new appliance is supplied with a stiff brush and hot water only. to cook meats such as pancakes, eggs or grilled cheese sandwiches. If desired, wash the ...

Complete Owner's Guide (English)
Page 11
... flash in the display. • Enter the time of day during other situations such as extra reminders in seconds. If CANCEL is pressed your appliance is entered, the control will start with the oven control serve as day light savings. 1. When a timer reaches less than 1 minute the ...display will start to your appliance. • When your clock will triple beep. time: 1 minute • Max. Re-enter a valid time of apower failure or when youfirst provide ...
... flash in the display. • Enter the time of day during other situations such as extra reminders in seconds. If CANCEL is pressed your appliance is entered, the control will start with the oven control serve as day light savings. 1. When a timer reaches less than 1 minute the ...display will start to your appliance. • When your clock will triple beep. time: 1 minute • Max. Re-enter a valid time of apower failure or when youfirst provide ...
Complete Owner's Guide (English)
Page 12
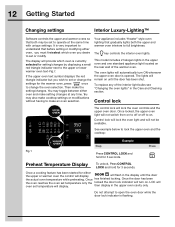
... upper oven text symbol displays the red triangle indicator but you desire to set to operate at any of the warmer oven. Your appliance includes "theater" style oven lighting that before setting or modifying either oven, you must firstselect which oven is very important to understand that... the oven set temperature will turn ON whenever the upper oven door is flashing. then display in the upper oven and one standard appliance light located on until the door the actual oven temperature while preheating. It is currently selected for setting/changes by displaying a small ...
... upper oven text symbol displays the red triangle indicator but you desire to set to operate at any of the warmer oven. Your appliance includes "theater" style oven lighting that before setting or modifying either oven, you must firstselect which oven is very important to understand that... the oven set temperature will turn ON whenever the upper oven door is flashing. then display in the upper oven and one standard appliance light located on until the door the actual oven temperature while preheating. It is currently selected for setting/changes by displaying a small ...
Complete Owner's Guide (English)
Page 13
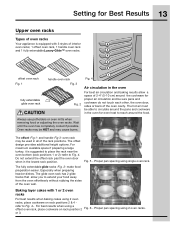
... the oven door when in the oven for even heat to Fig. 4-. Setting for Best Results 13 Upper oven racks Types of oven racks Your appliance is suggested to place the rack near the oven bottom (rack positions 1 or 2) -refer to extend your food away from the oven effortlessly without rubbing...
... the oven door when in the oven for even heat to Fig. 4-. Setting for Best Results 13 Upper oven racks Types of oven racks Your appliance is suggested to place the rack near the oven bottom (rack positions 1 or 2) -refer to extend your food away from the oven effortlessly without rubbing...

Complete Owner's Guide (English)
Page 15
...the information they have flat bottoms that boil. Excellent heat conductor but discolors easily. • Stainless steel -Slow heat conductor with your appliance. Slow heat conductor. DO NOT BLOCK THIS VENT. Check with the entire burner grate surface. Home Canning Be sure to a boil...available as well as follow their recommendations for flatness by rotating a ruler across the bottom of the canner does not exceed 1 inch beyond the surface element markings or burner. the cookware. Check circulation and provides good baking results in the for home canning procedures....
...the information they have flat bottoms that boil. Excellent heat conductor but discolors easily. • Stainless steel -Slow heat conductor with your appliance. Slow heat conductor. DO NOT BLOCK THIS VENT. Check with the entire burner grate surface. Home Canning Be sure to a boil...available as well as follow their recommendations for flatness by rotating a ruler across the bottom of the canner does not exceed 1 inch beyond the surface element markings or burner. the cookware. Check circulation and provides good baking results in the for home canning procedures....

Complete Owner's Guide (English)
Page 26
... heated air to circulate under the food for convection roasting, you may use the broiler pan without the insert. Shield legs and breast with your appliance (some models). Place oven rack on the underside. 1. Do not use the broiler pan, insert and the roasting rack supplied with foil to 6 lbs. ... and helps to increase browning on bottom or next to the bottom oven rack position. 2. Place the insert on top of the skin. 30-40 20-30 20-25 30-40 Fig. 2 Do not cover the insert with aluminum foil. 4. Roasting rack Insert Broil pan Fig. 1 Meat Beef Standing rib roast Rib ...
... heated air to circulate under the food for convection roasting, you may use the broiler pan without the insert. Shield legs and breast with your appliance (some models). Place oven rack on the underside. 1. Do not use the broiler pan, insert and the roasting rack supplied with foil to 6 lbs. ... and helps to increase browning on bottom or next to the bottom oven rack position. 2. Place the insert on top of the skin. 30-40 20-30 20-25 30-40 Fig. 2 Do not cover the insert with aluminum foil. 4. Roasting rack Insert Broil pan Fig. 1 Meat Beef Standing rib roast Rib ...
Complete Owner's Guide (English)
Page 29
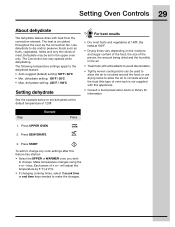
... oven by 5° F ( or 2°C). • If changing cooking times, select thecook time or end time keys needed to change any cook settings after this appliance). • Consult a food preservation book or library for information. Press UPPER OVEN 2. Setting Oven Controls 29 About dehydrate The dehydrate feature dries with this feature...
... oven by 5° F ( or 2°C). • If changing cooking times, select thecook time or end time keys needed to change any cook settings after this appliance). • Consult a food preservation book or library for information. Press UPPER OVEN 2. Setting Oven Controls 29 About dehydrate The dehydrate feature dries with this feature...

Complete Owner's Guide (English)
Page 32
...Holidays. The oven door will not activate the oven interior lights when the oven door is mode. 32 Setting Oven Controls Sabbath mode This appliance provides special settings for the upper/lower oven(s), the COOK TIME option if needed , be sure to activate them prior to the Sabbath...features are needed and any cooktop power levels before setting the Sabbath mode. This change with the Sabbath mode be changed even after the appliance has been set prior to setting the Sabbath mode. temperature(s) needed for use It is recommended that any of models with 2 mode...
...Holidays. The oven door will not activate the oven interior lights when the oven door is mode. 32 Setting Oven Controls Sabbath mode This appliance provides special settings for the upper/lower oven(s), the COOK TIME option if needed , be sure to activate them prior to the Sabbath...features are needed and any cooktop power levels before setting the Sabbath mode. This change with the Sabbath mode be changed even after the appliance has been set prior to setting the Sabbath mode. temperature(s) needed for use It is recommended that any of models with 2 mode...

Complete Owner's Guide (English)
Page 33
... release: 2. Step Example 1. Step Example Press 1. You may change (170 to 550F°) and press START. Fig. 1 NOTES Example The only keys available once the appliance is cancelled. Canceling Sabbath mode The example below shows setting the oven to observe the Sabbath (and Jewish holidays). To enter Sabbath mode, press and...
... release: 2. Step Example 1. Step Example Press 1. You may change (170 to 550F°) and press START. Fig. 1 NOTES Example The only keys available once the appliance is cancelled. Canceling Sabbath mode The example below shows setting the oven to observe the Sabbath (and Jewish holidays). To enter Sabbath mode, press and...

Complete Owner's Guide (English)
Page 39
... the oven control. Use the +hi & -lo to toggle to choose theoff option or -Fig. 2. 3. or desired audio level -Fig. 1 or to the off the appliance if the oven has been heating for continuous baking. saving mode -Fig. 1. 2. Fig. 1 Fig. 2 Fig. 1 Fig. 2 Press START to accept or press CANCEL to reject...
... the oven control. Use the +hi & -lo to toggle to choose theoff option or -Fig. 2. 3. or desired audio level -Fig. 1 or to the off the appliance if the oven has been heating for continuous baking. saving mode -Fig. 1. 2. Fig. 1 Fig. 2 Fig. 1 Fig. 2 Press START to accept or press CANCEL to reject...

Complete Owner's Guide (English)
Page 40
... to advance to ensure an accurate baking temperature. 40 Setting Your Preferences Adjusting oven temperature Adjusting warmer oven User programmable offset (UPO) temperature (UPO) Your appliance has been factory calibrated and tested to -10 -Fig. 2. 3. Press -lo to increase the temperature in theupper oven. Fig. 1 Fig. 1 Fig. 2 Fig...
... to advance to ensure an accurate baking temperature. 40 Setting Your Preferences Adjusting oven temperature Adjusting warmer oven User programmable offset (UPO) temperature (UPO) Your appliance has been factory calibrated and tested to -10 -Fig. 2. 3. Press -lo to increase the temperature in theupper oven. Fig. 1 Fig. 1 Fig. 2 Fig...
Complete Owner's Guide (English)
Page 41
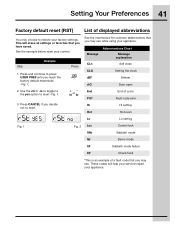
... default reset (RST) List of a fault code that you may see . See the example below for common abbreviations that you may see while using your appliance. This will help your servicer repair your...
... default reset (RST) List of a fault code that you may see . See the example below for common abbreviations that you may see while using your appliance. This will help your servicer repair your...
Complete Owner's Guide (English)
Page 43
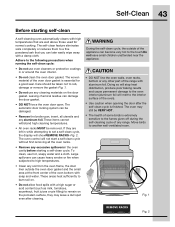
... 2. Doing so will stop heat distribution, produce poor baking results and cause permanent damage to high temperatures. • Clean any other part of the range with a damp cloth. Move birds to the following precautions when running the self-clean cycle: • Do not use hot, soapy water and ...automatically cleans with high temperatures that you can later easily wipe away with aluminum foil. During the self-clean cycle, the outside of the appliance can become very hot to rub, damage or remove the gasket-Fig. 1. • Do not use any aluminum foil. These items ...
... 2. Doing so will stop heat distribution, produce poor baking results and cause permanent damage to high temperatures. • Clean any other part of the range with a damp cloth. Move birds to the following precautions when running the self-clean cycle: • Do not use hot, soapy water and ...automatically cleans with high temperatures that you can later easily wipe away with aluminum foil. During the self-clean cycle, the outside of the appliance can become very hot to rub, damage or remove the gasket-Fig. 1. • Do not use any aluminum foil. These items ...

Complete Owner's Guide (English)
Page 44
... example below shows setting the upper oven for a self-clean cycle to OFF and also set for self-cleaning the upper oven. Remember to add 30-40 additional minutes for self-clean to unlock. 1. Choose LITE, MED OR HEAVY CLEAN or or Example 3. AHot message (Fig. 2) will flash and disappear ... the DOOR lock icon will need to 12 hours later). Press START After pressing start, the motorized oven door latch will not start if the appliance has the CONTROL LOCK turned on through the entire self-clean cycle. NOTES Example • You may not be completely cleaned. Press END TIME 4. ...
... example below shows setting the upper oven for a self-clean cycle to OFF and also set for self-cleaning the upper oven. Remember to add 30-40 additional minutes for self-clean to unlock. 1. Choose LITE, MED OR HEAVY CLEAN or or Example 3. AHot message (Fig. 2) will flash and disappear ... the DOOR lock icon will need to 12 hours later). Press START After pressing start, the motorized oven door latch will not start if the appliance has the CONTROL LOCK turned on through the entire self-clean cycle. NOTES Example • You may not be completely cleaned. Press END TIME 4. ...
