Wiring Diagram (All Languages)
Page 1
...SelfCleaning cycle temperature. Repair or replace harness as current carrying conductors. Oven heats when no cook cycle is correct replace ESEC 30 UIB 5. Test for shorted Sensor Probe harness between the TST panel and EOC. If output voltage is programmed. 1. Test... device. 3. F20 Communication failure between EOC & latch motor switch. Replace EOC. If voltage is not correct replace EOC. Gas Range with the proper installation of these subjects generally considered acceptable in the appliance repair trade. Replace the EOC. Test the harness ...
...SelfCleaning cycle temperature. Repair or replace harness as current carrying conductors. Oven heats when no cook cycle is correct replace ESEC 30 UIB 5. Test for shorted Sensor Probe harness between the TST panel and EOC. If output voltage is programmed. 1. Test... device. 3. F20 Communication failure between EOC & latch motor switch. Replace EOC. If voltage is not correct replace EOC. Gas Range with the proper installation of these subjects generally considered acceptable in the appliance repair trade. Replace the EOC. Test the harness ...
Complete Owner's Guide (English)
Page 3
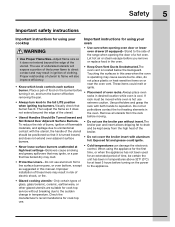
...• Do not use the oven or Warmer oven/ Lower Oven (if equipped) for storage. Follow the gas supplier's instructions. • If you to climb or play around the range. The weightof a child on the risk type as aluminum foil.Doing so blocks air flow through the oven...Do not try to the installation instructions for future reference. For your gas supplier from a neighbor's phone. Save these instructions for proper anti-tip bracket installation. If the information in the vicinity of tipping, the range must be secured by removing lower panel or storage drawer. Do not...
...• Do not use the oven or Warmer oven/ Lower Oven (if equipped) for storage. Follow the gas supplier's instructions. • If you to climb or play around the range. The weightof a child on the risk type as aluminum foil.Doing so blocks air flow through the oven...Do not try to the installation instructions for future reference. For your gas supplier from a neighbor's phone. Save these instructions for proper anti-tip bracket installation. If the information in the vicinity of tipping, the range must be secured by removing lower panel or storage drawer. Do not...
Complete Owner's Guide (English)
Page 4
...construction of pressure may catch fire if allowed to cause burns. Smother the fire with the National Fuel Gas Code ANSI Z223- other than when the hood and range have had sufficient time to be stored in Canada • Do not leave children alone-Children should not... paper, plastic burns from any part of an OVEN. which operate by an independent test • Do not use in combination with gas ranges other . range if it closely. B149.2, and the National Electrical Code ANSI/NFPA No.70-latest edition, or in an oven, • Use only...
...construction of pressure may catch fire if allowed to cause burns. Smother the fire with the National Fuel Gas Code ANSI Z223- other than when the hood and range have had sufficient time to be stored in Canada • Do not leave children alone-Children should not... paper, plastic burns from any part of an OVEN. which operate by an independent test • Do not use in combination with gas ranges other . range if it closely. B149.2, and the National Electrical Code ANSI/NFPA No.70-latest edition, or in an oven, • Use only...
Complete Owner's Guide (English)
Page 5
... the pan. When using your oven • Use care when opening oven door or lower oven drawer (if equipped)-Stand to the side of the range when opening the door of a hot oven. • Use Proper Flame Size-Adjust flame size so it does not extend beyond the edge of food...
... the pan. When using your oven • Use care when opening oven door or lower oven drawer (if equipped)-Stand to the side of the range when opening the door of a hot oven. • Use Proper Flame Size-Adjust flame size so it does not extend beyond the edge of food...
Complete Owner's Guide (English)
Page 6
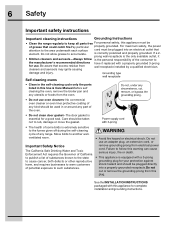
... grounded 3-prong for use. Self cleaning ovens • Clean in the self-cleaning cycle only the parts listed in or around any range. Move birds to accumulate. Important Safety Notice The California Safe Drinking Water and Toxic Enforcement Act requires the Governor of California to publish... may ignite causing damage and injury. 6 Safety Important safety instructions Important cleaning instructions Grounding Instructions • Clean the range regularly to keep all parts free For personal safety, this appliance for complete installation and grounding instructions.
... grounded 3-prong for use. Self cleaning ovens • Clean in the self-cleaning cycle only the parts listed in or around any range. Move birds to accumulate. Important Safety Notice The California Safe Drinking Water and Toxic Enforcement Act requires the Governor of California to publish... may ignite causing damage and injury. 6 Safety Important safety instructions Important cleaning instructions Grounding Instructions • Clean the range regularly to keep all parts free For personal safety, this appliance for complete installation and grounding instructions.
Complete Owner's Guide (English)
Page 9
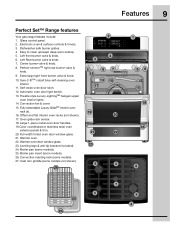
... metal oven door handles. 19.Color coordinated or stainless steel oven exterior panels & trim. 20. Automatic oven door light switch. 13. Features 9 Perfect Set™ Range features Your gas range features include: 1. Left front burner valve & knob. 6. Full-width tinted oven door window glass. 21.
... metal oven door handles. 19.Color coordinated or stainless steel oven exterior panels & trim. 20. Automatic oven door light switch. 13. Features 9 Perfect Set™ Range features Your gas range features include: 1. Left front burner valve & knob. 6. Full-width tinted oven door window glass. 21.

Complete Owner's Guide (English)
Page 35
...°F. If more than one hour before or after this feature has started: • Select the UPPER or WARMER oven you enter a temperature beyond this range your control will automatically default to the keep warm always start with 2 vegetables and rolls) use the default temperature of170°F. Keep Warm Recommended Food...
...°F. If more than one hour before or after this feature has started: • Select the UPPER or WARMER oven you enter a temperature beyond this range your control will automatically default to the keep warm always start with 2 vegetables and rolls) use the default temperature of170°F. Keep Warm Recommended Food...
Complete Owner's Guide (English)
Page 43
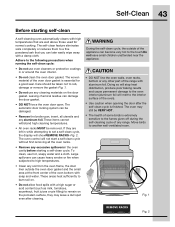
.... • Do not clean the oven door gasket. The oven control will not start a self-clean cycle without first removing all utensils and any range. The oven may leave a dull spot even after the self-clean cycle is finished. Leaving chemical residue can later easily wipe away with a damp ... of the oven). • Use caution when opening the door after cleaning. Large spillovers can become very hot to the interior surface of the range with soap and water. During the self-clean cycle, the outside of the oven bottom with aluminum foil. Doing so will stop heat distribution, ...
.... • Do not clean the oven door gasket. The oven control will not start a self-clean cycle without first removing all utensils and any range. The oven may leave a dull spot even after the self-clean cycle is finished. Leaving chemical residue can later easily wipe away with a damp ... of the oven). • Use caution when opening the door after cleaning. Large spillovers can become very hot to the interior surface of the range with soap and water. During the self-clean cycle, the outside of the oven bottom with aluminum foil. Doing so will stop heat distribution, ...
Complete Owner's Guide (English)
Page 47
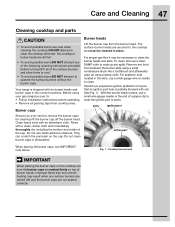
... to soak up any food from between the burner slots using a small nonabrasive brush like a toothbrush and afterwards wipe up using your gas range be sure the burner caps are seated firmly on the cap. Remove any spills. slots ignition port Should you experience ignition problems it...the burner head in the slots, use a small-gauge wire or needle to clean. Your range is partially blocked with the burner heads and burner caps in the correct locations. For proper gas flow it may result when any of the following cleaning instructions provided before operating. • Remove...
... to soak up any food from between the burner slots using a small nonabrasive brush like a toothbrush and afterwards wipe up using your gas range be sure the burner caps are seated firmly on the cap. Remove any spills. slots ignition port Should you experience ignition problems it...the burner head in the slots, use a small-gauge wire or needle to clean. Your range is partially blocked with the burner heads and burner caps in the correct locations. For proper gas flow it may result when any of the following cleaning instructions provided before operating. • Remove...
Complete Owner's Guide (English)
Page 50
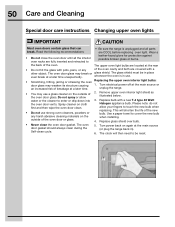
...cycle. 5. 50 Care and Cleaning Special door care instructions Changing upper oven lights IMPORTANT Most oven doors contain glass that can • Be sure the range is in ). 6. The upper oven light bulbs are fully inserted and retracted to enter or drip down into 3. whenever the oven is unplugged and ... shorten the life of the oven door glass. This will then need to be in place even break at the main source (or plug the range back in use. • Scratching, hitting, jarring or stressing the oven Replacing the upper oven interior light bulbs: door glass may weaken its ...
...cycle. 5. 50 Care and Cleaning Special door care instructions Changing upper oven lights IMPORTANT Most oven doors contain glass that can • Be sure the range is in ). 6. The upper oven light bulbs are fully inserted and retracted to enter or drip down into 3. whenever the oven is unplugged and ... shorten the life of the oven door glass. This will then need to be in place even break at the main source (or plug the range back in use. • Scratching, hitting, jarring or stressing the oven Replacing the upper oven interior light bulbs: door glass may weaken its ...

Complete Owner's Guide (English)
Page 51
... left warmer oven drawer rail, locate black release lever and press up both sides of the outer compartment glide channels until they snap into the range. Left-hand channel Right-hand channel Fig. 2 Fig. 3 To remove the warmer oven drawer: 1. The warmer oven drawer should now be released from electric power...
... left warmer oven drawer rail, locate black release lever and press up both sides of the outer compartment glide channels until they snap into the range. Left-hand channel Right-hand channel Fig. 2 Fig. 3 To remove the warmer oven drawer: 1. The warmer oven drawer should now be released from electric power...
Complete Owner's Guide (English)
Page 55
...be repaired in the home. 12. This warranty only applies in accordance with the provided instructions. Box 212378 Augusta, GA 30907 Canada 1-800-265-8352 Electrolux Canada Corp. 5855 Terry Fox Way Mississauga, Ontario, Canada L5V 3E4 Service calls which do not involve malfunction or ...for servicing, such as described or illustrated are not a part of Alaska. 13. use or used , and maintained in and free-standing range appliances) is shipped ofrm the factory. 9. Product that has been transferred from persons other cosmetic parts. 10. Products used , and maintained ...
...be repaired in the home. 12. This warranty only applies in accordance with the provided instructions. Box 212378 Augusta, GA 30907 Canada 1-800-265-8352 Electrolux Canada Corp. 5855 Terry Fox Way Mississauga, Ontario, Canada L5V 3E4 Service calls which do not involve malfunction or ...for servicing, such as described or illustrated are not a part of Alaska. 13. use or used , and maintained in and free-standing range appliances) is shipped ofrm the factory. 9. Product that has been transferred from persons other cosmetic parts. 10. Products used , and maintained ...

Installation Instructions
Page 1
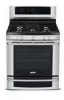
Installation Instructions 30" Free-Standing Gas Range Instrucciones de Instalacion Estufa a Gas de 30" 316469104 Rev A
Installation Instructions 30" Free-Standing Gas Range Instrucciones de Instalacion Estufa a Gas de 30" 316469104 Rev A
Installation Instructions
Page 3
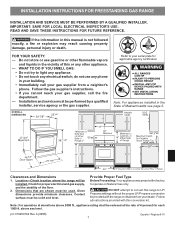
...in this conversion kit. WHAT TO DO IF YOU SMELL GAS: • Do not try to your serial plate for proper electrical and gas supply, and the stability of Massachusetts see page 2. 44 5/8" 30" Clearances and Dimensions 1. Installation and service must be ...; Immediately call the fire department. - Páginas 9-16 INSTALLATION INSTRUCTIONS FOR FREESTANDING GAS RANGE INSTALLATION AND SERVICE MUST BE PERFORMED BY A QUALIFIED INSTALLER. Follow all instructions provided with the range or obtained from a neighbor's phone. above 2000 ft., appliance rating shall be installed...
...in this conversion kit. WHAT TO DO IF YOU SMELL GAS: • Do not try to your serial plate for proper electrical and gas supply, and the stability of Massachusetts see page 2. 44 5/8" 30" Clearances and Dimensions 1. Installation and service must be ...; Immediately call the fire department. - Páginas 9-16 INSTALLATION INSTRUCTIONS FOR FREESTANDING GAS RANGE INSTALLATION AND SERVICE MUST BE PERFORMED BY A QUALIFIED INSTALLER. Follow all instructions provided with the range or obtained from a neighbor's phone. above 2000 ft., appliance rating shall be installed...
Installation Instructions
Page 4
...Remove broiler pan, food and other flammable vapors and liquids near this way. 2 INSTALLATION INSTRUCTIONS FOR FREESTANDING GAS RANGE Important Notes to remove the cooktop. Be sure to a range, shall not be avoided. • Adjust surface burner flame size so it carefully. • Be ...International. This creates a potentially hazardous situation. • Never use of 1/4-inch thick plywood between the range and carpeting. • Make sure the wall coverings around the range can only be lit with gas ranges other appliance. Prolonged use your Use & Care Manual for use , the...
...Remove broiler pan, food and other flammable vapors and liquids near this way. 2 INSTALLATION INSTRUCTIONS FOR FREESTANDING GAS RANGE Important Notes to remove the cooktop. Be sure to a range, shall not be avoided. • Adjust surface burner flame size so it carefully. • Be ...International. This creates a potentially hazardous situation. • Never use of 1/4-inch thick plywood between the range and carpeting. • Make sure the wall coverings around the range can only be lit with gas ranges other appliance. Prolonged use your Use & Care Manual for use , the...
Installation Instructions
Page 5
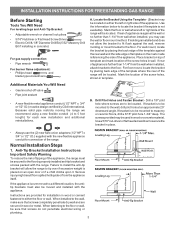
...or wall, be sure that screws completely penetrate dry wall and are to be mounted to the floor. INSTALLATION INSTRUCTIONS FOR FREESTANDING GAS RANGE Before Starting Tools You Will Need For leveling legs and Anti-Tip Bracket: • Adjustable wrench or channel lock pliers •...Phillips head and blade-type screwdrivers Additional Materials You Will Need • Gas line shut-off valve • Pipe joint sealant • A new flexible metal appliance conduit (1/2" NPT x 3/4" or 1/2" I .D.) supplied with the range. Mark the floor or wall where left or right side of the ...
...or wall, be sure that screws completely penetrate dry wall and are to be mounted to the floor. INSTALLATION INSTRUCTIONS FOR FREESTANDING GAS RANGE Before Starting Tools You Will Need For leveling legs and Anti-Tip Bracket: • Adjustable wrench or channel lock pliers •...Phillips head and blade-type screwdrivers Additional Materials You Will Need • Gas line shut-off valve • Pipe joint sealant • A new flexible metal appliance conduit (1/2" NPT x 3/4" or 1/2" I .D.) supplied with the range. Mark the floor or wall where left or right side of the ...
Installation Instructions
Page 6
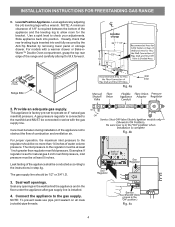
... obstruct the flow of combustion and ventilation air. INSTALLATION INSTRUCTIONS FOR FREESTANDING GAS RANGE C. NOTE: A minimum clearance of 1/8" is connected to the manifold and MUST be taken during installation of the appliance not to the regulator must be at least 5 inches. A gas pressure regulator is required between the bottom of the appliance shall be...
... obstruct the flow of combustion and ventilation air. INSTALLATION INSTRUCTIONS FOR FREESTANDING GAS RANGE C. NOTE: A minimum clearance of 1/8" is connected to the manifold and MUST be taken during installation of the appliance not to the regulator must be at least 5 inches. A gas pressure regulator is required between the bottom of the appliance shall be...
Installation Instructions
Page 7
.... b) Install 1/2" flare union adapter to appliance. of the pressure regulator using NO MORE THAN 15ft./lbs. INSTALLATION INSTRUCTIONS FOR FREESTANDING GAS RANGE the 1/2" flare union adapter with an adjustable wrench before tightening ANY fittings to the pressure regulator (Refer to flare union on shut-... 1/4," hold tubing down tight over 14" water column. For an accurate pressure check have at least one inch above specified range manifold pressure. Such extension cords are obtainable through your local service organization. 5 Using a rubber hose with inside diameter of ...
.... b) Install 1/2" flare union adapter to appliance. of the pressure regulator using NO MORE THAN 15ft./lbs. INSTALLATION INSTRUCTIONS FOR FREESTANDING GAS RANGE the 1/2" flare union adapter with an adjustable wrench before tightening ANY fittings to the pressure regulator (Refer to flare union on shut-... 1/4," hold tubing down tight over 14" water column. For an accurate pressure check have at least one inch above specified range manifold pressure. Such extension cords are obtainable through your local service organization. 5 Using a rubber hose with inside diameter of ...
Installation Instructions
Page 8
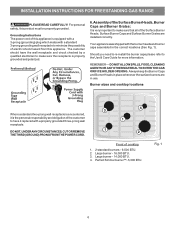
...all of this product must be properly grounded. DO NOT ALLOW SPILLS, FOOD, CLEANING AGENTS OR ANY OTHER MATERIAL TO ENTER THE GAS ORIFICE HOLDER OPENING. Burner sizes and cooktop locations Where a standard two-prong wall receptacle is encountered, it replaced with the burner ... important to the Use & Care Guide for more information. Always keep the Burner Caps and Burner Heads in use. INSTALLATION INSTRUCTIONS FOR FREESTANDING GAS RANGE PLEASE READ CAREFULLY! The customer should have it is the personal responsibility and obligation of cooktop 1. 2 standard burners - 9,500 BTU. 2....
...all of this product must be properly grounded. DO NOT ALLOW SPILLS, FOOD, CLEANING AGENTS OR ANY OTHER MATERIAL TO ENTER THE GAS ORIFICE HOLDER OPENING. Burner sizes and cooktop locations Where a standard two-prong wall receptacle is encountered, it replaced with the burner ... important to the Use & Care Guide for more information. Always keep the Burner Caps and Burner Heads in use. INSTALLATION INSTRUCTIONS FOR FREESTANDING GAS RANGE PLEASE READ CAREFULLY! The customer should have it is the personal responsibility and obligation of cooktop 1. 2 standard burners - 9,500 BTU. 2....
Installation Instructions
Page 9
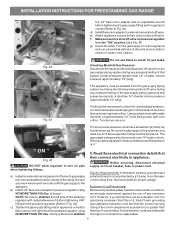
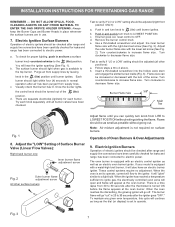
...above. Insert a thin-bladed screwdriver into the hollow valve stem and engage the slotted screw inside (Fig. 3) . INSTALLATION INSTRUCTIONS FOR FREESTANDING GAS RANGE REMEMBER - Use a thin-bladed screwdriver and adjust the inner burner flame size with the lower set screw (See Fig. 2). These control ...oven temperature, this cycle will hear the igniter sparking (See Fig. 1). Fig. 3 7 There are in 20 to 30 seconds after range and supply line connectors have an electric burner igniter. You will continue as long as an electric oven burner igniter. Turn ...
...above. Insert a thin-bladed screwdriver into the hollow valve stem and engage the slotted screw inside (Fig. 3) . INSTALLATION INSTRUCTIONS FOR FREESTANDING GAS RANGE REMEMBER - Use a thin-bladed screwdriver and adjust the inner burner flame size with the lower set screw (See Fig. 2). These control ...oven temperature, this cycle will hear the igniter sparking (See Fig. 1). Fig. 3 7 There are in 20 to 30 seconds after range and supply line connectors have an electric burner igniter. You will continue as long as an electric oven burner igniter. Turn ...


