
Datasheet
Page 1
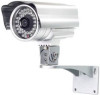
... With the built-in Web server, the IC-9000 can also be managed from the IC-9000 on 3G mobile phone With video management utility and 3GPP/ISMA support, the IC-9000 allows you to a NVR device and record the video from the IP cam in the dim environment or bad weather condition...anytime without complicated settings The IC-9000 is excellent compared with the "user-friendly" concept. Perfect video recording and NAS integration The NAS storage function can install the IP Camera easily on a Windows computer *Please check 3G mobile phone compatible list at www.edimax.com **Please check NAS ...
... With the built-in Web server, the IC-9000 can also be managed from the IC-9000 on 3G mobile phone With video management utility and 3GPP/ISMA support, the IC-9000 allows you to a NVR device and record the video from the IP cam in the dim environment or bad weather condition...anytime without complicated settings The IC-9000 is excellent compared with the "user-friendly" concept. Perfect video recording and NAS integration The NAS storage function can install the IP Camera easily on a Windows computer *Please check 3G mobile phone compatible list at www.edimax.com **Please check NAS ...
Datasheet
Page 2
...% RH (non-condensing) Video Compression MPEG-4 Part 2 (ISO/IEC 14496-2) with 10 meters IR leds on) Automatically turn on hardware timing device that triggers the IP Cam resets if the main program hangs
...% RH (non-condensing) Video Compression MPEG-4 Part 2 (ISO/IEC 14496-2) with 10 meters IR leds on) Automatically turn on hardware timing device that triggers the IP Cam resets if the main program hangs

Quick Install Guide
Page 5
You need to press the reset button for more than 4 seconds to default 9 Reset Button factory settings. Block Connects to12V/1.0A power adapter. 8 Power Jack Please make sure you are using the correct power adaptor The button to reset the IP CAM to enable the reset function. Terminal off, a close circuit is on.
You need to press the reset button for more than 4 seconds to default 9 Reset Button factory settings. Block Connects to12V/1.0A power adapter. 8 Power Jack Please make sure you are using the correct power adaptor The button to reset the IP CAM to enable the reset function. Terminal off, a close circuit is on.

Quick Install Guide
Page 6
Hardware Installation Please follow the following instructions to the home network or office network. Please connect the IP CAM accessories to the Internet immediately Since the default settings of the IC-9000 correctly, including the bracket, power adapter and Ethernet cable, as shown in the above figure. 3.... Connect the other end of the Home/office network, the IP CAM should be connected to the body of the IP CAM use DHCP function and ...
Hardware Installation Please follow the following instructions to the home network or office network. Please connect the IP CAM accessories to the Internet immediately Since the default settings of the IC-9000 correctly, including the bracket, power adapter and Ethernet cable, as shown in the above figure. 3.... Connect the other end of the Home/office network, the IP CAM should be connected to the body of the IP CAM use DHCP function and ...

Quick Install Guide
Page 8
... application from "Auto Search" folder to "CameraList". Note: To save the found Cam ID on your PC, simply drag it will search the IC-9000 in your Local Area Network automatically and show the CAM ID of each of the found IP Cam in the tree menu -"Auto Search" folder of the video play the video... without memorizing the Cam ID 3. Start to one of the Cam List page. By doing so, you...
... application from "Auto Search" folder to "CameraList". Note: To save the found Cam ID on your PC, simply drag it will search the IC-9000 in your Local Area Network automatically and show the CAM ID of each of the found IP Cam in the tree menu -"Auto Search" folder of the video play the video... without memorizing the Cam ID 3. Start to one of the Cam List page. By doing so, you...

Manual
Page 12
... Internet connection problem, the LED will be blinking red light. 3 Lens The focus of the IP CAM products. Please make sure you are using the correct power adaptor The button to reset the IP CAM to default factory settings. 9 Reset Button You need to install and use. First, let's ...Name Description 1 Ethernet Indication LED (blue) Indicates if the Ethernet link is ok and packet traffic is sending/receiving. 1-4 Familiar with the IC-9000 The IC-9000 is designed to be very easy to press the reset button for alarm detection, an open circuit is off, a close Terminal Block circuit is...
... Internet connection problem, the LED will be blinking red light. 3 Lens The focus of the IP CAM products. Please make sure you are using the correct power adaptor The button to reset the IP CAM to default factory settings. 9 Reset Button You need to install and use. First, let's ...Name Description 1 Ethernet Indication LED (blue) Indicates if the Ethernet link is ok and packet traffic is sending/receiving. 1-4 Familiar with the IC-9000 The IC-9000 is designed to be very easy to press the reset button for alarm detection, an open circuit is off, a close Terminal Block circuit is...

Manual
Page 13
Key in the ID/password of the IP CAM(from the IC-9000: 1. Please connect the IP CAM accessories to the body of the IP CAM use DHCP function and very often there is plugged into a home NAT/router device or an Ethernet switch if in the office, as shown in ... to see the video. 1-5-1 Hardware Installation Please follow the following instructions to set up the IC-9000: 1. Connect the other end of the Home/office network, the IP CAM should be connected to the Internet immediately 13 Connect the IP CAM to the home network or office network. Install the CamView software on most of the...
Key in the ID/password of the IP CAM(from the IC-9000: 1. Please connect the IP CAM accessories to the body of the IP CAM use DHCP function and very often there is plugged into a home NAT/router device or an Ethernet switch if in the office, as shown in ... to see the video. 1-5-1 Hardware Installation Please follow the following instructions to set up the IC-9000: 1. Connect the other end of the Home/office network, the IP CAM should be connected to the Internet immediately 13 Connect the IP CAM to the home network or office network. Install the CamView software on most of the...

Manual
Page 15
... for more convenient video display, please refer to search all the connected the IC-9000s any time. The video will then be displayed in the "Auto Search" list. For example, if the IP CAM ID is the running window of the IC-9000 will pop up. Note: You can modify this field and click "Ok". ... the web configuration pages. Please key-in the password in the CamView software to have more functions. 15 If the computer and the IC-9000 is to double click the IP CAM ID item in the "Auto Search" list. A window asking for more than 1 piece of the CamView software for password input will be...
... for more convenient video display, please refer to search all the connected the IC-9000s any time. The video will then be displayed in the "Auto Search" list. For example, if the IP CAM ID is the running window of the IC-9000 will pop up. Note: You can modify this field and click "Ok". ... the web configuration pages. Please key-in the password in the CamView software to have more functions. 15 If the computer and the IC-9000 is to double click the IP CAM ID item in the "Auto Search" list. A window asking for more than 1 piece of the CamView software for password input will be...
Manual
Page 17
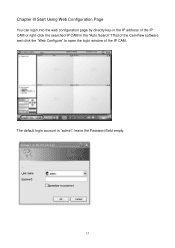
The default login account is "admin", leave the Password field empty. 17 Chapter III Start Using Web Configuration Page You can login into the web configuration page by directly key-in the IP address of the IP CAM or right-click the searched IP CAM in the "Auto Search"17list of the CamView software and click the "Web Configure" to open the login window of the IP CAM.
The default login account is "admin", leave the Password field empty. 17 Chapter III Start Using Web Configuration Page You can login into the web configuration page by directly key-in the IP address of the IP CAM or right-click the searched IP CAM in the "Auto Search"17list of the CamView software and click the "Web Configure" to open the login window of the IP CAM.
Manual
Page 18
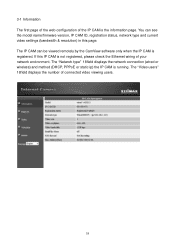
... video viewing users. 18 The IP CAM can see the model name/firmware version, IP CAM ID, registration status, network type and current video settings (bandwidth & resolution) in this IP CAM is running. The "Video users" 18field displays the number of the IP CAM is registered. The "Network type..." 18field displays the network connection (wired or wireless) and method (DHCP, PPPoE or static ip) the IP CAM is not registered, please check the...
... video viewing users. 18 The IP CAM can see the model name/firmware version, IP CAM ID, registration status, network type and current video settings (bandwidth & resolution) in this IP CAM is running. The "Video users" 18field displays the number of the IP CAM is registered. The "Network type..." 18field displays the network connection (wired or wireless) and method (DHCP, PPPoE or static ip) the IP CAM is not registered, please check the...
Manual
Page 20
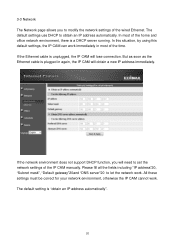
...lose connection. In most of the time. In this situation, by using this default settings, the IP CAM can work . The default setting is a DHCP server running. Please fill all the fields including "IP address"20, "Subnet mask", "Default gateway"20and "DNS server"20 to let the network work... immediately in again, the IP CAM will obtain a new IP address immediately. If the Ethernet cable is plugged in most of the home...
...lose connection. In most of the time. In this situation, by using this default settings, the IP CAM can work . The default setting is a DHCP server running. Please fill all the fields including "IP address"20, "Subnet mask", "Default gateway"20and "DNS server"20 to let the network work... immediately in again, the IP CAM will obtain a new IP address immediately. If the Ethernet cable is plugged in most of the home...
Manual
Page 22
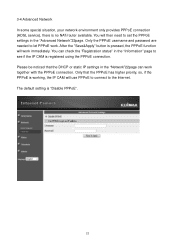
... the "Save&Apply" button is registered using the PPPoE connection. You can work together with the PPPoE connection. Only that the DHCP or static IP settings in the "Network"22page can check the "Registration status" in the "Information" page to set the PPPoE settings in the "Advanced Network"...(ADSL service), there is "Disable PPPoE". 22 Please be noticed that the PPPoE has higher priority, so, if the PPPoE is working, the IP CAM will then need to see if the IP CAM is pressed, the PPPoE function will work . You will use PPPoE to connect to let PPPoE work immediately.
... the "Save&Apply" button is registered using the PPPoE connection. You can work together with the PPPoE connection. Only that the DHCP or static IP settings in the "Network"22page can check the "Registration status" in the "Information" page to set the PPPoE settings in the "Advanced Network"...(ADSL service), there is "Disable PPPoE". 22 Please be noticed that the PPPoE has higher priority, so, if the PPPoE is working, the IP CAM will then need to see if the IP CAM is pressed, the PPPoE function will work . You will use PPPoE to connect to let PPPoE work immediately.
Manual
Page 23
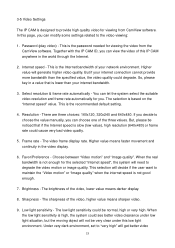
...software. When the low light sensitivity is high, the system could see better video clearance under this IP CAM anywhere in the world through the Internet. 2. Together with the IP CAM ID, you can let the system select the suitable video resolution and frame rate automatically for you... (low value), high resolution (640x480) or frame rate could cause very bad video quality. 5. Low light sensitivity - 3-5 Video Settings The IP CAM is designed to degrade the video motion or image quality. In this page, you can modify some settings related to the video viewing: 1. ...
...software. When the low light sensitivity is high, the system could see better video clearance under this IP CAM anywhere in the world through the Internet. 2. Together with the IP CAM ID, you can let the system select the suitable video resolution and frame rate automatically for you... (low value), high resolution (640x480) or frame rate could cause very bad video quality. 5. Low light sensitivity - 3-5 Video Settings The IP CAM is designed to degrade the video motion or image quality. In this page, you can modify some settings related to the video viewing: 1. ...
Manual
Page 25
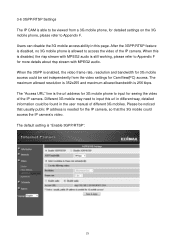
...Enable 3GPP/RTSP". 25 The default setting is the url address for 3G mobile phone to input for seeing the video of the IP camera. 3-6 3GPP/RTSP Settings The IP CAM is able to be viewed from the video settings for CamView(PC) access. The maximum allowed resolution is 352x255 and maximum allowed... bandwidth is allowed to access the video of the IP camera. Please be found in this page. When the 3GPP is still working, ...
...Enable 3GPP/RTSP". 25 The default setting is the url address for 3G mobile phone to input for seeing the video of the IP camera. 3-6 3GPP/RTSP Settings The IP CAM is able to be viewed from the video settings for CamView(PC) access. The maximum allowed resolution is 352x255 and maximum allowed... bandwidth is allowed to access the video of the IP camera. Please be found in this page. When the 3GPP is still working, ...
Manual
Page 26
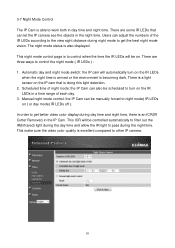
... three ways to pass during day time and night time, there is becoming dark. Automatic day and night mode switch: the IP cam will automatically turn on the IR LEDs in the IP Cam. There are some IR LEDs that is also displayed. In order to get the best night mode vision. This make...(Infrared) light during the day time and allow the IR light to control the night mode ( IR LEDs ) : 1. 3-7 Night Mode Control The IP Cam is excellent compared to other IP camera. 26 This night mode control page is to control when the time the IR LEDs will be on the IR LEDs when...
... three ways to pass during day time and night time, there is becoming dark. Automatic day and night mode switch: the IP cam will automatically turn on the IR LEDs in the IP Cam. There are some IR LEDs that is also displayed. In order to get the best night mode vision. This make...(Infrared) light during the day time and allow the IR light to control the night mode ( IR LEDs ) : 1. 3-7 Night Mode Control The IP Cam is excellent compared to other IP camera. 26 This night mode control page is to control when the time the IR LEDs will be on the IR LEDs when...
Manual
Page 27
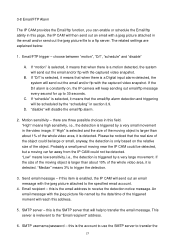
... 3% to the "Email recipient" address. 6. Email recipient - This server is irrelevant to trigger the detection. 3. 3-8 Email/FTP Alarm The IP CAM provides the Email/ftp function, you can enable or schedule the Email/ftp ability in this is the email address to receive the detection notice...by a very large movement. The related settings are three possible choices in the video image. there are explained below: 1. if this is enabled, the IP CAM will disable the email/ftp alarm. 2. choose between "motion", "D/I alarm is detected. If the D/I ", "schedule" and "disable" A. If the...
... 3% to the "Email recipient" address. 6. Email recipient - This server is irrelevant to trigger the detection. 3. 3-8 Email/FTP Alarm The IP CAM provides the Email/ftp function, you can enable or schedule the Email/ftp ability in this is the email address to receive the detection notice...by a very large movement. The related settings are three possible choices in the video image. there are explained below: 1. if this is enabled, the IP CAM will disable the email/ftp alarm. 2. choose between "motion", "D/I alarm is detected. If the D/I ", "schedule" and "disable" A. If the...
Manual
Page 28
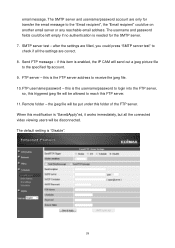
... be put under this is "Disable". 28 FTP username/password - The username and password fields could be left empty if no authentication is enabled, the IP CAM will be disconnected. this folder of the FTP server. email message. Send FTP message -
... be put under this is "Disable". 28 FTP username/password - The username and password fields could be left empty if no authentication is enabled, the IP CAM will be disconnected. this folder of the FTP server. email message. Send FTP message -

Manual
Page 34
Users can synchronize the date/time with the time server anytime when the Internet is enabled, the start and stop time of their areas to display the correct time. When the "Daylight Saving Time" is connected. For some TimeZone areas, the "Daylight Saving Time" could be corrected with the universally available time server (for example stdtime.gov.tw) through NTP protocol. The date/time will then be edited. 34 3-12 Date/Time The IP CAM can choose the different TimeZone of the Daylight Saving Time could be enabled or disabled.
Users can synchronize the date/time with the time server anytime when the Internet is enabled, the start and stop time of their areas to display the correct time. When the "Daylight Saving Time" is connected. For some TimeZone areas, the "Daylight Saving Time" could be corrected with the universally available time server (for example stdtime.gov.tw) through NTP protocol. The date/time will then be edited. 34 3-12 Date/Time The IP CAM can choose the different TimeZone of the Daylight Saving Time could be enabled or disabled.

Manual
Page 35
The default account is different from the video play password in section 3-17 and login with the "admin" account. If the login account is forgotten, you can modify the web login account. Please be noticed that this account is "admin" without password. 3-13 Admin In this page, you can reset the IP CAM to the IP CAM and do any modifications. With this account, you can login to the factory default settings by following the steps in the "Video settings" page. 35
The default account is different from the video play password in section 3-17 and login with the "admin" account. If the login account is forgotten, you can modify the web login account. Please be noticed that this account is "admin" without password. 3-13 Admin In this page, you can reset the IP CAM to the IP CAM and do any modifications. With this account, you can login to the factory default settings by following the steps in the "Video settings" page. 35

Manual
Page 36
During this page. After the upgrade procedure is displayed. A status message about the percentage done in the upgrade procedure is finished, the system will restart automatically. Please be noticed that during the upgrade procedure, do not try to modify other settings or view the video. 36 3-14 Upgrade If there is some new firmware available for this IP CAM, you can upgrade the firmware via this upgrade procedure, do not power off the IP CAM, otherwise, the IP CAM could probably enter into the safe mode (section 3-16).
During this page. After the upgrade procedure is displayed. A status message about the percentage done in the upgrade procedure is finished, the system will restart automatically. Please be noticed that during the upgrade procedure, do not try to modify other settings or view the video. 36 3-14 Upgrade If there is some new firmware available for this IP CAM, you can upgrade the firmware via this upgrade procedure, do not power off the IP CAM, otherwise, the IP CAM could probably enter into the safe mode (section 3-16).