Quick Install Guide
Page 5
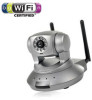
... enjoying your package contents 1 x IP Camera 1 x Power Adapter 2 x Detachable Antenna (IC-7010PTn only) 1 x Mounting Kit 1 x Category 5 Ethernet Cable 1 x Quick Installation Guide 1 x CD (Including Manual/Utility/Multi-Language QIG) 1 x Accessory Kit 3. 1. The Edimax IC-7010 series features built-in IR (infra red) LED and motorized Pan/Tilt with...
... enjoying your package contents 1 x IP Camera 1 x Power Adapter 2 x Detachable Antenna (IC-7010PTn only) 1 x Mounting Kit 1 x Category 5 Ethernet Cable 1 x Quick Installation Guide 1 x CD (Including Manual/Utility/Multi-Language QIG) 1 x Accessory Kit 3. 1. The Edimax IC-7010 series features built-in IR (infra red) LED and motorized Pan/Tilt with...

Quick Install Guide
Page 7
4. Hardware Installation Please follow the following instructions to the power jack located at the back of this IP camera. 2. Connect the Ethernet cable to your local area network, and connect the other end to the LAN jack of the IP camera. 7 Plug the power adapter to wall socket and connect the power connector to set the camera up: 1.
4. Hardware Installation Please follow the following instructions to the power jack located at the back of this IP camera. 2. Connect the Ethernet cable to your local area network, and connect the other end to the LAN jack of the IP camera. 7 Plug the power adapter to wall socket and connect the power connector to set the camera up: 1.
Quick Install Guide
Page 17
...similar for Windows Vista. The following installation steps are a demonstration of installing the 'Administrator Utility & Camera Viewer‟. Here you can select program you how to install. The procedure is for Windows 2000/XP/7. 1. The Install Wizard will guide you four options... to choose from. If it started up automatically. Click on the CD. 2. Insert the Edimax...
...similar for Windows Vista. The following installation steps are a demonstration of installing the 'Administrator Utility & Camera Viewer‟. Here you can select program you how to install. The procedure is for Windows 2000/XP/7. 1. The Install Wizard will guide you four options... to choose from. If it started up automatically. Click on the CD. 2. Insert the Edimax...

Quick Install Guide
Page 18
Click on „Next‟ to continue your installation. 4. 3. Click on 'Next' to move to an alternate location, click on „Browse‟ and select a location. 18 If you here. The 'Install Wizard' should take you wish to install the program to the next step.
Click on „Next‟ to continue your installation. 4. 3. Click on 'Next' to move to an alternate location, click on „Browse‟ and select a location. 18 If you here. The 'Install Wizard' should take you wish to install the program to the next step.

Quick Install Guide
Page 20
Click on „Install‟ to install the program. 20 6.
Click on „Install‟ to install the program. 20 6.
Quick Install Guide
Page 21
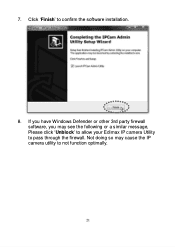
Not doing so may see the following or a similar message, Please click „Unblock‟ to allow your Edimax IP camera Utility to pass through the firewall. If you have Windows Defender or other 3rd party firewall software, you may cause the IP camera utility to confirm the software installation. 8. 7. Click „Finish‟ to not function optimally. 21
Not doing so may see the following or a similar message, Please click „Unblock‟ to allow your Edimax IP camera Utility to pass through the firewall. If you have Windows Defender or other 3rd party firewall software, you may cause the IP camera utility to confirm the software installation. 8. 7. Click „Finish‟ to not function optimally. 21

Quick Install Guide
Page 23
Select the one you wish to configure and click on the „Configure Camera‟ icon. 23 10. On the first page, the cameras found in your network will automatically run the „Administrator Utility‟. After installation, the system will be listed.
Select the one you wish to configure and click on the „Configure Camera‟ icon. 23 10. On the first page, the cameras found in your network will automatically run the „Administrator Utility‟. After installation, the system will be listed.
Quick Install Guide
Page 25
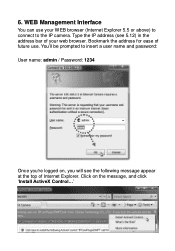
Bookmark the address for ease of your WEB browser (Internet Explorer 5.5 or above) to connect to insert a user name and password: User name: admin / Password: 1234 Once you will see 5.12) in the address bar of future use your web browser. 6. Type the IP address (see the following message appear at the top of Internet Explorer. Click on , you 're logged on the message, and click „Install ActiveX Control...‟ 25 WEB Management Interface You can use . You‟ll be prompted to the IP camera.
Bookmark the address for ease of your WEB browser (Internet Explorer 5.5 or above) to connect to insert a user name and password: User name: admin / Password: 1234 Once you will see 5.12) in the address bar of future use your web browser. 6. Type the IP address (see the following message appear at the top of Internet Explorer. Click on , you 're logged on the message, and click „Install ActiveX Control...‟ 25 WEB Management Interface You can use . You‟ll be prompted to the IP camera.
Quick Install Guide
Page 26
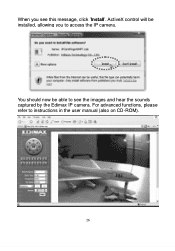
When you to instructions in the user manual (also on CD-ROM). 26 For advanced functions, please refer to access the IP camera. ActiveX control will be able to see this message, click ‟Install‟. You should now be installed, allowing you see the images and hear the sounds captured by the Edimax IP camera.
When you to instructions in the user manual (also on CD-ROM). 26 For advanced functions, please refer to access the IP camera. ActiveX control will be able to see this message, click ‟Install‟. You should now be installed, allowing you see the images and hear the sounds captured by the Edimax IP camera.

Quick Install Guide
Page 27
... (R&TTE) The R&TTE Directive repeals and replaces in the directive 98/13/EEC (Telecommunications Terminal Equipment and Satellite Earth Station Equipment) As of those who install and use it. Safety This equipment is intended for use in EFTA member states: Iceland, Liechtenstein, Norway, and Switzerland. EU Countries not intended for the...
... (R&TTE) The R&TTE Directive repeals and replaces in the directive 98/13/EEC (Telecommunications Terminal Equipment and Satellite Earth Station Equipment) As of those who install and use it. Safety This equipment is intended for use in EFTA member states: Iceland, Liechtenstein, Norway, and Switzerland. EU Countries not intended for the...
Manual
Page 4
Table of Contents Chapter I: Familiar with your Internet IP Camera 6 1.1 Package Contents 6 1.2 Basic Introduction 7 1.3 Product Highlights 8 1.4 Familiar with Key Components 9 IC-7010PT 11 IC-7010PTn 12 IC-7010PoE 13 1.5 Camera Installation 17 1.6 Locate the IP Address of this IP Camera 20 1.7 Using Camera Admin Software to Locate Camera 24 Chapter II: Using Web Management Interface 36...
Table of Contents Chapter I: Familiar with your Internet IP Camera 6 1.1 Package Contents 6 1.2 Basic Introduction 7 1.3 Product Highlights 8 1.4 Familiar with Key Components 9 IC-7010PT 11 IC-7010PTn 12 IC-7010PoE 13 1.5 Camera Installation 17 1.6 Locate the IP Address of this IP Camera 20 1.7 Using Camera Admin Software to Locate Camera 24 Chapter II: Using Web Management Interface 36...
Manual
Page 5
2.6.3 Schedule 77 2.6.4 Utilities 79 2.6.5 Status 81 2.6.6 System Log 82 2.7 Account 83 2.7.1 Status 86 2.7.2 Space Alarm 87 2.7.3 File Management 89 Chapter III: Using Surveillance Software 90 3-1 Installing IP Camera Surveillance Software 90 3-2 Using IP camera surveillance software 94 3-3 Configure IP camera surveillance software 97 3-3-1 Configure cameras 97 3-3-2 General Settings 106 3-4 Change Display ...
2.6.3 Schedule 77 2.6.4 Utilities 79 2.6.5 Status 81 2.6.6 System Log 82 2.7 Account 83 2.7.1 Status 86 2.7.2 Space Alarm 87 2.7.3 File Management 89 Chapter III: Using Surveillance Software 90 3-1 Installing IP Camera Surveillance Software 90 3-2 Using IP camera surveillance software 94 3-3 Configure IP camera surveillance software 97 3-3-1 Configure cameras 97 3-3-2 General Settings 106 3-4 Change Display ...
Manual
Page 6
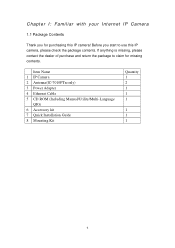
Chapter I: Familiar with your Internet IP Camera 1.1 Package Contents Thank you start to claim for purchasing this IP camera, please check the package contents. Item Name 1 IP Camera 2 Antenna(IC-7010PTn only) 3 Power Adapter 4 Ethernet Cable 5 CD ROM (Including Manual/Utility/Multi-Language QIG) 6 Accessory kit 7 Quick Installation Guide 8 Mounting Kit Quantity 1 2 1 1 1 1 1 1 6 If anything is missing, please contact the dealer of purchase and return the package to use this IP camera! Before you for missing contents.
Chapter I: Familiar with your Internet IP Camera 1.1 Package Contents Thank you start to claim for purchasing this IP camera, please check the package contents. Item Name 1 IP Camera 2 Antenna(IC-7010PTn only) 3 Power Adapter 4 Ethernet Cable 5 CD ROM (Including Manual/Utility/Multi-Language QIG) 6 Accessory kit 7 Quick Installation Guide 8 Mounting Kit Quantity 1 2 1 1 1 1 1 1 6 If anything is missing, please contact the dealer of purchase and return the package to use this IP camera! Before you for missing contents.

Manual
Page 8
Wired and wireless network (IC-7010PTn only, 802.11b / 802.11g / 802.11n) support Wireless data encryption (WEP / WPA) Supports DHCP and PPPoE protocol, you can set different password to different ...: MJPG and H.264 SXGA(1280 x 1024), VGA (640 x 480), and QVGA (320 x 240); Usage and event logging. 8 With supplied video surveillance software, you with plugin installed). Send captured picture and video by Email or FTP when motion is a browser like video conference or environment monitor.
Wired and wireless network (IC-7010PTn only, 802.11b / 802.11g / 802.11n) support Wireless data encryption (WEP / WPA) Supports DHCP and PPPoE protocol, you can set different password to different ...: MJPG and H.264 SXGA(1280 x 1024), VGA (640 x 480), and QVGA (320 x 240); Usage and event logging. 8 With supplied video surveillance software, you with plugin installed). Send captured picture and video by Email or FTP when motion is a browser like video conference or environment monitor.
Manual
Page 17
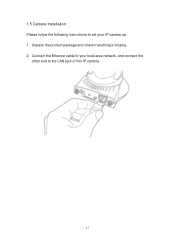
Unpack the product package and check if anything‟s missing. 2. 1.5 Camera Installation Please follow the following instructions to set your local area network, and connect the other end to your IP camera up. 1. Connect the Ethernet cable to the LAN jack of this IP camera. 17
Unpack the product package and check if anything‟s missing. 2. 1.5 Camera Installation Please follow the following instructions to set your local area network, and connect the other end to your IP camera up. 1. Connect the Ethernet cable to the LAN jack of this IP camera. 17

Manual
Page 24
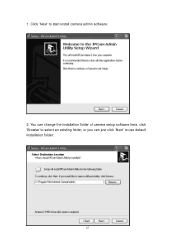
... the user manual CD-ROM supplied in last chapter, you can use camera admin software to search the camera which is also capable to install and use camera admin software: 24 The admin software is connected to your local area network. 1.7 Using Camera Admin Software to Locate Camera If... you can‟t connect to the camera by the instructions given in the product package, and the CD will automatically running the installation, if not please double-click „Setup_Admin_3.0.17‟ icon: Then follow the following instructions to locate multiple cameras on your local area ...
... the user manual CD-ROM supplied in last chapter, you can use camera admin software to search the camera which is also capable to install and use camera admin software: 24 The admin software is connected to your local area network. 1.7 Using Camera Admin Software to Locate Camera If... you can‟t connect to the camera by the instructions given in the product package, and the CD will automatically running the installation, if not please double-click „Setup_Admin_3.0.17‟ icon: Then follow the following instructions to locate multiple cameras on your local area ...
Manual
Page 25
1. You can change the installation folder of camera setup software here, click „Browse‟ to select an existing folder, or you can just click „Next‟ to start install camera admin software: 2. Click „Next‟ to use default installation folder: 25
1. You can change the installation folder of camera setup software here, click „Browse‟ to select an existing folder, or you can just click „Next‟ to start install camera admin software: 2. Click „Next‟ to use default installation folder: 25
Manual
Page 26
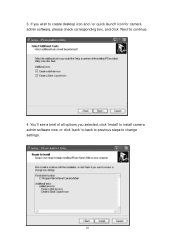
You‟ll see a brief of all options you wish to create desktop icon and / or quick launch icon for camera admin software, please check corresponding box, and click „Next‟ to change settings. 26 If you selected, click „Install‟ to install camera admin software now, or click „back‟ to back to previous steps to continue. 4. 3.
You‟ll see a brief of all options you wish to create desktop icon and / or quick launch icon for camera admin software, please check corresponding box, and click „Next‟ to change settings. 26 If you selected, click „Install‟ to install camera admin software now, or click „back‟ to back to previous steps to continue. 4. 3.
Manual
Page 27
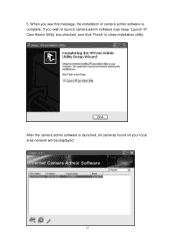
If you see this message, the installation of camera admin software is launched, all cameras found on your local area network will be displayed: 27 5. After the camera admin software is complete. When you wish to launch camera admin software now, keep „Launch IP Cam Admin Utility‟ box checked, and click „Finish‟ to close installation utility.
If you see this message, the installation of camera admin software is launched, all cameras found on your local area network will be displayed: 27 5. After the camera admin software is complete. When you wish to launch camera admin software now, keep „Launch IP Cam Admin Utility‟ box checked, and click „Finish‟ to close installation utility.

Manual
Page 32
If this is the first time you log onto web management interface, you‟ll be prompted to install ActiveX Plugin: When you see this message, please click „OK‟, and click „Download the latest ActiveX‟ link to download plugin so you can use this camera: Click „Run‟ to download plugin: 32
If this is the first time you log onto web management interface, you‟ll be prompted to install ActiveX Plugin: When you see this message, please click „OK‟, and click „Download the latest ActiveX‟ link to download plugin so you can use this camera: Click „Run‟ to download plugin: 32
