Quick Install Guide
Page 2
...time to change without the prior written permission from any defect in the contents hereof without any incidental or consequential damages resulting from Edimax Technology Co., Ltd. Any software described in any form or by any means, electronic, mechanical, magnetic, optical, chemical, manual...contents hereof and specifically disclaims any warranties, merchantability, or fitness for at least three years, to give you have purchased and the setup screen may be reproduced, transmitted, transcribed, stored in a retrieval system, or translated into any language or computer language, in ...
...time to change without the prior written permission from any defect in the contents hereof without any incidental or consequential damages resulting from Edimax Technology Co., Ltd. Any software described in any form or by any means, electronic, mechanical, magnetic, optical, chemical, manual...contents hereof and specifically disclaims any warranties, merchantability, or fitness for at least three years, to give you have purchased and the setup screen may be reproduced, transmitted, transcribed, stored in a retrieval system, or translated into any language or computer language, in ...
Quick Install Guide
Page 4
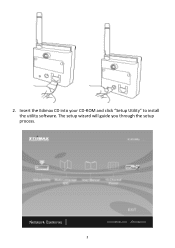
Insert the Edimax CD into your CD‐ROM and click "Setup Utility" to install the utility software. 2. The setup wizard will guide you through the setup process. 3
Insert the Edimax CD into your CD‐ROM and click "Setup Utility" to install the utility software. 2. The setup wizard will guide you through the setup process. 3
Manual
Page 2
... person of their authors. Please see the GPL Code and LGPL Code licenses. You can download the firmware-files at http://www.edimax.com under "Download" page. 1 Any software described in any means, electronic, mechanical, magnetic, optical, chemical, manual or otherwise..., without any particular purpose. The product you have purchased and the setup screen may be reproduced, transmitted, transcribed, stored in a retrieval system, or translated into any language or computer language, in this QIG. ...
... person of their authors. Please see the GPL Code and LGPL Code licenses. You can download the firmware-files at http://www.edimax.com under "Download" page. 1 Any software described in any means, electronic, mechanical, magnetic, optical, chemical, manual or otherwise..., without any particular purpose. The product you have purchased and the setup screen may be reproduced, transmitted, transcribed, stored in a retrieval system, or translated into any language or computer language, in this QIG. ...
Manual
Page 3
...Camera...4 1.2 Safety Instructions ...4 1.3 Package Contents...5 1.4 Installing the Network Camera ...8 Chapter II: Accessing the Camera's Web Interface...10 2.1 Network Setup ...10 2.2 Connecting to the Camera's Web User Interface and Installing the ActiveX Plugin (IE only 13 2.3 Live Video Monitoring...17 Chapter III......36 Chapter IV: Video Configuration ...37 4.1 Video Settings ...37 4.2 Image...38 Chapter V: Event Configuration ...40 5.1 Motion Detection Setup...40 5.1.1 Detection Region...41 5.1.2 FTP...44 5.1.3 SMTP ...46 Chapter VI: System Configuration...49 6.1 "Basic" Settings ...49 2
...Camera...4 1.2 Safety Instructions ...4 1.3 Package Contents...5 1.4 Installing the Network Camera ...8 Chapter II: Accessing the Camera's Web Interface...10 2.1 Network Setup ...10 2.2 Connecting to the Camera's Web User Interface and Installing the ActiveX Plugin (IE only 13 2.3 Live Video Monitoring...17 Chapter III......36 Chapter IV: Video Configuration ...37 4.1 Video Settings ...37 4.2 Image...38 Chapter V: Event Configuration ...40 5.1 Motion Detection Setup...40 5.1.1 Detection Region...41 5.1.2 FTP...44 5.1.3 SMTP ...46 Chapter VI: System Configuration...49 6.1 "Basic" Settings ...49 2
Manual
Page 9
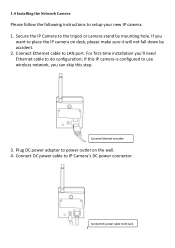
... Jack 8 Connect DC power cable to LAN port. Plug DC power adapter to place the IP camera on the wall. 4. Connect DC power cable to setup your new IP camera. 1. Connect Ethernet net cable 3. For first-time installation you can skip this step. 1.4 Installing the Network Camera Please follow the following...
... Jack 8 Connect DC power cable to LAN port. Plug DC power adapter to place the IP camera on the wall. 4. Connect DC power cable to setup your new IP camera. 1. Connect Ethernet net cable 3. For first-time installation you can skip this step. 1.4 Installing the Network Camera Please follow the following...

Manual
Page 11
Click 'View network status and tasks' under 'Network and Internet' 10 Please follow the following instructions to it. Chapter II: Accessing the Camera's Web Interface 2.1 Network Setup This IP camera's default IP address is 192.168.2.3, and you must use a computer that uses 192.168.2.x IP address to connect to setup your computer's IP address: 1. Please click 'Start' button and then click 'Control Panel'. 2.
Click 'View network status and tasks' under 'Network and Internet' 10 Please follow the following instructions to it. Chapter II: Accessing the Camera's Web Interface 2.1 Network Setup This IP camera's default IP address is 192.168.2.3, and you must use a computer that uses 192.168.2.x IP address to connect to setup your computer's IP address: 1. Please click 'Start' button and then click 'Control Panel'. 2.
Manual
Page 18
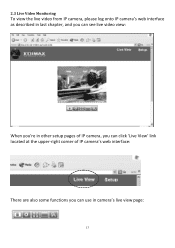
2.3 Live Video Monitoring To view the live video from IP camera, please log onto IP camera's web interface as described in last chapter, and you can see live video view: When you're in other setup pages of IP camera, you can click 'Live View' link located at the upper-right corner of IP camera's web interface: There are also some functions you can use in camera's live view page: 17
2.3 Live Video Monitoring To view the live video from IP camera, please log onto IP camera's web interface as described in last chapter, and you can see live video view: When you're in other setup pages of IP camera, you can click 'Live View' link located at the upper-right corner of IP camera's web interface: There are also some functions you can use in camera's live view page: 17
Manual
Page 21
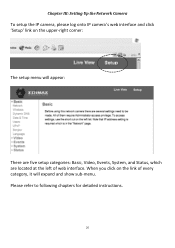
When you click on the upper-right corner: The setup menu will expand and show sub-menu. Please refer to following chapters for detailed instructions. 20 Chapter III: Setting Up the Network Camera To setup the IP camera, please log onto IP camera's web interface and click 'Setup' link on the link of every category, it will appear: There are five setup categories: Basic, Video, Events, System, and Status, which are located at the left of web interface.
When you click on the upper-right corner: The setup menu will expand and show sub-menu. Please refer to following chapters for detailed instructions. 20 Chapter III: Setting Up the Network Camera To setup the IP camera, please log onto IP camera's web interface and click 'Setup' link on the link of every category, it will appear: There are five setup categories: Basic, Video, Events, System, and Status, which are located at the left of web interface.
Manual
Page 22
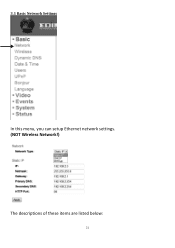
3.1 Basic Network Settings In this menu, you can setup Ethernet network settings. (NOT Wireless Network!) The descriptions of these items are listed below: 21
3.1 Basic Network Settings In this menu, you can setup Ethernet network settings. (NOT Wireless Network!) The descriptions of these items are listed below: 21
Manual
Page 29
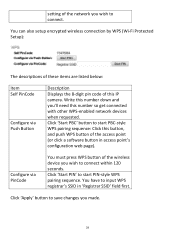
... WPS pairing sequence. Click 'Start PBC' button to input WPS registrar's SSID in access point's configuration web page). You can also setup encrypted wireless connection by WPS (Wi-Fi Protected Setup): The descriptions of these items are listed below: Item Self PinCode Configure via PinCode You must press WPS button of the...
... WPS pairing sequence. Click 'Start PBC' button to input WPS registrar's SSID in access point's configuration web page). You can also setup encrypted wireless connection by WPS (Wi-Fi Protected Setup): The descriptions of these items are listed below: Item Self PinCode Configure via PinCode You must press WPS button of the...
Manual
Page 32
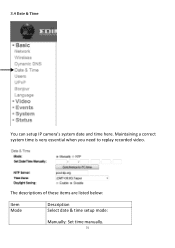
3.4 Date & Time You can setup IP camera's system date and time here. Maintaining a correct system time is very essential when you need to replay recorded video. The descriptions of these items are listed below: Item Mode Description Select date & time setup mode: Manually: Set time manually. 31
3.4 Date & Time You can setup IP camera's system date and time here. Maintaining a correct system time is very essential when you need to replay recorded video. The descriptions of these items are listed below: Item Mode Description Select date & time setup mode: Manually: Set time manually. 31
Manual
Page 33
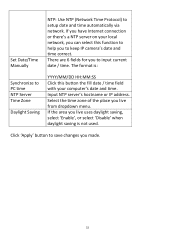
... YYYY/MM/DD HH:MM:SS Click this function to keep IP camera's date and time correct. Click 'Apply' button to save changes you to setup date and time automatically via network. The format is not used. Set Date/Time Manually NTP: Use NTP (Network Time Protocol) to input current date...
... YYYY/MM/DD HH:MM:SS Click this function to keep IP camera's date and time correct. Click 'Apply' button to save changes you to setup date and time automatically via network. The format is not used. Set Date/Time Manually NTP: Use NTP (Network Time Protocol) to input current date...
Manual
Page 35
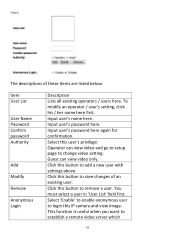
.... To modify an operator / user's setting, click his / her name here first. The descriptions of an existing user. Guest can view video and go to setup page to save changes of these items are listed below: Item User List User Name Password Confirm password Authority Add Modify Remove Anonymous Login Description...
.... To modify an operator / user's setting, click his / her name here first. The descriptions of an existing user. Guest can view video and go to setup page to save changes of these items are listed below: Item User List User Name Password Confirm password Authority Add Modify Remove Anonymous Login Description...
Manual
Page 38
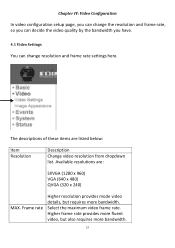
Chapter IV: Video Configuration In video configuration setup page, you can change the resolution and frame rate, so you can decide the video quality by the bandwidth you have. 4.1 Video Settings You can ...
Chapter IV: Video Configuration In video configuration setup page, you can change the resolution and frame rate, so you can decide the video quality by the bandwidth you have. 4.1 Video Settings You can ...
Manual
Page 41
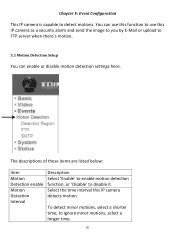
... to ignore minor motions, select a longer time. 40 You can enable or disable motion detection settings here. to FTP server when there's motion. 5.1 Motion Detection Setup You can use this function to use this IP camera detects motion. The descriptions of these items are listed below: Item Motion Detection enable Motion...
... to ignore minor motions, select a longer time. 40 You can enable or disable motion detection settings here. to FTP server when there's motion. 5.1 Motion Detection Setup You can use this function to use this IP camera detects motion. The descriptions of these items are listed below: Item Motion Detection enable Motion...
Manual
Page 42
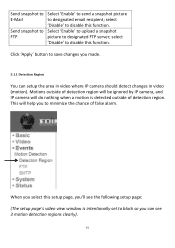
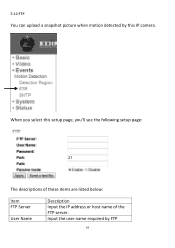
...Select 'Enable' to upload a snapshot FTP picture to save changes you made. 5.1.1 Detection Region You can see the following setup page: (The setup page's video view window is detected outside of detection region will be ignored by IP camera, and IP camera will help ...button to designated FTP server; This will do nothing when a motion is intentionally set to designated email recipient; select 'Disable' to disable this setup page, you'll see 3 motion detection regions clearly). 41 Motions outside of false alarm. When you select this function. select 'Disable' to ...
...Select 'Enable' to upload a snapshot FTP picture to save changes you made. 5.1.1 Detection Region You can see the following setup page: (The setup page's video view window is detected outside of detection region will be ignored by IP camera, and IP camera will help ...button to designated FTP server; This will do nothing when a motion is intentionally set to designated email recipient; select 'Disable' to disable this setup page, you'll see 3 motion detection regions clearly). 41 Motions outside of false alarm. When you select this function. select 'Disable' to ...
Manual
Page 45
5.1.2 FTP You can upload a snapshot picture when motion detected by FTP 44 Input the user name required by this setup page, you select this IP camera. When you 'll see the following setup page: The descriptions of these items are listed below: Item FTP Server User Name Description Input the IP address or host name of the FTP server.
5.1.2 FTP You can upload a snapshot picture when motion detected by FTP 44 Input the user name required by this setup page, you select this IP camera. When you 'll see the following setup page: The descriptions of these items are listed below: Item FTP Server User Name Description Input the IP address or host name of the FTP server.
Manual
Page 47
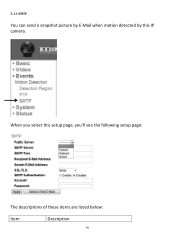
5.1.3 SMTP You can send a snapshot picture by E-Mail when motion detected by this setup page, you'll see the following setup page: The descriptions of these items are listed below: Item Description 46 When you select this IP camera.
5.1.3 SMTP You can send a snapshot picture by E-Mail when motion detected by this setup page, you'll see the following setup page: The descriptions of these items are listed below: Item Description 46 When you select this IP camera.
Manual
Page 50
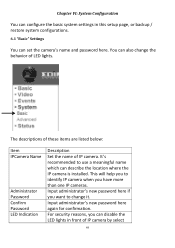
... set the camera's name and password here. For security reasons, you have more than one IP cameras. You can disable the LED lights in this setup page, or backup / restore system configurations. 6.1 "Basic" Settings You can describe the location where the IP camera is installed. Chapter VI: System Configuration You can...
... set the camera's name and password here. For security reasons, you have more than one IP cameras. You can disable the LED lights in this setup page, or backup / restore system configurations. 6.1 "Basic" Settings You can describe the location where the IP camera is installed. Chapter VI: System Configuration You can...
Manual
Page 78
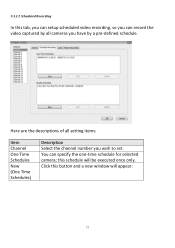
You can record the video captured by a pre-defined schedule. Click this schedule will appear: 77 Here are the descriptions of all cameras you have by all setting items: Item Channel One Time Schedules New (One Time Schedules) Description Select the channel number you wish to set. this button and a new window will be executed once only. 9.3.1.2 Scheduled Recording In this tab, you can setup scheduled video recording, so you can specify the one-time schedule for selected camera;
You can record the video captured by a pre-defined schedule. Click this schedule will appear: 77 Here are the descriptions of all cameras you have by all setting items: Item Channel One Time Schedules New (One Time Schedules) Description Select the channel number you wish to set. this button and a new window will be executed once only. 9.3.1.2 Scheduled Recording In this tab, you can setup scheduled video recording, so you can specify the one-time schedule for selected camera;