
Datasheet
Page 2
...edimax.com N600 Universal Dual-Band Wi-Fi Bridge for Smart TV, Blu-ray, Gaming & Music Streaming FEATURES CV-7438nDM Upgrade to 5GHz for HD video streaming Converts any wired LAN device to wireless and complies with wireless IEEE 802.11a/b/g/n standards for high performance, stable and robust wireless...vary depending on a smartphone, tablet or computer and ensures a smart, automated process to a greener environment. The CV-7438nDM dual-band wireless bridge is equipped with our user-friendly, browser-based iQ Setup. Say goodbye to Gigabit devices for two devices simultaneously. ...
...edimax.com N600 Universal Dual-Band Wi-Fi Bridge for Smart TV, Blu-ray, Gaming & Music Streaming FEATURES CV-7438nDM Upgrade to 5GHz for HD video streaming Converts any wired LAN device to wireless and complies with wireless IEEE 802.11a/b/g/n standards for high performance, stable and robust wireless...vary depending on a smartphone, tablet or computer and ensures a smart, automated process to a greener environment. The CV-7438nDM dual-band wireless bridge is equipped with our user-friendly, browser-based iQ Setup. Say goodbye to Gigabit devices for two devices simultaneously. ...
Quick Install Guide
Page 5
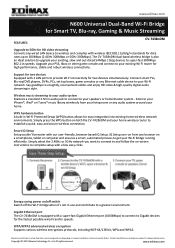
II. iQ Setup 1. the device is ready when the LED is flashing (red). The CV-7438nDM may take several minutes to setup the wireless bridge. If not, use the 5V DC adapter. 4 The CV-7438nDM requires 1 A of current - Installation There are two ways to boot up - II-1. please ensure that your USB port can provide sufficient power. Please follow the appropriate instructions. Plug the power adapter into the device's 5V power port, plug the adapter into a wall socket or available USB port, and press the power on/off button to switch the device on.
II. iQ Setup 1. the device is ready when the LED is flashing (red). The CV-7438nDM may take several minutes to setup the wireless bridge. If not, use the 5V DC adapter. 4 The CV-7438nDM requires 1 A of current - Installation There are two ways to boot up - II-1. please ensure that your USB port can provide sufficient power. Please follow the appropriate instructions. Plug the power adapter into the device's 5V power port, plug the adapter into a wall socket or available USB port, and press the power on/off button to switch the device on.

Quick Install Guide
Page 6
Please click "Get Started". You can also use the wireless bridge's default IP address http://192.168.9.2 You can 't access http://edimaxcv.setup please make sure your wireless device/computer is set to use a dynamic IP address. Use a Wi-Fi device (e.g. computer, tablet, smartphone) to search for a Wi-Fi network with the SSID "...
Please click "Get Started". You can also use the wireless bridge's default IP address http://192.168.9.2 You can 't access http://edimaxcv.setup please make sure your wireless device/computer is set to use a dynamic IP address. Use a Wi-Fi device (e.g. computer, tablet, smartphone) to search for a Wi-Fi network with the SSID "...

Quick Install Guide
Page 7
If the Wi-Fi network you use a hidden network, to connect to a hidden SSID, check the "Connect to display the next or previous page as desired. Select a network for the wireless bridge to connect to does not appear, try clicking "Refresh". Click the icons to a hidden network manually" box and enter the SSID and security key information. 6 iQ Setup will display all available 2.4GHz and 5GHz wireless networks. 4. If you wish to connect to and click "Next".
If the Wi-Fi network you use a hidden network, to connect to a hidden SSID, check the "Connect to display the next or previous page as desired. Select a network for the wireless bridge to connect to does not appear, try clicking "Refresh". Click the icons to a hidden network manually" box and enter the SSID and security key information. 6 iQ Setup will display all available 2.4GHz and 5GHz wireless networks. 4. If you wish to connect to and click "Next".

Quick Install Guide
Page 8
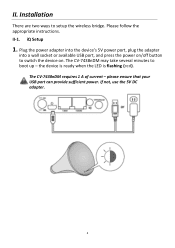
If the wireless bridge cannot obtain an IP address from the router/access point then click the "Static IP" button to assign an IP address to the user manual for more guidance. 7 Please wait while the wireless bridge tests the connection. 6. Please refer to the wireless bridge and then click "APPLY". 5. Check the details of your connection and click "Apply" to restart the CV-7438nDM and continue. When the connection test is complete, you will see the following screen.
If the wireless bridge cannot obtain an IP address from the router/access point then click the "Static IP" button to assign an IP address to the user manual for more guidance. 7 Please wait while the wireless bridge tests the connection. 6. Please refer to the wireless bridge and then click "APPLY". 5. Check the details of your connection and click "Apply" to restart the CV-7438nDM and continue. When the connection test is complete, you will see the following screen.
Quick Install Guide
Page 9
... which frequency's WPS is active on (white), the wireless bridge is flashing (red). When the Wi-Fi bridge's LED displays on your wireless bridge and wireless router/access point. WPS Setup WPS setup is a quick and easy method to II-1. Using the CV-7438nDM. The CV-7438nDM requires 1 A of current - Using the CV-7438nDM. The WPS button is an alternative to establish...
... which frequency's WPS is active on (white), the wireless bridge is flashing (red). When the Wi-Fi bridge's LED displays on your wireless bridge and wireless router/access point. WPS Setup WPS setup is a quick and easy method to II-1. Using the CV-7438nDM. The CV-7438nDM requires 1 A of current - Using the CV-7438nDM. The WPS button is an alternative to establish...

Quick Install Guide
Page 11
Your wireless bridge is now ready for use with audio speakers or Ethernet devices such as smart TVs, set-top boxes or game consoles. Using the CV-7438nDM. 10 Please see III.
Your wireless bridge is now ready for use with audio speakers or Ethernet devices such as smart TVs, set-top boxes or game consoles. Using the CV-7438nDM. 10 Please see III.

Quick Install Guide
Page 12
Using the CV-7438nDM Once your CV-7438nDM has established a connection with your network device. Use an Ethernet cable to connect the Wi-Fi bridge to the Ethernet port on your Wi-Fi network, follow the instructions below. 1. You can connect the wireless bridge to your requirements. 11 Installation, you can use either of the Wi-Fi bridge's Ethernet ports (10/100 or 10/100/1000) depending on your wireless router/access point as described in II. Ethernet To "bridge" any Ethernet device to any Ethernet device or audio speakers for wireless connectivity. III-1. III.
Using the CV-7438nDM Once your CV-7438nDM has established a connection with your network device. Use an Ethernet cable to connect the Wi-Fi bridge to the Ethernet port on your Wi-Fi network, follow the instructions below. 1. You can connect the wireless bridge to your requirements. 11 Installation, you can use either of the Wi-Fi bridge's Ethernet ports (10/100 or 10/100/1000) depending on your wireless router/access point as described in II. Ethernet To "bridge" any Ethernet device to any Ethernet device or audio speakers for wireless connectivity. III-1. III.

Quick Install Guide
Page 14
... on. Use an audio cable (not included) to connect the Wi-Fi bridge's 3.5mm audio jack to your speakers 1. III-2-2. Ensure that your speakers wirelessly. Ensure the LED is correctly connected to your CV-7438nDM. 13 PC, tablet or smartphone) is connected to your Wi-Fi network ...same router as your speakers, you can use the wireless bridge to "bridge" any audio speakers to the "audio in" port of your speakers. 2. Music Streaming After the wireless bridge is on /off button to your music player (e.g. III-2-1. Connect the CV-7438nDM's power supply to a wall socket or an ...
... on. Use an audio cable (not included) to connect the Wi-Fi bridge's 3.5mm audio jack to your speakers 1. III-2-2. Ensure that your speakers wirelessly. Ensure the LED is correctly connected to your CV-7438nDM. 13 PC, tablet or smartphone) is connected to your Wi-Fi network ...same router as your speakers, you can use the wireless bridge to "bridge" any audio speakers to the "audio in" port of your speakers. 2. Music Streaming After the wireless bridge is on /off button to your music player (e.g. III-2-1. Connect the CV-7438nDM's power supply to a wall socket or an ...

Quick Install Guide
Page 19
The wireless bridge is ready for the wireless bridge to restart. This resets all settings back to its factory settings. Reset If you experience problems with your wireless bridge, you can reset the device back to default. 1. Release the button when the LED displays on the back panel for at least 10 seconds. 2. Press and hold the WPS/Reset button found on (red). 3. Wait for setup when the LED is flashing (red). 18 III-3.
The wireless bridge is ready for the wireless bridge to restart. This resets all settings back to its factory settings. Reset If you experience problems with your wireless bridge, you can reset the device back to default. 1. Release the button when the LED displays on the back panel for at least 10 seconds. 2. Press and hold the WPS/Reset button found on (red). 3. Wait for setup when the LED is flashing (red). 18 III-3.
Quick Install Guide
Page 20
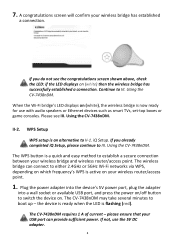
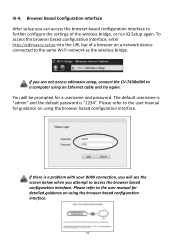
...Configuration Interface After setup you attempt to access the browser based configuration interface. Please refer to the same Wi-Fi network as the wireless bridge. If you will be prompted for detailed guidance on using an Ethernet cable and try again. The default username is "admin" and..."1234". To access the browser based configuration interface, enter http://edimaxcv.setup into the URL bar of the wireless bridge, or run iQ Setup again. You will see the screen below when you can not access edimaxcv.setup, connect the CV-7438nDM to the user manual for a username and password.
...Configuration Interface After setup you attempt to access the browser based configuration interface. Please refer to the same Wi-Fi network as the wireless bridge. If you will be prompted for detailed guidance on using an Ethernet cable and try again. The default username is "admin" and..."1234". To access the browser based configuration interface, enter http://edimaxcv.setup into the URL bar of the wireless bridge, or run iQ Setup again. You will see the screen below when you can not access edimaxcv.setup, connect the CV-7438nDM to the user manual for a username and password.

Manual
Page 5
... On/Off Power Port 100Mbps Port 3.5mm Audio Jack WPS/Reset Button 1000Mbps Port I -3. do not place the wireless bridge outdoors. 2. Safety Information In order to ensure the safe operation of the wireless bridge. 5 The wireless bridge is designed for indoor use only; Accidental damage will void the warranty of the device and its users, please...
... On/Off Power Port 100Mbps Port 3.5mm Audio Jack WPS/Reset Button 1000Mbps Port I -3. do not place the wireless bridge outdoors. 2. Safety Information In order to ensure the safe operation of the wireless bridge. 5 The wireless bridge is designed for indoor use only; Accidental damage will void the warranty of the device and its users, please...

Manual
Page 6
... 6 Contact an experienced electrical technician for help . 9. If you experience problems with the wireless bridge, please contact your dealer of purchase for any reason, do so. Please keep the wireless bridge out of reach of purchase and ask for further help . 8. There are a danger ...small children under 3 years old. The wireless bridge is an electrical device and as it without switching the power supply off. Do not place the wireless bridge on paper, cloth, or other flammable materials. Call your dealer of children. 6. The wireless bridge may become hot during use. 7. ...
... 6 Contact an experienced electrical technician for help . 9. If you experience problems with the wireless bridge, please contact your dealer of purchase for any reason, do so. Please keep the wireless bridge out of reach of purchase and ask for further help . 8. There are a danger ...small children under 3 years old. The wireless bridge is an electrical device and as it without switching the power supply off. Do not place the wireless bridge on paper, cloth, or other flammable materials. Call your dealer of children. 6. The wireless bridge may become hot during use. 7. ...

Manual
Page 7
Please follow the appropriate instructions. The CV-7438nDM may take several minutes to switch the device on. The CV-7438nDM requires 1 A of current - II-1. Plug the power adapter into the device's 5V power port, plug the adapter into a wall socket or available USB port, and press the power on/off button to boot up - the device is ready when the LED is flashing (red). If not, use the 5V DC adapter. 7 Installation There are two ways to setup the wireless bridge. iQ Setup 1. II. please ensure that your USB port can provide sufficient power.
Please follow the appropriate instructions. The CV-7438nDM may take several minutes to switch the device on. The CV-7438nDM requires 1 A of current - II-1. Plug the power adapter into the device's 5V power port, plug the adapter into a wall socket or available USB port, and press the power on/off button to boot up - the device is ready when the LED is flashing (red). If not, use the 5V DC adapter. 7 Installation There are two ways to setup the wireless bridge. iQ Setup 1. II. please ensure that your USB port can provide sufficient power.

Manual
Page 8
...://edimaxcv.setup and you continue. 3. For more information, refer to it. You can 't access http://edimaxcv.setup please make sure your wireless device/computer is set to use the wireless bridge's default IP address http://192.168.9.2 to access the browser based configuration interface. 2. Please disconnect any wired Ethernet connections from your IP...
...://edimaxcv.setup and you continue. 3. For more information, refer to it. You can 't access http://edimaxcv.setup please make sure your wireless device/computer is set to use the wireless bridge's default IP address http://192.168.9.2 to access the browser based configuration interface. 2. Please disconnect any wired Ethernet connections from your IP...

Manual
Page 9
iQ Setup will display all available 2.4GHz and 5GHz wireless networks. Select a network for the wireless bridge to connect to display the next or previous page as desired. If you wish to connect to a hidden network manually" box and enter the SSID and security key information. 9 If the Wi-Fi network you use a hidden network, to connect to a hidden SSID, check the "Connect to does not appear, try clicking "Refresh". Click the icons to and click "Next". 4.
iQ Setup will display all available 2.4GHz and 5GHz wireless networks. Select a network for the wireless bridge to connect to display the next or previous page as desired. If you wish to connect to a hidden network manually" box and enter the SSID and security key information. 9 If the Wi-Fi network you use a hidden network, to connect to a hidden SSID, check the "Connect to does not appear, try clicking "Refresh". Click the icons to and click "Next". 4.

Manual
Page 10
5. When the connection test is complete, you will see the following screen. Check the details of your IP address for more guidance. 10 If the wireless bridge cannot obtain an IP address from the router/access point then click the "Static IP" button to assign an IP address to restart the CV-7438nDM and continue. Configuring your connection and click "Apply" to the wireless bridge and then click "APPLY". Please wait while the wireless bridge tests the connection. 6. Please refer to V-1.
5. When the connection test is complete, you will see the following screen. Check the details of your IP address for more guidance. 10 If the wireless bridge cannot obtain an IP address from the router/access point then click the "Static IP" button to assign an IP address to restart the CV-7438nDM and continue. Configuring your connection and click "Apply" to the wireless bridge and then click "APPLY". Please wait while the wireless bridge tests the connection. 6. Please refer to V-1.

Manual
Page 11
... your USB port can connect to switch the device on your wireless bridge has established a connection. The CV-7438nDM requires 1 A of current - please ensure that your wireless bridge and wireless router/access point. If you already completed iQ Setup, please continue to II-1. Using the CV-7438nDM. Using the CV-7438nDM. If not, use with audio speakers or Ethernet devices such...
... your USB port can connect to switch the device on your wireless bridge has established a connection. The CV-7438nDM requires 1 A of current - please ensure that your wireless bridge and wireless router/access point. If you already completed iQ Setup, please continue to II-1. Using the CV-7438nDM. Using the CV-7438nDM. If not, use with audio speakers or Ethernet devices such...

Manual
Page 13
Please see III. Your wireless bridge is now ready for use with audio speakers or Ethernet devices such as smart TVs, set-top boxes or game consoles. Using the CV-7438nDM. 13
Please see III. Your wireless bridge is now ready for use with audio speakers or Ethernet devices such as smart TVs, set-top boxes or game consoles. Using the CV-7438nDM. 13

Manual
Page 14
Ethernet To "bridge" any Ethernet device or audio speakers for wireless connectivity. You can connect the wireless bridge to the Ethernet port on your network device. III. Using the CV-7438nDM Once your CV-7438nDM has established a connection with your Wi-Fi network, follow the instructions below. 1. Installation, you can use either of the Wi-Fi bridge's Ethernet ports (10/100 or 10/100/1000) depending on your requirements. 14 III-1. Use an Ethernet cable to connect the Wi-Fi bridge to any Ethernet device to your wireless router/access point as described in II.
Ethernet To "bridge" any Ethernet device or audio speakers for wireless connectivity. You can connect the wireless bridge to the Ethernet port on your network device. III. Using the CV-7438nDM Once your CV-7438nDM has established a connection with your Wi-Fi network, follow the instructions below. 1. Installation, you can use either of the Wi-Fi bridge's Ethernet ports (10/100 or 10/100/1000) depending on your requirements. 14 III-1. Use an Ethernet cable to connect the Wi-Fi bridge to any Ethernet device to your wireless router/access point as described in II.


