
Warranty (English)
Page 1
... comparable products or parts. This warranty does not cover: • Customer instruction • Installation • Set up adjustments • Cosmetic damage • Damage due to acts of God, such as lightning strikes • Accident • Misuse • Abuse • Negligence • Commercial use • Modification of any part of the product • Plasma display panel damaged by an authorized Dynex repair center or...
... comparable products or parts. This warranty does not cover: • Customer instruction • Installation • Set up adjustments • Cosmetic damage • Damage due to acts of God, such as lightning strikes • Accident • Misuse • Abuse • Negligence • Commercial use • Modification of any part of the product • Plasma display panel damaged by an authorized Dynex repair center or...

User Manual (English)
Page 3
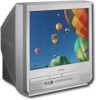
... 1 Dynex DX-R20TR ATSC 20" Round TV/DVD Combo Contents Important safety instructions 3 Features 8 Front 8 Back 9 Remote control 11 Setting up your TV combo 15 Connecting an antenna 15 Connecting cable TV 17 Connecting other video devices 18 Using the front audio/video input jacks 18 Using the TV 19 Turning your TV combo on and off 19 Selecting the video mode 20 Memorizing TV channels 20 Deleting a memorized channel 21 Changing TV channels 21 Adjusting the volume 22 Adjusting the video...
... 1 Dynex DX-R20TR ATSC 20" Round TV/DVD Combo Contents Important safety instructions 3 Features 8 Front 8 Back 9 Remote control 11 Setting up your TV combo 15 Connecting an antenna 15 Connecting cable TV 17 Connecting other video devices 18 Using the front audio/video input jacks 18 Using the TV 19 Turning your TV combo on and off 19 Selecting the video mode 20 Memorizing TV channels 20 Deleting a memorized channel 21 Changing TV channels 21 Adjusting the volume 22 Adjusting the video...

User Manual (English)
Page 4
... Displaying closed captions 33 Customizing closed captions for digital channels 37 Setting parental controls 39 Setting the ATSC parental lock 46 Using the DVD player 47 Playing a disc 47 Controlling disc playback 48 Searching on a disc 48 Selecting the audio mode 48 Viewing subtitles on a DVD 49 Repeating a DVD chapter, DVD title, or an entire DVD 49 Creating a playback loop 49 Viewing different recording angles 49 Opening the main DVD menu 50 Opening the DVD title menu 50 Displaying information about a disc 50 Selecting a program...
... Displaying closed captions 33 Customizing closed captions for digital channels 37 Setting parental controls 39 Setting the ATSC parental lock 46 Using the DVD player 47 Playing a disc 47 Controlling disc playback 48 Searching on a disc 48 Selecting the audio mode 48 Viewing subtitles on a DVD 49 Repeating a DVD chapter, DVD title, or an entire DVD 49 Creating a playback loop 49 Viewing different recording angles 49 Opening the main DVD menu 50 Opening the DVD title menu 50 Displaying information about a disc 50 Selecting a program...

User Manual (English)
Page 5
... the power cord plug to replace the obsolete outlet. This symbol indicates that dangerous voltage constituting a risk of electric shock is meant for some specific reason, such as the possibility of the loss of your TV combo before you will defeat this safety feature. Use only a damp cloth to clean the exterior of the safety and operating instructions...
... the power cord plug to replace the obsolete outlet. This symbol indicates that dangerous voltage constituting a risk of electric shock is meant for some specific reason, such as the possibility of the loss of your TV combo before you will defeat this safety feature. Use only a damp cloth to clean the exterior of the safety and operating instructions...

User Manual (English)
Page 8
... the power supply cord or plug is damaged or frayed. • If liquid has been spilled or objects have fallen into your TV combo. • If your TV combo has been exposed to your home, consult your TV combo or hit the glass screen. These...power company. Adjust only those controls that your TV combo is in performance. If the screen breaks, be careful of glass. 6 Important safety instructions Damage requiring service Unplug your TV combo from the type of power source indicated on the screen as a fixed blue, green, or red point. Safety check After completing any service or repair...
... the power supply cord or plug is damaged or frayed. • If liquid has been spilled or objects have fallen into your TV combo. • If your TV combo has been exposed to your home, consult your TV combo or hit the glass screen. These...power company. Adjust only those controls that your TV combo is in performance. If the screen breaks, be careful of glass. 6 Important safety instructions Damage requiring service Unplug your TV combo from the type of power source indicated on the screen as a fixed blue, green, or red point. Safety check After completing any service or repair...

User Manual (English)
Page 10
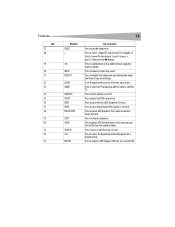
.... 1 2 3 4 5 6 7 8 Component Headphone jack VIDEO jack L-AUDIO-R jacks Power indicator Remote control sensor INPUT button MENU button VOL-/VOL+ 9 CH-/CH+ 10 Open/Close button 11 Play button 12 Stop button 13 Power/Standby button Description Plug headphones into this jack. When the OSD is open or close the DVD tray. Receives signals from the remote control. Do not block. Press to select TV or DVD mode. Press to stop disc playback. Press to start disc playback. Press to change the TV channel. Press to turn...
.... 1 2 3 4 5 6 7 8 Component Headphone jack VIDEO jack L-AUDIO-R jacks Power indicator Remote control sensor INPUT button MENU button VOL-/VOL+ 9 CH-/CH+ 10 Open/Close button 11 Play button 12 Stop button 13 Power/Standby button Description Plug headphones into this jack. When the OSD is open or close the DVD tray. Receives signals from the remote control. Do not block. Press to select TV or DVD mode. Press to stop disc playback. Press to start disc playback. Press to change the TV channel. Press to turn...

User Manual (English)
Page 14
... 24 25 26 Features Button DTV Audio Number buttons RECALL VOL-/VOL+ CH-/CH+ ENTER MENU CH.LIST FAVORITE TITLE DISPLAY REV FWD DVD MENU PLAY/ENTER ANGLE AUDIO PROGRAM TV/DVD EXIT OPEN/CLOSE TV/DTV PICTURE Description Press to select a second audio program if the TV program you want playback to start playback. Press to select TV or DVD mode. Press to select different viewing angles if the DVD was recorded with multiple...
... 24 25 26 Features Button DTV Audio Number buttons RECALL VOL-/VOL+ CH-/CH+ ENTER MENU CH.LIST FAVORITE TITLE DISPLAY REV FWD DVD MENU PLAY/ENTER ANGLE AUDIO PROGRAM TV/DVD EXIT OPEN/CLOSE TV/DTV PICTURE Description Press to select a second audio program if the TV program you want playback to start playback. Press to select TV or DVD mode. Press to select different viewing angles if the DVD was recorded with multiple...
User Manual (English)
Page 15
... to select channel 54 sub channel 3, press 54, press •, press 3, then press the OK button. In 16:9 digital mode, press to pause DVD playback. Press to select the aspect ratio. Press to repeat a DVD chapter, DVD title, or an entire DVD. Press to play a DVD forward slowly. Press to open the TV program guide for a playback loop. Press in combination with number buttons to set the sleep timer. Press to select the...
... to select channel 54 sub channel 3, press 54, press •, press 3, then press the OK button. In 16:9 digital mode, press to pause DVD playback. Press to select the aspect ratio. Press to repeat a DVD chapter, DVD title, or an entire DVD. Press to play a DVD forward slowly. Press to open the TV program guide for a playback loop. Press in combination with number buttons to set the sleep timer. Press to select the...

User Manual (English)
Page 19
... connect cable with scrambled and unscrambled channels: • Use the following illustration to the IN jack on the cable converter box. Setting up your TV combo 17 Connecting cable TV To connect basic cable (no converter box): • Connect the 75 ohm coaxial cable to the cable outlet and the RF IN jack on the back of your TV combo. 75 ohm coaxial cable RF IN jack To connect a cable converter box: 1 Connect...
... connect cable with scrambled and unscrambled channels: • Use the following illustration to the IN jack on the cable converter box. Setting up your TV combo 17 Connecting cable TV To connect basic cable (no converter box): • Connect the 75 ohm coaxial cable to the cable outlet and the RF IN jack on the back of your TV combo. 75 ohm coaxial cable RF IN jack To connect a cable converter box: 1 Connect...

User Manual (English)
Page 20
... video game Front A/V jacks A/V out jacks Additional TV Y=Yellow W=White R=Red Amplifier DVD player, VCD, or device Coaxial cable To coaxial-type digital audio input VHF UHF Video out COAXIAL OUT Audio out Receiver DVD, VCD, or device ANT IN Laser DVD with output terminal To video input To audio input To audio output Using the front audio/video input jacks To connect a camcorder or video game: • Use the following illustration to connect a camcorder or video game. 18 Setting up your TV combo Connecting other video devices Use...
... video game Front A/V jacks A/V out jacks Additional TV Y=Yellow W=White R=Red Amplifier DVD player, VCD, or device Coaxial cable To coaxial-type digital audio input VHF UHF Video out COAXIAL OUT Audio out Receiver DVD, VCD, or device ANT IN Laser DVD with output terminal To video input To audio input To audio output Using the front audio/video input jacks To connect a camcorder or video game: • Use the following illustration to connect a camcorder or video game. 18 Setting up your TV combo Connecting other video devices Use...
User Manual (English)
Page 22
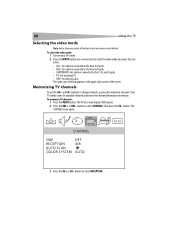
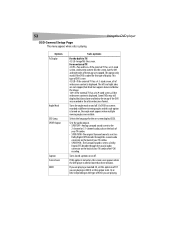
... front A/V jacks. • COMPONENT-For a device connected to select RECEPTION. Your TV combo scans for available channels and stores the channel information in tasks are remote control buttons. The option you need to select the video mode you want. button. To select the video mode: 1 Turn on -screen display (OSD) opens. 2 Press the VOL+ or VOL- The TV on your TV combo. 2 Press the INPUT button one or more times to memorize channels. The CHANNEL menu opens...
... front A/V jacks. • COMPONENT-For a device connected to select RECEPTION. Your TV combo scans for available channels and stores the channel information in tasks are remote control buttons. The option you need to select the video mode you want. button. To select the video mode: 1 Turn on -screen display (OSD) opens. 2 Press the VOL+ or VOL- The TV on your TV combo. 2 Press the INPUT button one or more times to memorize channels. The CHANNEL menu opens...

User Manual (English)
Page 23
... channel: 1 Press the number buttons for deleting a memorized channel and setting the SKIP option to open the CHANNEL LIST screen. 3 Press CH+ or CH- To delete a memorized digital channel: 1 Tune to the channel you want to delete. 2 Press the CH.LIST button to OFF. Tip: You can select: • AIR-Analog and digital antenna signal • CABLE-Analog and digital cable signal 5 Press the CH+ or CH- button to begin scanning for the minor channel. button to select AUTO SCAN...
... channel: 1 Press the number buttons for deleting a memorized channel and setting the SKIP option to open the CHANNEL LIST screen. 3 Press CH+ or CH- To delete a memorized digital channel: 1 Tune to the channel you want to delete. 2 Press the CH.LIST button to OFF. Tip: You can select: • AIR-Analog and digital antenna signal • CABLE-Analog and digital cable signal 5 Press the CH+ or CH- button to begin scanning for the minor channel. button to select AUTO SCAN...

User Manual (English)
Page 27
... 3 Program content 4 Program air time 5 Channel number 6 Closed caption mode 3 Press the round DISPLAY button again to select TIME, then press the CH-. button to close the OSD. AM. 4 Press the VOL+ or VOL- The TV on-screen display (OSD) opens. 2 Press the VOL+ or VOL- button to select TIME, then press the CH+ or CH- Using the TV 25 No. button to select --:-- button to change to setting. 5 Press the MENU button one or more times to reset...
... 3 Program content 4 Program air time 5 Channel number 6 Closed caption mode 3 Press the round DISPLAY button again to select TIME, then press the CH-. button to close the OSD. AM. 4 Press the VOL+ or VOL- The TV on-screen display (OSD) opens. 2 Press the VOL+ or VOL- button to select TIME, then press the CH+ or CH- Using the TV 25 No. button to select --:-- button to change to setting. 5 Press the MENU button one or more times to reset...

User Manual (English)
Page 35
...- Captions mode usually displays captions for the program's audio language. button. button to select FUNCTION, then press the CH- CC2 usually displays a secondary language. To turn the blue screen on or off When your TV combo is tuned to a channel that does not have a signal, you can specify whether you want the blank screen to close the OSD. Displaying closed captions Closed captions are usually displayed in Captions mode or Text mode. Text mode usually displays other types...
...- Captions mode usually displays captions for the program's audio language. button. button to select FUNCTION, then press the CH- CC2 usually displays a secondary language. To turn the blue screen on or off When your TV combo is tuned to a channel that does not have a signal, you can specify whether you want the blank screen to close the OSD. Displaying closed captions Closed captions are usually displayed in Captions mode or Text mode. Text mode usually displays other types...

User Manual (English)
Page 36
... is set to receive analog TV channels and the color system is set to NTSC, you can press the CCD button on -screen display (OSD) opens. 2 Press the VOL+ or VOL- This type of closed captions is usually the audio part of the program. button to be displayed. 34 Using the TV Using closed captions in a large black box that covers almost all of the TV screen. The TV on the remote control to close the...
... is set to receive analog TV channels and the color system is set to NTSC, you can press the CCD button on -screen display (OSD) opens. 2 Press the VOL+ or VOL- This type of closed captions is usually the audio part of the program. button to be displayed. 34 Using the TV Using closed captions in a large black box that covers almost all of the TV screen. The TV on the remote control to close the...
User Manual (English)
Page 37
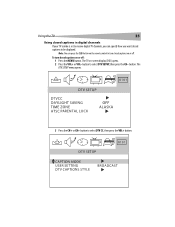
The TV on or off . To turn closed captions on or off : 1 Press the MENU button. ARENTAL LOCK 3 Press the CH+ or CH+ button to turn closed captions on -screen display (OSD) opens. 2 Press the VOL+ or VOL- Note: You can specify how you can press the CCD button on the remote control to select DTV CC, then press the VOL+ button. The DTV SETUP menu opens. Using the TV 35 Using closed captions in digital channels If your TV combo is set to receive digital TV channels, you want closed captions to select DTV SETUP, then press the CH- button to be displayed. button.
The TV on or off . To turn closed captions on or off : 1 Press the MENU button. ARENTAL LOCK 3 Press the CH+ or CH+ button to turn closed captions on -screen display (OSD) opens. 2 Press the VOL+ or VOL- Note: You can specify how you can press the CCD button on the remote control to select DTV CC, then press the VOL+ button. The DTV SETUP menu opens. Using the TV 35 Using closed captions in digital channels If your TV combo is set to receive digital TV channels, you want closed captions to select DTV SETUP, then press the CH- button to be displayed. button.

User Manual (English)
Page 38
...- button to select CAPTION MODE. 5 Press the VOL+ button. Notes: CAPTION MODE must be turned on closed captions, no captions are displayed, but your TV combo is normal, especially for live programs because the captions are entered live with no time for the program. Some cable systems and copy protections systems may not appear. button to a channel that has closed captions for the audio language for editing. SERVICE1 provides closed captions, the captions are six service...
...- button to select CAPTION MODE. 5 Press the VOL+ button. Notes: CAPTION MODE must be turned on closed captions, no captions are displayed, but your TV combo is normal, especially for live programs because the captions are entered live with no time for the program. Some cable systems and copy protections systems may not appear. button to a channel that has closed captions for the audio language for editing. SERVICE1 provides closed captions, the captions are six service...
User Manual (English)
Page 54
... type of display. Selects the language for more than three minutes. If you are playing an HDCD, set this option to off. Using the DVD player Option Tv Display Angle Mark OSD Lang SPDIF Output Caption Screen Saver HDCD Sub-options For the built-in the ultra widescreen format. For an external TV: 4:3/PS-Pan and Scan-If the external TV has a 4:3-sized screen, widescreen content fills the screen...
... type of display. Selects the language for more than three minutes. If you are playing an HDCD, set this option to off. Using the DVD player Option Tv Display Angle Mark OSD Lang SPDIF Output Caption Screen Saver HDCD Sub-options For the built-in the ultra widescreen format. For an external TV: 4:3/PS-Pan and Scan-If the external TV has a 4:3-sized screen, widescreen content fills the screen...
User Manual (English)
Page 59
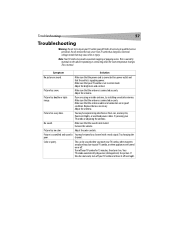
... caused when you are turned on . Adjust the brightness and contrast. Picture has double or triple image. Adjust the color controls. Troubleshooting 57 Troubleshooting Warning: Do not try installing an outside antenna. Refer all servicing to a channel with a weak signal. Make sure that your TV combo, or when appliances are using an inside that the antenna cables and connectors are placed too close to repair your TV combo for...
... caused when you are turned on . Adjust the brightness and contrast. Picture has double or triple image. Adjust the color controls. Troubleshooting 57 Troubleshooting Warning: Do not try installing an outside antenna. Refer all servicing to a channel with a weak signal. Make sure that your TV combo, or when appliances are using an inside that the antenna cables and connectors are placed too close to repair your TV combo for...
User Manual (English)
Page 63
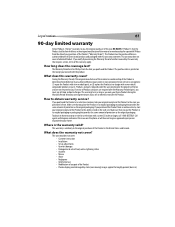
... • Misuse • Abuse • Negligence • Commercial use • Modification of any part of the Product • Plasma display panel damaged by this warranty that requires service, terms of this warranty apply. Legal notices 61 90-day limited warranty Dynex Products ("Dynex") warrants to you, the original purchaser of this new DX-R20TR ("Product"), that the Product shall be purchased from an...
... • Misuse • Abuse • Negligence • Commercial use • Modification of any part of the Product • Plasma display panel damaged by this warranty that requires service, terms of this warranty apply. Legal notices 61 90-day limited warranty Dynex Products ("Dynex") warrants to you, the original purchaser of this new DX-R20TR ("Product"), that the Product shall be purchased from an...


