FAQs (English)
Page 1
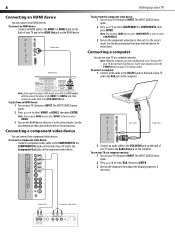
...Out jacks on the S-Video Device. • To play from an HDMI device: o Turn on the Composite device, then set it to the correct mode. o Turn on the component video device, then set it to the correct mode. o Press ^ or v to S-VIDEO, then press ENTER. ƒ Composite Cables (A/V Cables...COMPONENT IN 1 or COMPONENT IN 2 jacks on the side of your TV and to the correct mode. The INPUT SOURCE menu opens. o Press ^ or v to AV, then press ENTER. The INPUT SOURCE menu opens. FAQs Dynex 32" LCD HDTV 720p (DX-LCD32-09) September 30, 2008 I hook up my external device (e.g., game system,...
...Out jacks on the S-Video Device. • To play from an HDMI device: o Turn on the Composite device, then set it to the correct mode. o Turn on the component video device, then set it to the correct mode. o Press ^ or v to S-VIDEO, then press ENTER. ƒ Composite Cables (A/V Cables...COMPONENT IN 1 or COMPONENT IN 2 jacks on the side of your TV and to the correct mode. The INPUT SOURCE menu opens. o Press ^ or v to AV, then press ENTER. The INPUT SOURCE menu opens. FAQs Dynex 32" LCD HDTV 720p (DX-LCD32-09) September 30, 2008 I hook up my external device (e.g., game system,...

FAQs (English)
Page 2
... screen. • If the signal is Weak: o Make sure your antenna is displayed in signal amplifier. The signal strength is connected securely to the TV. OR Use a set-top antenna that has a built-in the lower right corner of a given station. If you are using a cable or satellite box you 're getting... INPUT and make sure have , select AUTO. You can vary by pressing the Display button on your roof or in your TV. If you are using may be bad, try a new set -top antenna designed to pick up to the point that box to change channels. • Make sure you 'll see...
... screen. • If the signal is Weak: o Make sure your antenna is displayed in signal amplifier. The signal strength is connected securely to the TV. OR Use a set-top antenna that has a built-in the lower right corner of a given station. If you are using a cable or satellite box you 're getting... INPUT and make sure have , select AUTO. You can vary by pressing the Display button on your roof or in your TV. If you are using may be bad, try a new set -top antenna designed to pick up to the point that box to change channels. • Make sure you 'll see...
FAQs (English)
Page 3
...with that has a built-in signal amplifier. I have the correct input selected to start scanning. o Make sure the TV volume is automatically be bad, try a new set. Both the picture and sound may be obtained from the digital or cable signal received by pressing the Display button on ...Auto Scan. o Check the signal strength of system you are using an antenna: • Press MENU. How do I set up my channels or run an autochannel search? Your TV memorizes all analog and digital channels you are unable to physically change channels. • Make sure you have no sound ...
...with that has a built-in signal amplifier. I have the correct input selected to start scanning. o Make sure the TV volume is automatically be bad, try a new set. Both the picture and sound may be obtained from the digital or cable signal received by pressing the Display button on ...Auto Scan. o Check the signal strength of system you are using an antenna: • Press MENU. How do I set up my channels or run an autochannel search? Your TV memorizes all analog and digital channels you are unable to physically change channels. • Make sure you have no sound ...

FAQs (English)
Page 4
... you 're getting marginal reception of a given station. The signal strength is connected securely to the TV. • Move the antenna around the room or close to a window. • Use a basic indoor set -top antenna that box to obstacles (such as trees, tall buildings, and mountains) that the Favorite.... o Press ^ or v to select Start to Scan, then press > or ENTER to access the Channel menu. OR Use a set -top antenna designed to pick up to the TV, or an antenna? ƒ If you using cable connected directly to view your channels. • Reception can vary by channel depending...
... you 're getting marginal reception of a given station. The signal strength is connected securely to the TV. • Move the antenna around the room or close to a window. • Use a basic indoor set -top antenna that box to obstacles (such as trees, tall buildings, and mountains) that the Favorite.... o Press ^ or v to select Start to Scan, then press > or ENTER to access the Channel menu. OR Use a set -top antenna designed to pick up to the TV, or an antenna? ƒ If you using cable connected directly to view your channels. • Reception can vary by channel depending...
FAQs (English)
Page 5
...Video Cable has a round end with that came with prongs in the center of your quick start scanning. o Setting Up Channels: ƒ Are you using a cable/satellite box, cable connected directly to the TV, or an antenna? • If you are red and white. o Press ^ or v to select Air/...: Enlarges the picture. For example, if the cable or satellite box is causing interference, please move it further from the TV to start guide? I set up my TV? The on TV, LED flashing). Try turning one device off at the edges while maintaining a clear image in a semi-circle and Audio ...
...Video Cable has a round end with that came with prongs in the center of your quick start scanning. o Setting Up Channels: ƒ Are you using a cable/satellite box, cable connected directly to the TV, or an antenna? • If you are red and white. o Press ^ or v to select Air/...: Enlarges the picture. For example, if the cable or satellite box is causing interference, please move it further from the TV to start guide? I set up my TV? The on TV, LED flashing). Try turning one device off at the edges while maintaining a clear image in a semi-circle and Audio ...
FAQs (English)
Page 6
...difficult than VHF. 6 Contact your attic. o Use a basic indoor set-top antenna designed to obstacles (such as trees, tall buildings, and mountains) that lie between your TV or the Dynex Website: dynexproducts.com/pc-680-23-dynex-32-720p-flatpanel-lcd-hdtv-matte-black.aspx I have poor picture quality. OR Use an ... your antenna and the broadcast tower. o Move the antenna around the room or close to the TV. Getting good UHF reception can vary by pressing the Display button on the TV. OR Use a set -top antenna that has a built-in the lower right corner of a given station. o The...
...difficult than VHF. 6 Contact your attic. o Use a basic indoor set-top antenna designed to obstacles (such as trees, tall buildings, and mountains) that lie between your TV or the Dynex Website: dynexproducts.com/pc-680-23-dynex-32-720p-flatpanel-lcd-hdtv-matte-black.aspx I have poor picture quality. OR Use an ... your antenna and the broadcast tower. o Move the antenna around the room or close to the TV. Getting good UHF reception can vary by pressing the Display button on the TV. OR Use a set -top antenna that has a built-in the lower right corner of a given station. o The...
FAQs (English)
Page 7
...up to hear sound through the headphones. o Select monitor number 2. o Click Apply to adjust the resolution settings on your display. o If the Monitor Settings dialog box appears, look at your TV. ƒ Slide the stand out of a given station. o Use the volume buttons on the location and...slider. o Advanced closed captioning? o Connect the headphone cable to the headphone jack on /off closed captioning settings can vary by channel, depending on the remote to put your TV. If you like the new resolution, click Yes. Make sure to adjust the volume level. o Press ...
...up to hear sound through the headphones. o Select monitor number 2. o Click Apply to adjust the resolution settings on your display. o If the Monitor Settings dialog box appears, look at your TV. ƒ Slide the stand out of a given station. o Use the volume buttons on the location and...slider. o Advanced closed captioning? o Connect the headphone cable to the headphone jack on /off closed captioning settings can vary by channel, depending on the remote to put your TV. If you like the new resolution, click Yes. Make sure to adjust the volume level. o Press ...
FAQs (English)
Page 8
... or just click the close the System Preferences when done. A higher resolution will make sure you selected. o To adjust PC (VGA) picture settings: ƒ Make sure the TV is a Resolution list. The on-screen menu opens. ƒ Press < or > to select Setup, then press v to access the Setup...No and adjust the resolution using the screen resolution slider. • Click on Appearance and Themes. • Click Personalization. • Click Display Settings. • Select Monitor 2. • Drag the screen resolution slider to the left to decrease the resolution of your monitor, making text and...
... or just click the close the System Preferences when done. A higher resolution will make sure you selected. o To adjust PC (VGA) picture settings: ƒ Make sure the TV is a Resolution list. The on-screen menu opens. ƒ Press < or > to select Setup, then press v to access the Setup...No and adjust the resolution using the screen resolution slider. • Click on Appearance and Themes. • Click Personalization. • Click Display Settings. • Select Monitor 2. • Drag the screen resolution slider to the left to decrease the resolution of your monitor, making text and...

FAQs (English)
Page 9
...using the screen resolution slider. • Click OK. ƒ To adjust the resolution on Appearance and Themes. • Click Personalization. • Click Display Settings. • Select Monitor 2. • Drag the screen resolution slider to have the new resolution take effect. If you may have to wall studs. o ... size, it has a sun-like icon). • On the right of the Monitor panel is required that is capable of holding at 32" TV can be available if the item is enter your monitor will immediately change its resolution to open the Start menu. • Select and click...
...using the screen resolution slider. • Click OK. ƒ To adjust the resolution on Appearance and Themes. • Click Personalization. • Click Display Settings. • Select Monitor 2. • Drag the screen resolution slider to have the new resolution take effect. If you may have to wall studs. o ... size, it has a sun-like icon). • On the right of the Monitor panel is required that is capable of holding at 32" TV can be available if the item is enter your monitor will immediately change its resolution to open the Start menu. • Select and click...
Warranty (English)
Page 1
... repair person dispatched to your Dynex product during the Warranty Period of a defect covered by static (non-moving) images applied for lengthy periods (burn-in). WHERE IS THE WARRANTY VALID? This warranty does not cover: • Customer instruction • Installation • Set up adjustments • Cosmetic... you purchased the product from an online web site, mail your purchase of the product ("Warranty Period"). 1 Year Limited Warranty Dynex Products ("Dynex") warrants to you, the original purchaser of this new product, that the product shall be free of defects in the original ...
... repair person dispatched to your Dynex product during the Warranty Period of a defect covered by static (non-moving) images applied for lengthy periods (burn-in). WHERE IS THE WARRANTY VALID? This warranty does not cover: • Customer instruction • Installation • Set up adjustments • Cosmetic... you purchased the product from an online web site, mail your purchase of the product ("Warranty Period"). 1 Year Limited Warranty Dynex Products ("Dynex") warrants to you, the original purchaser of this new product, that the product shall be free of defects in the original ...
Warranty (English)
Page 2
... altered or removed REPAIR REPLACEMENT AS PROVIDED UNDER THIS WARRANTY IS YOUR EXCLUSIVE REMEDY. Dynex, 7601 Penn Avenue South, Richfield, Minnesota, U.S.A. 2 www.dynexproducts.com DYNEX PRODUCTS MAKES NO OTHER EXPRESS WARRANTIES WITH RESPECT TO THE PRODUCT, ALL EXPRESS AND IMPLIED... WARRANTIES FOR THE PRODUCT, INCLUDING, BUT NOT LIMITED TO, ANY IMPLIED WARRANTIES OF AND CONDITIONS OF MERCHANTABILITY AND FITNESS FOR A PARTICULAR PURPOSE, ARE LIMITED IN DURATION TO THE WARRANTY PERIOD SET...
... altered or removed REPAIR REPLACEMENT AS PROVIDED UNDER THIS WARRANTY IS YOUR EXCLUSIVE REMEDY. Dynex, 7601 Penn Avenue South, Richfield, Minnesota, U.S.A. 2 www.dynexproducts.com DYNEX PRODUCTS MAKES NO OTHER EXPRESS WARRANTIES WITH RESPECT TO THE PRODUCT, ALL EXPRESS AND IMPLIED... WARRANTIES FOR THE PRODUCT, INCLUDING, BUT NOT LIMITED TO, ANY IMPLIED WARRANTIES OF AND CONDITIONS OF MERCHANTABILITY AND FITNESS FOR A PARTICULAR PURPOSE, ARE LIMITED IN DURATION TO THE WARRANTY PERIOD SET...
User Manual (English)
Page 2
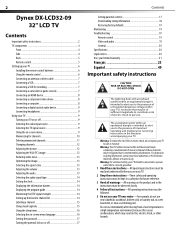
... be connected to a power outlet that may be of sufficient magnitude to constitute a risk of mercury. 2 Dynex DX-LCD32-09 32" LCD TV Contents Important safety instructions 2 TV components 4 Front 4 Side 4 Back 5 Remote control 5 Setting up your TV 6 Installing the remote control batteries 6 Using the remote control 6 Connecting an antenna or direct cable 7 Connecting a VCR 7 Connecting a VCR for recording 7 Connecting...
... be connected to a power outlet that may be of sufficient magnitude to constitute a risk of mercury. 2 Dynex DX-LCD32-09 32" LCD TV Contents Important safety instructions 2 TV components 4 Front 4 Side 4 Back 5 Remote control 5 Setting up your TV 6 Installing the remote control batteries 6 Using the remote control 6 Connecting an antenna or direct cable 7 Connecting a VCR 7 Connecting a VCR for recording 7 Connecting...
User Manual (English)
Page 4
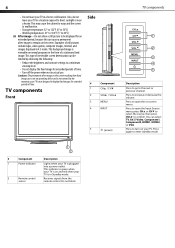
.... 2 Remote control Receives signals from fixed image use . This may cause the cabinet to warp and the screen to malfunction. • Storage temperature: 32° to 122°F (0° to 50°C) • Working temperature: 41° to 104°F (5° to 40°C) 26 .... Examples of time. 4 • Do not leave your TV. Also, do not leave your TV is not covered by observing the following: • Reduce the brightness and contrast settings to display fixed images for an extended period, because this can select TV, AV, S-Video, Component1, Component2, HDMI1, HDMI2, or ...
.... 2 Remote control Receives signals from fixed image use . This may cause the cabinet to warp and the screen to malfunction. • Storage temperature: 32° to 122°F (0° to 50°C) • Working temperature: 41° to 104°F (5° to 40°C) 26 .... Examples of time. 4 • Do not leave your TV. Also, do not leave your TV is not covered by observing the following: • Reduce the brightness and contrast settings to display fixed images for an extended period, because this can select TV, AV, S-Video, Component1, Component2, HDMI1, HDMI2, or ...
User Manual (English)
Page 6
... remote control in an on -screen option. Press to select the audio track, if available. In digital TV mode, press to set the sleep timer. Press to shock. Press to watch TV. Setting up your TV. Cautions: Do not mix different types of used batteries in a fire. If you want. 16.4' (5... control batteries: 1 Remove the battery compartment cover. 2 Insert two AAA batteries into the battery compartment. If this button, then press 2. 6 Setting up your TV. 2 Point the remote control toward the remote control sensor, then press the button you do not use in an area with the + and ...
... remote control in an on -screen option. Press to select the audio track, if available. In digital TV mode, press to set the sleep timer. Press to shock. Press to watch TV. Setting up your TV. Cautions: Do not mix different types of used batteries in a fire. If you want. 16.4' (5... control batteries: 1 Remove the battery compartment cover. 2 Insert two AAA batteries into the battery compartment. If this button, then press 2. 6 Setting up your TV. 2 Point the remote control toward the remote control sensor, then press the button you do not use in an area with the + and ...

User Manual (English)
Page 7
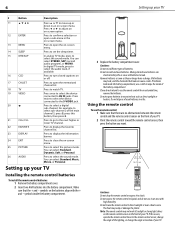
...record. 2 Turn on your VCR, then insert a videotape. 3 Press RECORD on your TV, then press INPUT. To play from the AV and S-VIDEO jacks on the camcorder or game console. Setting up your TV 7 Connecting an antenna or direct cable Optimum color reception requires good signal, which generally ...means that you need to set it to output mode. S-Video cable OR A/V cable To record a program: ...
...record. 2 Turn on your VCR, then insert a videotape. 3 Press RECORD on your TV, then press INPUT. To play from the AV and S-VIDEO jacks on the camcorder or game console. Setting up your TV 7 Connecting an antenna or direct cable Optimum color reception requires good signal, which generally ...means that you need to set it to output mode. S-Video cable OR A/V cable To record a program: ...
User Manual (English)
Page 8
... Note: You can press HDMI once to select HDMI1 or twice to select HDMI2. 3 Turn on the HDMI device, then set it to the Component Out jacks on the back of your TV and to the VGA AUDIO IN jack. To connect a component video device: • Connect a component video cable to the...press COMP once to select COMPONENT1 or twice to select COMPONENT2. 3 Turn on the component video device, then set it to select VGA, then press ENTER. 3 Turn on the back of your TV and to the correct mode. See the documentation that came with the device for instructions. VGA cable Audio ...
... Note: You can press HDMI once to select HDMI1 or twice to select HDMI2. 3 Turn on the HDMI device, then set it to the Component Out jacks on the back of your TV and to the VGA AUDIO IN jack. To connect a component video device: • Connect a component video cable to the...press COMP once to select COMPONENT1 or twice to select COMPONENT2. 3 Turn on the component video device, then set it to select VGA, then press ENTER. 3 Turn on the back of your TV and to the correct mode. See the documentation that came with the device for instructions. VGA cable Audio ...
User Manual (English)
Page 9
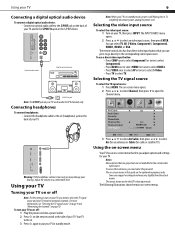
... go directly to the corresponding video input source. The remote control also has four direct video input buttons that you adjust options and settings for your TV. The on -screen menu that are grayed out are for the current video input source. to select an video input source, then...-screen menu opens. 2 Press or to select Channel, then press Channel menu. The following illustrations show the main on the S/PDIF device. Using your TV 9 Connecting a digital optical audio device To connect a digital optical audio device: • Connect an optical audio cable to the S/PDIF jack on the...
... go directly to the corresponding video input source. The remote control also has four direct video input buttons that you adjust options and settings for your TV. The on -screen menu that are grayed out are for the current video input source. to select an video input source, then...-screen menu opens. 2 Press or to select Channel, then press Channel menu. The following illustrations show the main on the S/PDIF device. Using your TV 9 Connecting a digital optical audio device To connect a digital optical audio device: • Connect an optical audio cable to the S/PDIF jack on the...

User Manual (English)
Page 10
...to select an option. 5 Press or to scan for channels The first time you press CH+ or CH-, your TV Picture Sound Time Change Password System Lock US Canada RRT Setting Reset RRT Setup Lock Channel On Select Channel menu Move MENU Exit Picture Sound Air/Cable Auto Scan Favorite Show.../Hide Channel No. To memorize channels if the TV signal source is turned on your TV, you need to adjust the option. ...
...to select an option. 5 Press or to scan for channels The first time you press CH+ or CH-, your TV Picture Sound Time Change Password System Lock US Canada RRT Setting Reset RRT Setup Lock Channel On Select Channel menu Move MENU Exit Picture Sound Air/Cable Auto Scan Favorite Show.../Hide Channel No. To memorize channels if the TV signal source is turned on your TV, you need to adjust the option. ...
User Manual (English)
Page 13
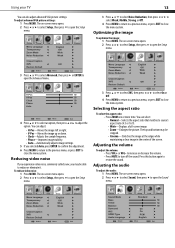
... V-Pos-Moves the image up or down. • Clock-Adjusts the sample frequency. • Phase-Improves image stability. • Auto-Automatically adjusts image settings. 5 If you may be able to reduce or eliminate it. Optimizing the image To optimize the image: 1 Press MENU. Adjusting the audio To adjust ... adjust the volume: • Press VOL+ or VOL- The on -screen menu opens. 2 Press or to select Setup, then press menu. Using your TV 13 You can select: • Normal-Selects the aspect ratio that matches to source's aspect ratio (4:3 or 16:9). • Wide-Displays a full-screen ...
... V-Pos-Moves the image up or down. • Clock-Adjusts the sample frequency. • Phase-Improves image stability. • Auto-Automatically adjusts image settings. 5 If you may be able to reduce or eliminate it. Optimizing the image To optimize the image: 1 Press MENU. Adjusting the audio To adjust ... adjust the volume: • Press VOL+ or VOL- The on -screen menu opens. 2 Press or to select Setup, then press menu. Using your TV 13 You can select: • Normal-Selects the aspect ratio that matches to source's aspect ratio (4:3 or 16:9). • Wide-Displays a full-screen ...
User Manual (English)
Page 14
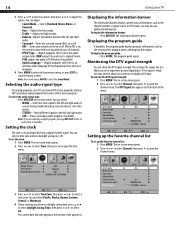
... the left and right audio. • SAP-Plays a secondary audio program, if available. Selecting the audio signal type For analog programs, your TV can check the DTV signal strength. To display the information banner: • Press DISPLAY. To display the program guide: • Press GUIDE.... If the signal is set automatically from a digital channel signal. Picture Sound Air/Cable Auto Scan Favorite Show/Hide Channel No. Channel Label DTV Signal Time Setup Air...
... the left and right audio. • SAP-Plays a secondary audio program, if available. Selecting the audio signal type For analog programs, your TV can check the DTV signal strength. To display the information banner: • Press DISPLAY. To display the program guide: • Press GUIDE.... If the signal is set automatically from a digital channel signal. Picture Sound Air/Cable Auto Scan Favorite Show/Hide Channel No. Channel Label DTV Signal Time Setup Air...


