
FAQs (English)
Page 1
Agent Debug Tree Dynex LCD TVs (DX-26L150A11, DX-32L150A11, DX-37L150A11, DX-46L150A11) July 29, 2010 Setup ...1 Image Issues...4 Channel Issues...5 Audio Issues...7 General ...7 Hardware Issues...8 Stand/Wall Mounting...8 Setup 1. Connect an HDMI cable to the HDMI jack on the back or side of your TV and to the HDMI Out jack on the ...
Agent Debug Tree Dynex LCD TVs (DX-26L150A11, DX-32L150A11, DX-37L150A11, DX-46L150A11) July 29, 2010 Setup ...1 Image Issues...4 Channel Issues...5 Audio Issues...7 General ...7 Hardware Issues...8 Stand/Wall Mounting...8 Setup 1. Connect an HDMI cable to the HDMI jack on the back or side of your TV and to the HDMI Out jack on the ...
FAQs (English)
Page 8
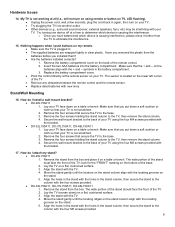
...14. Remove the four screws holding the stand column to the TV, then remove the stand column. 4. How do I install a wall-mount bracket? DX-26L150A11 1. The wide portion of the stand must face the front of the base. 2. Lay the TV on my remote. ...battery compartment cover on your TV using the four M6 screws provided with the four screws provided. DX-32L150A11, DX-37L150A11, DX-46L150A11 1. Stand/Wall Mounting 16. Secure the wall-mount bracket to the column with the bracket. 17. Remove the stand from the TV to determine which device is...
...14. Remove the four screws holding the stand column to the TV, then remove the stand column. 4. How do I install a wall-mount bracket? DX-26L150A11 1. The wide portion of the stand must face the front of the base. 2. Lay the TV on my remote. ...battery compartment cover on your TV using the four M6 screws provided with the four screws provided. DX-32L150A11, DX-37L150A11, DX-46L150A11 1. Stand/Wall Mounting 16. Secure the wall-mount bracket to the column with the bracket. 17. Remove the stand from the TV to determine which device is...

Quick Setup Guide (English)
Page 1
...and place it on the batteries align with the four screws provided Locating grooves Installing a wall-mount bracket 1 Carefully place your remote control 1 While pressing the release button on the battery ...or bench. If you connect the AV cable. Universal remote control TV codes (for all Dynex TVs manufactured after Jan. 1, 2007) Universal remote control makers and models Philips PHDVD5, PH5DSS... the holes in the battery compartment. 3 Replace the cover. 26" LCD TV QUICK SETUP GUIDE DX-26L150A11 Front and side features + - A B Remote control and 2 AAA batteries AC power cord Component...
...and place it on the batteries align with the four screws provided Locating grooves Installing a wall-mount bracket 1 Carefully place your remote control 1 While pressing the release button on the battery ...or bench. If you connect the AV cable. Universal remote control TV codes (for all Dynex TVs manufactured after Jan. 1, 2007) Universal remote control makers and models Philips PHDVD5, PH5DSS... the holes in the battery compartment. 3 Replace the cover. 26" LCD TV QUICK SETUP GUIDE DX-26L150A11 Front and side features + - A B Remote control and 2 AAA batteries AC power cord Component...

User Manual (English)
Page 2
ii Dynex DX-26L150A11 26" LCD TV Contents CHILD SAFETY 1 Important safety instructions 2 Warnings 2 Cautions 2 Installing and removing the stand 4 Installing the stand 4 Removing the stand column 4 Installing a wall-mount bracket 5 TV components 5 Accessories 5 Front 5 Side 5 Back 6 Remote control 7 Using the remote control 8 Installing remote control batteries 8 Aiming the remote control 8 Programming a universal remote control ...
ii Dynex DX-26L150A11 26" LCD TV Contents CHILD SAFETY 1 Important safety instructions 2 Warnings 2 Cautions 2 Installing and removing the stand 4 Installing the stand 4 Removing the stand column 4 Installing a wall-mount bracket 5 TV components 5 Accessories 5 Front 5 Side 5 Back 6 Remote control 7 Using the remote control 8 Installing remote control batteries 8 Aiming the remote control 8 Programming a universal remote control ...

User Manual (English)
Page 4
... consumer electronics industry are required for proper use your flat panel display As you enjoy your TV, always remember: • One size of wall mount does not fit all . Make sure that you place or install the TV where it cannot be pushed, pulled over and cause injury. ...and cables so that they cannot be pulled or grabbed by the TV and wall mount manufacturers. • If you have any doubts about your ability to safely wall mount your TV. • Follow all instructions supplied by curious children. DX-26L150A11 1 f CHILD SAFETY It makes a difference how and where you use of ...
... consumer electronics industry are required for proper use your flat panel display As you enjoy your TV, always remember: • One size of wall mount does not fit all . Make sure that you place or install the TV where it cannot be pushed, pulled over and cause injury. ...and cables so that they cannot be pulled or grabbed by the TV and wall mount manufacturers. • If you have any doubts about your ability to safely wall mount your TV. • Follow all instructions supplied by curious children. DX-26L150A11 1 f CHILD SAFETY It makes a difference how and where you use of ...

User Manual (English)
Page 7
Dynex is not responsible for any damages or injuries that is not intended to support the weight of the TV. Installing the stand Note: Your TV ... four screws. To remove the stand column: 1 Lay the TV flat (screen down) on a table or bench. 4 DX-26L150A11 Installing and removing the stand Installing and removing the stand You must install your TV into the stand in order for it on the edge of a table or bench. If you wall-mount the TV.
Dynex is not responsible for any damages or injuries that is not intended to support the weight of the TV. Installing the stand Note: Your TV ... four screws. To remove the stand column: 1 Lay the TV flat (screen down) on a table or bench. 4 DX-26L150A11 Installing and removing the stand Installing and removing the stand You must install your TV into the stand in order for it on the edge of a table or bench. If you wall-mount the TV.
User Manual (English)
Page 8
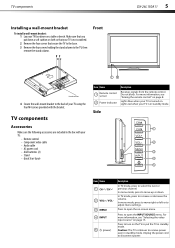
Front DX-26L150A11 5 12 Stand column 4 Secure the wall-mount bracket to the back of your TV using the four M4 screws provided with your TV: • Remote control • Component video cable • Audio .... In menu mode, press to move up or down a soft cushion or cloth so that your TV is in standby mode. TV components Installing a wall-mount bracket To install a wall-mount bracket: 1 Lay your TV face down on the TV or put down . Do not block. Side Item Name 1 CH / CH 2 VOL+ / VOL3 MENU...
Front DX-26L150A11 5 12 Stand column 4 Secure the wall-mount bracket to the back of your TV using the four M4 screws provided with your TV: • Remote control • Component video cable • Audio .... In menu mode, press to move up or down a soft cushion or cloth so that your TV is in standby mode. TV components Installing a wall-mount bracket To install a wall-mount bracket: 1 Lay your TV face down on the TV or put down . Do not block. Side Item Name 1 CH / CH 2 VOL+ / VOL3 MENU...


