Quick Setup Guide (English)
Page 1
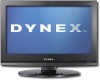
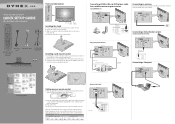
...0463 0091 DirectTV RC23 10463 S-video cable Video device 19"/22"LCD/DVD Combo TV QUICK SETUP GUIDE DX-19LD150A11/DX-22LD150A11 Front and side features Remote control Power sensor indicator Installing the stand 1 Remove the stand from damages and ...scratches. 2 Remove the two screws holding the TV to its base, then remove the base. 3 Secure the wall-mount bracket to the back of your new Dynex TV, see the table below for common codes. Remote...
...0463 0091 DirectTV RC23 10463 S-video cable Video device 19"/22"LCD/DVD Combo TV QUICK SETUP GUIDE DX-19LD150A11/DX-22LD150A11 Front and side features Remote control Power sensor indicator Installing the stand 1 Remove the stand from damages and ...scratches. 2 Remove the two screws holding the TV to its base, then remove the base. 3 Secure the wall-mount bracket to the back of your new Dynex TV, see the table below for common codes. Remote...
Quick Setup Guide (English)
Page 2
...TV automatically scans for the first time 1 Plug in your remote control MENU Press to open the on . You can also press any of BBY Solutions, Inc. The initial Setup Wizard to the Choose your TV...• 2 2 " LC D / D V D CO M B O T V I Q U I C K S E T U P G U I D E I DX-19LD150A11/DX-22LD150A11 ENGLISH 09-1087 09-0xxx We're here for details. de R.L. All other end to a power outlet. Press or to highlight Home Mode (recommended.... Press to select menu options. Need additional help? All rights reserved. DYNEX is a trademark of the video source buttons directly. Press to move to...
...TV automatically scans for the first time 1 Plug in your remote control MENU Press to open the on . You can also press any of BBY Solutions, Inc. The initial Setup Wizard to the Choose your TV...• 2 2 " LC D / D V D CO M B O T V I Q U I C K S E T U P G U I D E I DX-19LD150A11/DX-22LD150A11 ENGLISH 09-1087 09-0xxx We're here for details. de R.L. All other end to a power outlet. Press or to highlight Home Mode (recommended.... Press to select menu options. Need additional help? All rights reserved. DYNEX is a trademark of the video source buttons directly. Press to move to...
User Manual (English)
Page 2
ii Dynex DX-19LD150A11/DX22LD150A11 19" and 22" LCD TV/DVD Combos Contents CHILD SAFETY 1 Important safety instructions 2 Warnings 2 Cautions 2 Installing and removing the stand 4 Installing the stand 4 Removing the stand 4 Installing a wall-mount bracket 4 TV/DVD combo components 5 Accessories 5 Front 5 Back 5 Side 6 Remote control 6 Using the remote control 7 Installing remote control batteries 7 Aiming the remote control 7 Programming a universal remote control...
ii Dynex DX-19LD150A11/DX22LD150A11 19" and 22" LCD TV/DVD Combos Contents CHILD SAFETY 1 Important safety instructions 2 Warnings 2 Cautions 2 Installing and removing the stand 4 Installing the stand 4 Removing the stand 4 Installing a wall-mount bracket 4 TV/DVD combo components 5 Accessories 5 Front 5 Back 5 Side 6 Remote control 6 Using the remote control 7 Installing remote control batteries 7 Aiming the remote control 7 Programming a universal remote control...
User Manual (English)
Page 3
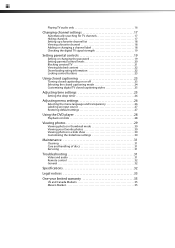
... Locking control buttons 23 Using closed captioning 23 Turning closed captioning on or off 23 Selecting the closed captioning mode 24 Customizing digital TV closed captioning styles 25 Adjusting time settings 25 Setting the sleep timer 26 Adjusting menu settings 26 Selecting the menu language and transparency...the slideshow settings 30 Maintenance 31 Cleaning 31 Care and handling of discs 31 Servicing 31 Troubleshooting 31 Video and audio 31 Remote control 32 General 32 Specifications 32 Legal notices 33 One-year limited warranty 35 US and Canada Markets 35 Mexico Market 35
... Locking control buttons 23 Using closed captioning 23 Turning closed captioning on or off 23 Selecting the closed captioning mode 24 Customizing digital TV closed captioning styles 25 Adjusting time settings 25 Setting the sleep timer 26 Adjusting menu settings 26 Selecting the menu language and transparency...the slideshow settings 30 Maintenance 31 Cleaning 31 Care and handling of discs 31 Servicing 31 Troubleshooting 31 Video and audio 31 Remote control 32 General 32 Specifications 32 Legal notices 33 One-year limited warranty 35 US and Canada Markets 35 Mexico Market 35
User Manual (English)
Page 6
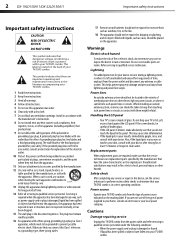
... panel is a Class I television to a grounding-type, three-prong outlet. 17 Remote control batteries should not be exposed to rain or moisture. Replacement parts When replacement parts...all servicing to prevent possible electric shock. Handling the LCD panel • Your TV's screen is used, use caution when moving the cart/apparatus combination to avoid injury...Do not drop your safety. Safety check After completing any ventilation openings. 2 DX-19LD150A11/DX-22LD150A11 Important safety instructions Important safety instructions CAUTION RISK OF ELECTRIC SHOCK DO NOT...
... panel is a Class I television to a grounding-type, three-prong outlet. 17 Remote control batteries should not be exposed to rain or moisture. Replacement parts When replacement parts...all servicing to prevent possible electric shock. Handling the LCD panel • Your TV's screen is used, use caution when moving the cart/apparatus combination to avoid injury...Do not drop your safety. Safety check After completing any ventilation openings. 2 DX-19LD150A11/DX-22LD150A11 Important safety instructions Important safety instructions CAUTION RISK OF ELECTRIC SHOCK DO NOT...
User Manual (English)
Page 9
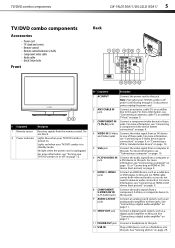
...) jacks Connect a component video device to these jacks. See "Connecting a digital audio amplifier" on page 29. TV/DVD combo components DX-19LD150A11/DX-22LD150A11 5 TV/DVD combo components Accessories • Power cord • TV stand and screws • Remote control • Remote control batteries (2 AAA) • Component video cable • Audio cable • Quick Setup Guide Front Back...
...) jacks Connect a component video device to these jacks. See "Connecting a digital audio amplifier" on page 29. TV/DVD combo components DX-19LD150A11/DX-22LD150A11 5 TV/DVD combo components Accessories • Power cord • TV stand and screws • Remote control • Remote control batteries (2 AAA) • Component video cable • Audio cable • Quick Setup Guide Front Back...
User Manual (English)
Page 10
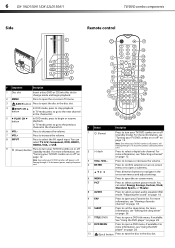
6 DX-19LD150A11/DX-22LD150A11 Side TV/DVD combo components Remote control # Component Description 1 Disc slot Insert a disc (DVD or CD) into this slot to change mode and begin or resume playback. In TV mode, press to go to the next channel in the channel list. 5 PLAY/ CH button In DVD mode, press to begin playback. 2 MENU Press...
6 DX-19LD150A11/DX-22LD150A11 Side TV/DVD combo components Remote control # Component Description 1 Disc slot Insert a disc (DVD or CD) into this slot to change mode and begin or resume playback. In TV mode, press to go to the next channel in the channel list. 5 PLAY/ CH button In DVD mode, press to begin playback. 2 MENU Press...
User Manual (English)
Page 11
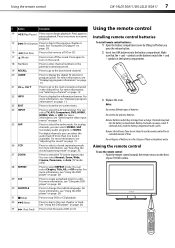
... the battery compartment with a cloth. Aiming the remote control To use the remote control: • Point the remote control towards the remote sensor on page 12. 22 INFO 23 EXIT Press to use the remote control for a disc. Using the remote control DX-19LD150A11/DX-22LD150A11 7 # Button Description 14 (Play/Pause)... INPUT Press to the previous chapter or track. For digital channels, you can select Normal, Zoom, Wide, Cinema, Panorama, or Auto (TV mode only). 28 REPEAT 29 A-B Press to select the audio mode. For more information, see "Adjusting the sound" on page 15. ...
... the battery compartment with a cloth. Aiming the remote control To use the remote control: • Point the remote control towards the remote sensor on page 12. 22 INFO 23 EXIT Press to use the remote control for a disc. Using the remote control DX-19LD150A11/DX-22LD150A11 7 # Button Description 14 (Play/Pause)... INPUT Press to the previous chapter or track. For digital channels, you can select Normal, Zoom, Wide, Cinema, Panorama, or Auto (TV mode only). 28 REPEAT 29 A-B Press to select the audio mode. For more information, see "Adjusting the sound" on page 15. ...
User Manual (English)
Page 12
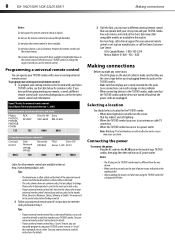
... listed on the marking label. • Always unplug the power cord when not using your universal remote control's instructions for details. 3 If all Dynex TVs manufactured after Jan. 1, 2007) Universal remote control manufacturer and model Philips PHDVD5, PH5DSS, PMDVR8, PDVR8 RCA RCU807 One for All Sony URC... TV in Step 1. Do not place objects, such as furniture, between the remote control and the remote sensor. Connecting the power To connect the power: • Plug the AC cord into the AC IN jack on the screen may be different from the one at a time. 8 DX-19LD150A11/DX-...
... listed on the marking label. • Always unplug the power cord when not using your universal remote control's instructions for details. 3 If all Dynex TVs manufactured after Jan. 1, 2007) Universal remote control manufacturer and model Philips PHDVD5, PH5DSS, PMDVR8, PDVR8 RCA RCU807 One for All Sony URC... TV in Step 1. Do not place objects, such as furniture, between the remote control and the remote sensor. Connecting the power To connect the power: • Plug the AC cord into the AC IN jack on the screen may be different from the one at a time. 8 DX-19LD150A11/DX-...

User Manual (English)
Page 14
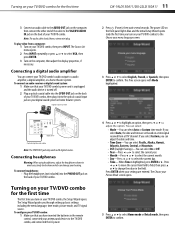
...should only be a 15-pin D-Sub (analog RGB) cable. 10 DX-19LD150A11/DX-22LD150A11 Making connections To connect an antenna, cable TV, or satellite TV box: 1 Connect one end of a 75-Ohm, coaxial cable to ... then press PLAY. If the antenna is not installed correctly, contact qualified service personnel to select TV, then press ENTER. Connecting a computer Tip: Some computers have an HDMI connector, which can be... ENTER. 3 Turn on the remote control or the side of TV The Source List menu opens. 2 Press INPUT repeatedly or press or to the antenna or cable TV wall jack. Connecting a VCR ...
...should only be a 15-pin D-Sub (analog RGB) cable. 10 DX-19LD150A11/DX-22LD150A11 Making connections To connect an antenna, cable TV, or satellite TV box: 1 Connect one end of a 75-Ohm, coaxial cable to ... then press PLAY. If the antenna is not installed correctly, contact qualified service personnel to select TV, then press ENTER. Connecting a computer Tip: Some computers have an HDMI connector, which can be... ENTER. 3 Turn on the remote control or the side of TV The Source List menu opens. 2 Press INPUT repeatedly or press or to the antenna or cable TV wall jack. Connecting a VCR ...
User Manual (English)
Page 15
If you turn on your TV/DVD combo for the first time DX-19LD150A11/DX-22LD150A11 11 3 Connect an audio cable to the AUDIO OUT jack on the computer, then connect the other end of the cable to the VGA/DVI AUDIO IN jack on the back of your TV/DVD combo. If you select Custom... optical coaxial input jack on a time signal received from field to field, then press or to change the value in the remote control, connected your antenna and devices to the TV/DVD combo, and connected the AC power. 4 Press or to highlight an option, then press or to adjust the option. Press...
If you turn on your TV/DVD combo for the first time DX-19LD150A11/DX-22LD150A11 11 3 Connect an audio cable to the AUDIO OUT jack on the computer, then connect the other end of the cable to the VGA/DVI AUDIO IN jack on the back of your TV/DVD combo. If you select Custom... optical coaxial input jack on a time signal received from field to field, then press or to change the value in the remote control, connected your antenna and devices to the TV/DVD combo, and connected the AC power. 4 Press or to highlight an option, then press or to adjust the option. Press...
User Manual (English)
Page 16
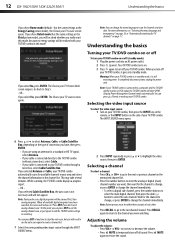
12 DX-19LD150A11/DX-22LD150A11 Understanding the basics If you select No, press ENTER. If you chose Home mode (default - Understanding the basics Turning your TV/DVD combo. The INPUT SOURCE menu opens. 6 Press or to select Antenna, Cable, or Cable/Satellite Box, depending on the type of your TV/DVD combo... a channel list. 7 Select the corresponding video input source through a tuner box, select Cable/Satellite Box. Note: If your TV/DVD combo, then press the INPUT key on the remote, or the INPUT button on page 17. If you select Yes, press ENTER. If you were watching. Wait for...
12 DX-19LD150A11/DX-22LD150A11 Understanding the basics If you select No, press ENTER. If you chose Home mode (default - Understanding the basics Turning your TV/DVD combo. The INPUT SOURCE menu opens. 6 Press or to select Antenna, Cable, or Cable/Satellite Box, depending on the type of your TV/DVD combo... a channel list. 7 Select the corresponding video input source through a tuner box, select Cable/Satellite Box. Note: If your TV/DVD combo, then press the INPUT key on the remote, or the INPUT button on page 17. If you select Yes, press ENTER. If you were watching. Wait for...
User Manual (English)
Page 18
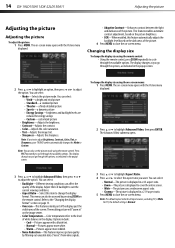
...automatically adjusts the backlight level based on the dark areas of the picture. 4 Press MENU to the "Changing the display format" section on the remote control. Refer to close the on -screen menus: 1 Press MENU. Options include: • Cool-Pictures appear with a bluish tint. •... display. For TV, the default setting is displayed in the popup screen. You can affect the quality of the screen. The resulting picture will "zoom in" on -screen menu. Changing the display size To change the display size using the remote control. 14 DX-19LD150A11/DX-22LD150A11 Adjusting the...
...automatically adjusts the backlight level based on the dark areas of the picture. 4 Press MENU to the "Changing the display format" section on the remote control. Refer to close the on -screen menus: 1 Press MENU. Options include: • Cool-Pictures appear with a bluish tint. •... display. For TV, the default setting is displayed in the popup screen. You can affect the quality of the screen. The resulting picture will "zoom in" on -screen menu. Changing the display size To change the display size using the remote control. 14 DX-19LD150A11/DX-22LD150A11 Adjusting the...

User Manual (English)
Page 19
... For more information, see "Selecting the video input source"on -screen menu opens with the remote control: • Using the remote control, press SAP repeatedly to save your TV/DVD combo is 1360×768. Format Resolution VGA 640x480 720x400 SVGA 800x600 800x600 XGA 1024x768 ... TV provider. • In analog TV mode, select one of the following table shows the suggested screen resolutions. The Display Properties dialog box opens. 3 Press or to adjust the option. To choose an audio language with the Picture menu displayed. Adjusting the sound DX-19LD150A11/DX-...
... For more information, see "Selecting the video input source"on -screen menu opens with the remote control: • Using the remote control, press SAP repeatedly to save your TV/DVD combo is 1360×768. Format Resolution VGA 640x480 720x400 SVGA 800x600 800x600 XGA 1024x768 ... TV provider. • In analog TV mode, select one of the following table shows the suggested screen resolutions. The Display Properties dialog box opens. 3 Press or to adjust the option. To choose an audio language with the Picture menu displayed. Adjusting the sound DX-19LD150A11/DX-...
User Manual (English)
Page 20
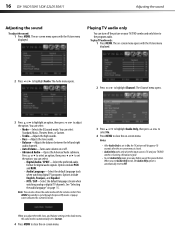
.... 2 Press or to close the on page 15. The on -screen menu opens with the remote control. Options include PCM and RAW. • Audio Language-Select the default language track when watching digital TV programs. Options include English, Français, and Español. • MTS / SAP...the current EQ mode. 3 Press or to highlight Audio Only, then press or to select On. 4 Press MENU to the program audio. 16 DX-19LD150A11/DX-22LD150A11 Adjusting the sound Adjusting the sound To adjust the sound: 1 Press MENU. When you adjust the treble, bass, and balance settings in ...
.... 2 Press or to close the on page 15. The on -screen menu opens with the remote control. Options include PCM and RAW. • Audio Language-Select the default language track when watching digital TV programs. Options include English, Français, and Español. • MTS / SAP...the current EQ mode. 3 Press or to highlight Audio Only, then press or to select On. 4 Press MENU to the program audio. 16 DX-19LD150A11/DX-22LD150A11 Adjusting the sound Adjusting the sound To adjust the sound: 1 Press MENU. When you adjust the treble, bass, and balance settings in ...
User Manual (English)
Page 27
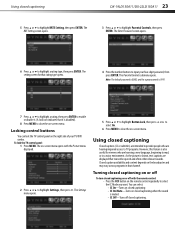
...; Press the CCD button on the remote control repeatedly to select the CC Mode you want. The Settings menu opens. 5 Press or to highlight Button Lock, then press or to select On. 6 Press MENU to close the on-screen menu. To lock the TV control panel: 1 Press MENU. Note... ENTER. The Enter Password screen opens. 6 Press or to highlight Settings, then press . Turning closed captioning on or off To turn closed captioning DX-19LD150A11/DX-22LD150A11 23 5 Press or to highlight RRT5 Setting, then press ENTER. Using closed captioning on or off with the Picture menu displayed. 2 Press ...
...; Press the CCD button on the remote control repeatedly to select the CC Mode you want. The Settings menu opens. 5 Press or to highlight Button Lock, then press or to select On. 6 Press MENU to close the on-screen menu. To lock the TV control panel: 1 Press MENU. Note... ENTER. The Enter Password screen opens. 6 Press or to highlight Settings, then press . Turning closed captioning on or off To turn closed captioning DX-19LD150A11/DX-22LD150A11 23 5 Press or to highlight RRT5 Setting, then press ENTER. Using closed captioning on or off with the Picture menu displayed. 2 Press ...

User Manual (English)
Page 30
... the on -screen menu. 26 DX-19LD150A11/DX-22LD150A11 Adjusting menu settings 4 Press or to highlight Time, then press ENTER. To set the sleep timer with the Picture menu displayed. 2 Press or to highlight Settings, then press . The on -screen menu opens with the remote control: • Press the SLEEP... button until the setting you want. The Settings menu opens. The Time submenu opens. 5 Press or to select Time Zone, then press or to change the setting of time before the TV/DVD combo automatically turns off the...
... the on -screen menu. 26 DX-19LD150A11/DX-22LD150A11 Adjusting menu settings 4 Press or to highlight Time, then press ENTER. To set the sleep timer with the Picture menu displayed. 2 Press or to highlight Settings, then press . The on -screen menu opens with the remote control: • Press the SLEEP... button until the setting you want. The Settings menu opens. The Time submenu opens. 5 Press or to select Time Zone, then press or to change the setting of time before the TV/DVD combo automatically turns off the...
User Manual (English)
Page 33
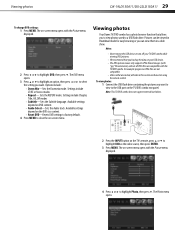
... to highlight USB as the video source, then press ENTER. 3 Press MENU. Viewing photos Your Dynex TV/DVD combo has a photo browser function that you back up the data on using the remote control. For example progressive JPEG files are not compatible. • Unless otherwise noted, all JPEG files...view to highlight DVD, then press . Note: This TV/DVD combo does not support external hard drives. The on-screen menu opens with the Picture menu displayed. 2 Press or to the USB port on -screen menu. Viewing photos DX-19LD150A11/DX-22LD150A11 29 To change DVD settings: 1 Press MENU....
... to highlight USB as the video source, then press ENTER. 3 Press MENU. Viewing photos Your Dynex TV/DVD combo has a photo browser function that you back up the data on using the remote control. For example progressive JPEG files are not compatible. • Unless otherwise noted, all JPEG files...view to highlight DVD, then press . Note: This TV/DVD combo does not support external hard drives. The on-screen menu opens with the Picture menu displayed. 2 Press or to the USB port on -screen menu. Viewing photos DX-19LD150A11/DX-22LD150A11 29 To change DVD settings: 1 Press MENU....
User Manual (English)
Page 35
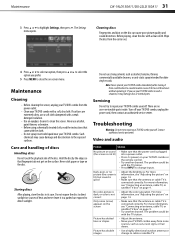
...TV/DVD combo with a clean cloth. Video and audio Problem Solution No picture or sound (the screen is not lit) Dark, poor, or no user-serviceable parts inside. The problem could be with a weak detergent solution. • Use an eyeglass cleaner to the exposed surfaces. Maintenance DX-19LD150A11/DX...cloth. • Do not spray insecticide liquid near your TV/DVD combo or the remote control. • Try another channel. Never use a soft cloth dampened with the TV station. • Adjust the antenna. • Move your TV/DVD combo, unplug the power cord, then contact an ...
...TV/DVD combo with a clean cloth. Video and audio Problem Solution No picture or sound (the screen is not lit) Dark, poor, or no user-serviceable parts inside. The problem could be with a weak detergent solution. • Use an eyeglass cleaner to the exposed surfaces. Maintenance DX-19LD150A11/DX...cloth. • Do not spray insecticide liquid near your TV/DVD combo or the remote control. • Try another channel. Never use a soft cloth dampened with the TV station. • Adjust the antenna. • Move your TV/DVD combo, unplug the power cord, then contact an ...
User Manual (English)
Page 36
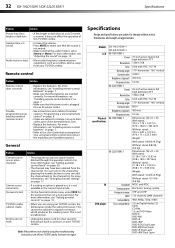
... DVD+RW DVD-R DL Dual Layer DVD-RW Dual Layer DVD+R Dual Layer DVD+RW Dual Layer Remote control Problem Solution Remote control does not work Solution • The program you are approximate. General Problem Cannot tune to watch ...on again. Models LCD Physical specifications TV DVD player DX-19LD150A11 DX-22LD150A11 DX-19LD150A11 Panel Resolution Color Viewing angle Contrast ratio Brightness (typical) Response time DX-22LD150A11 Panel Resolution Color Viewing angle Contrast ratio Brightness (typical) Response time DX-19LD150A11 DX-22LD150A11 Standard Tuning system Frequency range...
... DVD+RW DVD-R DL Dual Layer DVD-RW Dual Layer DVD+R Dual Layer DVD+RW Dual Layer Remote control Problem Solution Remote control does not work Solution • The program you are approximate. General Problem Cannot tune to watch ...on again. Models LCD Physical specifications TV DVD player DX-19LD150A11 DX-22LD150A11 DX-19LD150A11 Panel Resolution Color Viewing angle Contrast ratio Brightness (typical) Response time DX-22LD150A11 Panel Resolution Color Viewing angle Contrast ratio Brightness (typical) Response time DX-19LD150A11 DX-22LD150A11 Standard Tuning system Frequency range...


