User Guide
Page 4
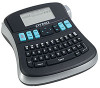
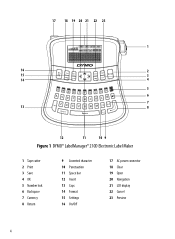
17 18 19 20 21 22 23 1 16 2 15 3 14 4 5 6 7 c 13 8 12 11 10 9 Figure 1 DYMO® LabelManager® 210D Electronic Label Maker 1 Tape cutter 2 Print 3 Save 4 OK 5 Number lock 6 Backspace 7 Currency 8 Return 9 Accented character 10 Punctuation 11 Space bar 12 Insert 13 Caps 14 Format 15 Settings 16 On/Off 17 AC power connector 18 Clear 19 Open 20 Navigation 21 LCD display 22 Cancel 23 Preview 4
17 18 19 20 21 22 23 1 16 2 15 3 14 4 5 6 7 c 13 8 12 11 10 9 Figure 1 DYMO® LabelManager® 210D Electronic Label Maker 1 Tape cutter 2 Print 3 Save 4 OK 5 Number lock 6 Backspace 7 Currency 8 Return 9 Accented character 10 Punctuation 11 Space bar 12 Insert 13 Caps 14 Format 15 Settings 16 On/Off 17 AC power connector 18 Clear 19 Open 20 Navigation 21 LCD display 22 Cancel 23 Preview 4
User Guide
Page 5
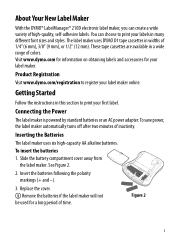
Visit www.dymo.com for information on obtaining labels and accessories for a long period of time. Insert the batteries following the polarity markings (+ and -). 3. Figure 2 5 Getting Started Follow ... range of inactivity. Product Registration Visit www.dymo.com/registration to register your labels in this section to print your label maker. See Figure 2. 2. Inserting the Batteries The label maker uses six high-capacity AA alkaline batteries. About Your New Label Maker With the DYMO® LabelManager® 210D electronic label maker, you can choose to...
Visit www.dymo.com for information on obtaining labels and accessories for a long period of time. Insert the batteries following the polarity markings (+ and -). 3. Figure 2 5 Getting Started Follow ... range of inactivity. Product Registration Visit www.dymo.com/registration to register your labels in this section to print your label maker. See Figure 2. 2. Inserting the Batteries The label maker uses six high-capacity AA alkaline batteries. About Your New Label Maker With the DYMO® LabelManager® 210D electronic label maker, you can choose to...


