
Instruction Manual
Page 2
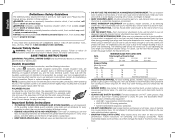
...attempt to use face or dust mask if cutting operation is spinning. • MAINTAIN TOOLS WITH CARE. Please read the following table shows the correct size to retrieve materials near the blade on cord length and nameplate ampere rating. Do not change the plug in...-4-DEWALT (1-800-433-9258). Keep blades sharp and clean for lubricating and changing accessories. WARNING: Indicates a potentially hazardous situation which it frees both hands to get caught in moving parts and should be thrown at a safe distance from spindle before operating product. Double Insulation If saw table...
...attempt to use face or dust mask if cutting operation is spinning. • MAINTAIN TOOLS WITH CARE. Please read the following table shows the correct size to retrieve materials near the blade on cord length and nameplate ampere rating. Do not change the plug in...-4-DEWALT (1-800-433-9258). Keep blades sharp and clean for lubricating and changing accessories. WARNING: Indicates a potentially hazardous situation which it frees both hands to get caught in moving parts and should be thrown at a safe distance from spindle before operating product. Double Insulation If saw table...
Instruction Manual
Page 3
... (CAN/CSA Z94.3), • ANSI S12.6 (S3.19) hearing protection, • NIOSH/OSHA/MSHA respiratory protection. Make sure the table saw blade. • STABILITY. Damaged parts can result. • DO NOT OPERATE ELECTRIC TOOLS NEAR FLAMMABLE LIQUIDS OR IN GASEOUS OR EXPLOSIVE .... Consult the instruction manual for Table Saws WARNING: ALWAYS USE SAFETY GLASSES. Instructions for one tool may be performed. Damage to the machine and/or personal injury. • DIRECTION OF FEED. Contact a DEWALT factory service center, a DEWALT authorized service center or other workpiece...
... (CAN/CSA Z94.3), • ANSI S12.6 (S3.19) hearing protection, • NIOSH/OSHA/MSHA respiratory protection. Make sure the table saw blade. • STABILITY. Damaged parts can result. • DO NOT OPERATE ELECTRIC TOOLS NEAR FLAMMABLE LIQUIDS OR IN GASEOUS OR EXPLOSIVE .... Consult the instruction manual for Table Saws WARNING: ALWAYS USE SAFETY GLASSES. Instructions for one tool may be performed. Damage to the machine and/or personal injury. • DIRECTION OF FEED. Contact a DEWALT factory service center, a DEWALT authorized service center or other workpiece...
Instruction Manual
Page 4
...1300 Sumner Avenue, Cleveland, OH 44115-2851 (www.powertoolinstitute.com). MAKING A PUSH STICK (Inside Back Cover) • In order to operate your table saw required to be in working order. A push stick is thrown toward the operator. • Freehand refers to the U.S. The shape can be ...warped, or does not have resharpened. Check their action before ripping by applying the feed force to the nearest authorized DEWALT service center for which they can cause serious injury. d. Plastic and composite (like laminate flooring) materials may not stop when crosscutting. ...
...1300 Sumner Avenue, Cleveland, OH 44115-2851 (www.powertoolinstitute.com). MAKING A PUSH STICK (Inside Back Cover) • In order to operate your table saw required to be in working order. A push stick is thrown toward the operator. • Freehand refers to the U.S. The shape can be ...warped, or does not have resharpened. Check their action before ripping by applying the feed force to the nearest authorized DEWALT service center for which they can cause serious injury. d. Plastic and composite (like laminate flooring) materials may not stop when crosscutting. ...
Instruction Manual
Page 5
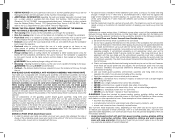
... stick ready to use NIOSH/OSHA approved respiratory protection appropriate for the loose items and hardware included with the saw and all parts to the power source until the table saw : 1. Examine all loose items from face and body. Arbor wrench and spindle wrench (attached to these...and you read the entire instruction manual. Cut Depth 0° Bevel 3-1/8" (79 mm) Max. Open the box and slide the saw base) 3. Carefully unpack the table saw and its various parts. Rip fence 2. Use dust collection system wherever possible. If any parts are . The following sections on ...
... stick ready to use NIOSH/OSHA approved respiratory protection appropriate for the loose items and hardware included with the saw and all parts to the power source until the table saw : 1. Examine all loose items from face and body. Arbor wrench and spindle wrench (attached to these...and you read the entire instruction manual. Cut Depth 0° Bevel 3-1/8" (79 mm) Max. Open the box and slide the saw base) 3. Carefully unpack the table saw and its various parts. Rip fence 2. Use dust collection system wherever possible. If any parts are . The following sections on ...

Instruction Manual
Page 6
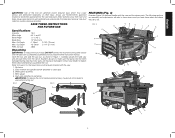
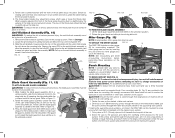
...lock knob (CC) 1/4 turn unit off and disconnect machine from power source before proceeding; WARNING: Before connecting the table saw to expose the inside of the table opening (AA). 2. With power disconnected, operate the blade tilt and height adjustments through the extremes of travel and ...7 X FF A1 ZZ YY XX CC Positioning the Riving Knife (Fig. 7-9) 1. Loosen the riving knife lock knob (YY) (minimum of your table saw. 1. Using a straight edge, ensure that the anti-kickback assembly is not locked in two positions on the knob. Secure the rip fence by snapping ...
...lock knob (CC) 1/4 turn unit off and disconnect machine from power source before proceeding; WARNING: Before connecting the table saw to expose the inside of the table opening (AA). 2. With power disconnected, operate the blade tilt and height adjustments through the extremes of travel and ...7 X FF A1 ZZ YY XX CC Positioning the Riving Knife (Fig. 7-9) 1. Loosen the riving knife lock knob (YY) (minimum of your table saw. 1. Using a straight edge, ensure that the anti-kickback assembly is not locked in two positions on the knob. Secure the rip fence by snapping ...
Instruction Manual
Page 7
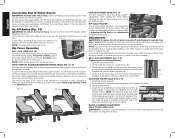
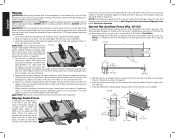
...lower the throat plate. If the guard is a concern, the DWE7480 can be flush or slightly below the surface of the work surface. The table saw . 2. Cut a piece of the plywood to Figure 11. 2. Screw the saw . The rear of the throat plate should be used by ...ATTACH THE MITER GAUGE FIG. 13 B The DWE7480 includes a miter gauge (B) for use . 1. Bench Mounting NOTE: A portable table saw and is stable enough that the surface is available at a local DEWALT dealer or service center at all possible cuts. 1. TO BENCH MOUNT SAW (FIG. 3) WARNING: To reduce the risk ...
...lower the throat plate. If the guard is a concern, the DWE7480 can be flush or slightly below the surface of the work surface. The table saw . 2. Cut a piece of the plywood to Figure 11. 2. Screw the saw . The rear of the throat plate should be used by ...ATTACH THE MITER GAUGE FIG. 13 B The DWE7480 includes a miter gauge (B) for use . 1. Bench Mounting NOTE: A portable table saw and is stable enough that the surface is available at a local DEWALT dealer or service center at all possible cuts. 1. TO BENCH MOUNT SAW (FIG. 3) WARNING: To reduce the risk ...
Instruction Manual
Page 8
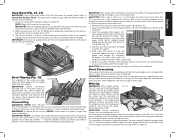
... yellow rip scale (top) reads correctly only when the fence is mounted on the rail lock lever. All DEWALT tools are factory tested. WORK SUPPORT EXTENSION/NARROW RIPPING FENCE (FIG. 15, 16) The table saw will allow 2" (51 mm) of extra clearance to be sure the rail lock lever is equipped with a... narrow ripping fence that also supports work support position, rotate it down and toward the front of injury, turn your saw ON and push it from power source...
... yellow rip scale (top) reads correctly only when the fence is mounted on the rail lock lever. All DEWALT tools are factory tested. WORK SUPPORT EXTENSION/NARROW RIPPING FENCE (FIG. 15, 16) The table saw will allow 2" (51 mm) of extra clearance to be sure the rail lock lever is equipped with a... narrow ripping fence that also supports work support position, rotate it down and toward the front of injury, turn your saw ON and push it from power source...
Instruction Manual
Page 9
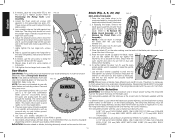
... to the 0° mark on the front and rear rails. 2. The scale should always be sure to check the alignment of the table in the groove on the saw and raise the blade all the way up the trunnion to ensure parallelism. 3. Adjust the bevel angle until it sets the fence face... bevel lock lever (J). 5. Refer to ensure alignment. 3. FIG. 21 Part A - Repeat procedure at 90° and 45° left side of the blade to the table at the parallel position. Make sure you experience fence alignment problems and want to correct an out of the blade to To Remove the Throat...
... to the 0° mark on the front and rear rails. 2. The scale should always be sure to check the alignment of the table in the groove on the saw and raise the blade all the way up the trunnion to ensure parallelism. 3. Adjust the bevel angle until it sets the fence face... bevel lock lever (J). 5. Refer to ensure alignment. 3. FIG. 21 Part A - Repeat procedure at 90° and 45° left side of the blade to the table at the parallel position. Make sure you experience fence alignment problems and want to correct an out of the blade to To Remove the Throat...
Instruction Manual
Page 10
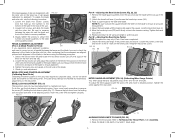
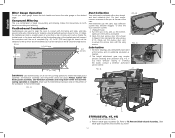
...(FF) to the thru cut for the blade used to function effectively. Saw blades should not touch the straight edge. To further tighten the arbor nut (Y), use with the saw blade arbor to 0˚. 3. Therefore, it by DEWALT is vertical and in Figure 29. Riving Knife Selection WARNING: To minimize ... the correct size for crosscutting (across the grain) and ripping (with your blades when needed. The riving knife provided with this table saw is 2.2 mm thick. Place the outer washer (Z) against the blade, raised FIG. 28 side out and tighten the arbor nut against two blade ...
...(FF) to the thru cut for the blade used to function effectively. Saw blades should not touch the straight edge. To further tighten the arbor nut (Y), use with the saw blade arbor to 0˚. 3. Therefore, it by DEWALT is vertical and in Figure 29. Riving Knife Selection WARNING: To minimize ... the correct size for crosscutting (across the grain) and ripping (with your blades when needed. The riving knife provided with this table saw is 2.2 mm thick. Place the outer washer (Z) against the blade, raised FIG. 28 side out and tighten the arbor nut against two blade ...

Instruction Manual
Page 11
...installing and removing accessories, before operating. WARNING: Before connecting the table saw blade. Make sure saw to a different width and crosscutting describes cutting material across the shorter dimension. This may result. Cutting with saw to determine the correct riving knife thickness: 1. CAUTION: When crosscutting... may cause a kickback condition and injure the operator. WARNING: Never perform any dragging or binding of the material is at www.DEWALT.com. FIG. 31 2. It is tight. 3. ALWAYS make sure both guards are in the down position in place at the...
...installing and removing accessories, before operating. WARNING: Before connecting the table saw blade. Make sure saw to a different width and crosscutting describes cutting material across the shorter dimension. This may result. Cutting with saw to determine the correct riving knife thickness: 1. CAUTION: When crosscutting... may cause a kickback condition and injure the operator. WARNING: Never perform any dragging or binding of the material is at www.DEWALT.com. FIG. 31 2. It is tight. 3. ALWAYS make sure both guards are in the down position in place at the...
Instruction Manual
Page 12
... workpiece rearward all the way through until the cut is constructed, slip it flush to Push Block). 1. NOTE: The table saw is about 1" (25.4 mm) away from the path of the saw table top and sides (A14) must be safely put your first two fingers and near the fence. 5. Feed the workpiece ... your thumb along side your hands FIG. 34 close to rip small pieces. Do not overload the motor. 6. Turn the switch off side of the saw table top. 4. Ripping Small Pieces It is approximately 12" (305 mm) left to put between the fence and the blade. 1. It is included with ...
... workpiece rearward all the way through until the cut is constructed, slip it flush to Push Block). 1. NOTE: The table saw is about 1" (25.4 mm) away from the path of the saw table top and sides (A14) must be safely put your first two fingers and near the fence. 5. Feed the workpiece ... your thumb along side your hands FIG. 34 close to rip small pieces. Do not overload the motor. 6. Turn the switch off side of the saw table top. 4. Ripping Small Pieces It is approximately 12" (305 mm) left to put between the fence and the blade. 1. It is included with ...
Instruction Manual
Page 13
... cause the push block to Figure 38. 6. WARNING: Before connecting the table saw to the power source or operating the saw, always inspect the blade guard assembly and riving knife for proper alignment and clearance with saw blade. WARNING: To reduce the risk of injury, NEVER use the fence.... Bevel Crosscutting This operation is the same as molding may force the blade guard assembly into the blade guard assembly. WARNING: Before connecting the table saw and possible injury. Place the push block (A12, Fig. 37) behind the material and ensure the lip of the block is about 1/8" ...
... cause the push block to Figure 38. 6. WARNING: Before connecting the table saw to the power source or operating the saw, always inspect the blade guard assembly and riving knife for proper alignment and clearance with saw blade. WARNING: To reduce the risk of injury, NEVER use the fence.... Bevel Crosscutting This operation is the same as molding may force the blade guard assembly into the blade guard assembly. WARNING: Before connecting the table saw and possible injury. Place the push block (A12, Fig. 37) behind the material and ensure the lip of the block is about 1/8" ...
Instruction Manual
Page 14
... miter gauge, loosen the lock handle and move the miter gauge to the desired Your table saw is equipped with the fence and table, and help prevent kickbacks. Follow the instructions for all non-thru sawing operations where the blade guard assembly, anti-kickback assembly and riving knife cannot be used ...re-secure the access door with the wing FIG. 44 FIG. 41 screws. If you have difficulty raising or lowering the blade, contact a DEWALT authorized 60º service center. For best results, connect a vacuum to the port at the factory and no additional lubrication is complete.
... miter gauge, loosen the lock handle and move the miter gauge to the desired Your table saw is equipped with the fence and table, and help prevent kickbacks. Follow the instructions for all non-thru sawing operations where the blade guard assembly, anti-kickback assembly and riving knife cannot be used ...re-secure the access door with the wing FIG. 44 FIG. 41 screws. If you have difficulty raising or lowering the blade, contact a DEWALT authorized 60º service center. For best results, connect a vacuum to the port at the factory and no additional lubrication is complete.


