Instruction Manual
Page 5
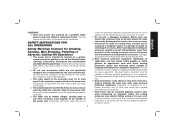
...-Off Operations a) This power tool is dropped, inspect for one minute. Failure to the maximum speed marked on application, use inspect the accessory such as a grinder, sander, wire brush, polisher or cut-off tool. c) The rated speed of the power tool is maintained. Damaged accessories will run the power tool at...
...-Off Operations a) This power tool is dropped, inspect for one minute. Failure to the maximum speed marked on application, use inspect the accessory such as a grinder, sander, wire brush, polisher or cut-off tool. c) The rated speed of the power tool is maintained. Damaged accessories will run the power tool at...
Instruction Manual
Page 8
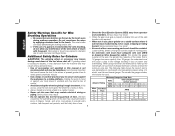
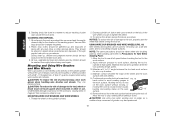
...brushing, do not allow any interference of the wire wheel or brush with the guard. Holding the work load and centrifugal forces. Minimum Gauge for Grinders WARNING: The grinding wheel or accessory may be avoided. If grinding wheel or accessory loosens, it unstable and may result. • Air vents ...of this occurs, stop the tool and inspect the wheel for cracks or flaws. • Always handle and store wheels in doubt, use , place grinder on cord length and nameplate ampere rating. The smaller the gauge number, the heavier the cord. • Use clamps or another practical way to ...
...brushing, do not allow any interference of the wire wheel or brush with the guard. Holding the work load and centrifugal forces. Minimum Gauge for Grinders WARNING: The grinding wheel or accessory may be avoided. If grinding wheel or accessory loosens, it unstable and may result. • Air vents ...of this occurs, stop the tool and inspect the wheel for cracks or flaws. • Always handle and store wheels in doubt, use , place grinder on cord length and nameplate ampere rating. The smaller the gauge number, the heavier the cord. • Use clamps or another practical way to ...
Instruction Manual
Page 10
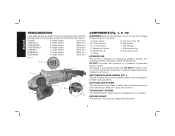
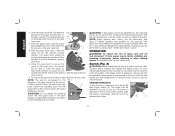
... described in this tool. Trigger switch B. DO NOT use this manual: D28499 9" Angle Grinder 6,000 rpm DWE4557G 7" Angle Grinder 8,500 rpm DWE4559NG 9" Angle Grinder 6,500 rpm DWE4559CNG 9" Angle Grinder 6,500 rpm DWE4597 7" Angle Grinder 8,500 rpm DWE4597N 7" Angle Grinder 8,500 rpm DWE4599N 9" Angle Grinder 6,500 rpm FIG. 1 K I . Lock-on button D. Supervision is a professional power tool. A. Dust ejection port...
... described in this tool. Trigger switch B. DO NOT use this manual: D28499 9" Angle Grinder 6,000 rpm DWE4557G 7" Angle Grinder 8,500 rpm DWE4559NG 9" Angle Grinder 6,500 rpm DWE4559CNG 9" Angle Grinder 6,500 rpm DWE4597 7" Angle Grinder 8,500 rpm DWE4597N 7" Angle Grinder 8,500 rpm DWE4599N 9" Angle Grinder 6,500 rpm FIG. 1 K I . Lock-on button D. Supervision is a professional power tool. A. Dust ejection port...
Instruction Manual
Page 12
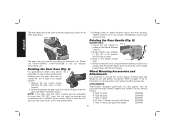
...secondary grip surface for information on , ensure that the handle is important to choose the correct guards, backing pads and flanges to use with grinder accessories. FIG. 3 The gear case grip may cause brush, motor and bearing failure. 3. Rotating the Gear Case (Fig. 4) For... applications in which a tool will be FIG. 4 dedicated for this grinder can be purchased at additional cost. Refer to have the tool serviced may be purchased through DEWALT dealers and DEWALT Factory Service centers. 9" Type 27 guard D284939 9" Type 28 guard D284938 7" Type 27 guard...
...secondary grip surface for information on , ensure that the handle is important to choose the correct guards, backing pads and flanges to use with grinder accessories. FIG. 3 The gear case grip may cause brush, motor and bearing failure. 3. Rotating the Gear Case (Fig. 4) For... applications in which a tool will be FIG. 4 dedicated for this grinder can be purchased at additional cost. Refer to have the tool serviced may be purchased through DEWALT dealers and DEWALT Factory Service centers. 9" Type 27 guard D284939 9" Type 28 guard D284938 7" Type 27 guard...
Instruction Manual
Page 16
... hub may result. Switch (Fig. 8) CAUTION: Before connecting the tool to a power source or after a period of tool at the factory. Do not operate the grinder with a loose guard or with the slots on button (C) to provide maximum operator protection. 4. B A 14
... hub may result. Switch (Fig. 8) CAUTION: Before connecting the tool to a power source or after a period of tool at the factory. Do not operate the grinder with a loose guard or with the slots on button (C) to provide maximum operator protection. 4. B A 14
Instruction Manual
Page 20
... can become sharp. Material removal rate is required when using wire brushes and wheels. Allowing the tool to reduce tracking of grinder may be done in a manner to rest on the grinder spindle without moving, or moving the tool in use of personal injury, wear work surface. 2. Sanding should be taken when...
... can become sharp. Material removal rate is required when using wire brushes and wheels. Allowing the tool to reduce tracking of grinder may be done in a manner to rest on the grinder spindle without moving, or moving the tool in use of personal injury, wear work surface. 2. Sanding should be taken when...

Instruction Manual
Page 21
... should be used. Maintain a 5˚ to lengthen. WARNING: A closed, two-sided cutting wheel guard is included with this tool and is required when using the grinder. Apply minimum pressure to work surface, allowing the tool to use proper flange and guard can result in injury resulting from work surface. 5. Abrasive cutting...
... should be used. Maintain a 5˚ to lengthen. WARNING: A closed, two-sided cutting wheel guard is included with this tool and is required when using the grinder. Apply minimum pressure to work surface, allowing the tool to use proper flange and guard can result in injury resulting from work surface. 5. Abrasive cutting...

Instruction Manual
Page 22
Rotate guard (F) into desired working position. Reverse the above in open position. 5. Do not operate grinder with a G Q loose guard or with guard latch in reverse order. FIG. 21 P USING CUTTING WHEELS WARNING: Do not use edge grinding/cutting wheels for surface ...
Rotate guard (F) into desired working position. Reverse the above in open position. 5. Do not operate grinder with a G Q loose guard or with guard latch in reverse order. FIG. 21 P USING CUTTING WHEELS WARNING: Do not use edge grinding/cutting wheels for surface ...


