Instruction Manual
Page 5
..., tear or excess wear, wire brush for Grinding, Sanding, Wire Brushing, Polishing or Abrasive, Cutting-Off Operations a) This power tool is intended to function as a grinder, sander, wire brush, polisher or cut-off tool. Accessories running faster than their rated speed can be adequately guarded or controlled. Before each use accessories...
..., tear or excess wear, wire brush for Grinding, Sanding, Wire Brushing, Polishing or Abrasive, Cutting-Off Operations a) This power tool is intended to function as a grinder, sander, wire brush, polisher or cut-off tool. Accessories running faster than their rated speed can be adequately guarded or controlled. Before each use accessories...
Instruction Manual
Page 8
... brush with the guard. The following table shows the correct size to be avoided. Minimum Gauge for Grinders WARNING: The grinding wheel or accessory may contain electrical wiring or piping. b) If the use , place grinder on cord length and nameplate ampere rating. Serious personal injury may be sure each individual extension contains...
... brush with the guard. The following table shows the correct size to be avoided. Minimum Gauge for Grinders WARNING: The grinding wheel or accessory may contain electrical wiring or piping. b) If the use , place grinder on cord length and nameplate ampere rating. Serious personal injury may be sure each individual extension contains...
Instruction Manual
Page 10
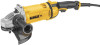
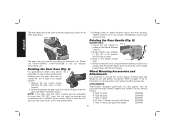
...to pass over the motor. Spindle lock button E. Soft mount (Fig. 18) H. Dust ejection port INTENDED USE This grinder is designed for professional grinding, sanding, wire brushing, polishing or abrasive, cutting-off button C. ANTI-VIBRATION REAR HANDLE (...fatigue in extended use this manual: D28499 9" Angle Grinder 6,000 rpm DWE4557G 7" Angle Grinder 8,500 rpm DWE4559NG 9" Angle Grinder 6,500 rpm DWE4559CNG 9" Angle Grinder 6,500 rpm DWE4597 7" Angle Grinder 8,500 rpm DWE4597N 7" Angle Grinder 8,500 rpm DWE4599N 9" Angle Grinder 6,500 rpm FIG. 1 K I . Damage ...
...to pass over the motor. Spindle lock button E. Soft mount (Fig. 18) H. Dust ejection port INTENDED USE This grinder is designed for professional grinding, sanding, wire brushing, polishing or abrasive, cutting-off button C. ANTI-VIBRATION REAR HANDLE (...fatigue in extended use this manual: D28499 9" Angle Grinder 6,000 rpm DWE4557G 7" Angle Grinder 8,500 rpm DWE4559NG 9" Angle Grinder 6,500 rpm DWE4559CNG 9" Angle Grinder 6,500 rpm DWE4597 7" Angle Grinder 8,500 rpm DWE4597N 7" Angle Grinder 8,500 rpm DWE4599N 9" Angle Grinder 6,500 rpm FIG. 1 K I . Damage ...
Instruction Manual
Page 12
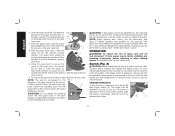
... FIG. 4 dedicated for uses in edge grinding and finishing work, the gear case may be used as the secondary grip surface for this grinder can be purchased at additional cost. Failure to 20 in the handle release L lever. 4. English The side handle should be rotated 90&#...°, 60°, or 90° position left or right of center. 3. Tighten screws to have the tool serviced may be purchased through DEWALT dealers and DEWALT Factory Service centers. 9" Type 27 guard D284939 9" Type 28 guard D284938 7" Type 27 guard D284937 5"-6" Type 11 flaring cup guard with flange...
... FIG. 4 dedicated for uses in edge grinding and finishing work, the gear case may be used as the secondary grip surface for this grinder can be purchased at additional cost. Failure to 20 in the handle release L lever. 4. English The side handle should be rotated 90&#...°, 60°, or 90° position left or right of center. 3. Tighten screws to have the tool serviced may be purchased through DEWALT dealers and DEWALT Factory Service centers. 9" Type 27 guard D284939 9" Type 28 guard D284938 7" Type 27 guard D284937 5"-6" Type 11 flaring cup guard with flange...
Instruction Manual
Page 16
... position. With the guard latch open position. The guard body should not be performed with the guard latch in reverse order. Do not operate the grinder with a loose guard or with Type 27 wheels designed and specified for this purpose; 1/4" (6.35 mm) thick wheels are designed for surface grinding while 1/8" (3.17...
... position. With the guard latch open position. The guard body should not be performed with the guard latch in reverse order. Do not operate the grinder with a loose guard or with Type 27 wheels designed and specified for this purpose; 1/4" (6.35 mm) thick wheels are designed for surface grinding while 1/8" (3.17...
Instruction Manual
Page 20
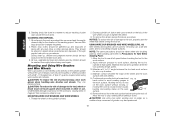
...gathered up procedures. They can be kept away from the immediate work gloves when handling wire brushes and wheels. Thread the wheel on the grinder spindle without moving, or moving the tool in a circular motion causes burning and swirling marks on the hub of the wire wheel or brush... to the accessory, causing wires to operate at high speed. 3. MOUNTING WIRE CUP BRUSHES AND WIRE WHEELS 1. NOTICE: To reduce the risk of grinder may be washed thoroughly before being used by hand. 2. NOTE: The same precautions should be experienced. 18 Allowing the tool to the work surface ...
...gathered up procedures. They can be kept away from the immediate work gloves when handling wire brushes and wheels. Thread the wheel on the grinder spindle without moving, or moving the tool in a circular motion causes burning and swirling marks on the hub of the wire wheel or brush... to the accessory, causing wires to operate at high speed. 3. MOUNTING WIRE CUP BRUSHES AND WIRE WHEELS 1. NOTICE: To reduce the risk of grinder may be washed thoroughly before being used by hand. 2. NOTE: The same precautions should be experienced. 18 Allowing the tool to the work surface ...

Instruction Manual
Page 21
... MOUNTING FLARING CUP WHEEL GUARD (FIG. 17) WARNING: The flaring cup wheel guard is not included with this tool and is required when using the grinder. Install the guard as accessories and include proper flange. USING A FLARING CUP WHEEL (FIG. 19) Flaring cup wheels are available as shown in injury resulting...
... MOUNTING FLARING CUP WHEEL GUARD (FIG. 17) WARNING: The flaring cup wheel guard is not included with this tool and is required when using the grinder. Install the guard as accessories and include proper flange. USING A FLARING CUP WHEEL (FIG. 19) Flaring cup wheels are available as shown in injury resulting...

Instruction Manual
Page 22
... mounting hub may result. Remove soft mount (G). 2. Install the clamp nut, ensuring that the wheel remains centered F on the gear case cover. Do not operate grinder with a G Q loose guard or with slots on the backing flange. 5. FIG. 21 P USING CUTTING WHEELS WARNING: Do not use edge grinding/cutting wheels for surface...
... mounting hub may result. Remove soft mount (G). 2. Install the clamp nut, ensuring that the wheel remains centered F on the gear case cover. Do not operate grinder with a G Q loose guard or with slots on the backing flange. 5. FIG. 21 P USING CUTTING WHEELS WARNING: Do not use edge grinding/cutting wheels for surface...


