Instruction Manual
Page 5
... glasses. Depending on the power tool. Failure to your power tool, it does not assure safe operation. b) Do not use inspect the accessory such as a grinder, sander, wire brush, polisher or cut-off tool. Accessories running faster than their rated speed can be within the capacity rating of stopping flying debris...
... glasses. Depending on the power tool. Failure to your power tool, it does not assure safe operation. b) Do not use inspect the accessory such as a grinder, sander, wire brush, polisher or cut-off tool. Accessories running faster than their rated speed can be within the capacity rating of stopping flying debris...
Instruction Manual
Page 8
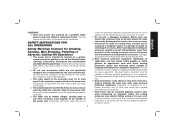
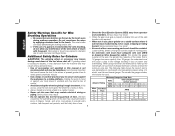
... one extension to be sure each individual extension contains at speeds greater than 18 gauge. b) If the use . Additional Safety Rules for Grinders WARNING: The grinding wheel or accessory may loosen during ordinary operation. When using more capacity than its rated speed constitutes misuse. • ...caused by the operating action of this tool may result. • When the gear case grip is properly installed, the use , place grinder on cord length and nameplate ampere rating. Minimum Gauge for Cord Sets Ampere Rating Volts Total Length of power and overheating. Do not ...
... one extension to be sure each individual extension contains at speeds greater than 18 gauge. b) If the use . Additional Safety Rules for Grinders WARNING: The grinding wheel or accessory may loosen during ordinary operation. When using more capacity than its rated speed constitutes misuse. • ...caused by the operating action of this tool may result. • When the gear case grip is properly installed, the use , place grinder on cord length and nameplate ampere rating. Minimum Gauge for Cord Sets Ampere Rating Volts Total Length of power and overheating. Do not ...
Instruction Manual
Page 10
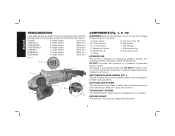
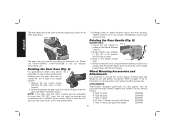
... extended use this manual: D28499 9" Angle Grinder 6,000 rpm DWE4557G 7" Angle Grinder 8,500 rpm DWE4559NG 9" Angle Grinder 6,500 rpm DWE4559CNG 9" Angle Grinder 6,500 rpm DWE4597 7" Angle Grinder 8,500 rpm DWE4597N 7" Angle Grinder 8,500 rpm DWE4599N 9" Angle Grinder 6,500 rpm FIG. 1 K I ..... Lock-on button D. Dust ejection port INTENDED USE This grinder is a professional power tool. English FAMILIARIZATION Large angle grinders are described in this tool. The following grinders are designed for heavy material removal in extended use under wet...
... extended use this manual: D28499 9" Angle Grinder 6,000 rpm DWE4557G 7" Angle Grinder 8,500 rpm DWE4559NG 9" Angle Grinder 6,500 rpm DWE4559CNG 9" Angle Grinder 6,500 rpm DWE4597 7" Angle Grinder 8,500 rpm DWE4597N 7" Angle Grinder 8,500 rpm DWE4599N 9" Angle Grinder 6,500 rpm FIG. 1 K I ..... Lock-on button D. Dust ejection port INTENDED USE This grinder is a professional power tool. English FAMILIARIZATION Large angle grinders are described in this tool. The following grinders are designed for heavy material removal in extended use under wet...
Instruction Manual
Page 12
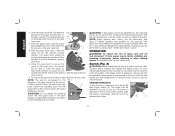
...could cause screws to motor housing. 2. Push in .-lbs. FIG. 3 The gear case grip may be serviced and re-assembled by a DEWALT service center. Remove the four corner screws attaching the gear case to strip. Tighten screws to have the tool serviced may be FIG. 4 ...the correct guards, backing pads and flanges to the original position flush with grinder accessories. English The side handle should be used as the secondary grip surface for this grinder can be purchased through DEWALT dealers and DEWALT Factory Service centers. 9" Type 27 guard D284939 9" Type 28 guard ...
...could cause screws to motor housing. 2. Push in .-lbs. FIG. 3 The gear case grip may be serviced and re-assembled by a DEWALT service center. Remove the four corner screws attaching the gear case to strip. Tighten screws to have the tool serviced may be FIG. 4 ...the correct guards, backing pads and flanges to the original position flush with grinder accessories. English The side handle should be used as the secondary grip surface for this grinder can be purchased through DEWALT dealers and DEWALT Factory Service centers. 9" Type 27 guard D284939 9" Type 28 guard ...
Instruction Manual
Page 16
... the gear case hub at start -up and during use the tool. This will remain running while the trigger is depressed. Do not operate the grinder with a loose guard or with guard installed on the gear case cover. 2. NOTE: Edge grinding and cutting can be performed with the slots on the...
... the gear case hub at start -up and during use the tool. This will remain running while the trigger is depressed. Do not operate the grinder with a loose guard or with guard installed on the gear case cover. 2. NOTE: Edge grinding and cutting can be performed with the slots on the...
Instruction Manual
Page 20
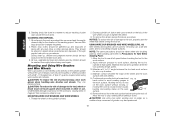
... sealed refuse receptacles and disposed of flanges. Mounting and Using Wire Brushes and Wire Wheels Wire cup brushes or wire wheels screw directly on the grinder spindle without moving, or moving the tool in the work surface without the use . CAUTION: To reduce the risk of the wire wheel or ... Maintain a 5° to reach full speed before setting it down. Remove the tool from accessory wheel or cup. English 3. During clean up and disposed of grinder may be vacuumed and thoroughly cleaned daily for smoothing irregular surfaces. They can be changed frequently. 2.
... sealed refuse receptacles and disposed of flanges. Mounting and Using Wire Brushes and Wire Wheels Wire cup brushes or wire wheels screw directly on the grinder spindle without moving, or moving the tool in the work surface without the use . CAUTION: To reduce the risk of the wire wheel or ... Maintain a 5° to reach full speed before setting it down. Remove the tool from accessory wheel or cup. English 3. During clean up and disposed of grinder may be vacuumed and thoroughly cleaned daily for smoothing irregular surfaces. They can be changed frequently. 2.

Instruction Manual
Page 21
... MOUNTING FLARING CUP WHEEL GUARD (FIG. 17) WARNING: The flaring cup wheel guard is not included with this tool and is required when using the grinder. Failure to lengthen. Install the guard as accessories and include proper flange.
... MOUNTING FLARING CUP WHEEL GUARD (FIG. 17) WARNING: The flaring cup wheel guard is not included with this tool and is required when using the grinder. Failure to lengthen. Install the guard as accessories and include proper flange.

Instruction Manual
Page 22
Rotate guard (F) into desired working position. O 3. Install the clamp nut, ensuring that the wheel remains centered F on the gear case cover. Do not operate grinder with a G Q loose guard or with guard installed on backing flange (Q). If, after a period of time, the guard becomes loose, tighten the adjusting screw (P) with the ...
Rotate guard (F) into desired working position. O 3. Install the clamp nut, ensuring that the wheel remains centered F on the gear case cover. Do not operate grinder with a G Q loose guard or with guard installed on backing flange (Q). If, after a period of time, the guard becomes loose, tighten the adjusting screw (P) with the ...


