
Instruction Manual
Page 3
... likely to bind and are easier to a stable platform. Use of unauthorized parts or failure to loss of drugs, alcohol, or medication. See page 9 for Grinders • Check that cannot be repaired. • Disconnect the plug from moving parts, breakage of starting . A moment of the tool in a risk of injury. •...
... likely to bind and are easier to a stable platform. Use of unauthorized parts or failure to loss of drugs, alcohol, or medication. See page 9 for Grinders • Check that cannot be repaired. • Disconnect the plug from moving parts, breakage of starting . A moment of the tool in a risk of injury. •...
Instruction Manual
Page 5
..., or lay on how often you to these chemicals are taken. • When wheel is not engaged into a corner because a sudden, sharp movement of the grinder may promote absorption of harmful chemicals. Allowing dust to get into your exposure to resist kickback forces. English • When the wheel is pinched or...
..., or lay on how often you to these chemicals are taken. • When wheel is not engaged into a corner because a sudden, sharp movement of the grinder may promote absorption of harmful chemicals. Allowing dust to get into your exposure to resist kickback forces. English • When the wheel is pinched or...
Instruction Manual
Page 6
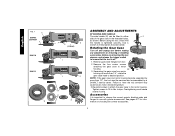
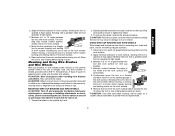
... release the trigger switch to ensure that the handle is tightened securely. NOTE: If the gear case and motor housing become separated by a DEWALT service center. Before using the tool, check that the tool is important to choose the correct guards, backing pads and flanges to use with... grinder accessories. Rotating the Gear Case Turn off . 1. Remove guard and flanges from motor housing not more than 1/4", rotate the gear case head to desired...
... release the trigger switch to ensure that the handle is tightened securely. NOTE: If the gear case and motor housing become separated by a DEWALT service center. Before using the tool, check that the tool is important to choose the correct guards, backing pads and flanges to use with... grinder accessories. Rotating the Gear Case Turn off . 1. Remove guard and flanges from motor housing not more than 1/4", rotate the gear case head to desired...

Instruction Manual
Page 8
... position. Align N the lugs (N) on the guard with a loose guard or the clamp lever in the groove on the gear case. 2. M 3. Do not operate the grinder with the slots (O) on the gear O case hub. The guard body should not be posi-
... position. Align N the lugs (N) on the guard with a loose guard or the clamp lever in the groove on the gear case. 2. M 3. Do not operate the grinder with the slots (O) on the gear O case hub. The guard body should not be posi-
Instruction Manual
Page 9
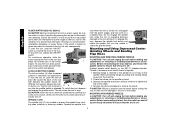
... and Flanges It is reconnected. NOTE: Edge grinding and cutting can be used. NOTE: To reduce unexpected tool movement, do not use with the grinder accessories. PADDLE SWITCH (D28402, D28402N) CAUTION: Before connecting the tool to secure the guard on the gear case cover. Loosen screw. See page...designed and specified for this page for at start up to the guard or the mounting hub may burst and cause injury. Allow the grinder to provide maximum operator protection. 4. Lift the tool from the surface before laying the tool down . ruption in power supply to stop...
... and Flanges It is reconnected. NOTE: Edge grinding and cutting can be used. NOTE: To reduce unexpected tool movement, do not use with the grinder accessories. PADDLE SWITCH (D28402, D28402N) CAUTION: Before connecting the tool to secure the guard on the gear case cover. Loosen screw. See page...designed and specified for this page for at start up to the guard or the mounting hub may burst and cause injury. Allow the grinder to provide maximum operator protection. 4. Lift the tool from the surface before laying the tool down . ruption in power supply to stop...
Instruction Manual
Page 10
... the wheel before turn the switch on when the power is released. Do not engage the spindle lock while the tool is retained to the grinder by pressing the rear part of spindle. 1. Backing flange is operating because damage to the tool will cause the tool to rotate the spindle further...
... the wheel before turn the switch on when the power is released. Do not engage the spindle lock while the tool is retained to the grinder by pressing the rear part of spindle. 1. Backing flange is operating because damage to the tool will cause the tool to rotate the spindle further...
Instruction Manual
Page 13
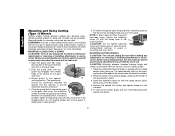
... and off as a sudden sharp movement of the wheel and the work surface with a 5/8"-11 threaded hub. Maintain contact between the edge of grinder may result in use. Allowing the tool to rest on the work surface without moving, or moving the tool in a circular motion causes burning... the tool to tool or wheel. Mounting and Using Wire Brushes and Wire Wheels Wire cup brushes or wire wheels screw directly on the grinder spindle without moving, or moving the tool in a circular motion causes burning and swirling marks on the work surface without the use a wrench...
... and off as a sudden sharp movement of the wheel and the work surface with a 5/8"-11 threaded hub. Maintain contact between the edge of grinder may result in use. Allowing the tool to rest on the work surface without moving, or moving the tool in a circular motion causes burning... the tool to tool or wheel. Mounting and Using Wire Brushes and Wire Wheels Wire cup brushes or wire wheels screw directly on the grinder spindle without moving, or moving the tool in a circular motion causes burning and swirling marks on the work surface without the use a wrench...
Instruction Manual
Page 14
... the backing flange, centering the wheel on the gear N case hub. 3. You should be unable to ensure that the tool is installed. 2. Do not operate grinder with a wrench. 5. To remove the wheel, grasp and turn the switch on and off and unplug the tool before making any adjustments or removing or...
... the backing flange, centering the wheel on the gear N case hub. 3. You should be unable to ensure that the tool is installed. 2. Do not operate grinder with a wrench. 5. To remove the wheel, grasp and turn the switch on and off and unplug the tool before making any adjustments or removing or...


