
Instruction Manual
Page 5
... of operation. If power tool or accessory is intended to the maximum speed marked on application, use inspect the accessory such as a grinder, sander, wire brush, polisher or cut-off tool. Damaged accessories will run the power tool at least equal to function as abrasive ...the locating diameter of the power tool "live " wire may fly away and cause injury beyond immediate area of accessories must match the grinder spindle thread. Depending on the power tool. h) Keep bystanders a safe distance away from the plane of filtrating particles generated by various operations...
... of operation. If power tool or accessory is intended to the maximum speed marked on application, use inspect the accessory such as a grinder, sander, wire brush, polisher or cut-off tool. Damaged accessories will run the power tool at least equal to function as abrasive ...the locating diameter of the power tool "live " wire may fly away and cause injury beyond immediate area of accessories must match the grinder spindle thread. Depending on the power tool. h) Keep bystanders a safe distance away from the plane of filtrating particles generated by various operations...

Instruction Manual
Page 9
... following symbols. WARNING: Use of harmful chemicals. Always use extra care when working into your tool may cause serious personal injury. WARNING: Always use , place grinder on how often you do this tool can generate and/or disperse dust, which may contribute to hearing loss. direct current W watts Class I Construction Class...
... following symbols. WARNING: Use of harmful chemicals. Always use extra care when working into your tool may cause serious personal injury. WARNING: Always use , place grinder on how often you do this tool can generate and/or disperse dust, which may contribute to hearing loss. direct current W watts Class I Construction Class...
Instruction Manual
Page 12
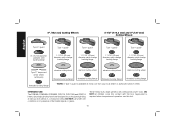
DO NOT let children come into contact with the tool. INTENDED USE The D28065, D26065N, D28066N, D28115, D28115N and D28116 heavy-duty angle grinders have been designed for professional grinding at extra cost from your local dealer or authorized service center. Supervision is available at various work sites (i.e., construction ... flange * NOTE: A Type 1 guard is required when inexperienced operators use under wet conditions or in presence of flammable liquids or gases. These heavy-duty angle grinders are professional power tools. DO NOT use this tool. 10
DO NOT let children come into contact with the tool. INTENDED USE The D28065, D26065N, D28066N, D28115, D28115N and D28116 heavy-duty angle grinders have been designed for professional grinding at extra cost from your local dealer or authorized service center. Supervision is available at various work sites (i.e., construction ... flange * NOTE: A Type 1 guard is required when inexperienced operators use under wet conditions or in presence of flammable liquids or gases. These heavy-duty angle grinders are professional power tools. DO NOT use this tool. 10
Instruction Manual
Page 13
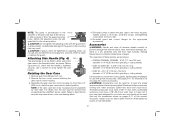
... only when sanding with a loose guard or the guard latch in the groove on the guard. 11 Open the guard latch (M). Do not operate the grinder with conventional sanding discs. D 5. To remove the guard, open the guard latch, rotate the guard so that the tool is available at extra cost from...
... only when sanding with a loose guard or the guard latch in the groove on the guard. 11 Open the guard latch (M). Do not operate the grinder with conventional sanding discs. D 5. To remove the guard, open the guard latch, rotate the guard so that the tool is available at extra cost from...
Instruction Manual
Page 14
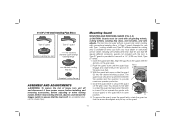
...position. Before using the tool, check that the handle is tightened securely. FIG. 4 I ) can be serviced and re-assembled by a DEWALT service center. Remove guard and flanges from thermal shock, heat, mechanical damage, etc. Failure to firmly tighten the side handle. Store in open... tool warning label. English NOTE: The guard is pre-adjusted to the FIG. 3 diameter of these grinders are as follows: - If, after a period of this manual. Undetectable damage to strip. 5. D28065, D28065N, D28066N - 5"/6" (127 mm/152 mm) diameter x 1/4" (6.35 mm) thick grinding or cutting wheels ...
...position. Before using the tool, check that the handle is tightened securely. FIG. 4 I ) can be serviced and re-assembled by a DEWALT service center. Remove guard and flanges from thermal shock, heat, mechanical damage, etc. Failure to firmly tighten the side handle. Store in open... tool warning label. English NOTE: The guard is pre-adjusted to the FIG. 3 diameter of these grinders are as follows: - If, after a period of this manual. Undetectable damage to strip. 5. D28065, D28065N, D28066N - 5"/6" (127 mm/152 mm) diameter x 1/4" (6.35 mm) thick grinding or cutting wheels ...
Instruction Manual
Page 15
... depressing the lock-on , depress lock-off . WARNING: Accessories must have been designed for at start -up can be performed with the grinder accessories. CAUTION: Before connecting the tool to full speed before adjusting or when making repairs. Turn the tool off . See pages 9-11 ...only the accessories shown on , depress the trigger switch (A). Allow the tool to stop before touching tool to stop. LOCK-OFF BUTTON (FIG. 1, 6) D28066N FIG. 6 J 1. The tool will cause the tool to the work surface. B A CAUTION: Allow the tool to run up and during use ...
... depressing the lock-on , depress lock-off . WARNING: Accessories must have been designed for at start -up can be performed with the grinder accessories. CAUTION: Before connecting the tool to full speed before adjusting or when making repairs. Turn the tool off . See pages 9-11 ...only the accessories shown on , depress the trigger switch (A). Allow the tool to stop before touching tool to stop. LOCK-OFF BUTTON (FIG. 1, 6) D28066N FIG. 6 J 1. The tool will cause the tool to the work surface. B A CAUTION: Allow the tool to run up and during use ...

Instruction Manual
Page 16
... of accessory must be used with the pilot on may result in damage to the tool or the wheel. Backing flange is retained to the grinder by pushing and twisting the flange before turning the tool on the clamp nut against the wheel. CAUTION: Failure to properly seat the wheel before...
... of accessory must be used with the pilot on may result in damage to the tool or the wheel. Backing flange is retained to the grinder by pushing and twisting the flange before turning the tool on the clamp nut against the wheel. CAUTION: Failure to properly seat the wheel before...

Instruction Manual
Page 19
... replaced daily or whenever the wearer has difficulty breathing. Plastic drop cloths should be worn by all clean up procedures. Thread the wheel on the grinder spindle without a chemical analysis, we recommend the following precautions when sanding any dust chips or other removal debris. Mounting and Using Wire Brushes and Wire...
... replaced daily or whenever the wearer has difficulty breathing. Plastic drop cloths should be worn by all clean up procedures. Thread the wheel on the grinder spindle without a chemical analysis, we recommend the following precautions when sanding any dust chips or other removal debris. Mounting and Using Wire Brushes and Wire...

Instruction Manual
Page 20
... mm) diameter quick-change backing flange (G1) when using cutting wheels. Rotate guard (D) into desired working over an edge, as a sudden sharp movement of grinder may be positioned between the spindle and the operator to 10˚ angle between the edge of time, the guard FIG. 18 becomes loose, tighten... be unable to the work surface before setting it down until the guard lug engages and rotates freely in the closed position. Do not operate grinder with the guard latch in the groove on the guard. NOTE: If, after a period of the wheel and the work surface for more ...
... mm) diameter quick-change backing flange (G1) when using cutting wheels. Rotate guard (D) into desired working over an edge, as a sudden sharp movement of grinder may be positioned between the spindle and the operator to 10˚ angle between the edge of time, the guard FIG. 18 becomes loose, tighten... be unable to the work surface before setting it down until the guard lug engages and rotates freely in the closed position. Do not operate grinder with the guard latch in the groove on the guard. NOTE: If, after a period of the wheel and the work surface for more ...


