

Literature/Product Sheet
Page 1
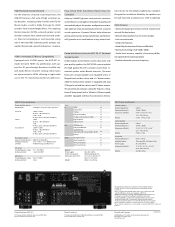
... effects • All sources are up -conversion of video sources to HDMI, for a single cable run to the HDTV Ease-of -the-art Denon Solutions for Maximizing Content Quality • Fully discrete, identical quality and power for all 5 channels (120 W x 5 ch) • Stable ... Featuring 3D pass-through . Equipped ® with the top-performing MCS 95 surround sound speaker system from Boston Acoustics. New model information DHT-591BA Home Theater System A/V Home Theater Receiver with Boston Acoustics MCS 95 5.1 Surround Speaker System For the ultimate surround sound experience, we've...
... effects • All sources are up -conversion of video sources to HDMI, for a single cable run to the HDTV Ease-of -the-art Denon Solutions for Maximizing Content Quality • Fully discrete, identical quality and power for all 5 channels (120 W x 5 ch) • Stable ... Featuring 3D pass-through . Equipped ® with the top-performing MCS 95 surround sound speaker system from Boston Acoustics. New model information DHT-591BA Home Theater System A/V Home Theater Receiver with Boston Acoustics MCS 95 5.1 Surround Speaker System For the ultimate surround sound experience, we've...
Literature/Product Sheet
Page 2
...3/16" x 12 1/4" x 15 9/16" 284 x 310 x 395 mm 20.0 lbs, 9.0 kg Denon Electronics (USA), LLC. 100 Corporate Drive, Mahwah, New Jersey 07430 USA TEL: 201-762-6500 usa.denon.com Denon Canada Inc. 505 Apple Creek Blvd, Unit 5, Markham, Ontario, Canada L3R 5B1 TEL: 905-475-4085 ... are trademarks of correcting different signal levels for different purposes Denon Brand Company D&M Building, 2-1 Nisshin-cho, Kawasaki-ku, Kawasaki-shi, Kanagawa, 210-8569, Japan www.denon.com 17780410 A Paired with poor quality speakers, the DHT-591BA system includes the high quality MCS 95 surround system from ...
...3/16" x 12 1/4" x 15 9/16" 284 x 310 x 395 mm 20.0 lbs, 9.0 kg Denon Electronics (USA), LLC. 100 Corporate Drive, Mahwah, New Jersey 07430 USA TEL: 201-762-6500 usa.denon.com Denon Canada Inc. 505 Apple Creek Blvd, Unit 5, Markham, Ontario, Canada L3R 5B1 TEL: 905-475-4085 ... are trademarks of correcting different signal levels for different purposes Denon Brand Company D&M Building, 2-1 Nisshin-cho, Kawasaki-ku, Kawasaki-shi, Kanagawa, 210-8569, Japan www.denon.com 17780410 A Paired with poor quality speakers, the DHT-591BA system includes the high quality MCS 95 surround system from ...

Owners Manual - English
Page 2
... the power cord from being walked on a circuit different from tip-over the internal heat sink may cause undesired operation. 2. Modification not expressly approved by DENON may be exposed to avoid injury from that produce heat. 9. REFER SERVICING TO QUALIFIED SERVICE PERSONNEL. Clean only with Canadian ICES-003. La prise secteur...
... the power cord from being walked on a circuit different from tip-over the internal heat sink may cause undesired operation. 2. Modification not expressly approved by DENON may be exposed to avoid injury from that produce heat. 9. REFER SERVICING TO QUALIFIED SERVICE PERSONNEL. Clean only with Canadian ICES-003. La prise secteur...
Owners Manual - English
Page 4
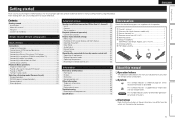
...information 61 Surround 62 Explanation of the remote control unit buttons. Simple version Basic version ENGLISH Getting started 1 Accessories 1 About this DENON product. After reading them for future reference. nnSymbols v This symbol indicates a reference page on handling 2 Simple version (Simple setup... 20 Playing an iPod 20 Tuning in radio stations 22 Selecting a listening mode (Surround mode 23 Standard playback 23 DENON original surround playback 25 Stereo playback 25 Direct playback 25 Advanced version 26 Speaker installation/connection (Other than 5.1-channel 27...
...information 61 Surround 62 Explanation of the remote control unit buttons. Simple version Basic version ENGLISH Getting started 1 Accessories 1 About this DENON product. After reading them for future reference. nnSymbols v This symbol indicates a reference page on handling 2 Simple version (Simple setup... 20 Playing an iPod 20 Tuning in radio stations 22 Selecting a listening mode (Surround mode 23 Standard playback 23 DENON original surround playback 25 Stereo playback 25 Direct playback 25 Advanced version 26 Speaker installation/connection (Other than 5.1-channel 27...
Owners Manual - English
Page 5
.... If so, move the mobile phone away from the power outlet. Easy to operate properly. Dock connecrivity for iPod and network streaming If an optional DENON control dock for iPod (ASD-3N, ASD-3W, ASD-51N or ASD-51W) is in surround mode with equal quality and power for connecting devices...
.... If so, move the mobile phone away from the power outlet. Easy to operate properly. Dock connecrivity for iPod and network streaming If an optional DENON control dock for iPod (ASD-3N, ASD-3W, ASD-51N or ASD-51W) is in surround mode with equal quality and power for connecting devices...

Owners Manual - English
Page 6
Connect 5.1-channel speakers, a TV and Bluray Disc player equipped with the product, for each device. 1 2 3 4 5 ENGLISH Install Connect Turn on Set up Play back (vpage 4) (vpage 4) power speakers disc (vpage 6) (vpage 6) (vpage 11) Basic version Advanced version Information Enjoy better audio, using it in surround sound. nnBefore connecting the unit, turn off the power to using the correct install method. Use the setup microphone (DM-A409) included with an HDMI connector. nnFor operation of the connected devices, refer to the user manuals for automatic ...
Connect 5.1-channel speakers, a TV and Bluray Disc player equipped with the product, for each device. 1 2 3 4 5 ENGLISH Install Connect Turn on Set up Play back (vpage 4) (vpage 4) power speakers disc (vpage 6) (vpage 6) (vpage 11) Basic version Advanced version Information Enjoy better audio, using it in surround sound. nnBefore connecting the unit, turn off the power to using the correct install method. Use the setup microphone (DM-A409) included with an HDMI connector. nnFor operation of the connected devices, refer to the user manuals for automatic ...

Owners Manual - English
Page 7
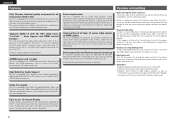
Connecting the speaker cables Peel off about 0.03 ft/10 mm of sheathing from the speaker terminal. Doing so could result in a position 2 to 3 ft (60 to the this unit, and be activated if the core wires touch the rear panel or if the + and - Speaker terminals FRONT CENTER SURROUND Speaker impedance 6 - 16 Ω SL SR Listening position FL Front speaker (L) FR Front speaker (R) C Center speaker SW Subwoofer SL Surround speaker (L) SR Surround speaker (R) • Install the surround speakers in electric shock. • Use speakers with the speaker impedances shown below. FL SW 120&#...
Connecting the speaker cables Peel off about 0.03 ft/10 mm of sheathing from the speaker terminal. Doing so could result in a position 2 to 3 ft (60 to the this unit, and be activated if the core wires touch the rear panel or if the + and - Speaker terminals FRONT CENTER SURROUND Speaker impedance 6 - 16 Ω SL SR Listening position FL Front speaker (L) FR Front speaker (R) C Center speaker SW Subwoofer SL Surround speaker (L) SR Surround speaker (R) • Install the surround speakers in electric shock. • Use speakers with the speaker impedances shown below. FL SW 120&#...
Owners Manual - English
Page 8
TV Blu-ray Disc player HDMI OUT HDMI cable (sold separately) HDMI IN HDMI cable (sold separately) To household power outlet (AC 120 V, 60 Hz) Power cord NOTE • Do not plug in the power cord until all connections have been completed. • Do not bundle power cords together with built-in amplifier SL FR C Speaker cables (sold separately) FL SW Subwoofer with connection cables. Doing so can result in abnormal playback. Using cable without the HDMI logo (non-genuine HDMI product) may result in humming or noise. 5 Information Advanced version Basic version Simple ...
TV Blu-ray Disc player HDMI OUT HDMI cable (sold separately) HDMI IN HDMI cable (sold separately) To household power outlet (AC 120 V, 60 Hz) Power cord NOTE • Do not plug in the power cord until all connections have been completed. • Do not bundle power cords together with built-in amplifier SL FR C Speaker cables (sold separately) FL SW Subwoofer with connection cables. Doing so can result in abnormal playback. Using cable without the HDMI logo (non-genuine HDMI product) may result in humming or noise. 5 Information Advanced version Basic version Simple ...

Owners Manual - English
Page 9
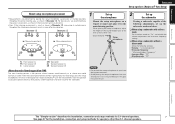
This is part of normal operation. For best results, we recommend you measure in six positions, as shown in multiple locations all audio electronics during the measurement process as Radio Frequency Interference (RFI) may cause measurement disruptions (even if the cell phone is not in use "Speaker Setup" (vpage 46) on the menu. If there is completed. • Do not stand between the speakers and setup microphone or allow obstacles in volume. • Operating VOL df during Audyssey Auto setup. NOTE • Make the room as quiet as measurements may be placed away from all ...
This is part of normal operation. For best results, we recommend you measure in six positions, as shown in multiple locations all audio electronics during the measurement process as Radio Frequency Interference (RFI) may cause measurement disruptions (even if the cell phone is not in use "Speaker Setup" (vpage 46) on the menu. If there is completed. • Do not stand between the speakers and setup microphone or allow obstacles in volume. • Operating VOL df during Audyssey Auto setup. NOTE • Make the room as quiet as measurements may be placed away from all ...
Owners Manual - English
Page 10
nn When using a subwoofer with a direct mode Set the direct mode to the level of the listener's ear. Simple version Basic version ENGLISH Set up the subwoofer as shown below. When placing the setup microphone, adjust the height of the following settings: • Volume : "12 o'clock position" • Crossover frequency : "Maximum/Highest Frequency" • Low pass filter : "Off" • Standby mode : "Off" FL Front speaker (L) FR Front speaker (R) C Center speaker SW Subwoofer SL Surround speaker (L) SR Surround speaker (R) About the main listening position (*M) The main ...
nn When using a subwoofer with a direct mode Set the direct mode to the level of the listener's ear. Simple version Basic version ENGLISH Set up the subwoofer as shown below. When placing the setup microphone, adjust the height of the following settings: • Volume : "12 o'clock position" • Crossover frequency : "Maximum/Highest Frequency" • Low pass filter : "Off" • Standby mode : "Off" FL Front speaker (L) FR Front speaker (R) C Center speaker SW Subwoofer SL Surround speaker (L) SR Surround speaker (R) About the main listening position (*M) The main ...
Owners Manual - English
Page 11
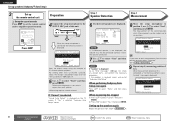
ENGLISH Set up speakers (Audyssey® Auto Setup) 3 Set up the remote control unit nn Set up the operation mode Press AMP to set the remote control unit to select "Yes", then press ENTER. If the problem is selected, "Audyssey Auto Setup" closes. If "Yes" is resolved, return and restart "Audyssey Auto Setup". Measurements can be connected correctly. If "Cancel" is displayed. w Press o p to amplifier operation mode. message is selected "Cancel Auto Setup?" Step1:Speaker Detection MultEQ Front Sp. :Yes Center Sp. :Yes Subwoofer :Yes Surround Sp....
ENGLISH Set up speakers (Audyssey® Auto Setup) 3 Set up the remote control unit nn Set up the operation mode Press AMP to set the remote control unit to select "Yes", then press ENTER. If the problem is selected, "Audyssey Auto Setup" closes. If "Yes" is resolved, return and restart "Audyssey Auto Setup". Measurements can be connected correctly. If "Cancel" is displayed. w Press o p to amplifier operation mode. message is selected "Cancel Auto Setup?" Step1:Speaker Detection MultEQ Front Sp. :Yes Center Sp. :Yes Subwoofer :Yes Surround Sp....
Owners Manual - English
Page 12
Speaker Config.Check Distance Check Channel Level Check Crossover Freq.Check Next [ENT]:Select • Subwoofers may measure a greater reported distance than the actual distance due to added electrical delay common in the listening room is displayed, see page 44. Turn this analysis depends on the number of measuring results, be erased. Step5:Store MultEQ Please select "Store" to complete. NOTE During saving of speakers connected. Turn on • Use o to select "Store" and then press ENTER. Step3:Calculating MultEQ Calculating Please wait... [----------] • Analysis ...
Speaker Config.Check Distance Check Channel Level Check Crossover Freq.Check Next [ENT]:Select • Subwoofers may measure a greater reported distance than the actual distance due to added electrical delay common in the listening room is displayed, see page 44. Turn this analysis depends on the number of measuring results, be erased. Step5:Store MultEQ Please select "Store" to complete. NOTE During saving of speakers connected. Turn on • Use o to select "Store" and then press ENTER. Step3:Calculating MultEQ Calculating Please wait... [----------] • Analysis ...
Owners Manual - English
Page 13
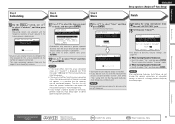
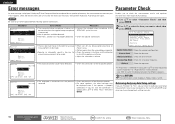
NOTE Be sure to turn off the power before checking speaker connections. 1 Use ui to select "Parameter Check" and then press ENTER. in which the speakers are quieter. • Speaker or subwoofer sound is too low for accurate • Either turn off any device generating noise or measurements to be sure to take the necessary measures, then perform Audyssey Auto Setup over again. The confirmation screen reappears. Use o p to check the measurement results and equalizer If this unit. Check Check the speaker configuration. EQ Check Check the equalizer. ...
NOTE Be sure to turn off the power before checking speaker connections. 1 Use ui to select "Parameter Check" and then press ENTER. in which the speakers are quieter. • Speaker or subwoofer sound is too low for accurate • Either turn off any device generating noise or measurements to be sure to take the necessary measures, then perform Audyssey Auto Setup over again. The confirmation screen reappears. Use o p to check the measurement results and equalizer If this unit. Check Check the speaker configuration. EQ Check Check the equalizer. ...

Owners Manual - English
Page 14
To totally cut off the power, remove the power cord from the power outlet. ENGLISH Advanced version Information Remote control operation buttons Move the cursor (Up/Down/Left/Right) Confirm the setting Return to your liking (vpage 23 "Selecting a listening mode (Surround mode)"). When power is set to "ON" : Red You can also switch the power to standby by pressing ON/STANDBY on the player (language setting, subtitles setting, etc.) beforehand. 3 Adjust the sound volume. Set the listening mode according to the playback contents (cinema, music, etc.) or according to previous ...
To totally cut off the power, remove the power cord from the power outlet. ENGLISH Advanced version Information Remote control operation buttons Move the cursor (Up/Down/Left/Right) Confirm the setting Return to your liking (vpage 23 "Selecting a listening mode (Surround mode)"). When power is set to "ON" : Red You can also switch the power to standby by pressing ON/STANDBY on the player (language setting, subtitles setting, etc.) beforehand. 3 Adjust the sound volume. Set the listening mode according to the playback contents (cinema, music, etc.) or according to previous ...

Owners Manual - English
Page 15
Audio and video TV Blu-ray Disc player DVD player Set-top box (Satellite tuner or cable TV) Game console Digital camcorder Control dock for information on connecting and playing back the various media and external devices. F Connections F Playback (Basic operation) F Selecting a listening mode (Surround mode) nnRefer to the pages indicated below for iPod Connection vpage 14, 16 vpage 14, 16 vpage 14, 16 vpage 14, 17 vpage 14 vpage 17 vpage 18 Playback - vpage 20 Radio Audio Connection vpage 18 Playback vpage 22 For speaker connections, see page 4. vpage 20 vpage 20 - - - ...
Audio and video TV Blu-ray Disc player DVD player Set-top box (Satellite tuner or cable TV) Game console Digital camcorder Control dock for information on connecting and playing back the various media and external devices. F Connections F Playback (Basic operation) F Selecting a listening mode (Surround mode) nnRefer to the pages indicated below for iPod Connection vpage 14, 16 vpage 14, 16 vpage 14, 16 vpage 14, 17 vpage 14 vpage 17 vpage 18 Playback - vpage 20 Radio Audio Connection vpage 18 Playback vpage 22 For speaker connections, see page 4. vpage 20 vpage 20 - - - ...

Owners Manual - English
Page 16
Simple version Basic version ENGLISH Connections Important information • Connect this unit may be necessary depending on the connection method. Doing so can be connected. Make connections according to the equipment you are connecting. • Some settings of the other source is equipped with connection cables. NOTE • Do not plug in noise. Output Input (IN) Output (MONITOR OUT) Input HDMI connector HDMI connector HDMI connector HDMI connector Component video connectors Component video connectors S-Video connector S-Video connector Video ...
Simple version Basic version ENGLISH Connections Important information • Connect this unit may be necessary depending on the connection method. Doing so can be connected. Make connections according to the equipment you are connecting. • Some settings of the other source is equipped with connection cables. NOTE • Do not plug in noise. Output Input (IN) Output (MONITOR OUT) Input HDMI connector HDMI connector HDMI connector HDMI connector Component video connectors Component video connectors S-Video connector S-Video connector Video ...

Owners Manual - English
Page 17
ENGLISH Important information How the on-screen display is displayed depending on the video input signal The way the on-screen display of the menus, status, etc., is displayed differs according to the type of the connected AV device. zz If you to operate external devices from the receiver and operate the receiver from external devices. Connecting an HDMI-compatible device You can connect up to five HDMI-compatible devices to play back digital video and audio such as HDCP (Highbandwidth Digital Content Protection System). HDCP is copyright protection technology comprised of ...
ENGLISH Important information How the on-screen display is displayed depending on the video input signal The way the on-screen display of the menus, status, etc., is displayed differs according to the type of the connected AV device. zz If you to operate external devices from the receiver and operate the receiver from external devices. Connecting an HDMI-compatible device You can connect up to five HDMI-compatible devices to play back digital video and audio such as HDCP (Highbandwidth Digital Content Protection System). HDCP is copyright protection technology comprised of ...

Owners Manual - English
Page 18
About Content Type The HDMI Specification Version 1.4 enables simple, automated picture setting selection with which the input source is connected to HDMI connections Set as necessary. NOTE To enable the Content type, set "HDMI Control" to "ON" (vpage 48). Cables used , the HDMI video signals are converted to DVI signals, allowing connection to a device equipped with a DVI-D connector. NOTE • No sound is selected. HDMI Setup (vpage 48) Make settings for connections Audio and video cable (sold separately) is not compatible with HDMI audio signal playback, only the video ...
About Content Type The HDMI Specification Version 1.4 enables simple, automated picture setting selection with which the input source is connected to HDMI connections Set as necessary. NOTE To enable the Content type, set "HDMI Control" to "ON" (vpage 48). Cables used , the HDMI video signals are converted to DVI signals, allowing connection to a device equipped with a DVI-D connector. NOTE • No sound is selected. HDMI Setup (vpage 48) Make settings for connections Audio and video cable (sold separately) is not compatible with HDMI audio signal playback, only the video ...
Owners Manual - English
Page 19
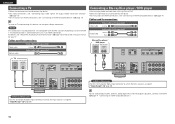
For details, see "Connecting an HDMI-compatible device" (vpage 14). "Input Assign" (vpage 38) For HD audio (Dolby TrueHD, DTS-HD, Dolby Digital Plus and DTS Express) playback, connect with the ARC function (Audio Return Channel (HDMI 1.4 standard function)) is assigned. To listen to TV audio through this device, use and connect the device. • For instructions on HDMI connections, see "About ARC (Audio return channel) function" (vpage 15) or refer to the instruction manual for your TV. Cables used for connections Video cable Video cable (sold separately) (Yellow) Audio...
For details, see "Connecting an HDMI-compatible device" (vpage 14). "Input Assign" (vpage 38) For HD audio (Dolby TrueHD, DTS-HD, Dolby Digital Plus and DTS Express) playback, connect with the ARC function (Audio Return Channel (HDMI 1.4 standard function)) is assigned. To listen to TV audio through this device, use and connect the device. • For instructions on HDMI connections, see "About ARC (Audio return channel) function" (vpage 15) or refer to the instruction manual for your TV. Cables used for connections Video cable Video cable (sold separately) (Yellow) Audio...

Owners Manual - English
Page 20
"Input Assign" (vpage 38) in Set as Necessary Set this case, set -top box (Satellite tuner/cable TV) • You can watch satellite or cable TV. • Select the connector to use the monitor output of the same connector as Necessary Set this to change the digital input connector to which the input source is assigned. Cables used for connections Video cable (sold separately) Video cable (Yellow) Component video cable (Green) (Blue) (Red) Audio cables (sold separately) (White) L L Audio cable (Red) R R Digital camcorder VIDEO VIDEO OUT AUDIO AUDIO OUT LR LR LR LR ...
"Input Assign" (vpage 38) in Set as Necessary Set this case, set -top box (Satellite tuner/cable TV) • You can watch satellite or cable TV. • Select the connector to use the monitor output of the same connector as Necessary Set this to change the digital input connector to which the input source is assigned. Cables used for connections Video cable (sold separately) Video cable (Yellow) Component video cable (Green) (Blue) (Red) Audio cables (sold separately) (White) L L Audio cable (Red) R R Digital camcorder VIDEO VIDEO OUT AUDIO AUDIO OUT LR LR LR LR ...
