
Owners Manual - English
Page 2
... of the lead-in a fire or electric shock. this product through openings as they may touch dangerous voltage points or short-out parts that produce heat. The exclamation point within an equilateral triangle is a safety feature. Follow Instructions - Attachments - and the like. ..." within an equilateral triangle, is operated. 2. If an outside antenna system should be sure the service technician has used replacement parts specified by items placed upon or against voltage surges and built-up static charges. Outdoor Antenna Grounding - Object and Liquid Entry ...
... of the lead-in a fire or electric shock. this product through openings as they may touch dangerous voltage points or short-out parts that produce heat. The exclamation point within an equilateral triangle is a safety feature. Follow Instructions - Attachments - and the like. ..." within an equilateral triangle, is operated. 2. If an outside antenna system should be sure the service technician has used replacement parts specified by items placed upon or against voltage surges and built-up static charges. Outdoor Antenna Grounding - Object and Liquid Entry ...
Owners Manual - English
Page 3
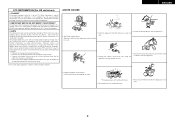
... in a rack. • Do not let insecticides, benzene, and thinner come in a particular installation. Modification not expressly approved by DENON may cause harmful interference to comply with the apparatus. • Unplug the power cord when not using the apparatus for a Class B...limits are designed to Part 15 of time. • Handle the power cord carefully. II PRODUCT This product complies with ventilation holes) • Do not obstruct the ventilation holes. • Never disassemble or modify the apparatus in any interference received, including interference that interference...
... in a rack. • Do not let insecticides, benzene, and thinner come in a particular installation. Modification not expressly approved by DENON may cause harmful interference to comply with the apparatus. • Unplug the power cord when not using the apparatus for a Class B...limits are designed to Part 15 of time. • Handle the power cord carefully. II PRODUCT This product complies with ventilation holes) • Do not obstruct the ventilation holes. • Never disassemble or modify the apparatus in any interference received, including interference that interference...

Owners Manual - English
Page 4
...surround sound listening with home theater sources such as DVD, as well as providing outstanding high fidelity reproduction of the remote control unit 3 Part names and functions Front panel 4 Display 4 Rear panel 5 Remote control unit 5, 6 Easy Setup Procedure Easy to setup flow 7 ... with HDMI terminals [To convert analog video signals to music 41 Viewing still pictures and videos (only for choosing the DENON AVR-2307CI AV Surround Receiver. Contents Getting Started Accessories 2 Before using 3 Cautions on installation 3 About the remote control unit 3 Inserting the batteries...
...surround sound listening with home theater sources such as DVD, as well as providing outstanding high fidelity reproduction of the remote control unit 3 Part names and functions Front panel 4 Display 4 Rear panel 5 Remote control unit 5, 6 Easy Setup Procedure Easy to setup flow 7 ... with HDMI terminals [To convert analog video signals to music 41 Viewing still pictures and videos (only for choosing the DENON AVR-2307CI AV Surround Receiver. Contents Getting Started Accessories 2 Before using 3 Cautions on installation 3 About the remote control unit 3 Inserting the batteries...

Owners Manual - English
Page 5
...Setting the Volume Control 58 Setting the Trigger Out 59 Setting the Setup Lock 59 Operating the remote control unit Operating DENON audio components 65 Setting the preset memory function 65 Operating a component stored in addition to the main unit: q...-1043 1 y R6P/AA batteries 2 u AM loop antenna 1 i FM indoor antenna 1 o Setup microphone (DM-S205) (Approx. 20 ft / 6 m 1 r t y u i o Advanced Setup - Part 2 Speaker Setup Setting the Speaker Configuration 60 Setting the Subwoofer Setup 61 Setting the Distance 61 Setting the Channel Level 62 Setting the Crossover Frequency...
...Setting the Volume Control 58 Setting the Trigger Out 59 Setting the Setup Lock 59 Operating the remote control unit Operating DENON audio components 65 Setting the preset memory function 65 Operating a component stored in addition to the main unit: q...-1043 1 y R6P/AA batteries 2 u AM loop antenna 1 i FM indoor antenna 1 o Setup microphone (DM-S205) (Approx. 20 ft / 6 m 1 r t y u i o Advanced Setup - Part 2 Speaker Setup Setting the Speaker Configuration 60 Setting the Subwoofer Setup 61 Setting the Distance 61 Setting the Channel Level 62 Setting the Crossover Frequency...

Owners Manual - English
Page 7
...volume level. AUX INPUT terminals Remove the cap covering the terminals when you want to the settings of the front speakers of these parts, refer to the pages given in parentheses ( ). IN button 25) @5 Remote control sensor 3) @6 INPUT MODE button 25... digital signal is displayed in the AUTO tuning mode. !1 STEREO indicator This lights when an FM stereo broadcast has been received. !2 TUNED indicator This lights when an FM/AM broadcast has been received. 4 ENGLISH Front panel @0 !8 @9 @8 @7 @6 @5 @4 @3 @2 @1 !9 !7 ENGLISH !6 Cursor buttons (D, H 11) !7 MASTER VOLUME ...
...volume level. AUX INPUT terminals Remove the cap covering the terminals when you want to the settings of the front speakers of these parts, refer to the pages given in parentheses ( ). IN button 25) @5 Remote control sensor 3) @6 INPUT MODE button 25... digital signal is displayed in the AUTO tuning mode. !1 STEREO indicator This lights when an FM stereo broadcast has been received. !2 TUNED indicator This lights when an FM/AM broadcast has been received. 4 ENGLISH Front panel @0 !8 @9 @8 @7 @6 @5 @4 @3 @2 @1 !9 !7 ENGLISH !6 Cursor buttons (D, H 11) !7 MASTER VOLUME ...
Owners Manual - English
Page 25
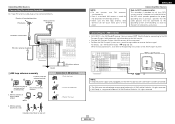
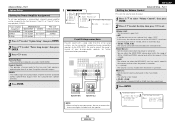
... Ready is used, do not disconnect the AM loop antenna. • Make sure the AM loop antenna lead terminals do not touch metal parts of the NEC which provides guidelines for proper grounding and, in the reverse direction. 2. XM Passport System ¢ AM loop antenna assembly ...antenna Connection of the XM Passport System. ENGLISH Connecting Other Sources Note to CATV system installer: This reminder is the XM Ready® receiver. Push the lever. Installation hole Mount on top any stable surface. Mount Bend in particular, specifies that the cable ground shall be ...
... Ready is used, do not disconnect the AM loop antenna. • Make sure the AM loop antenna lead terminals do not touch metal parts of the NEC which provides guidelines for proper grounding and, in the reverse direction. 2. XM Passport System ¢ AM loop antenna assembly ...antenna Connection of the XM Passport System. ENGLISH Connecting Other Sources Note to CATV system installer: This reminder is the XM Ready® receiver. Push the lever. Installation hole Mount on top any stable surface. Mount Bend in particular, specifies that the cable ground shall be ...

Owners Manual - English
Page 48
ENGLISH Advanced Setup - Part 1 System setup items and default values 1. Speaker Setup 1 Speaker Configuration 2 Subwoofer Setup 3 Distance 4 Channel Level 5 Crossover Frequency Items Automatically set the output component and properties ...
ENGLISH Advanced Setup - Part 1 System setup items and default values 1. Speaker Setup 1 Speaker Configuration 2 Subwoofer Setup 3 Distance 4 Channel Level 5 Crossover Frequency Items Automatically set the output component and properties ...

Owners Manual - English
Page 49
...2 Subwoofer Level Advanced Setup - CD CDR / DVD / TAPE VDP TV / DBS VCR-1 VCR-2 V. When this function is displayed can be changed. Part 1 Items This assigns the digital input terminals for the different input sources. Preset Name - 52 1 HDMI In Assignment 2 Component In Assignment 3 Video Convert... PHONO The playback level is possible to assign the Control Dock for indications other than the menu screens. This sets whether or not to HDMI. Part 1 3. TUNER PHONO CD CDR / DVD / TAPE VDP TV / DBS VCR-1 VCR-2 V. AUX COAX 1 OPT 1 OPT 2 COAX 2 OFF OPT 3 ...
...2 Subwoofer Level Advanced Setup - CD CDR / DVD / TAPE VDP TV / DBS VCR-1 VCR-2 V. When this function is displayed can be changed. Part 1 Items This assigns the digital input terminals for the different input sources. Preset Name - 52 1 HDMI In Assignment 2 Component In Assignment 3 Video Convert... PHONO The playback level is possible to assign the Control Dock for indications other than the menu screens. This sets whether or not to HDMI. Part 1 3. TUNER PHONO CD CDR / DVD / TAPE VDP TV / DBS VCR-1 VCR-2 V. AUX COAX 1 OPT 1 OPT 2 COAX 2 OFF OPT 3 ...

Owners Manual - English
Page 50
... sources and surround modes. Main 3 Trigger Out 4 Setup Lock Use the DC 12 V output of the various speakers while listening to the playback signals. Part 1 Page 56 OFF 56 Auto Surround Mode = ON 57 All Channels and Frequency = 0 dB 57 1 Power Amp Assign Items To suit your preference,...changed. TUNER OFF TUNER ON PHONO OFF PHONO ON Default settings S. Back Vol.Limit = OFF P. AUX ON ON Page 58 58 59 59 47 ENGLISH Part 1 5. Option Setup 1 2ch Direct/Stereo 2 Dolby Digital Setup 3 Auto Surround Mode 4 Manual EQ Setup Items Make the 2-channel direct mode and ...
... sources and surround modes. Main 3 Trigger Out 4 Setup Lock Use the DC 12 V output of the various speakers while listening to the playback signals. Part 1 Page 56 OFF 56 Auto Surround Mode = ON 57 All Channels and Frequency = 0 dB 57 1 Power Amp Assign Items To suit your preference,...changed. TUNER OFF TUNER ON PHONO OFF PHONO ON Default settings S. Back Vol.Limit = OFF P. AUX ON ON Page 58 58 59 59 47 ENGLISH Part 1 5. Option Setup 1 2ch Direct/Stereo 2 Dolby Digital Setup 3 Auto Surround Mode 4 Manual EQ Setup Items Make the 2-channel direct mode and ...

Owners Manual - English
Page 51
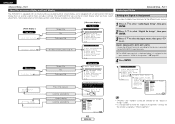
Part 1 ENTER SYSTEM SETUP F G, ENTER SYSTEM SETUP D H D H F G ENTER D H F G Use System Setup to change the setting. ENGLISH Advanced Setup - Select "Default Yes", then press F to reset to ... < > : Buttons on the main unit [ ] : Buttons on the remote control unit Button name only : Buttons on the main unit and remote control unit 48 ENGLISH Part 1 [ Display ] *SYSTEM SETUP Audio In Setup *Audio In Setup Digital In *Digital In CD : COAX1 *SYSTEM SETUP E x i t About the button names in this unit ( page...
Part 1 ENTER SYSTEM SETUP F G, ENTER SYSTEM SETUP D H D H F G ENTER D H F G Use System Setup to change the setting. ENGLISH Advanced Setup - Select "Default Yes", then press F to reset to ... < > : Buttons on the main unit [ ] : Buttons on the remote control unit Button name only : Buttons on the main unit and remote control unit 48 ENGLISH Part 1 [ Display ] *SYSTEM SETUP Audio In Setup *Audio In Setup Digital In *Digital In CD : COAX1 *SYSTEM SETUP E x i t About the button names in this unit ( page...
Owners Manual - English
Page 52
ENGLISH Advanced Setup - Part 1 About the on screen display and front display Audio Input Setup The AVR-2307CI is equipped with an intuitive and easy-to check and adjust ... can also be selected on screen display when you use the on the "Digital In Assign" screen. • It is assigned to make system adjustments. Part 1 Advanced Setup -
ENGLISH Advanced Setup - Part 1 About the on screen display and front display Audio Input Setup The AVR-2307CI is equipped with an intuitive and easy-to check and adjust ... can also be selected on screen display when you use the on the "Digital In Assign" screen. • It is assigned to make system adjustments. Part 1 Advanced Setup -

Owners Manual - English
Page 53
AUX: When using a Control Dock for iPod, it is the factory default setting. Part 1 Advanced Setup - CD, CDR/TAPE: When using a Control Dock for iPod's (ASD-1R, sold separately) audio and/or video signals to any input terminals on ...-2" is possible to assign the Control Dock for iPod, it is possible to connect with the audio and video input terminals of the assigned function. Part 1 Setting the EXT. ENGLISH Advanced Setup - It is selected) 50 ENGLISH DVD/VDP, TV/DBS, VCR-1, VCR-2, V. IN Subwoofer Level Setting the iPod Assignment Setting...
AUX: When using a Control Dock for iPod, it is the factory default setting. Part 1 Advanced Setup - CD, CDR/TAPE: When using a Control Dock for iPod's (ASD-1R, sold separately) audio and/or video signals to any input terminals on ...-2" is possible to assign the Control Dock for iPod, it is possible to connect with the audio and video input terminals of the assigned function. Part 1 Setting the EXT. ENGLISH Advanced Setup - It is selected) 50 ENGLISH DVD/VDP, TV/DBS, VCR-1, VCR-2, V. IN Subwoofer Level Setting the iPod Assignment Setting...
Owners Manual - English
Page 54
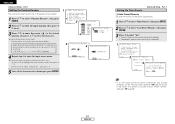
... Yes", then press F. 5 Once all the characters have been input, press ENTER. Setting the Tuner Presets Advanced Setup - w Press D H to input the input source name. Part 1 ¢ Auto Preset Memory Up to 56 FM stations can be preset automatically. 1 Press D H to select "Tuner Presets", then press ENTER. 2 Press D H to ... 3 • If an FM station cannot be preset automatically due to poor reception, use the "Manual tuning" operation ( page 37) to 8 characters can be input. Part 1 Setting the Function Rename 1 The name of the input function that can be input are shown below.
... Yes", then press F. 5 Once all the characters have been input, press ENTER. Setting the Tuner Presets Advanced Setup - w Press D H to input the input source name. Part 1 ¢ Auto Preset Memory Up to 56 FM stations can be preset automatically. 1 Press D H to select "Tuner Presets", then press ENTER. 2 Press D H to ... 3 • If an FM station cannot be preset automatically due to poor reception, use the "Manual tuning" operation ( page 37) to 8 characters can be input. Part 1 Setting the Function Rename 1 The name of the input function that can be input are shown below.

Owners Manual - English
Page 55
Press F G to move the cursor ( 2 ) to the desired position, then press D H to 8 characters can be input. Up to select the character. Part 1 2 4 52 ENGLISH Part 1 ¢ Preset Skip Preset channels that can be input are not used often can be skipped. ¢ Preset Name 1 The preset channels can be given ...
Press F G to move the cursor ( 2 ) to the desired position, then press D H to 8 characters can be input. Up to select the character. Part 1 2 4 52 ENGLISH Part 1 ¢ Preset Skip Preset channels that can be input are not used often can be skipped. ¢ Preset Name 1 The preset channels can be given ...

Owners Manual - English
Page 56
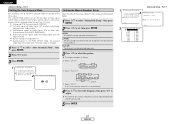
..., then press F G to the AVR-2307CI. EXT. AMP: Output the speakers connected to set . ENGLISH Advanced Setup - Part 1 Video Setup Setting the HDMI In Assignment 1 2 The HDMI input terminals are transferred simultaneously. Advanced Setup - Part 1 Setting the Component In Assignment This assigns the component video input terminals for the different input sources.
..., then press F G to the AVR-2307CI. EXT. AMP: Output the speakers connected to set . ENGLISH Advanced Setup - Part 1 Video Setup Setting the HDMI In Assignment 1 2 The HDMI input terminals are transferred simultaneously. Advanced Setup - Part 1 Setting the Component In Assignment This assigns the component video input terminals for the different input sources.

Owners Manual - English
Page 57
Part 1 Setting the Video Convert This sets whether or not to use the component video output terminal, connect the player to the S-Video or video input ... happens, please set "Analog to HDMI Convert" at "HDMI Out Setup" to "Enhanced". 4 Press ENTER. 1 Advanced Setup - Analog video signals are converted into HDMI signals. Part 1 2 (When "ON" is selected) • When "Y Cb Cr" is selected under "Color Space", "RGB Mode Setup" will have no effect. • "Color Space" and "RGB...
Part 1 Setting the Video Convert This sets whether or not to use the component video output terminal, connect the player to the S-Video or video input ... happens, please set "Analog to HDMI Convert" at "HDMI Out Setup" to "Enhanced". 4 Press ENTER. 1 Advanced Setup - Analog video signals are converted into HDMI signals. Part 1 2 (When "ON" is selected) • When "Y Cb Cr" is selected under "Color Space", "RGB Mode Setup" will have no effect. • "Color Space" and "RGB...

Owners Manual - English
Page 58
... for indications other than the menu screens. 1 Press D H to select "On Screen Display", then press ENTER. 2 Press D H to select the item, then press F G to set . Part 1 Part 1 Setting the Audio Delay Adjust the time delay between the video and audio signals. 1 Press D H to select "Audio Delay", then press ENTER. 2 Press F G to set...
... for indications other than the menu screens. 1 Press D H to select "On Screen Display", then press ENTER. 2 Press D H to select the item, then press F G to set . Part 1 Part 1 Setting the Audio Delay Adjust the time delay between the video and audio signals. 1 Press D H to select "Audio Delay", then press ENTER. 2 Press F G to set...

Owners Manual - English
Page 59
Part 1 Setting the Dolby Digital Downmix Option Setup Turn the audio compression on or off when down-mixing Dolby Digital signals. 1 Press D H to select "Dolby Digital ... set . Set "Compression" to the front speakers. OFF: The dynamic range is distorted because the input level exceeds the allowable input for the front speakers. Part 1 Advanced Playback Setting the 2ch Direct/Stereo 1 2 Make the 2-channel direct mode and stereo mode speaker settings. 1 Press D H to select "Advanced Playback", then press ENTER...
Part 1 Setting the Dolby Digital Downmix Option Setup Turn the audio compression on or off when down-mixing Dolby Digital signals. 1 Press D H to select "Dolby Digital ... set . Set "Compression" to the front speakers. OFF: The dynamic range is distorted because the input level exceeds the allowable input for the front speakers. Part 1 Advanced Playback Setting the 2ch Direct/Stereo 1 2 Make the 2-channel direct mode and stereo mode speaker settings. 1 Press D H to select "Advanced Playback", then press ENTER...
Owners Manual - English
Page 60
... and right channels of the pair of speakers can be adjusted mode does not change even if the input signal is input. Part 1 Setting the Auto Surround Mode Setting the Manual Equalizer Setup 1 Set whether or not to store the surround mode last played... adjusted simultaneously. simultaneously. 1 Press D H to select "Auto Surround Mode", then press ENTER. 2 Press F G to select "Manual EQ Setup", then press ENTER. signals. Part 1 2 Press F G to select the speaker. Each CH: The channels can be adjusted separately. 3 Press F G to set . w 2-channel signals of Dolby Digital, ...
... and right channels of the pair of speakers can be adjusted mode does not change even if the input signal is input. Part 1 Setting the Auto Surround Mode Setting the Manual Equalizer Setup 1 Set whether or not to store the surround mode last played... adjusted simultaneously. simultaneously. 1 Press D H to select "Auto Surround Mode", then press ENTER. 2 Press F G to select "Manual EQ Setup", then press ENTER. signals. Part 1 2 Press F G to select the speaker. Each CH: The channels can be adjusted separately. 3 Press F G to set . w 2-channel signals of Dolby Digital, ...
Owners Manual - English
Page 61
... used in the memory and set when the power is turned on. • - - - (Mute): The volume is always muted when the power is turned on . Part 1 1 Press D H to select "Volume Control", then press ENTER. 2 Press D H to select the item, then press F G to set to consult the owner...to the AVR-2307CI's maximum volume (output) level of output. Front A, Front B: This provides a bi-amp mode for further information before proceeding. Part 1 Option Setup Setting the Power Amplifier Assignment To suit your bi-amp-capable speakers for the two main front speakers, replicating the front A or ...
... used in the memory and set when the power is turned on. • - - - (Mute): The volume is always muted when the power is turned on . Part 1 1 Press D H to select "Volume Control", then press ENTER. 2 Press D H to select the item, then press F G to set to consult the owner...to the AVR-2307CI's maximum volume (output) level of output. Front A, Front B: This provides a bi-amp mode for further information before proceeding. Part 1 Option Setup Setting the Power Amplifier Assignment To suit your bi-amp-capable speakers for the two main front speakers, replicating the front A or ...

