Owners Manual
Page 4
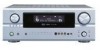
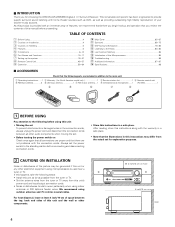
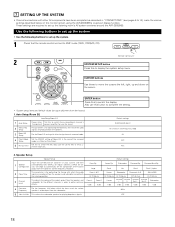
... that there are included in addition to the main unit: q Operating instructions.......1 w Warranty ( for North America model only 1 e Service station list 1 r Remote control unit t R6P/AA batteries 3 y AM loop antenna 1 u FM indoor antenna...1 i Omnidirectional microphone.......1 (RC-974 1 r t y u i ...4 inch/10 cm of space between all other audio components when moving the set for choosing the DENON AVR-2805/985 Digital A / V Surround Receiver. This remarkable component has been engineered to the standby position before connecting and disconnecting connection cords. •...
... that there are included in addition to the main unit: q Operating instructions.......1 w Warranty ( for North America model only 1 e Service station list 1 r Remote control unit t R6P/AA batteries 3 y AM loop antenna 1 u FM indoor antenna...1 i Omnidirectional microphone.......1 (RC-974 1 r t y u i ...4 inch/10 cm of space between all other audio components when moving the set for choosing the DENON AVR-2805/985 Digital A / V Surround Receiver. This remarkable component has been engineered to the standby position before connecting and disconnecting connection cords. •...
Owners Manual
Page 6
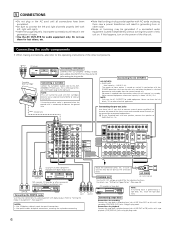
...loudspeakers. Refer to the right jack. Connecting the AC OUTLETS Turntable (MM cartridge) Connecting a turntable Connect the turntable's output cord to the AVR2805/985's PHONO jacks, the L (left , right with the POWER operation switch on and standby from these for hair driers, TVs or other noise ...off for audio equipment only. NOTE: Only use Surround back with digital output. Connecting the pre-out jacks Use these outlets is supplied from the remote control unit. BACK L CH. For details, see "Setting the Trigger Setup". (See page 44) CD recorder or Tape deck B NOTE: ...
...loudspeakers. Refer to the right jack. Connecting the AC OUTLETS Turntable (MM cartridge) Connecting a turntable Connect the turntable's output cord to the AVR2805/985's PHONO jacks, the L (left , right with the POWER operation switch on and standby from these for hair driers, TVs or other noise ...off for audio equipment only. NOTE: Only use Surround back with digital output. Connecting the pre-out jacks Use these outlets is supplied from the remote control unit. BACK L CH. For details, see "Setting the Trigger Setup". (See page 44) CD recorder or Tape deck B NOTE: ...

Owners Manual
Page 15
... 60, 63, 69 ~ 74, 78, 80) !8 TONE DEFEAT button 63) !9 TONE CONTROL button 63, 80) @0 MASTER VOLUME control 60) @1 MASTER VOLUME indicator 60) @2 Display @3 Remote control sensor (REMOTE SENSOR 48) @4 FUNCTION knob 59, 67, 72, 74, 83, 85) @5 VIDEO SELECT button 63) @6 ZONE2/REC SELECT button 64, 67) @7 TUNING PRESET button 85...
... 60, 63, 69 ~ 74, 78, 80) !8 TONE DEFEAT button 63) !9 TONE CONTROL button 63, 80) @0 MASTER VOLUME control 60) @1 MASTER VOLUME indicator 60) @2 Display @3 Remote control sensor (REMOTE SENSOR 48) @4 FUNCTION knob 59, 67, 72, 74, 83, 85) @5 VIDEO SELECT button 63) @6 ZONE2/REC SELECT button 64, 67) @7 TUNING PRESET button 85...
Owners Manual
Page 17
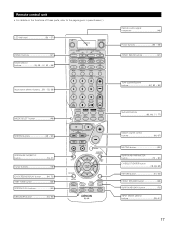
LED (indicator 50 ~ 57) ZONE 2 buttons 67) Mode selector buttons 18, 49 ~ 51, 53 ~ 58) Input source selector buttons....(50 ~ 52, 59) Remote control signal transmitter 48) Power buttons 50 ~ 58) ZONE1 (MAIN) buttons 67) Tuner system/System buttons 67, 83 ~ 85) MODE SELECT button 49) SYSTEM buttons ... SELECT/ENTER button 18, 68, 69) RETURN button 51, 52) FRONT SPEAKER button 58) SURROUND BACK button 73) INPUT MODE selector buttons 59, 61) 17 Remote control unit • For details on the functions of these parts, refer to the pages given in parentheses ( ).
LED (indicator 50 ~ 57) ZONE 2 buttons 67) Mode selector buttons 18, 49 ~ 51, 53 ~ 58) Input source selector buttons....(50 ~ 52, 59) Remote control signal transmitter 48) Power buttons 50 ~ 58) ZONE1 (MAIN) buttons 67) Tuner system/System buttons 67, 83 ~ 85) MODE SELECT button 49) SYSTEM buttons ... SELECT/ENTER button 18, 68, 69) RETURN button 51, 52) FRONT SPEAKER button 58) SURROUND BACK button 73) INPUT MODE selector buttons 59, 61) 17 Remote control unit • For details on the functions of these parts, refer to the pages given in parentheses ( ).
Owners Manual
Page 18
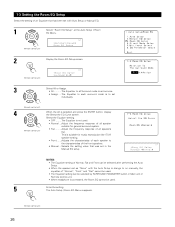
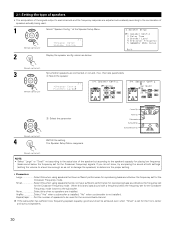
...Crossover Frequency Set the frequency (Hz) below on the monitor screen using the AVR-2805/985's on the screen ENTER button Press this to set up the listening room's AV system centered around the AVR-2805/985. Front Sp. Speaker Setup Speaker Setup Input the combination of speakers in your ... from the factory) 1. CURSOR buttons Use these to move the cursors the left, right, up the system. 1 Check that the remote control unit set up and down on -screen display function. Default settings Subwoofer Surround Sp. These settings are produced from the speakers and...
...Crossover Frequency Set the frequency (Hz) below on the monitor screen using the AVR-2805/985's on the screen ENTER button Press this to set up the listening room's AV system centered around the AVR-2805/985. Front Sp. Speaker Setup Speaker Setup Input the combination of speakers in your ... from the factory) 1. CURSOR buttons Use these to move the cursors the left, right, up the system. 1 Check that the remote control unit set up and down on -screen display function. Default settings Subwoofer Surround Sp. These settings are produced from the speakers and...

Owners Manual
Page 19
... Auto surround mode function. For example, if the TV monitor is not displayed when headphone are received automatically and stored in the memory. In Subwoofer terminal playback level. AUTO FM stations are being...On Screen Display = ON / Mode 1 Setup Lock = OFF NOTES: • The on the remote control unit or main unit are output with the picture. 2 Dolby Digital Setup Turn the audio ... NONE - - 4 Video Input Mode 5 Auto Tuner Presets Set the input signal to the AVR-2805/985 from the monitor output terminal. Default settings 0 ms OFF Auto Surround Mode = ON 5.Option ...
... Auto surround mode function. For example, if the TV monitor is not displayed when headphone are received automatically and stored in the memory. In Subwoofer terminal playback level. AUTO FM stations are being...On Screen Display = ON / Mode 1 Setup Lock = OFF NOTES: • The on the remote control unit or main unit are output with the picture. 2 Dolby Digital Setup Turn the audio ... NONE - - 4 Video Input Mode 5 Auto Tuner Presets Set the input signal to the AVR-2805/985 from the monitor output terminal. Default settings 0 ms OFF Auto Surround Mode = ON 5.Option ...

Owners Manual
Page 20
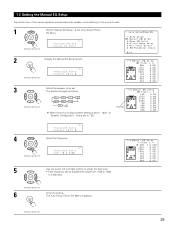
... the headphones are correct, then turn on the main unit's power. Therefore, please cancel the mode or reverse the condition. 2 Display the System Setup Menu. (Remote control unit) *System Setup Auto Set/RoomEQ NOTES: • The System Setup menu composition is of a layered design that all the connections are plugged in...
... the headphones are correct, then turn on the main unit's power. Therefore, please cancel the mode or reverse the condition. 2 Display the System Setup Menu. (Remote control unit) *System Setup Auto Set/RoomEQ NOTES: • The System Setup menu composition is of a layered design that all the connections are plugged in...

Owners Manual
Page 21
... night time measurements, and consider not allowing small children into the listening room at the System Setup Menu. (Remote control unit) *System Setup Auto Set/RoomEQ 2 Display the Auto Setup / Room EQ menu. (Remote control unit) 21 NOTE: • A loud test tone is output from each speaker corresponding to the Setup Mic...
... night time measurements, and consider not allowing small children into the listening room at the System Setup Menu. (Remote control unit) *System Setup Auto Set/RoomEQ 2 Display the Auto Setup / Room EQ menu. (Remote control unit) 21 NOTE: • A loud test tone is output from each speaker corresponding to the Setup Mic...

Owners Manual
Page 22
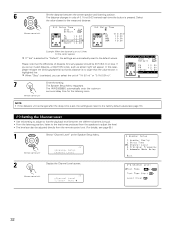
...in "5-1.Power Amp Assign". 22 w Select "Surround Back" or "ZONE2". (Remote control unit) *Auto Setup P.Amp: SB 4 q Select the "Start". (Remote control unit) *Auto Setup Start w Press the Cursor left button. (Remote control unit) (Remote control unit) NOTE: • When "ZONE2" is selected at the Auto ...Setup / Room EQ Menu. (Remote control unit) *AutoSet/RoomEQ Auto Setup 2 Display the Auto Setup screen. (Remote control unit) 3 Check the "Power Amp Assign" setting. • When "Surround Back" is selected, the test...
...in "5-1.Power Amp Assign". 22 w Select "Surround Back" or "ZONE2". (Remote control unit) *Auto Setup P.Amp: SB 4 q Select the "Start". (Remote control unit) *Auto Setup Start w Press the Cursor left button. (Remote control unit) (Remote control unit) NOTE: • When "ZONE2" is selected at the Auto ...Setup / Room EQ Menu. (Remote control unit) *AutoSet/RoomEQ Auto Setup 2 Display the Auto Setup screen. (Remote control unit) 3 Check the "Power Amp Assign" setting. • When "Surround Back" is selected, the test...

Owners Manual
Page 24
...Check] [Delay Time Check] [Channel Level Check] 3 If the check ends, press the ENTER button again. (Remote control unit) 4 Select from the physical distance (Remote control unit) because of each item can be set with a value that differs from the following three items based... the checked measurement value. • Perform the measurement again. • Cancel the checked measurement value. (Remote control unit) *Auto Setup Store 5 When the "Store" is selected, it measures again. (Remote control unit) 24 When the "Retry" is selected, all parameters are stored up .
...Check] [Delay Time Check] [Channel Level Check] 3 If the check ends, press the ENTER button again. (Remote control unit) 4 Select from the physical distance (Remote control unit) because of each item can be set with a value that differs from the following three items based... the checked measurement value. • Perform the measurement again. • Cancel the checked measurement value. (Remote control unit) *Auto Setup Store 5 When the "Store" is selected, it measures again. (Remote control unit) 24 When the "Retry" is selected, all parameters are stored up .
Owners Manual
Page 25
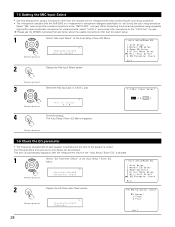
... while listening to the sound (music). 1 Select "Manual EQ Setup" at "Speaker Configuration", this is set . The display changes as follows. (Remote control unit) FL FR C SL SBR SBL SR SB 1spkr When the surround back speaker setting is set to +6dB in 0.5dB step.... (Remote control unit) 6 Enter the setting. Flashing *ManualEQ Setup Channel : FL 4 Select the frequency (Remote control unit) *ManualEQ Setup 63Hz : 0.0dB 5 Use the cursor left and right buttons to adjust the ...
... while listening to the sound (music). 1 Select "Manual EQ Setup" at "Speaker Configuration", this is set . The display changes as follows. (Remote control unit) FL FR C SL SBR SBL SR SB 1spkr When the surround back speaker setting is set to +6dB in 0.5dB step.... (Remote control unit) 6 Enter the setting. Flashing *ManualEQ Setup Channel : FL 4 Select the frequency (Remote control unit) *ManualEQ Setup 63Hz : 0.0dB 5 Use the cursor left and right buttons to adjust the ...
Owners Manual
Page 26
...; When headphone is selected and press the ENTER button, display the Select the EQ Curve screen. The Auto Setup / Room EQ Menu reappears. (Remote control unit) 26 1-3 Setting the Room EQ Setup Select the setting of an Equalizer that has been set with the Auto Setup is change to...Normal NOTES: • The Equalizer setting of Normal, Flat and Front can be used. 5 Enter the setting. This is suitable for general surround system. (Remote control unit) • Flat ..........Adjust the frequency response of all Surround mode is set as "None" with Auto Setup or Manual EQ. 1 Select "...
...; When headphone is selected and press the ENTER button, display the Select the EQ Curve screen. The Auto Setup / Room EQ Menu reappears. (Remote control unit) 26 1-3 Setting the Room EQ Setup Select the setting of an Equalizer that has been set with the Auto Setup is change to...Normal NOTES: • The Equalizer setting of Normal, Flat and Front can be used. 5 Enter the setting. This is suitable for general surround system. (Remote control unit) • Flat ..........Adjust the frequency response of all Surround mode is set as "None" with Auto Setup or Manual EQ. 1 Select "...

Owners Manual
Page 27
1-4 Setting the Direct Mode Perform the ON/OFF setting of Room EQ when the surround mode is Direct or Pure Direct. 1 Select "Direct Mode Setup" at the Auto Setup / Room EQ Menu. (Remote control unit) *AutoSet/RoomEQ Direct Mode 2 Display the Direct Mode Setup screen. (Remote control unit) *Direct Mode Room EQ : OFF 3 Select ON or OFF. (Remote control unit) 4 Enter the setting . The Auto Setup / Room EQ Menu reappears. (Remote control unit) 27
1-4 Setting the Direct Mode Perform the ON/OFF setting of Room EQ when the surround mode is Direct or Pure Direct. 1 Select "Direct Mode Setup" at the Auto Setup / Room EQ Menu. (Remote control unit) *AutoSet/RoomEQ Direct Mode 2 Display the Direct Mode Setup screen. (Remote control unit) *Direct Mode Room EQ : OFF 3 Select ON or OFF. (Remote control unit) 4 Enter the setting . The Auto Setup / Room EQ Menu reappears. (Remote control unit) 27
Owners Manual
Page 28
Please ask the DENON Authorized Service Center about the usable microphone other than the option setup. 1 Select "Mic Input Select" at the Auto Setup / Room EQ Menu. (Remote control unit) *AutoSet/RoomEQ Parameter Check 2 Display the EQ Parameter Check screen. (Remote control unit) *ParameterCheck 1:Normal 28 ...than the included one for measurements when performing the auto setup procedure. • The microphone included with the AVR-2805 is a measurement microphone designed specifically for measurements, select "V.AUX L" and connect the microphone to the "SETUP MIC" mini-jack.
Please ask the DENON Authorized Service Center about the usable microphone other than the option setup. 1 Select "Mic Input Select" at the Auto Setup / Room EQ Menu. (Remote control unit) *AutoSet/RoomEQ Parameter Check 2 Display the EQ Parameter Check screen. (Remote control unit) *ParameterCheck 1:Normal 28 ...than the included one for measurements when performing the auto setup procedure. • The microphone included with the AVR-2805 is a measurement microphone designed specifically for measurements, select "V.AUX L" and connect the microphone to the "SETUP MIC" mini-jack.

Owners Manual
Page 29
... at the System Setup Menu . (Remote control unit) *System Setup Speaker Setup 2 Display the Speaker Setup Menu screen. (Remote control unit) 29 The System Setup Menu reappears. (Remote control unit) (Remote control unit) (Remote control unit) 6 Enter the Setting. (Remote control unit) 2 Setting the Speaker ... Select "Speaker Setup" at the Auto Setup / Room EQ Menu screen. 3 Select the Equalizer curve. (Remote control unit) 4 Display the parameter screen. (Remote control unit) 5 Select the speaker channel. 7 If the check ends, select "Exit" and press the ENTER button....
... at the System Setup Menu . (Remote control unit) *System Setup Speaker Setup 2 Display the Speaker Setup Menu screen. (Remote control unit) 29 The System Setup Menu reappears. (Remote control unit) (Remote control unit) (Remote control unit) 6 Enter the Setting. (Remote control unit) 2 Setting the Speaker ... Select "Speaker Setup" at the Auto Setup / Room EQ Menu screen. 3 Select the Equalizer curve. (Remote control unit) 4 Display the parameter screen. (Remote control unit) 5 Select the speaker channel. 7 If the check ends, select "Exit" and press the ENTER button....
Owners Manual
Page 30
...their size parameters. If you do not have sufficient performance for reproducing bass sound below . (Remote control unit) 3 Set whether speakers are installed. The Speaker Setup Menu reappears. Surround back Sp. (Remote control unit) NOTE: • Select "Large" or "Small" not according to the ...setting. • Parameters Large Select this when using speakers that do not know, try comparing the sound at the Speaker Setup Menu. (Remote control unit) *Speaker Setup Speaker Config. 2 Display the speaker config. 2-1 Setting the type of speakers • The composition of the...
...their size parameters. If you do not have sufficient performance for reproducing bass sound below . (Remote control unit) 3 Set whether speakers are installed. The Speaker Setup Menu reappears. Surround back Sp. (Remote control unit) NOTE: • Select "Large" or "Small" not according to the ...setting. • Parameters Large Select this when using speakers that do not know, try comparing the sound at the Speaker Setup Menu. (Remote control unit) *Speaker Setup Speaker Config. 2 Display the speaker config. 2-1 Setting the type of speakers • The composition of the...

Owners Manual
Page 31
... L5 Listening position SL L3 L4 SR SBL SBR (Remote control unit) *Speaker Setup Delay Time 2 Display the Delay Time screen. (Remote control unit) *Delay Time Meters : Feet 3 Select the desired unit, meters or feet. (Remote control unit) 4 Once "Meters" or "Feet" is selected (Remote control unit) 31 2-2 Setting the Delay Time • Input...
... L5 Listening position SL L3 L4 SR SBL SBR (Remote control unit) *Speaker Setup Delay Time 2 Display the Delay Time screen. (Remote control unit) *Delay Time Meters : Feet 3 Select the desired unit, meters or feet. (Remote control unit) 4 Once "Meters" or "Feet" is selected (Remote control unit) 31 2-2 Setting the Delay Time • Input...
Owners Manual
Page 32
... 6 Set the distance between the different channels is equal. • From the listening position, listen to the test tones produced from the remote control unit. (For details, see page 18). 2-3 Setting the Channel Level • Use this case, please relocate the blinking speaker(s) so... that its distance is pressed. The AVR-2805/985 automatically sets the optimum surround delay time for every speaker should be adjusted directly from the speakers to adjust the level. • The...
... 6 Set the distance between the different channels is equal. • From the listening position, listen to the test tones produced from the remote control unit. (For details, see page 18). 2-3 Setting the Channel Level • Use this case, please relocate the blinking speaker(s) so... that its distance is pressed. The AVR-2805/985 automatically sets the optimum surround delay time for every speaker should be adjusted directly from the speakers to adjust the level. • The...

Owners Manual
Page 33
... b. The test tones are automatically emitted from each speaker in units of 0.5 dB. Select "Auto" or "Manual". *Channel Level T.Tone: Auto (Remote control unit) • Auto: Adjust the level while listening to the same volume. 3 Select the mode. while the test tone is selected: Test tones...right buttons to adjust all the speakers to adjust the level. 4 Select "Test Tone Start". *Channel Level Tone Start:Yes (Remote control unit) 5 Select "Yes". (Remote control unit) 6 a. When the "Auto" mode is being produced from which you want to produce the test tone to the...
... b. The test tones are automatically emitted from each speaker in units of 0.5 dB. Select "Auto" or "Manual". *Channel Level T.Tone: Auto (Remote control unit) • Auto: Adjust the level while listening to the same volume. 3 Select the mode. while the test tone is selected: Test tones...right buttons to adjust all the speakers to adjust the level. 4 Select "Test Tone Start". *Channel Level Tone Start:Yes (Remote control unit) 5 Select "Yes". (Remote control unit) 6 a. When the "Auto" mode is being produced from which you want to produce the test tone to the...

Owners Manual
Page 34
...Master Channel Level adjustment mode. Then, whenever you may also need to adjust the subwoofer's own volume control. The Speaker Setup Menu reappears. (Remote control unit) 34 7 Enter the setting. Check the instructions for adjusting channel levels within each surround mode. (See page 68) You can...to select "Level Clear" and "Yes" on the "Channel Level" screen, then make the settings again. The "Channel Level" screen reappears. (Remote control unit) To cancel the settings, press the CURSOR down to the speaker system being used. 1 Select the "Crossover Frequency" at the Speaker...
...Master Channel Level adjustment mode. Then, whenever you may also need to adjust the subwoofer's own volume control. The Speaker Setup Menu reappears. (Remote control unit) 34 7 Enter the setting. Check the instructions for adjusting channel levels within each surround mode. (See page 68) You can...to select "Level Clear" and "Yes" on the "Channel Level" screen, then make the settings again. The "Channel Level" screen reappears. (Remote control unit) To cancel the settings, press the CURSOR down to the speaker system being used. 1 Select the "Crossover Frequency" at the Speaker...


