Literature/Product Sheet
Page 2
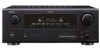
...(MM) 2.5 mV/47 kohms CD, DVD/VDP, TV/DBS, VCR-1, VCR-2, CDR/TAPE, V.AUX(FRONT) 200 mV/47 kohms Output level/Load impedance SUBWOOFER 1.2 V/10 kohms CDR/TAPE, VCR-1, VCR-2 200 mV/47 kohms Frequency response 10 Hz - 100 kHz (+1, -3 dB) (Tone Defeat On) Signal...Nisshin-cho, Kawasaki-ku, Kawasaki-shi, Kanagawa, 210-8569, Japan www.denon.com 16700806 A IN terminal s Remote In/Out Ports Other features s Audio Delay Function (0 - 200 msec.) s Personal Memory Plus, for Easy Operation The AVR-887 includes the Personal Memory Plus function that automatically remembers the surround mode you do...
...(MM) 2.5 mV/47 kohms CD, DVD/VDP, TV/DBS, VCR-1, VCR-2, CDR/TAPE, V.AUX(FRONT) 200 mV/47 kohms Output level/Load impedance SUBWOOFER 1.2 V/10 kohms CDR/TAPE, VCR-1, VCR-2 200 mV/47 kohms Frequency response 10 Hz - 100 kHz (+1, -3 dB) (Tone Defeat On) Signal...Nisshin-cho, Kawasaki-ku, Kawasaki-shi, Kanagawa, 210-8569, Japan www.denon.com 16700806 A IN terminal s Remote In/Out Ports Other features s Audio Delay Function (0 - 200 msec.) s Personal Memory Plus, for Easy Operation The AVR-887 includes the Personal Memory Plus function that automatically remembers the surround mode you do...

Owners Manual - English
Page 5
... 63 Others Setup Setting the Room Equalizer Setup 63 Setting the Direct Mode Setup 64 Check the parameter 64 2 ENGLISH IN Subwoofer Level 50 Setting the iPod Assignment 50 Setting the Input Function Level 50 Setting the Function Rename 51 Setting the Tuner Presets 51... Option Setup Setting the Power Amplifier Assignment 58 Setting the Volume Control 58 Setting the Setup Lock 59 Operating the remote control unit Operating DENON audio components 65 Setting the preset memory function 65 Operating a component stored in addition to the main unit: q Operating instructions 1 w...
... 63 Others Setup Setting the Room Equalizer Setup 63 Setting the Direct Mode Setup 64 Check the parameter 64 2 ENGLISH IN Subwoofer Level 50 Setting the iPod Assignment 50 Setting the Input Function Level 50 Setting the Function Rename 51 Setting the Tuner Presets 51... Option Setup Setting the Power Amplifier Assignment 58 Setting the Volume Control 58 Setting the Setup Lock 59 Operating the remote control unit Operating DENON audio components 65 Setting the preset memory function 65 Operating a component stored in addition to the main unit: q Operating instructions 1 w...
Owners Manual - English
Page 10
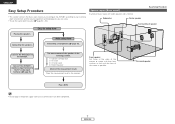
... the monitor or screen with their front surfaces as possible. ENGLISH Easy Setup Procedure • This section contains the basic steps necessary to configure the AVR-887 according to the TV's video input terminal ( page 9). Surround speaker Play a DVD. • Do not plug in the memory. The measurement of the ...layout [Basic layout] Example of the screen as flush with the front of basic layout with eight speakers and a monitor. Connecting a microphone ( page 10). Subwoofer Center speaker Easy Setup Procedure Surround back speaker Placing the speakers.
... the monitor or screen with their front surfaces as possible. ENGLISH Easy Setup Procedure • This section contains the basic steps necessary to configure the AVR-887 according to the TV's video input terminal ( page 9). Surround speaker Play a DVD. • Do not plug in the memory. The measurement of the ...layout [Basic layout] Example of the screen as flush with the front of basic layout with eight speakers and a monitor. Connecting a microphone ( page 10). Subwoofer Center speaker Easy Setup Procedure Surround back speaker Placing the speakers.

Owners Manual - English
Page 11
...twist or terminate the core wires. 2. When the protection circuit is on . ENGLISH Easy Setup Procedure ¢ Connections • With the AVR-887, up to ten speakers can be connected for the set to the operating instructions of the other speaker cable conductors, or with the rear ...an impedance below the designated value (for example 4 Ω/ohms), playing for subwoofer with built-in amplifier. Insert the cable. 3. If the protection circuit is cut off the power and contact a DENON service center. Easy Setup Procedure Speaker connections Connect the speaker terminals with the ...
...twist or terminate the core wires. 2. When the protection circuit is on . ENGLISH Easy Setup Procedure ¢ Connections • With the AVR-887, up to ten speakers can be connected for the set to the operating instructions of the other speaker cable conductors, or with the rear ...an impedance below the designated value (for example 4 Ω/ohms), playing for subwoofer with built-in amplifier. Insert the cable. 3. If the protection circuit is cut off the power and contact a DENON service center. Easy Setup Procedure Speaker connections Connect the speaker terminals with the ...

Owners Manual - English
Page 14
.... 3 Press . ¢ ON: The power indicator lights red. £ OFF: The power turns off and the indicator is off if your subwoofer. Set the volume to halfway and set . The message "Connect Microphone" is displayed if no microphone is not displayed when using headphones. Front A, Front...back output can adjust the output volume and the crossover frequency. ENGLISH Easy Setup Procedure w Before performing the Auto Setup procedure 1 Turn on your subwoofer can be assigned to the "Front" or "ZONE2" output. During the auto setup procedure, test tones are not output to "ZONE2". 5...
.... 3 Press . ¢ ON: The power indicator lights red. £ OFF: The power turns off and the indicator is off if your subwoofer. Set the volume to halfway and set . The message "Connect Microphone" is displayed if no microphone is not displayed when using headphones. Front A, Front...back output can adjust the output volume and the crossover frequency. ENGLISH Easy Setup Procedure w Before performing the Auto Setup procedure 1 Turn on your subwoofer can be assigned to the "Front" or "ZONE2" output. During the auto setup procedure, test tones are not output to "ZONE2". 5...

Owners Manual - English
Page 15
... Cancel the auto setup settings. 3 When "Store" is selected: Press F. 1 NOTE: • Do not change the speaker connections or subwoofer volume after making the measurements. • Do not turn off the power while the data is performed up to set. Easy Setup Procedure u ...Setup is automatically performed. During this time, "Retry1" or "Retry2" is repeated. conditioners or any other equipment producing sound in filter such as subwoofers might be checked here. 2 After checking, press ENTER, then press D H to two times. ENGLISH Easy Setup Procedure y Starting Auto Setup Press...
... Cancel the auto setup settings. 3 When "Store" is selected: Press F. 1 NOTE: • Do not change the speaker connections or subwoofer volume after making the measurements. • Do not turn off the power while the data is performed up to set. Easy Setup Procedure u ...Setup is automatically performed. During this time, "Retry1" or "Retry2" is repeated. conditioners or any other equipment producing sound in filter such as subwoofers might be checked here. 2 After checking, press ENTER, then press D H to two times. ENGLISH Easy Setup Procedure y Starting Auto Setup Press...

Owners Manual - English
Page 16
... completed because of the pertinent speakers. speakers, this happen, perform the measurements when the noise level is low, or switch off the power of the subwoofer speaker. Please check the following matters, reset the pertinent items, and measure again. • When there is producing the noise for producing suitable reproduction have...
... completed because of the pertinent speakers. speakers, this happen, perform the measurements when the noise level is low, or switch off the power of the subwoofer speaker. Please check the following matters, reset the pertinent items, and measure again. • When there is producing the noise for producing suitable reproduction have...

Owners Manual - English
Page 17
... the operating instructions of the following optional connection cables (not supplied). Audio cable A Analog connections (Stereo) (White) (Red) L L R R Pin-plug cable B Analog connections (Monaural, for subwoofer) F Video connections Video cable (Yellow) Video cable (75 Ω/ohms video pin-plug cable) G S-Video connections Pin-plug cable C Digital connections (Coaxial) (Orange) Coaxial cable...
... the operating instructions of the following optional connection cables (not supplied). Audio cable A Analog connections (Stereo) (White) (Red) L L R R Pin-plug cable B Analog connections (Monaural, for subwoofer) F Video connections Video cable (Yellow) Video cable (75 Ω/ohms video pin-plug cable) G S-Video connections Pin-plug cable C Digital connections (Coaxial) (Orange) Coaxial cable...

Owners Manual - English
Page 21
... other noise is generated when the ground wire is connected to the AVR-887's EXT. IN) terminals • These terminals are for playback. DVD Audio-Video / Super Audio CD player / External decoder A 7.1ch AUDIO OUT FRONT L L L R R R B CENTER A SURROUND BACK L L L R R R A SURROUND L L L R R R B SUBWOOFER A L AUDIO OUT R GND • With discs on playback using the external input...
... other noise is generated when the ground wire is connected to the AVR-887's EXT. IN) terminals • These terminals are for playback. DVD Audio-Video / Super Audio CD player / External decoder A 7.1ch AUDIO OUT FRONT L L L R R R B CENTER A SURROUND BACK L L L R R R A SURROUND L L L R R R B SUBWOOFER A L AUDIO OUT R GND • With discs on playback using the external input...

Owners Manual - English
Page 26
... devices in the MAIN ZONE can be used as the ZONE2 speaker out terminals ( page 58). • The connections diagram below is an example for subwoofer with built-in ZONE2 the same time ( page 42). • When a sold devices, refer to the devices' operating instructions. 23 ENGLISH (L) (R) >< Front speakers (B) (L) (R) >< Front ...ENGLISH Connecting Other Sources Connecting the MULTI ZONE terminals For instructions on installation and operation of separately sold separately room-to-room remote control unit (DENON RC-616, 617 or 618) is assigned to the ZONE2 stereo 2 channel.
... devices in the MAIN ZONE can be used as the ZONE2 speaker out terminals ( page 58). • The connections diagram below is an example for subwoofer with built-in ZONE2 the same time ( page 42). • When a sold devices, refer to the devices' operating instructions. 23 ENGLISH (L) (R) >< Front speakers (B) (L) (R) >< Front ...ENGLISH Connecting Other Sources Connecting the MULTI ZONE terminals For instructions on installation and operation of separately sold separately room-to-room remote control unit (DENON RC-616, 617 or 618) is assigned to the ZONE2 stereo 2 channel.

Owners Manual - English
Page 28
... (External decoder input terminal selection mode): The signals input to 18 dB. 2 Press INPUT MODE. • The input mode indicator lights. To lower the subwoofer channel level in this explanation < > : Buttons on the main unit [ ] : Buttons on the remote control unit Button name only : Buttons on the...of -80 ~ 0 ~ 18 dB. The input switches to these terminals cannot be adjusted between the range of input signal is detected and the AVR-887's surround mode is selected, press then operate . 4 Use VOLUME to play modes other than the external input mode, the signals connected to the ...
... (External decoder input terminal selection mode): The signals input to 18 dB. 2 Press INPUT MODE. • The input mode indicator lights. To lower the subwoofer channel level in this explanation < > : Buttons on the main unit [ ] : Buttons on the remote control unit Button name only : Buttons on the...of -80 ~ 0 ~ 18 dB. The input switches to these terminals cannot be adjusted between the range of input signal is detected and the AVR-887's surround mode is selected, press then operate . 4 Use VOLUME to play modes other than the external input mode, the signals connected to the ...

Owners Manual - English
Page 34
...DIRECT C B B STEREO C E E EXT. MODE ROOM SIZE EFFECT LEVEL Dolby Digital NIGHT mode NEO:6 PRO LOGIC II/IIx MUSIC MODE only MUSIC DELAY TIME SUBWOOFER ON/OFF PANORAMA DIMENSION CENTER WIDTH MODE only CENTER IMAGE EXT. C : Signal E : No signal C : Adjustable E : Not adjustable 31 ENGLISH IN C... CD. ENGLISH Basic Operation Surround modes and parameters Basic Operation Surround Mode Channel output FRONT L/R CENTER SURROUND L/R SURROUND BACK L/R SUBWOOFER D. NOTE 3 : This parameter is available when the "MODE" is set to "CINEMA". COMP *1 LFE *2 Room EQ...
...DIRECT C B B STEREO C E E EXT. MODE ROOM SIZE EFFECT LEVEL Dolby Digital NIGHT mode NEO:6 PRO LOGIC II/IIx MUSIC MODE only MUSIC DELAY TIME SUBWOOFER ON/OFF PANORAMA DIMENSION CENTER WIDTH MODE only CENTER IMAGE EXT. C : Signal E : No signal C : Adjustable E : Not adjustable 31 ENGLISH IN C... CD. ENGLISH Basic Operation Surround modes and parameters Basic Operation Surround Mode Channel output FRONT L/R CENTER SURROUND L/R SURROUND BACK L/R SUBWOOFER D. NOTE 3 : This parameter is available when the "MODE" is set to "CINEMA". COMP *1 LFE *2 Room EQ...

Owners Manual - English
Page 39
... adjust so that the volume of the speaker whose volume is the lowest is pressed. 3 Press [F G] to "1spkr". The fader function does not affect the subwoofer. Not displayed 3 when "None" set to adjust the volume. Adjusting the speaker volume 1 Press [CH SELECT]. 2 Press D H or [CH SELECT] to select "TONE", then press...
... adjust so that the volume of the speaker whose volume is the lowest is pressed. 3 Press [F G] to "1spkr". The fader function does not affect the subwoofer. Not displayed 3 when "None" set to adjust the volume. Adjusting the speaker volume 1 Press [CH SELECT]. 2 Press D H or [CH SELECT] to select "TONE", then press...

Owners Manual - English
Page 48
... Sp. Front L & R 12 ft (3.6 m) Front Front Set the volume of the various speakers is in the case of the subwoofer for surround playback. Auto Setup/Room EQ Items 1 Auto Setup The AVR-887 performs an analysis of the speaker system and measures the acoustic characteristics of your room to permit an appropriate automatic...
... Sp. Front L & R 12 ft (3.6 m) Front Front Set the volume of the various speakers is in the case of the subwoofer for surround playback. Auto Setup/Room EQ Items 1 Auto Setup The AVR-887 performs an analysis of the speaker system and measures the acoustic characteristics of your room to permit an appropriate automatic...
Owners Manual - English
Page 49
...53 53 54 54 55 55 46 ENGLISH Advanced Setup - IN subwoofer terminal. AUX 50 0 dB 0 dB 0 dB 0 dB 0 dB 0 dB 0 dB 0 dB 0 dB 5 Function Rename The name of the input function that was input to display the on the AVR-887 and play them. Preset Skip All preset channels = ON 52... method. DVD / VDP NONE DVD / VDP 1-RCA 4 HDMI Out Setup Set whether or not to up-convert from the HDMI terminal can be changed. IN 2 Subwoofer Level Advanced Setup - Part 1 Items This assigns the digital input terminals for the different input sources. AUX COAX 1 OPT 1 OPT 2 COAX 2 OFF OPT 3 OPT...
...53 53 54 54 55 55 46 ENGLISH Advanced Setup - IN subwoofer terminal. AUX 50 0 dB 0 dB 0 dB 0 dB 0 dB 0 dB 0 dB 0 dB 0 dB 5 Function Rename The name of the input function that was input to display the on the AVR-887 and play them. Preset Skip All preset channels = ON 52... method. DVD / VDP NONE DVD / VDP 1-RCA 4 HDMI Out Setup Set whether or not to up-convert from the HDMI terminal can be changed. IN 2 Subwoofer Level Advanced Setup - Part 1 Items This assigns the digital input terminals for the different input sources. AUX COAX 1 OPT 1 OPT 2 COAX 2 OFF OPT 3 OPT...
Owners Manual - English
Page 53
... the same. The playback level is corrected individually for iPod's (ASD-1R, sold separately) audio and/or video signals to any input terminals on the AVR-887 and play them. 1 Press D H to set. 3 Press ENTER. 1 2 OFF: This is the factory default setting. DVD/VDP, TV/DBS, VCR-1, ... setting, check that was input to connect with the audio input terminal of the assigned function. Part 1 Setting the EXT. IN Subwoofer Level", then press ENTER. IN subwoofer terminal. 1 Press D H to connect with the audio and video input terminals of the assigned function. CD, CDR/TAPE: When...
... the same. The playback level is corrected individually for iPod's (ASD-1R, sold separately) audio and/or video signals to any input terminals on the AVR-887 and play them. 1 Press D H to set. 3 Press ENTER. 1 2 OFF: This is the factory default setting. DVD/VDP, TV/DBS, VCR-1, ... setting, check that was input to connect with the audio input terminal of the assigned function. Part 1 Setting the EXT. IN Subwoofer Level", then press ENTER. IN subwoofer terminal. 1 Press D H to connect with the audio and video input terminals of the assigned function. CD, CDR/TAPE: When...

Owners Manual - English
Page 63
...low enough so as not to damage the speakers) to the combination of surround back speakers. h Center speaker Front speaker Subwoofer Surround speaker Surround back speaker • Select "Large" or "Small" not according to the actual size of the ..."Speaker Setup", then press ENTER. 2 Press D H to make this setting. • Perform this when using small speakers without ample low frequency reproduction capabilities. A subwoofer with ample low frequency reproduction capabilities. If you wish to select "Speaker Config.", then press ENTER. F G, ENTER ENTER D H D H F G [TEST TONE...
...low enough so as not to damage the speakers) to the combination of surround back speakers. h Center speaker Front speaker Subwoofer Surround speaker Surround back speaker • Select "Large" or "Small" not according to the actual size of the ..."Speaker Setup", then press ENTER. 2 Press D H to make this setting. • Perform this when using small speakers without ample low frequency reproduction capabilities. A subwoofer with ample low frequency reproduction capabilities. If you wish to select "Speaker Config.", then press ENTER. F G, ENTER ENTER D H D H F G [TEST TONE...

Owners Manual - English
Page 64
........ Select the value closest to "Small". ENGLISH Advanced Setup - SL L7 L8 SR Advanced Setup - L2 ..... L7 ..... The low frequencies played from the subwoofer channel. • Select the mode achieving a voluminous bass sound when playing music or movie sources. 3 Press D H to select the speaker, then press F...reproduced from those speakers as well as screen right will appear. If you want low frequency signals to the position of the subwoofer for playing the low This parameter is pressed. SW LFE+Main: L1 L3 L2 Low frequencies from speaker channels that have ...
........ Select the value closest to "Small". ENGLISH Advanced Setup - SL L7 L8 SR Advanced Setup - L2 ..... L7 ..... The low frequencies played from the subwoofer channel. • Select the mode achieving a voluminous bass sound when playing music or movie sources. 3 Press D H to select the speaker, then press F...reproduced from those speakers as well as screen right will appear. If you want low frequency signals to the position of the subwoofer for playing the low This parameter is pressed. SW LFE+Main: L1 L3 L2 Low frequencies from speaker channels that have ...

Owners Manual - English
Page 65
...; To adjust the channel level separately for the different surround modes. 1 Press [TEST TONE]. • Test tones are automatically emitted from the speakers and the subwoofer seems to have the same volume level. 1 Press D H to select "Channel Level", then press ENTER. 2 Press F G to -2 adjust the volume. 5 Press ENTER. 62 ENGLISH Auto...
...; To adjust the channel level separately for the different surround modes. 1 Press [TEST TONE]. • Test tones are automatically emitted from the speakers and the subwoofer seems to have the same volume level. 1 Press D H to select "Channel Level", then press ENTER. 2 Press F G to -2 adjust the volume. 5 Press ENTER. 62 ENGLISH Auto...

Owners Manual - English
Page 66
... sources. OFF: The equalizer is not used . • When headphones are set at "Subwoofer Setup", "SW:LFE+Main" ( page 61) is set to be output from the subwoofer or the speakers that was cut is output from the subwoofer. Part 2 1 2 3 • The equalizer setting of "Normal", "Front" and ..., 250 Hz: Set as desired according to your speakers' bass playback ability. 3 Press ENTER. 1 2 • The crossover frequency mode is valid only when subwoofer is selected: Press F G to set as described in the "Setting the Manual Equalizer Setup" ( page 57). page 3 When "All" is set to "ON...
... sources. OFF: The equalizer is not used . • When headphones are set at "Subwoofer Setup", "SW:LFE+Main" ( page 61) is set to be output from the subwoofer or the speakers that was cut is output from the subwoofer. Part 2 1 2 3 • The equalizer setting of "Normal", "Front" and ..., 250 Hz: Set as desired according to your speakers' bass playback ability. 3 Press ENTER. 1 2 • The crossover frequency mode is valid only when subwoofer is selected: Press F G to set as described in the "Setting the Manual Equalizer Setup" ( page 57). page 3 When "All" is set to "ON...


