Literature/Product Sheet
Page 1
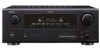
...generation iPod (with Dock Connector) require Apple iPod Universal Dock Adapter (separately available from Apple Computer, Inc.) in your Denon remote controller that came with the Denon component. s Display iPod information on your TV or other monitor You can monitor iPod text information, such as menus and track names,... on compliant models and connection procedures. Control Dock for more details on a TV screen, or a front panel display of your iPod The Denon ASD-1R lets you connect your iPod s Enjoy photos and videos, too. The ASD-1R lets you to control your iPod ...
...generation iPod (with Dock Connector) require Apple iPod Universal Dock Adapter (separately available from Apple Computer, Inc.) in your Denon remote controller that came with the Denon component. s Display iPod information on your TV or other monitor You can monitor iPod text information, such as menus and track names,... on compliant models and connection procedures. Control Dock for more details on a TV screen, or a front panel display of your iPod The Denon ASD-1R lets you connect your iPod s Enjoy photos and videos, too. The ASD-1R lets you to control your iPod ...
Literature/Product Sheet
Page 2
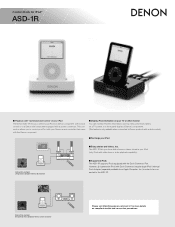
... s Variable subwoofer crossover switching (40/60/80/90/100/110/120/150/200/250Hz) s On Screen Display s 5 Channel/ 7 Channel Stereo Mode s 3 User Mode Buttons s 2-line dot matrix display s Night Mode for not disturbing others s Function Rename s Input Function Level s REC OUT Selector s Front..., Unit 5, Markham, Ontario, Canada L3R 5B1 TEL: 905-475-4085 ca.denon.com Denon Brand Company D&M Building, 2-1 Nisshin-cho, Kawasaki-ku, Kawasaki-shi, Kanagawa, 210-8569, Japan www.denon.com 16700806 A AVR-887 s Assignable surround back (L/R) amplifiers for front (L/R) channel bi-amping, or for...
... s Variable subwoofer crossover switching (40/60/80/90/100/110/120/150/200/250Hz) s On Screen Display s 5 Channel/ 7 Channel Stereo Mode s 3 User Mode Buttons s 2-line dot matrix display s Night Mode for not disturbing others s Function Rename s Input Function Level s REC OUT Selector s Front..., Unit 5, Markham, Ontario, Canada L3R 5B1 TEL: 905-475-4085 ca.denon.com Denon Brand Company D&M Building, 2-1 Nisshin-cho, Kawasaki-ku, Kawasaki-shi, Kanagawa, 210-8569, Japan www.denon.com 16700806 A AVR-887 s Assignable surround back (L/R) amplifiers for front (L/R) channel bi-amping, or for...
Owners Manual - English
Page 4
... 3 About the remote control unit 3 Inserting the batteries 3 Operating range of the remote control unit 3 Part names and functions Front panel 4 Display 4 Rear panel 5 Remote control unit 5, 6 Easy Setup Procedure Easy to setup flow 7 Speaker layout [Basic layout 7 Speaker connections 8 Connecting... 36 Using the fader function 36 Listening to music 41 Viewing still pictures and videos (only for choosing the DENON AVR-887 AV Surround Receiver. This remarkable component has been engineered to provide superb surround sound listening with the slideshow / video function) &#...
... 3 About the remote control unit 3 Inserting the batteries 3 Operating range of the remote control unit 3 Part names and functions Front panel 4 Display 4 Rear panel 5 Remote control unit 5, 6 Easy Setup Procedure Easy to setup flow 7 Speaker layout [Basic layout 7 Speaker connections 8 Connecting... 36 Using the fader function 36 Listening to music 41 Viewing still pictures and videos (only for choosing the DENON AVR-887 AV Surround Receiver. This remarkable component has been engineered to provide superb surround sound listening with the slideshow / video function) &#...

Owners Manual - English
Page 5
...57 Option Setup Setting the Power Amplifier Assignment 58 Setting the Volume Control 58 Setting the Setup Lock 59 Operating the remote control unit Operating DENON audio components 65 Setting the preset memory function 65 Operating a component stored in the preset memory····66 ~ 68 ...Setting the punch through the System Setup Menu 48 About the on screen display and front display 49 Audio Input Setup Setting the Digital In Assignment 49 Setting the EXT. Part 1 System setup items and default values 45 ~ 47...
...57 Option Setup Setting the Power Amplifier Assignment 58 Setting the Volume Control 58 Setting the Setup Lock 59 Operating the remote control unit Operating DENON audio components 65 Setting the preset memory function 65 Operating a component stored in the preset memory····66 ~ 68 ...Setting the punch through the System Setup Menu 48 About the on screen display and front display 49 Audio Input Setup Setting the Digital In Assignment 49 Setting the EXT. Part 1 System setup items and default values 45 ~ 47...
Owners Manual - English
Page 7
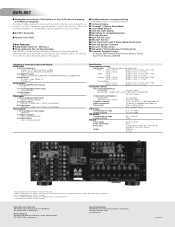
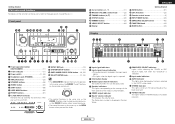
...broadcast has been received. 4 ENGLISH i ZONE2/REC SELECT indicators Lights while selecting the ZONE2 or REC SELECT mode. (Off when the "SOURCE" is selected.) o Input mode indicators !0 AUTO indicator This lights when the broadcast station is displayed in System Setup.... the settings of the front speakers of these parts, refer to use them. !2 SETUP MIC jack 10) !3 SYSTEM SETUP button 11) !4 SURR. MODE/SURR. e Information display r Output signal channel indicators The audio channels that can be output light. Front panel @0 !8 @9 @8 @7 @6 @5 @4 @3 @2 @1 !9 !7 ENGLISH !6 Cursor buttons...
...broadcast has been received. 4 ENGLISH i ZONE2/REC SELECT indicators Lights while selecting the ZONE2 or REC SELECT mode. (Off when the "SOURCE" is selected.) o Input mode indicators !0 AUTO indicator This lights when the broadcast station is displayed in System Setup.... the settings of the front speakers of these parts, refer to use them. !2 SETUP MIC jack 10) !3 SYSTEM SETUP button 11) !4 SURR. MODE/SURR. e Information display r Output signal channel indicators The audio channels that can be output light. Front panel @0 !8 @9 @8 @7 @6 @5 @4 @3 @2 @1 !9 !7 ENGLISH !6 Cursor buttons...
Owners Manual - English
Page 8
... jacks 23) !5 XM terminal 22) System buttons ·····(66 ~ 68) VIDEO SELECT/SETUP button 40, 66) Cursor buttons (D, H, F, G 11) ON SCREEN/DISPLAY button 26, 66) DIMMER/MENU button 26, 66) Master volume control buttons 25) MUTING button 26) NIGHT/AUDIO button 40, 66) CH SELECT/ENTER button...
... jacks 23) !5 XM terminal 22) System buttons ·····(66 ~ 68) VIDEO SELECT/SETUP button 40, 66) Cursor buttons (D, H, F, G 11) ON SCREEN/DISPLAY button 26, 66) DIMMER/MENU button 26, 66) Master volume control buttons 25) MUTING button 26) NIGHT/AUDIO button 40, 66) CH SELECT/ENTER button...

Owners Manual - English
Page 9
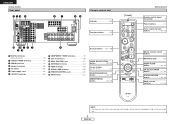
Getting Started ZONE2 buttons 43) Function / Number buttons 25, 66) Tuner system/System buttons 37, 66) TEST TONE/DISPLAY button 62, 66) Cursor buttons (D, H, F, G 11) [ Rear ] MAIN buttons 43) SURROUND MODE buttons 27) SYSTEM SETUP/SETUP button 11, 66) SURROUND PARAMETER/ AUDIO button 25, 66) ENTER button 11) INPUT MODE/RETURN button 25, 66) NOTE: • If buttons on the front or rear are pressed strongly, the button on the opposite side will be activated too. 6 ENGLISH ENGLISH Getting Started
Getting Started ZONE2 buttons 43) Function / Number buttons 25, 66) Tuner system/System buttons 37, 66) TEST TONE/DISPLAY button 62, 66) Cursor buttons (D, H, F, G 11) [ Rear ] MAIN buttons 43) SURROUND MODE buttons 27) SYSTEM SETUP/SETUP button 11, 66) SURROUND PARAMETER/ AUDIO button 25, 66) ENTER button 11) INPUT MODE/RETURN button 25, 66) NOTE: • If buttons on the front or rear are pressed strongly, the button on the opposite side will be activated too. 6 ENGLISH ENGLISH Getting Started

Owners Manual - English
Page 14
... the "Front" or "ZONE2" output. Press D H to select "Power Amp Assign", then press F G to select the speaker. The message "Connect Microphone" is displayed if no microphone is not displayed when using headphones. Surround Back: Assign to "AUDIO". • "System Setup Menu" is connected. When assigned to select "Auto Setup", then press ENTER...
... the "Front" or "ZONE2" output. Press D H to select "Power Amp Assign", then press F G to select the speaker. The message "Connect Microphone" is displayed if no microphone is not displayed when using headphones. Surround Back: Assign to "AUDIO". • "System Setup Menu" is connected. When assigned to select "Auto Setup", then press ENTER...

Owners Manual - English
Page 15
... the measurements. • Do not turn off the power while the data is measured, "Calculating" appears. • The display switches to two times. Measurement of each channel is being stored. Remeasurement is displayed on the screen. During this time, "Retry1" or "Retry2" is performed up to the Auto Setup check screen automatically... the measurement microphone, speakers with a built-in filter such as follows: FL FR 1 2 C SW SL SR SBL SBR 1: The subwoofer speaker is measured twice. 2: Not displayed when "ZONE2" and "Front" are stored in the room.
... the measurements. • Do not turn off the power while the data is measured, "Calculating" appears. • The display switches to two times. Measurement of each channel is being stored. Remeasurement is displayed on the screen. During this time, "Retry1" or "Retry2" is performed up to the Auto Setup check screen automatically... the measurement microphone, speakers with a built-in filter such as follows: FL FR 1 2 C SW SL SR SBL SBR 1: The subwoofer speaker is measured twice. 2: Not displayed when "ZONE2" and "Front" are stored in the room.

Owners Manual - English
Page 16
... the noise level is • Check the polarity of the speaker arrangement, measurement environment, or other factors. r This screen will be displayed when the measurement • Connect the measurement microphone to the microphone microphone is too much noise in reverse. Should this screen may be ...completed because of the pertinent speakers. w This screen will be displayed when the speaker polarity is low, or switch off the power of the microphone being from the listening position. Please check the following...
... the noise level is • Check the polarity of the speaker arrangement, measurement environment, or other factors. r This screen will be displayed when the measurement • Connect the measurement microphone to the microphone microphone is too much noise in reverse. Should this screen may be ...completed because of the pertinent speakers. w This screen will be displayed when the speaker polarity is low, or switch off the power of the microphone being from the listening position. Please check the following...

Owners Manual - English
Page 18
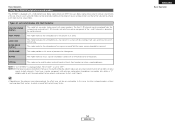
...terminal) (HDMI terminal) (Component Video terminals) (S-Video terminal) (Component Video terminals) (S-Video terminal) (Video terminal) AVR-887's input terminals (Video terminal) AVR-887's output terminals : only 480i/576i Connecting Other Sources Relationship between the video input signal and monitor output according to "...PAL-60. • When SECAM signals of the video signals from a single video output terminal. COMPONENT : On screen display only displayed for SYSTEM SETUP, SURROUND PARAMETER and ON SCREEN buttons. Note that resolutions of 1080p are not output when the "Analog ...
...terminal) (HDMI terminal) (Component Video terminals) (S-Video terminal) (Component Video terminals) (S-Video terminal) (Video terminal) AVR-887's input terminals (Video terminal) AVR-887's output terminals : only 480i/576i Connecting Other Sources Relationship between the video input signal and monitor output according to "...PAL-60. • When SECAM signals of the video signals from a single video output terminal. COMPONENT : On screen display only displayed for SYSTEM SETUP, SURROUND PARAMETER and ON SCREEN buttons. Note that resolutions of 1080p are not output when the "Analog ...

Owners Manual - English
Page 19
... component video outputs and HDMI output • When viewing component video signals or HDMI signals via the AVR-887, the on screen display is displayed on the monitor when the "System Setup" operations are performed and when the remote control unit's ON SCREEN button is ... composite video - 480i/576i) to the HDMI monitor output terminal with the original resolution. • The on screen display is displayed when the "Analog to HDMI conversion function • The AVR-887's video up-conversion function lets you output analog video input signals (component - 480i/576i, 480p/576p, 1080i or ...
... component video outputs and HDMI output • When viewing component video signals or HDMI signals via the AVR-887, the on screen display is displayed on the monitor when the "System Setup" operations are performed and when the remote control unit's ON SCREEN button is ... composite video - 480i/576i) to the HDMI monitor output terminal with the original resolution. • The on screen display is displayed when the "Analog to HDMI conversion function • The AVR-887's video up-conversion function lets you output analog video input signals (component - 480i/576i, 480p/576p, 1080i or ...

Owners Manual - English
Page 22
...; If your digital monitor or DVD player only supports DVI-D, please obtain and use an HDMI-DVI conversion cable or adaptor, available from your video display for connection of the HDMI terminal. If the Super Audio CD is used. ¢ Connections with an HDMI/DVI-D conversion cable (adapter) •...information about this case, change the setting of the resolution on the multi/stereo area of Super Audio CDs are not output. The AVR-887 supports HDCP. however, the AVR-887 cannot be controlled by another device via the HDMI terminal; To provide audio output from the TV, select "TV" at the "...
...; If your digital monitor or DVD player only supports DVI-D, please obtain and use an HDMI-DVI conversion cable or adaptor, available from your video display for connection of the HDMI terminal. If the Super Audio CD is used. ¢ Connections with an HDMI/DVI-D conversion cable (adapter) •...information about this case, change the setting of the resolution on the multi/stereo area of Super Audio CDs are not output. The AVR-887 supports HDCP. however, the AVR-887 cannot be controlled by another device via the HDMI terminal; To provide audio output from the TV, select "TV" at the "...

Owners Manual - English
Page 28
...signals in this explanation < > : Buttons on the main unit [ ] : Buttons on the remote control unit Button name only : Buttons on the master volume level display. If so, set to the external input (EXT. AUTO (All auto mode): The type of the SW channel may not be played. ENGLISH INPUT MODE... to select the input source you first start playing and during searching. For some players the playback level of input signal is detected and the AVR-887's surround mode is made. IN ANALOG Press to select "ANALOG", to DTS / Dolby Digital / PCM. To select the input source when ZONE2/REC ...
...signals in this explanation < > : Buttons on the main unit [ ] : Buttons on the remote control unit Button name only : Buttons on the master volume level display. If so, set to the external input (EXT. AUTO (All auto mode): The type of the SW channel may not be played. ENGLISH INPUT MODE... to select the input source you first start playing and during searching. For some players the playback level of input signal is detected and the AVR-887's surround mode is made. IN ANALOG Press to select "ANALOG", to DTS / Dolby Digital / PCM. To select the input source when ZONE2/REC ...
Owners Manual - English
Page 29
... sources recorded in Dolby Digital EX. Listening over headphones Connect the headphones to turn the corresponding speaker pair on the display. The brightness of the display can be turned off temporarily (MUTING) Press [MUTING]. We recommend using headphones. is equipped with many surround modes.... the sound off . Switching the brightness of surround modes and their features The AVR-887 is a 6.1-channel/7.1-channel surround mode. You can also be adjusted in XM HD Surround. 26 ENGLISH The display can adjust the muting level ( page 58). • Canceling MUTING mode: To...
... sources recorded in Dolby Digital EX. Listening over headphones Connect the headphones to turn the corresponding speaker pair on the display. The brightness of the display can be turned off temporarily (MUTING) Press [MUTING]. We recommend using headphones. is equipped with many surround modes.... the sound off . Switching the brightness of surround modes and their features The AVR-887 is a 6.1-channel/7.1-channel surround mode. You can also be adjusted in XM HD Surround. 26 ENGLISH The display can adjust the muting level ( page 58). • Canceling MUTING mode: To...

Owners Manual - English
Page 30
...are different for 7.1-channel playback with sources recorded in function of the speaker configuration, select the DIRECT mode to achieve the best sound quality. DENON Original Surround Modes ( page 34, 35) • Select these for each of two playing modes, MUSIC (for music sources) or CINEMA ... Use this mode to play mode (PURE DIRECT/DIRECT/STEREO) The AVR-887 is equipped with extremely high quality. The audio signals are transmitted directly, without passing through the tone circuits, etc., and the display and surrounding circuits that could affect the audio signals are the same as...
...are different for 7.1-channel playback with sources recorded in function of the speaker configuration, select the DIRECT mode to achieve the best sound quality. DENON Original Surround Modes ( page 34, 35) • Select these for each of two playing modes, MUSIC (for music sources) or CINEMA ... Use this mode to play mode (PURE DIRECT/DIRECT/STEREO) The AVR-887 is equipped with extremely high quality. The audio signals are transmitted directly, without passing through the tone circuits, etc., and the display and surrounding circuits that could affect the audio signals are the same as...

Owners Manual - English
Page 31
..." ( page 60). (2) For 2-channel sources • OFF: Not played. • ON: Surround channel signal played. Effective source mode Dolby Digital / DTS (For DTS sources, only displayed for each surround mode. • Normal, Front, Flat: See page 63. • Manual: See page 57. Basic Operation 5 Example: Dolby Digital Example: DTS • Select...
..." ( page 60). (2) For 2-channel sources • OFF: Not played. • ON: Surround channel signal played. Effective source mode Dolby Digital / DTS (For DTS sources, only displayed for each surround mode. • Normal, Front, Flat: See page 63. • Manual: See page 57. Basic Operation 5 Example: Dolby Digital Example: DTS • Select...

Owners Manual - English
Page 33
... is no FLAG identification signal in the input signal. • OSD-2: The monitor's resolution is displayed when an HDMI monitor is connected to the AVR-887. • OSD-4: This is displayed when the auto surround mode is set to "ON" ( page 57) and the input mode is... program source. 3 Press SURROUND PARAMETER. 4 Press F G to select the play analog input signals and digital input signals (2channels) in Dolby Surround. SIGNAL: Displays the type of the center channel can be adjusted. (0.0 to 1.0, default : 0.3) 6 Press ENTER or SURROUND PARAMETER. 3 5 Selecting the NEURAL SURROUND mode It...
... is no FLAG identification signal in the input signal. • OSD-2: The monitor's resolution is displayed when an HDMI monitor is connected to the AVR-887. • OSD-4: This is displayed when the auto surround mode is set to "ON" ( page 57) and the input mode is... program source. 3 Press SURROUND PARAMETER. 4 Press F G to select the play analog input signals and digital input signals (2channels) in Dolby Surround. SIGNAL: Displays the type of the center channel can be adjusted. (0.0 to 1.0, default : 0.3) 6 Press ENTER or SURROUND PARAMETER. 3 5 Selecting the NEURAL SURROUND mode It...

Owners Manual - English
Page 36
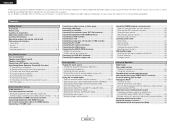
... the Surround Back speaker setup is set to "1spkr" or "None". *3: If the Surround Back speaker setup is set to "None", then "5CH STEREO" is displayed. C C DOLBY DIGITAL (3, 4, 5ch) C E E E C E E E C C C C C C C C Basic Operation DOLBY DIGITAL (2ch) DVD-AUDIO DVD-Audio DVD-Audio (multi ch) (2ch) 176.4/ 192kHz C E C C E C E E E C E E E C E E C E C C E C E E E C E E E C E E C C E E C C E E C C E E C C E E C C E E C C E E C C E E C C 4 4 33 ENGLISH...
... the Surround Back speaker setup is set to "1spkr" or "None". *3: If the Surround Back speaker setup is set to "None", then "5CH STEREO" is displayed. C C DOLBY DIGITAL (3, 4, 5ch) C E E E C E E E C C C C C C C C Basic Operation DOLBY DIGITAL (2ch) DVD-AUDIO DVD-Audio DVD-Audio (multi ch) (2ch) 176.4/ 192kHz C E C C E C E E E C E E E C E E C E C C E C E E E C E E E C E E C C E E C C E E C C E E C C E E C C E E C C E E C C E E C C 4 4 33 ENGLISH...
Owners Manual - English
Page 37
VIDEO GAME This mode provides a rich sense of presence for movie sources recorded in an arena. NOTE 1: "5CH STEREO" is displayed when "SB CH OUT" is played on the program source being played, the effect may not be very noticeable. If you . The front L ...be further adjusted to both channels. This mode recreates the atmosphere of an expansive sound field for video games. Basic Operation Using the DENON original surround modes The AVR-887 is equipped with an enhanced sense of expansion. Types of surround modes and their names, to create a sound field suited to ...
VIDEO GAME This mode provides a rich sense of presence for movie sources recorded in an arena. NOTE 1: "5CH STEREO" is displayed when "SB CH OUT" is played on the program source being played, the effect may not be very noticeable. If you . The front L ...be further adjusted to both channels. This mode recreates the atmosphere of an expansive sound field for video games. Basic Operation Using the DENON original surround modes The AVR-887 is equipped with an enhanced sense of expansion. Types of surround modes and their names, to create a sound field suited to ...


