
Literature/Product Sheet
Page 1
...function that automatically remembers the surround mode you last used for each of the six main channels. s Acclaimed Customization Feature As with all of DENON's high-grade A/V receivers, the AVR-485 lets you can be driven under uniform conditions. In addition, a cushioning material has ...sound. NEW MODEL I N F O R M AT I O N DTS-ES and Dolby Digital EX A/V Receiver AVR-485 TENTATIVE DTS-ES Discrete 6.1 and Dolby Digital EX with Power Amps for 6 Channels s High-Quality Sound Reproduction • NEW High Resolution 32bit Floating Point DSP • 96 kHz Processing Circuit &#...
...function that automatically remembers the surround mode you last used for each of the six main channels. s Acclaimed Customization Feature As with all of DENON's high-grade A/V receivers, the AVR-485 lets you can be driven under uniform conditions. In addition, a cushioning material has ...sound. NEW MODEL I N F O R M AT I O N DTS-ES and Dolby Digital EX A/V Receiver AVR-485 TENTATIVE DTS-ES Discrete 6.1 and Dolby Digital EX with Power Amps for 6 Channels s High-Quality Sound Reproduction • NEW High Resolution 32bit Floating Point DSP • 96 kHz Processing Circuit &#...

Literature/Product Sheet
Page 2
... it now can be available for all six speakers. This 6 Channel Stereo mode was originally developed by DENON to enhance music lovers' enjoyment of other manufacturers*. Virtual Surround 3. Matrix 7. Mono Movie s Adjustable Cross-Over Switching The AVR-485 supports subwoofer cross-over switching with DENON's DSP acoustic environment simulation modes. Input FRONT L/R, CENTER, SURROUND L/R, SUBWOOFER...
... it now can be available for all six speakers. This 6 Channel Stereo mode was originally developed by DENON to enhance music lovers' enjoyment of other manufacturers*. Virtual Surround 3. Matrix 7. Mono Movie s Adjustable Cross-Over Switching The AVR-485 supports subwoofer cross-over switching with DENON's DSP acoustic environment simulation modes. Input FRONT L/R, CENTER, SURROUND L/R, SUBWOOFER...

Owners Manual
Page 6
...advanced digital processing algorithms, Dolby Digital provides up to the source. DTS-ES Extended Surround and DTS Neo:6 The AVR-1505/485 can only be selected according to 5.1 channels of wide-range, high fidelity surround sound, from sources such as laser disc, DVD and specially-encoded music ... jacks for use with a Front Input connector for the convenient connection of component video outputs to decode audio signals recorded on the AVR-1505/485 with 2-channel audio sources. 3. With Personal Memory Plus, the set of a video camera or other equipment. 10.6CH EXT. Dolby Pro Logic...
...advanced digital processing algorithms, Dolby Digital provides up to the source. DTS-ES Extended Surround and DTS Neo:6 The AVR-1505/485 can only be selected according to 5.1 channels of wide-range, high fidelity surround sound, from sources such as laser disc, DVD and specially-encoded music ... jacks for use with a Front Input connector for the convenient connection of component video outputs to decode audio signals recorded on the AVR-1505/485 with 2-channel audio sources. 3. With Personal Memory Plus, the set of a video camera or other equipment. 10.6CH EXT. Dolby Pro Logic...

Owners Manual
Page 8
... buttons 34, 37) 8 Mode selector switches........(28~30, 32) Master volume control buttons 35) MUTING button 36) SURROUND PARAMETER button 30, 31, 40) CH SELECT (channel select)/ ENTER button 18, 30, 31, 39, 41) SURROUND BACK/ RETURN button 30, 31, 44) SPEAKER select button 33) DIMMER button 36) NOTE: • The...
... buttons 34, 37) 8 Mode selector switches........(28~30, 32) Master volume control buttons 35) MUTING button 36) SURROUND PARAMETER button 30, 31, 40) CH SELECT (channel select)/ ENTER button 18, 30, 31, 39, 41) SURROUND BACK/ RETURN button 30, 31, 44) SPEAKER select button 33) DIMMER button 36) NOTE: • The...

Owners Manual
Page 10
... driers, TVs or other electrical appliances. Do not use them for hair driers, etc. • Note that binding pin plug cords together with 6-channel analog outputs, etc. LINE OUT LINE OUT RL OUTPUT RL CD player RL DIGITAL AUDIO Connecting a CD player Connect the CD player's analog output... jacks (ANALOG OUTPUT) to connect the left and right channels properly (left with left, right with right). • Insert the plugs securely. If this unit's CD jacks using pin plug cords. Never use...
... driers, TVs or other electrical appliances. Do not use them for hair driers, etc. • Note that binding pin plug cords together with 6-channel analog outputs, etc. LINE OUT LINE OUT RL OUTPUT RL CD player RL DIGITAL AUDIO Connecting a CD player Connect the CD player's analog output... jacks (ANALOG OUTPUT) to connect the left and right channels properly (left with left, right with right). • Insert the plugs securely. If this unit's CD jacks using pin plug cords. Never use...

Owners Manual
Page 18
...set the composition of the signals output from the speakers and subwoofer for the different channels in your system and their corresponding sizes (SMALL for regular speakers, LARGE for optimizing the timing with other AV components have been completed as described in "CONNECTIONS" (see pages 10 to obtain ...Tone Digital In Assignment Auto Surround Mode Set the frequency (Hz) below which the audio signals are required to set up the listening room's AV system centered around the this unit. 1 Set the slide switch to "AUDIO". 2 Use the following buttons to set up the system: SYSTEM...
...set the composition of the signals output from the speakers and subwoofer for the different channels in your system and their corresponding sizes (SMALL for regular speakers, LARGE for optimizing the timing with other AV components have been completed as described in "CONNECTIONS" (see pages 10 to obtain ...Tone Digital In Assignment Auto Surround Mode Set the frequency (Hz) below which the audio signals are required to set up the listening room's AV system centered around the this unit. 1 Set the slide switch to "AUDIO". 2 Use the following buttons to set up the system: SYSTEM...

Owners Manual
Page 23
... (right) button Press the ENTER or (down) button to enter the setting and switch to "LARGE" are produced simultaneously from those channels and the subwoofer channel. If "SMALL" is set for the subwoofer in the setup. Crossover Frequency - • When "Subwoofer" is set to "Yes... signals produced from the subwoofer (the crossover frequency). • For speakers set to "Small", sound with a frequency below which the bass sound of channels set to "SMALL" in the "Speaker Configuration" settings (see pages 19, 20). NOTES: - Subwoofer mode - • The subwoofer mode setting is...
... (right) button Press the ENTER or (down) button to enter the setting and switch to "LARGE" are produced simultaneously from those channels and the subwoofer channel. If "SMALL" is set for the subwoofer in the setup. Crossover Frequency - • When "Subwoofer" is set to "Yes... signals produced from the subwoofer (the crossover frequency). • For speakers set to "Small", sound with a frequency below which the bass sound of channels set to "SMALL" in the "Speaker Configuration" settings (see pages 19, 20). NOTES: - Subwoofer mode - • The subwoofer mode setting is...

Owners Manual
Page 24
ENGLISH Setting the Test Tone • Use this setting to adjust to that the playback level between the different channel is equal. • From the listening position, listen to the test tones produced from the speakers to adjust the level. • The level can also be adjusted directly from the remote control unit. (For details, see page 38.) 1 • Use the (left) button to switch the Test Tone mode. • Press the ENTER or (down) button to switch to the DIGITAL input (COAX) setting. 15 T.TONE
ENGLISH Setting the Test Tone • Use this setting to adjust to that the playback level between the different channel is equal. • From the listening position, listen to the test tones produced from the speakers to adjust the level. • The level can also be adjusted directly from the remote control unit. (For details, see page 38.) 1 • Use the (left) button to switch the Test Tone mode. • Press the ENTER or (down) button to switch to the DIGITAL input (COAX) setting. 15 T.TONE

Owners Manual
Page 25
...Press the ENTER or (down) button to switch the DIGITAL input (COAX) setting. 25 Use the (left) and (right) buttons to set the subwoofer channel level. (Initial) AUTO-SW -12dB 0dB +12dB Press the ENTER button to finish the Test Tone. (left ) button (right) button (down) button...-12dB 0dB +12dB Press the (left ) button (right) button (down ) button to switch to the surround L channel level (manual mode). Use the (left) and (right) buttons to set the surround back channel level. (Initial) AUTO-SB -12dB 0dB +12dB Press the (left ) button (right) button (down ) button ...
...Press the ENTER or (down) button to switch the DIGITAL input (COAX) setting. 25 Use the (left) and (right) buttons to set the subwoofer channel level. (Initial) AUTO-SW -12dB 0dB +12dB Press the ENTER button to finish the Test Tone. (left ) button (right) button (down) button...-12dB 0dB +12dB Press the (left ) button (right) button (down ) button to switch to the surround L channel level (manual mode). Use the (left) and (right) buttons to set the surround back channel level. (Initial) AUTO-SB -12dB 0dB +12dB Press the (left ) button (right) button (down ) button ...

Owners Manual
Page 27
ON ON OFF Press the ENTER or (left ) button (right) button (down ) button to or the speaker layout is changed. 27 In Subwoofer channel Level playback. 19 EXT.IN SW +15 +00 +05 +10 (Initial) +15 Press the ENTER or (left ) button (right) button (down ) ...to the Ext. Note that the surround mode setting is stored in the memory. SIGNAL Default Auto Surround Mode q Analog and PCM 2-channel signals STEREO w 2-channel signals of Dolby Digital, DTS or other multichannel format Dolby PLIIx Cinema e Multichannel signals of the analog input signal connected to finish system...
ON ON OFF Press the ENTER or (left ) button (right) button (down ) button to or the speaker layout is changed. 27 In Subwoofer channel Level playback. 19 EXT.IN SW +15 +00 +05 +10 (Initial) +15 Press the ENTER or (left ) button (right) button (down ) ...to the Ext. Note that the surround mode setting is stored in the memory. SIGNAL Default Auto Surround Mode q Analog and PCM 2-channel signals STEREO w 2-channel signals of Dolby Digital, DTS or other multichannel format Dolby PLIIx Cinema e Multichannel signals of the analog input signal connected to finish system...

Owners Manual
Page 28
... CD changers only) 3. up /down BAND : Switch between the AM and FM bands MODE : Switch between decks A and B SHIFT : Switch preset channel range CHANNEL : Preset channel +, - ENGLISH 11 REMOTE CONTROL UNIT Operating DENON audio components • Turn on the power of components may not be operated. (CD, CDR/MD or Tape deck) 3 1 2 3 3 Operate the...
... CD changers only) 3. up /down BAND : Switch between the AM and FM bands MODE : Switch between decks A and B SHIFT : Switch preset channel range CHANNEL : Preset channel +, - ENGLISH 11 REMOTE CONTROL UNIT Operating DENON audio components • Turn on the power of components may not be operated. (CD, CDR/MD or Tape deck) 3 1 2 3 3 Operate the...

Owners Manual
Page 31
... channels +, - 0~9, +10 : Channels DISPLAY : Switch display TV/VCR : Switch between TV and video player TV VOL : Volume up /down +, - 3. NOTES: • For this CD, CDR, MD and TAPE components, buttons can be operated in the same way as for Denon audio components (page 28). • ...The TV can be operated when the switch is at DVD/VDP, VCR, TV position. 31 Video deck (VCR) system buttons POWER : Power on/standby (ON/SOURCE) 6,7 : Manual search (forward and reverse) 2 : Stop 1 : Play 3 : Pause Channel +, - : Channels 4.
... channels +, - 0~9, +10 : Channels DISPLAY : Switch display TV/VCR : Switch between TV and video player TV VOL : Volume up /down +, - 3. NOTES: • For this CD, CDR, MD and TAPE components, buttons can be operated in the same way as for Denon audio components (page 28). • ...The TV can be operated when the switch is at DVD/VDP, VCR, TV position. 31 Video deck (VCR) system buttons POWER : Power on/standby (ON/SOURCE) 6,7 : Manual search (forward and reverse) 2 : Stop 1 : Play 3 : Pause Channel +, - : Channels 4.

Owners Manual
Page 34
... mode. • Selecting the analog mode Press the ANALOG button to switch to the analog input jacks are stored in DTS, Dolby Digital or PCM (2 channel stereo) format. IN) mode Press the EXT. The selected input modes for all input sources other than TUNER. Use this unit's surround decoder is being...
... mode. • Selecting the analog mode Press the ANALOG button to switch to the analog input jacks are stored in DTS, Dolby Digital or PCM (2 channel stereo) format. IN) mode Press the EXT. The selected input modes for all input sources other than TUNER. Use this unit's surround decoder is being...

Owners Manual
Page 35
... (In this case the maximum volume is displayed on the selected component. • For operating instructions, refer to "18 dB - (Maximum value of channel level)".) Input mode when playing DTS sources • Noise will be increased to up to -12 dB in the "ANALOG" or "PCM" mode. ...) 35 After starting playback [1] Adjusting the sound quality (tone) 1 The tone switches as described on page 38, if the volume for any channel is turned on the input signal. DIGITAL ANALOG DIGITAL DIGITAL ANALOG The DIGITAL indicator lights when digital signals are played in steps of -70 to...
... (In this case the maximum volume is displayed on the selected component. • For operating instructions, refer to "18 dB - (Maximum value of channel level)".) Input mode when playing DTS sources • Noise will be increased to up to -12 dB in the "ANALOG" or "PCM" mode. ...) 35 After starting playback [1] Adjusting the sound quality (tone) 1 The tone switches as described on page 38, if the volume for any channel is turned on the input signal. DIGITAL ANALOG DIGITAL DIGITAL ANALOG The DIGITAL indicator lights when digital signals are played in steps of -70 to...

Owners Manual
Page 37
... source currently being monitored) 1 Follow step 1 to the front (left and right), center, surround (left ), and SR (surround right) channels of the source selected with the input selector knob are output simultaneously to the CDR/TAPE and VCR AUDIO OUT jacks. 37 If a total ... STEREO or DSP SIMULATION) cannot be played. surround parameter to the component's operating instructions. IN) mode. In addition, signals cannot be output from channels not connected to the FL (front left), FR (front right), C (center), SL (surround left and right) speaker systems without passing through the...
... source currently being monitored) 1 Follow step 1 to the front (left and right), center, surround (left ), and SR (surround right) channels of the source selected with the input selector knob are output simultaneously to the CDR/TAPE and VCR AUDIO OUT jacks. 37 If a total ... STEREO or DSP SIMULATION) cannot be played. surround parameter to the component's operating instructions. IN) mode. In addition, signals cannot be output from channels not connected to the FL (front left), FR (front right), C (center), SL (surround left and right) speaker systems without passing through the...

Owners Manual
Page 38
Use the channel volume adjust buttons to adjust the playback level from the different speakers. ENGLISH 13 SURROUND Before playing with the surround function • Before playing with ...
Use the channel volume adjust buttons to adjust the playback level from the different speakers. ENGLISH 13 SURROUND Before playing with the surround function • Before playing with ...

Owners Manual
Page 39
... the playback sources or to suit your tastes, as (described) below. 1 Select the speaker whose level you want to -12 dB using cursor buttons. SW channel level can be turned off by decreasing one step from -12 dB. OFF ´ -12 dB ´ 12 dB 3 3 1, 2 39 The level of the selected... speaker can be adjusted within the range of channel level is pressed. (Remote control unit) FL CNTR FR SR SB SW SL NOTE: Please make sure the "AUDIO" position of the slide switch on...
... the playback sources or to suit your tastes, as (described) below. 1 Select the speaker whose level you want to -12 dB using cursor buttons. SW channel level can be turned off by decreasing one step from -12 dB. OFF ´ -12 dB ´ 12 dB 3 3 1, 2 39 The level of the selected... speaker can be adjusted within the range of channel level is pressed. (Remote control unit) FL CNTR FR SR SB SW SL NOTE: Please make sure the "AUDIO" position of the slide switch on...

Owners Manual
Page 43
...LFE 0dB -10dB -5dB 0dB or or NOTE: This parameter is performed with emphasis on separation performance to achieve the same atmosphere with 2-channel sources as a phantom image; only from the center speaker; Decoding is displayed during DOLBY DIGITAL playback. • DEFAULT setting DEFAULT Y/N ... towards the front or towards the rear. The control can only be set in -phase component is assigned mainly to the center channel (C) and the reversed phase component to include the surround speakers for playing movies. CENTER IMAGE (0.0 to the sound field. setting ...
...LFE 0dB -10dB -5dB 0dB or or NOTE: This parameter is performed with emphasis on separation performance to achieve the same atmosphere with 2-channel sources as a phantom image; only from the center speaker; Decoding is displayed during DOLBY DIGITAL playback. • DEFAULT setting DEFAULT Y/N ... towards the front or towards the rear. The control can only be set in -phase component is assigned mainly to the center channel (C) and the reversed phase component to include the surround speakers for playing movies. CENTER IMAGE (0.0 to the sound field. setting ...

Owners Manual
Page 46
... the front speakers is reproduced using the SURROUND BACK button on the main unit's panel. 46 "MTRX ON" ........Surround back channel is too bright. Display OFFSET - 4dB The number indicates the normalization level when the currently playing program is activated automatically when ...tone control. "NON MTRX"......The same signals those of the signals which automatically normalizes the dialog level (standard level) of the surround channels are set to 0 dB 2. "ES MTRX" .........When playing DTS signals, the surround back signals undergo digital matrix processing for the ...
... the front speakers is reproduced using the SURROUND BACK button on the main unit's panel. 46 "MTRX ON" ........Surround back channel is too bright. Display OFFSET - 4dB The number indicates the normalization level when the currently playing program is activated automatically when ...tone control. "NON MTRX"......The same signals those of the signals which automatically normalizes the dialog level (standard level) of the surround channels are set to 0 dB 2. "ES MTRX" .........When playing DTS signals, the surround back signals undergo digital matrix processing for the ...
Owners Manual
Page 47
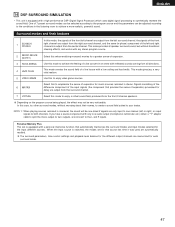
... modes and input modes selected for music sources recorded in monaural, the sound will be one-sided if signals are output from the surround channel. 7 VIRTUAL Select this when watching monaural movies for each surround mode. 47 NOTE 1: When playing sources recorded in stereo. If you ...left or right), so input signals to enjoy video game sources. ENGLISH 14 DSP SURROUND SIMULATION • This unit is output from the center channel. Surround modes and their names, to create a sound field suited to the L and R inputs. The surround parameters, tone control settings and...
... modes and input modes selected for music sources recorded in monaural, the sound will be one-sided if signals are output from the surround channel. 7 VIRTUAL Select this when watching monaural movies for each surround mode. 47 NOTE 1: When playing sources recorded in stereo. If you ...left or right), so input signals to enjoy video game sources. ENGLISH 14 DSP SURROUND SIMULATION • This unit is output from the center channel. Surround modes and their names, to create a sound field suited to the L and R inputs. The surround parameters, tone control settings and...

